To auto populate Requester properties dynamically follow below procedure
1. Add "Crow Canyon Apps Common" app into the Site Contents.
Note: If you do not see the "Crow Canyon Apps Common" app please contact Crow Canyon.
2. Open "Crow Canyon Apps Common" app and click on Update button. It will add some scripts files in Site Assets.
Go to Site Assets list –> CCS –> AD –> download UserInformationContentLink
3. Change the url in UserInformationContentLink.txt file like below.
Go to Site Contents –> SiteAssets–>CCS folder–>AD –> Copy the url of UserInformationFiller.js file and replace the url in
UserinformationContentLink.txt file follow like below.

4. Open notepad and add below script and save the file with Tickets list Id (File type: xml)
{
"BasedOnLoginUser": {
"FieldMappings": [{
"ColumnName": "RequesterEmail",
"Property": "WorkEmail",
"DisableEventFire": true
}, {
"ColumnName": "RequesterDepartment",
"Property": "Department",
"DisableEventFire": false
}, {
"ColumnName": "RequesterPhone",
"Property": "WorkPhone",
"DisableEventFire": false
}
],
"OverWrite": false,
"UserColumn": "Requester"
},
"UserInColumn": {
"Requester": {
"FieldMappings": [{
"ColumnName": "RequesterEmail",
"Property": "WorkEmail",
"DisableEventFire": true
}, {
"ColumnName": "RequesterDepartment",
"Property": "Department",
"DisableEventFire": false
}, {
"ColumnName": "RequesterPhone",
"Property": "WorkPhone",
"DisableEventFire": false
}
],
"OverWrite": true,
"FormType": "New|Edit"
}
}
}
You can add more field mapping settings like below.
{
"ColumnName": "Replace with field internal name",
"Property": "User profile property name",
"DisableEventFire": true
}
Note: File name will be smaller case like ‘ccc029ea-0a65-4d6d-97dc-50bd1c620228.xml’
5. Upload UserinformationContentLink.txt file and Tickets list ID.xml file in Site Assets.
Go to Site Contents –>SiteAssets–>CCS Folder–>AD–>Upload the two files here.
6.Copy the url of UserinformationContentLink.txt
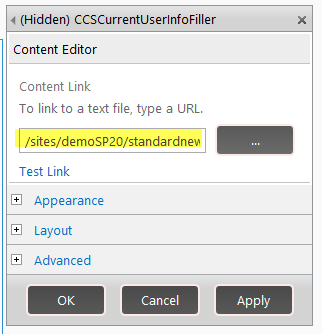
7. Edit the default ‘New form’ of Tickets list
Go to Site Contents –> Tickets list –> List –>Form Web Parts–> Default New form

Edit the "Default New form" Page –>Edit "CCSCurrentUserInfofiller" content webpart –> Enter the copied Url of
UserInformationContentLink.txt in Content link and click Ok. If "CCSCurrentUserInfofiller" content editor does not present on the form, add a content editor web part, set the content URL, make it hidden and save.
8.Edit ‘Default Edit’ form in Tickets list follow step 7.