Applies to: SharePoint Online
Description:
Custom Actions allow seamless integration to update the current item. In scenarios where integration with Microsoft Power Automate is required, Custom Actions provide the flexibility to invoke an existing Power Automate flow. With Crow Canyon NITRO Studio, you can configure a Custom Action to call a Power Automate flow and pass values from the current item into it. This enables powerful automation for integration scenarios.
NITRO Forms also support extending functionality through Post Save Scripts. For example, you can configure a script to call a Power Automate flow after saving a form and send item data (such as ID, Title, or custom fields) to that flow.
This article explains the steps to invoke Power Automate either through a Custom Action or by using a Post Save Script on the Submit Action, with examples of how parameters can be passed.
Detailed Steps for Invoking a Power Automate Flow from Custom Actions
Step 1: Configure Invoke Workflow Action in Custom Action
Go to Custom Action Settings in NITRO Studio -> Add a new Invoke Workflow Action
Fill in the details as shown below:
- Action Name: Provide a meaningful name, e.g., Call Power Automate.
- Execution Status: Choose Show or Hide as required.
- Run for: Select Current Item.
- Workflow Type: Select Power Automate.
- HTTP POST URL: Copy the HTTP POST trigger URL from your Power Automate flow (we’ll get this in Step 2).
- Data: Define the JSON object with the values you want to send. Use NITRO placeholders/variables for item values.
Example JSON:
{

  "ItemId": %%varItemId##Value%%,

  "Title": "%%[Title]%% - Progress",

  "TimeStamp": "%%{Today}%%"

}
Configure a Custom Action named Invoke Power Automate:
- Drag and drop the Invoke Workflow action and name it Invoke Legacy Power Automate.
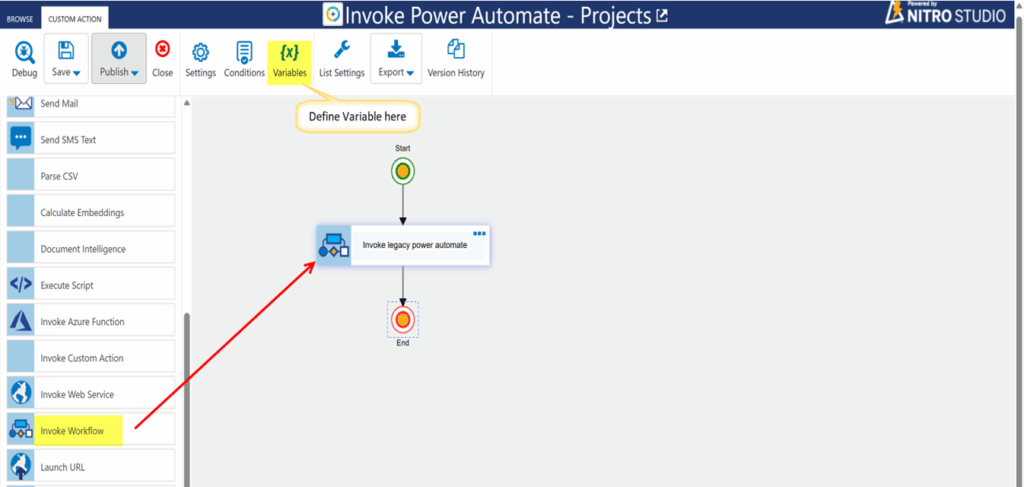
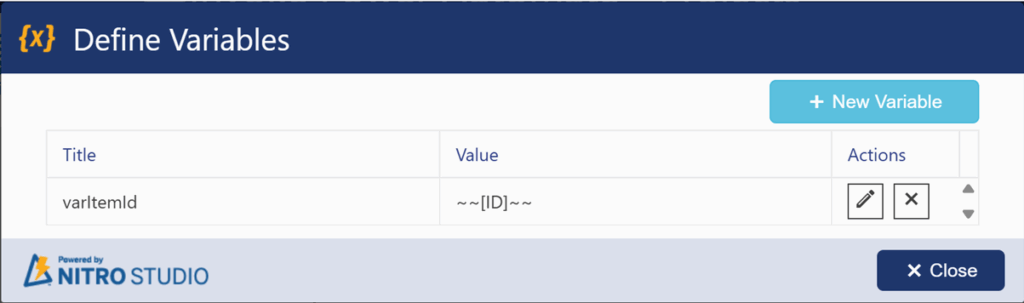
Define Variable as below:
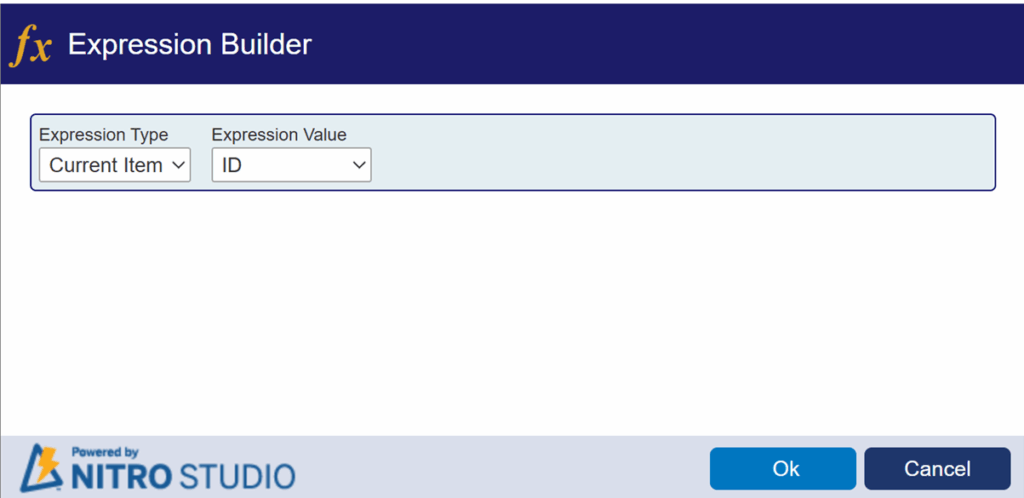
Expression builder:
Invoke Workflow Action settings:
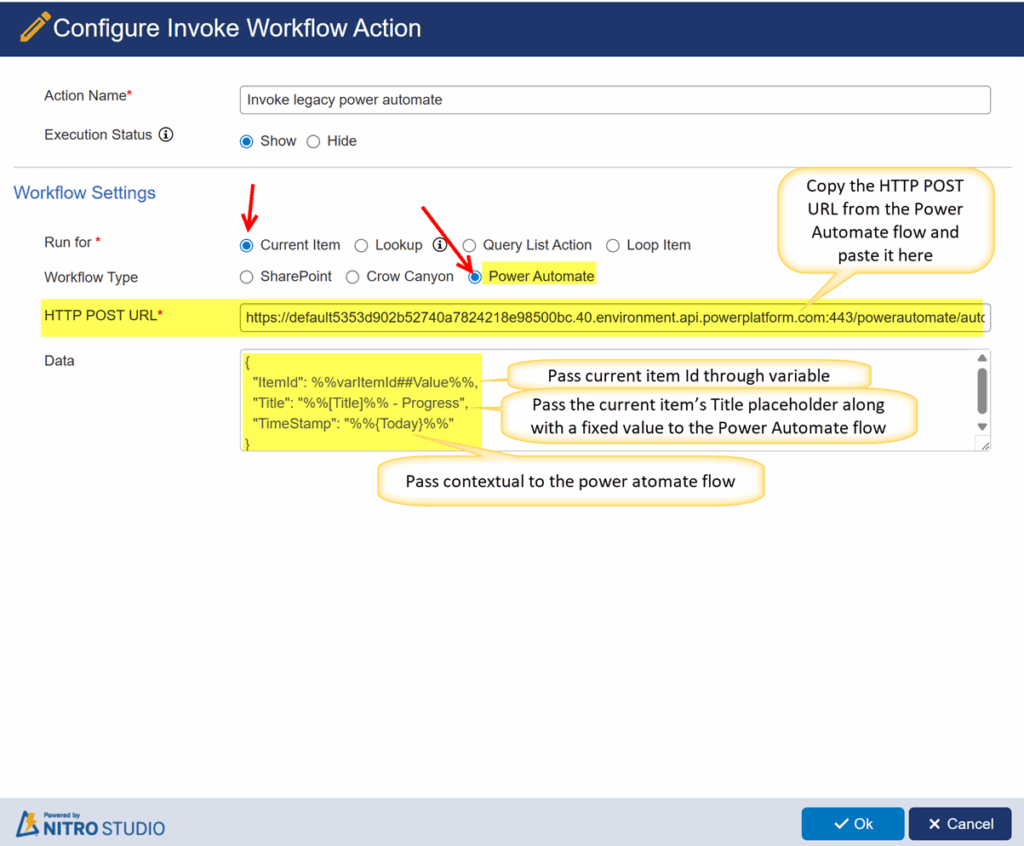
Note: The Power Automate flow includes ItemId, Title, and TimeStamp as columns, but you can add additional columns as required.
Step 2: Configure Power Automate Flow
Use Existing Flow
If you already have a Power Automate flow, you can reuse it.
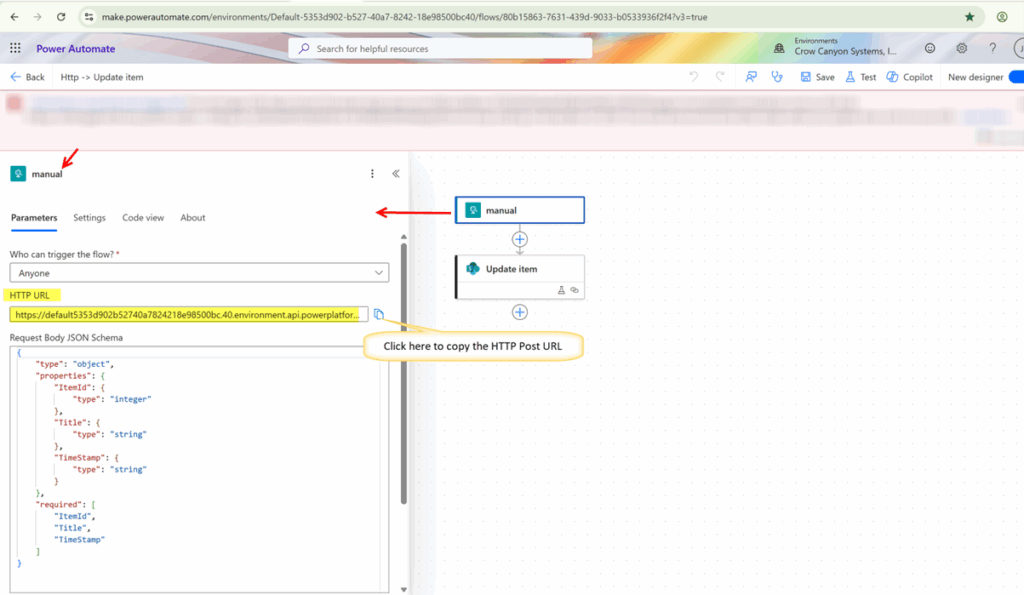
Open Power Automate → navigate to My Flows → Cloud Flows -> Edit the flow
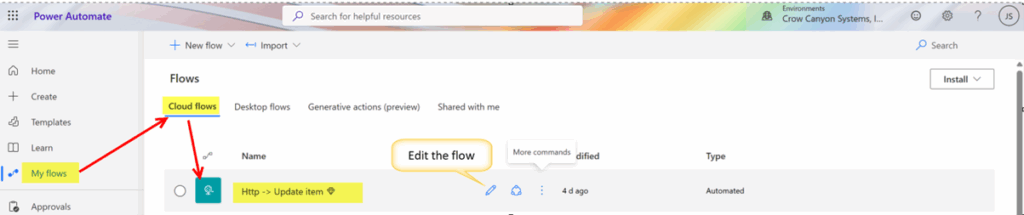
Copy the HTTP POST URL generated for the trigger and paste it into the Custom Action configuration (Step 1). To copy the HTTP POST URL, edit the flow and select the Manual trigger.
Create a new Power Automate flow
· Build the Flow (Power Automate)
- Open Power Automate → https://make.powerautomate.com
- Create a new flow → Select Instant cloud flow (or Automated) → Choose Trigger: When an HTTP request is received
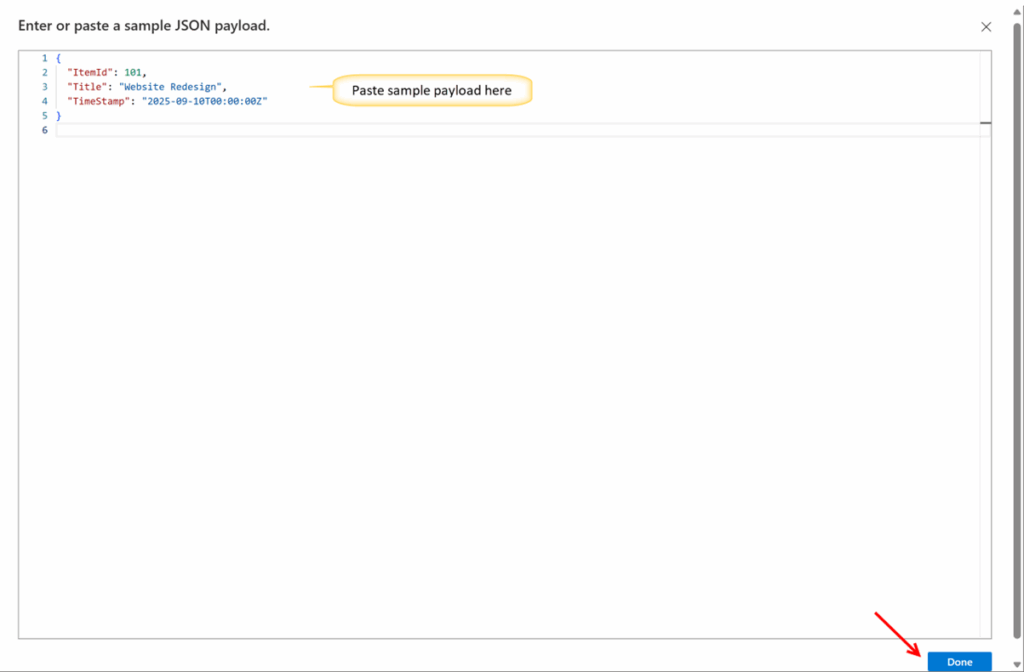
- In the trigger, click Use sample payload to generate schema and paste this sample payload (you can copy/paste exactly):
Sample Payload
{
  "ItemId": 101,
  "Title": "Website Redesign",
  "TimeStamp": "2025-09-10T00:00:00Z"
}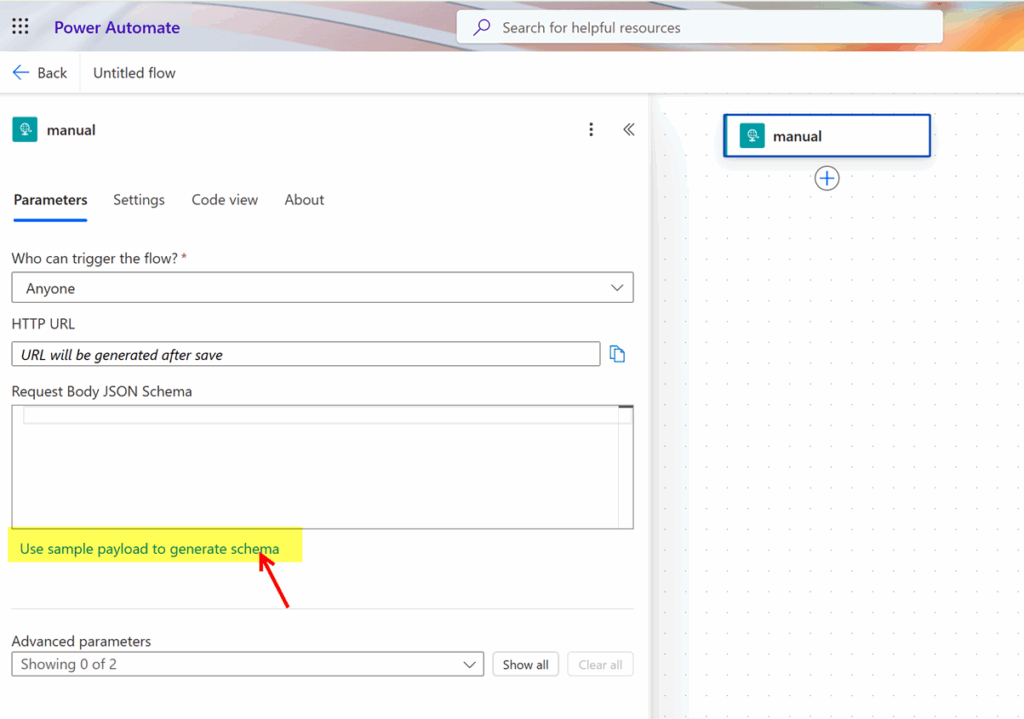
Power Automate will generate a JSON schema. If it doesn’t, use this schema (copy it):
{
  "type": "object",
  "properties": {
    "ItemId": { "type": "integer" },
    "Title": { "type": "string" },
    "TimeStamp": { "type": "string" }
  },
  "required": [ "ItemId", "Title", "TimeStamp" ]
}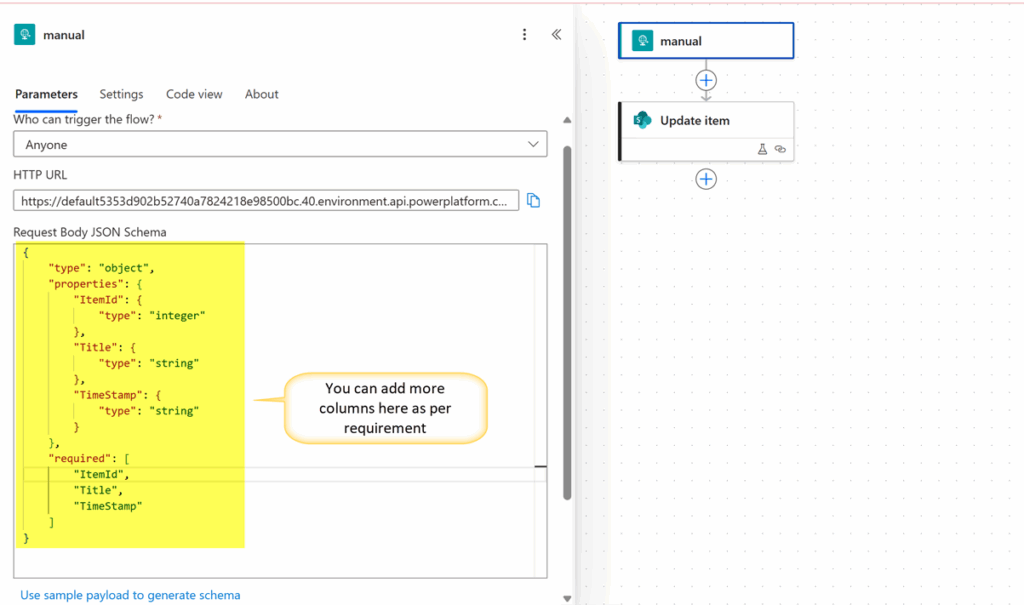
Note: If you prefer to pass ItemId as a string from Crow Canyon, change ItemId type to “string” in the schema.
- Save the Flow. After saving, Power Automate will show an HTTP POST URL in the trigger card. Copy that full URL— this is the URL you will paste into Crow Canyon custom action. Do not copy the make.powerautomate.com/…/flows/… designer URL.
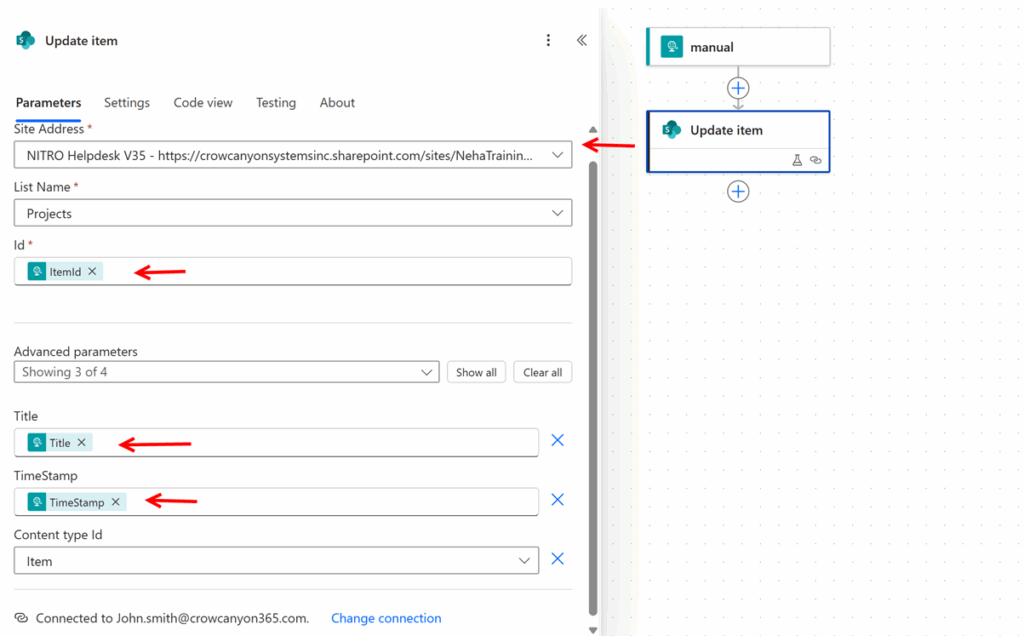
· Add Update item (SharePoint) action
- Click + New step → search SharePoint → Update item.
- Configure:
- Site Address: (select your site)
- List Name: Projects (or your list)
- Id: choose the dynamic value from the trigger.
- Title: choose the dynamic value from the trigger.
- TimeStamp: choose the dynamic value from the trigger.
· Save & Test
- Save the flow.
- Open the flow run history after you trigger it to inspect the request body and debug if needed.
Step 3: Test the Integration
- Go to your list item in SharePoint.
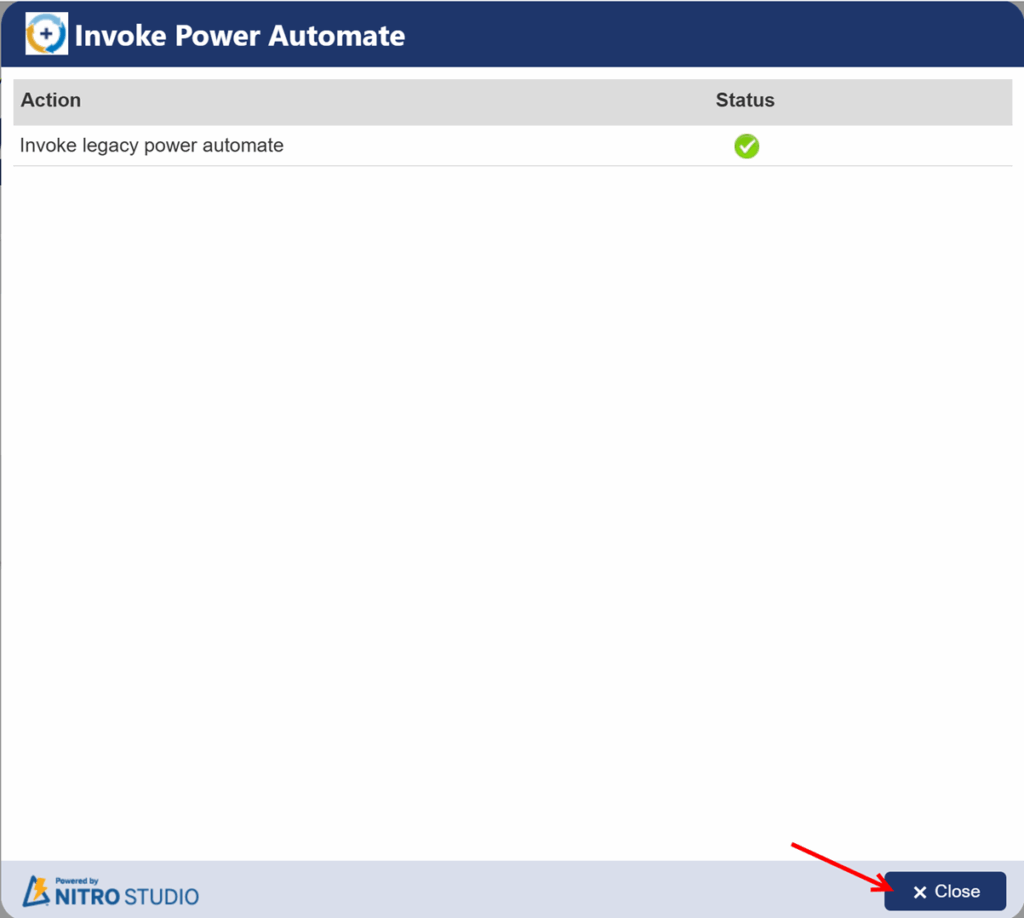
- Execute the Custom Action.
- The configured data will be passed from CA to Power Automate.
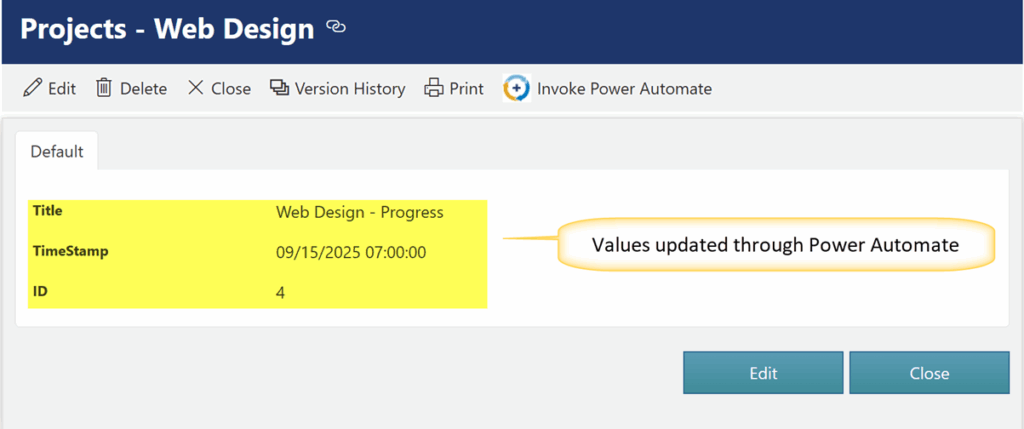
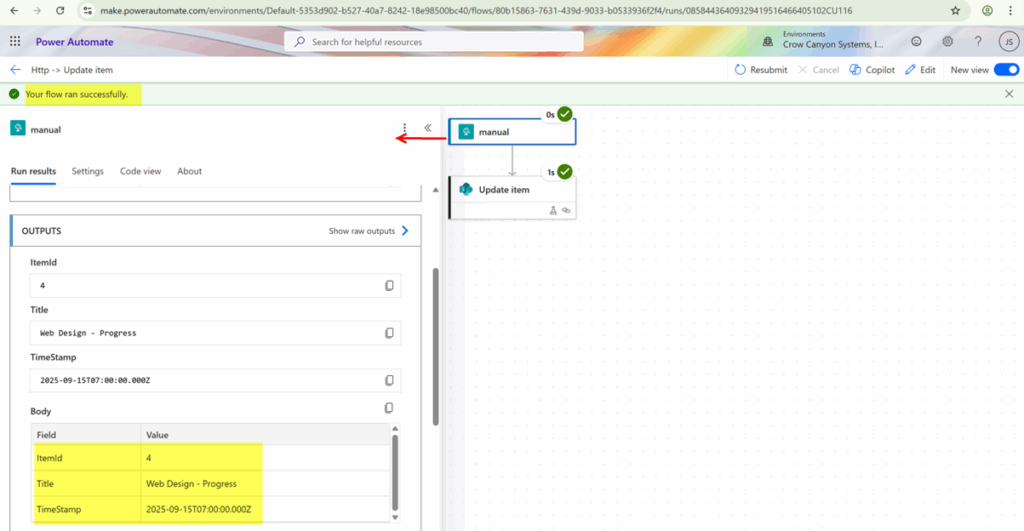
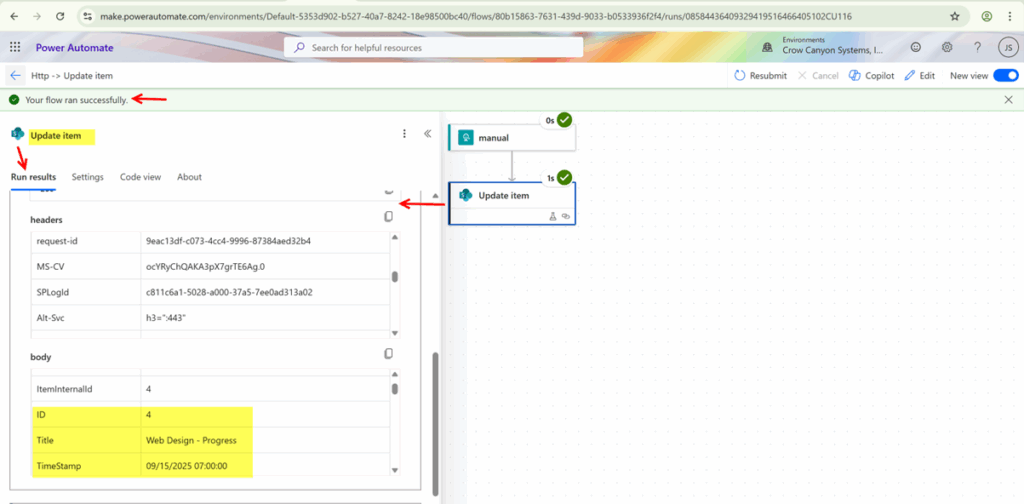
- Verify in the flow run history that the values (e.g., ItemId, Title, TimeStamp) were received correctly.
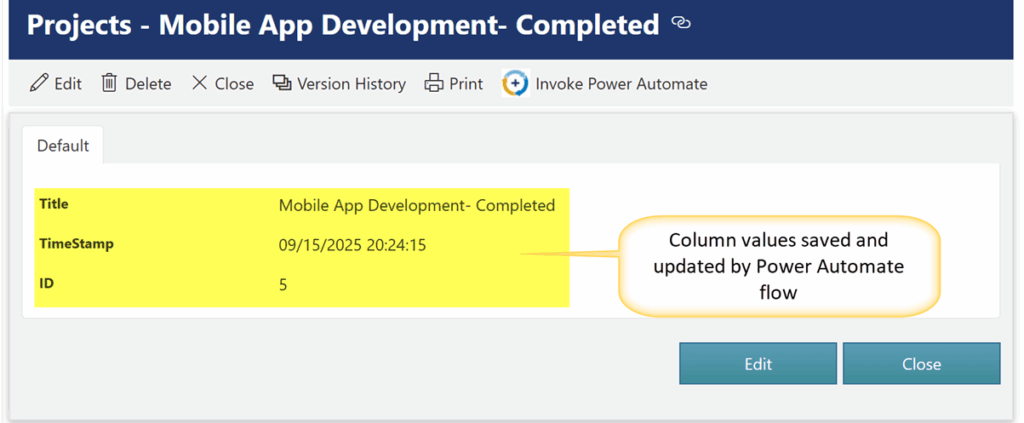
Execute Custom Action on below item
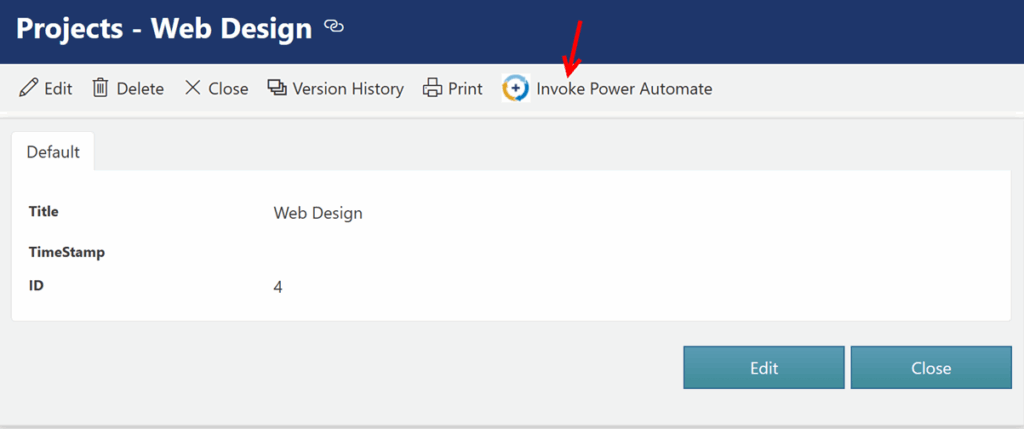
Sample Output:
View run history of item
To view run history of the item
Go to Power Automate -> My Flows-> 28 -day run history

Click item to see Power Automate flow run result
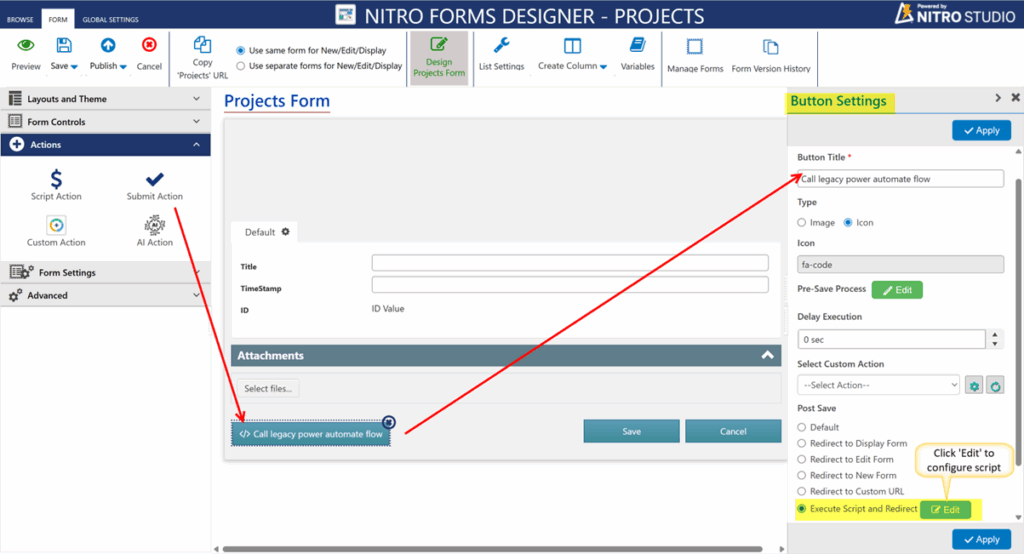
Detailed Steps for invoking a Power Automate flow from Post Save Scripts in Submit Action (NITRO Form)
Step 1: Configure Submit Action with Post Save Script
- Open your NITRO Form settings.
- Edit the Submit Action configuration if already there else drag and drop Submit Action button and configure the settings.
- Click Edit Button in Execute Script and Redirect in Submit button settings
- Add the script to call Power Automate Flow using HTTP POST.
Step 2: Example Script to Call Power Automate
Below is a sample script that sends ItemId , Title and TimeStamp to the Power Automate flow:
Custom Script Example:
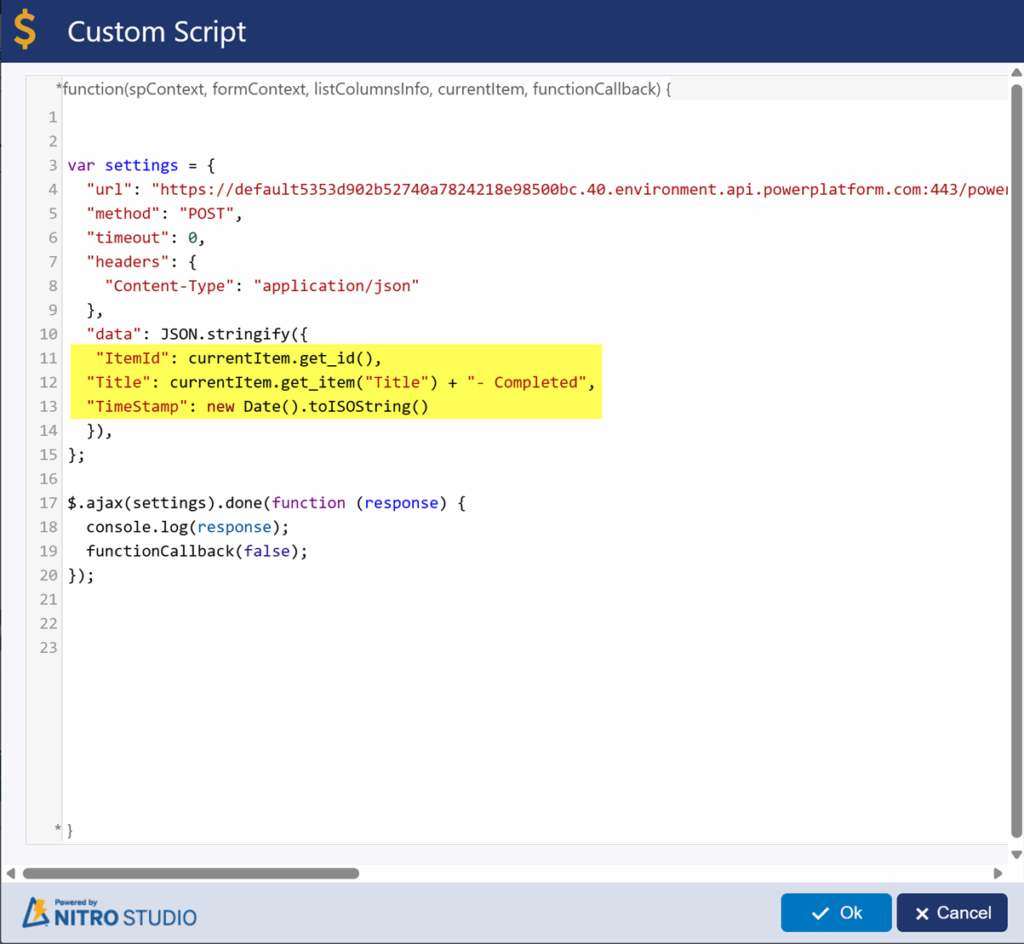
Script used above:
function(spContext, formContext, listColumnsInfo, currentItem, functionCallback) {
  var settings = {
  "url": "https://default5353d902b52740a7824218e98500bc.40.environment.api.powerplatform.com:443/powerautomate/automations/direct/workflows/27052af953ad4c8286419460c7e0953f/triggers/manual/paths/invoke?api-version=1&sp=%2Ftriggers%2Fmanual%2Frun&sv=1.0&sig=PgNMm7YWabx88fmH-gY0UUcWptb0wWe8GVCylz-invM",
  "method": "POST",
  "timeout": 0,
  "headers": {
    "Content-Type": "application/json"
  },
  "data": JSON.stringify({
   "ItemId": currentItem.get_id(),
  "Title": currentItem.get_item("Title") + "- Completed",
  "TimeStamp": new Date().toISOString()
  }),
};

$.ajax(settings).done(function (response) {
  console.log(response);
  functionCallback(false);
});
Step 3: Configure Power Automate Flow
Follow same steps as described above in Step 2 of custom action
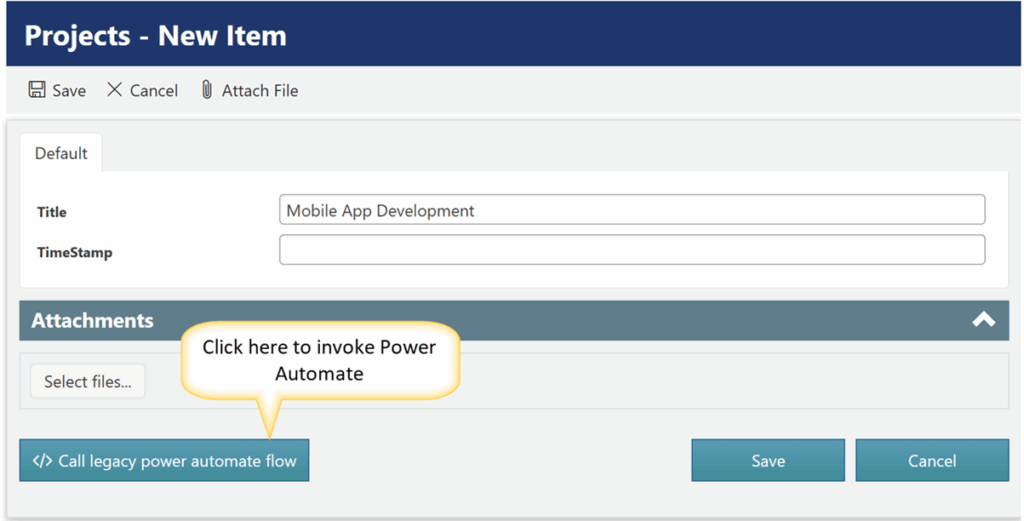
Step 4: Test the Integration
- Open your form and submit a new item.
- Go to Power Automate Run History and confirm the data was received. (Follow same step as described above in custom action sample output)
New Item:
Sample Output: