Permission configurations in Crow Canyon Service Request application
Applies to: SharePoint On-premises and Online
Description:
Crow Canyon Service Request application has two areas for configuration. There is the “backend” where staff and administrators will configure the program and work on their Tickets, requests, or work orders. Then there is the portal, where users can submit Tickets, requests, or work orders. We often refer to this as the “front end” of the application.
Crow Canyon Service Request application has 4 different roles (SharePoint Groups) for accessing the two areas.
- End Users
- Staff
- Managers
- Administrators
1. End Users:
This group of users are allowed to create Tickets and they can view their own Tickets form the portal. People who are members to only this group are not allowed to access the backend of the program.
2. Staff:
This group of users can access the backend of the program. These people generally work from the “Staff Workspace” which shows Tickets that are assigned to them and the Tickets that are not yet assigned to anyone. These people are allowed to see all other Tickets using other quick launch links and can view reports etc.
3. Managers:
This group of users can access the backend of the program. These people generally work from the “Manager Dashboard” which shows Tickets that are overdue and Tickets that are not yet assigned to anyone. Also, this workspace has more reports that helps the manager to understand the state of the Ticketing system. This group of people generally has the Full Control permission on the site so they are allowed to perform most of the operations.
4. Administrators:
This group of users are the ones who can configure the system. They can be defined in an Administrators SharePoint group with Full Control permissions, or they can be defined as Site Collection Administrators. These people can use “Application Administration” to configure the application and can grant permissions to others as needed.
Permission Levels and Group Associations:
- End Users – Contribute without delete (custom permission level, more detailed are described below)
- Staff – Contribute
- Managers – Full Control
- Administrators – Site Collection Administrators
We can apply the permissions to corresponding groups as listed above on root site and inherit permissions in service area site (sub site).
Note:
Do not use the site visitors group for end users. Create a new SharePoint group for end users and add “Everyone Except External” users security group to this group. For more details, refer this Article
These are simple/basic configurations, more granular permissions can be configured as needed.
Summary of Steps:
1. Create SharePoint group for each role. Please note that we can use default site groups (“Visitors” for End Users, “Members” for Staff and Managers, and “Owners” for Administrators) for different roles instead of creating new groups.
2. Create a custom permission level (Contribute without delete).
3. Configure permissions on root site as described above in permission levels and group associations.
4. Inherit permissions in service area site (sub site). By default sub site inherits permissions from root site so this step can be ignored if the sub site permissions are not changed.
5. Add desired users to corresponding groups.
6. Configure redirection in Portal security settings.
Detailed Steps:
1. Create a SharePoint group for each role with read permissions on root site in the site collection. If we decide to use the existing site groups then we can skip those groups creation.
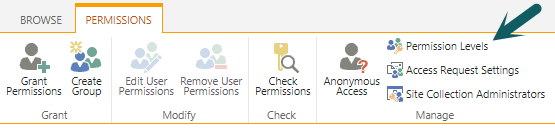
Go to site settings of root site of the site collection –> Site Permissions –> Create Group –> grant “Read” permissions.
2. Create custom permission level (Contribute without delete).
Go to Site Settings–> go to top level settings –> Site Permissions –> Permission levels
– Click on “Contribute” permissions
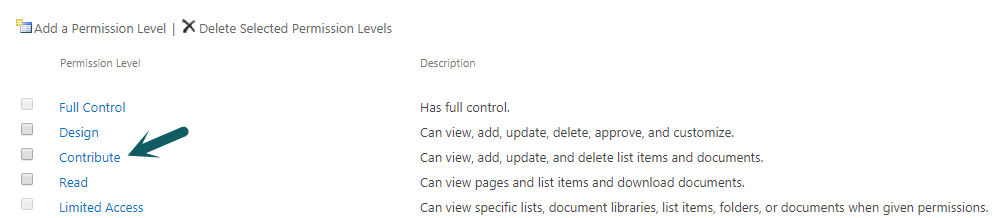
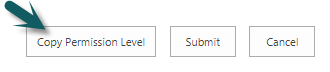
– Now click on “Copy Permissions Level” in Contribute permissions. Using this template, create a new permission level “Contribute without delete” by unchecking all the “delete” permission levels in it.
3. Configure permissions on root site as described above in permission levels and group associations.
Go to root site, Site Settings, Site Permissions and grant the permissions as described in permission levels and group associations above. (Sample screenshot below)
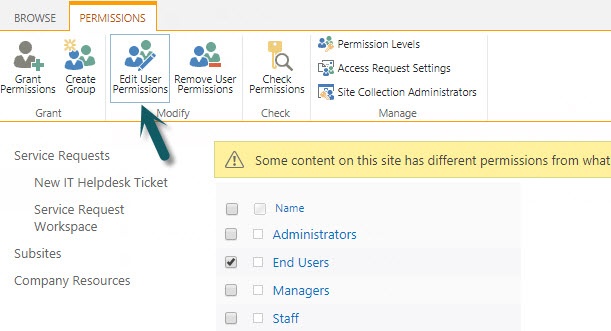
– Grant “Contribute without Delete” permissions. This will allow users to create and manage Tickets without able to delete them.

4. Inherit permissions in service area site (sub site). By default sub site inherits permissions from root site so this step can be ignored if the sub site permissions are not changed.
5. Add desired users to corresponding groups.
6. Configure redirection in Portal security settings.
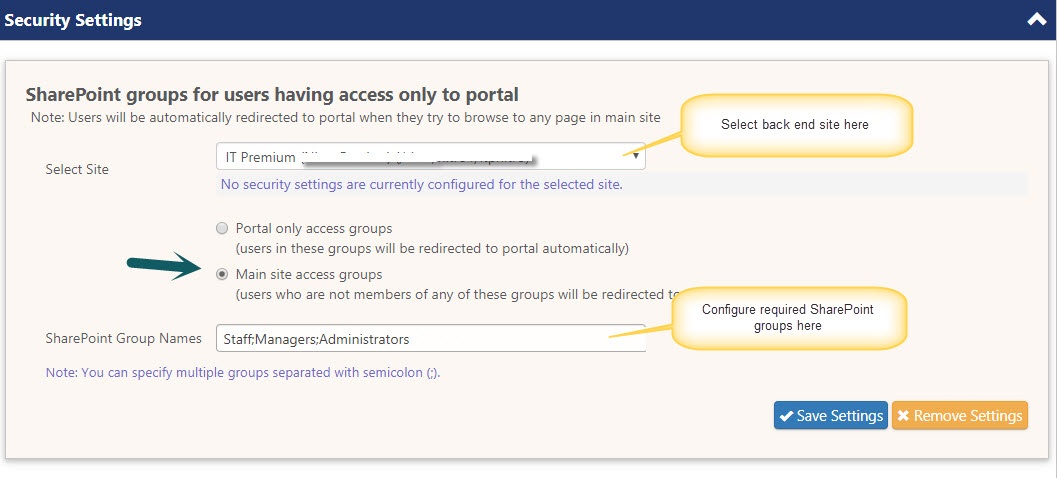
Configure security settings in Portal such that only staff, managers and administrators SharePoint groups has access to the backend site and end users are redirected back to portal upon accessing backend site.
Go to Portal Settings -> Security Settings -> configure “Main site access group” and specify the staff, managers and administrator SharePoint group as shown in below image -> click “Save Settings”.