Applies To: SharePoint Online and On-Premises
Introduction
NITRO Studio is installed at Site Collection level. NITRO can be activated in any sub-site in the site collection including the root site. SharePoint allows changing the Site Collection/Site URL. Also, a site URL can get changed if URL of its parent site is changed. If NITRO is already activated on a site when its URL is changed, then some updates are required as site URL is used in NITRO configurations.
Reconfiguration Steps
NITRO has built-in feature to update most of the NITRO site settings after URL change. Only few manual steps are required. Please follow the steps as listed below.
Step 1 – NITRO Site Repair feature
1. Navigate to Crow Canyon NITRO Apps page for the site
Go to the root site of site collection -> Open Crow Canyon NITRO Studio app -> Search for the site whose URL has changed -> Click “Manage” to navigate to the NITRO Apps page for the site.
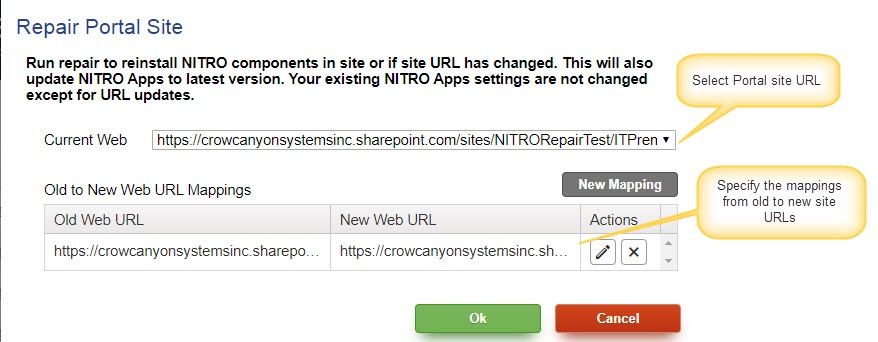
2. Click “REPAIR SITE” at the right bottom of the page
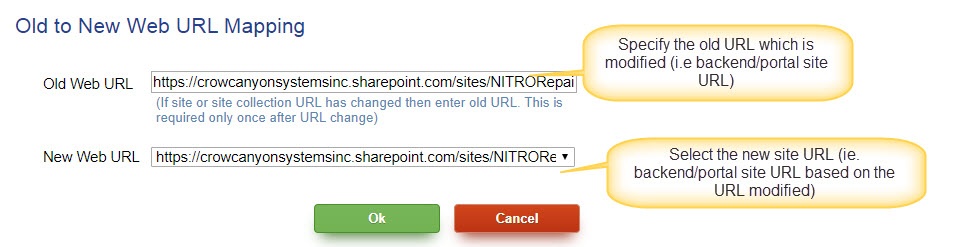
3. Add mappings of old to new site URLs
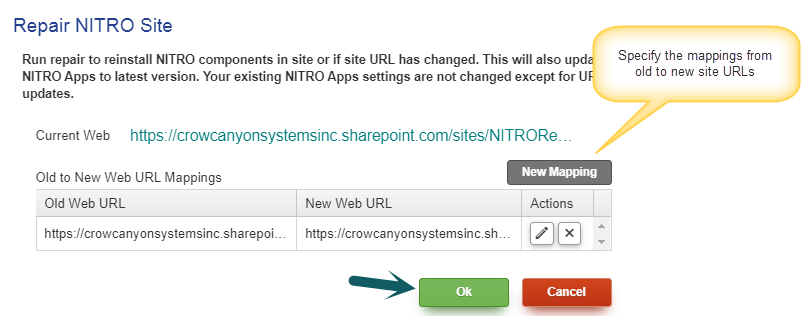
Example:
Old Web URL: https://contoso.sharepoint.com/sites/NITRO/IT
New Web URL: https://contoso.sharepoint.com/sites/NITRO/helpdesk
Note: If you only want to run NITRO Repair for the site and there is no change in site URL, then you can leave this section blank.
4. This will re-install the NITRO and update the URL’s in the NITRO settings files. Please note that this step will also update the NITRO Studio in the site to the latest version.
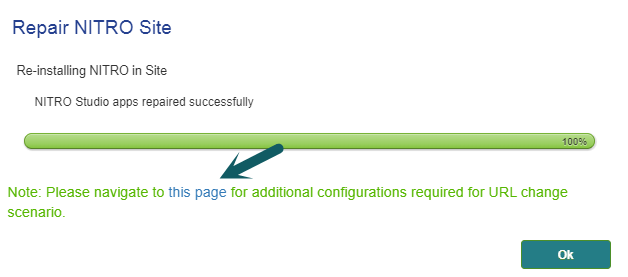
5. Please wait until the process completes. Once done, it will show link to a page that has additional steps for URL change scenario. Note that this is not required if you are only running NITRO Repair for the site and there is no URL change.
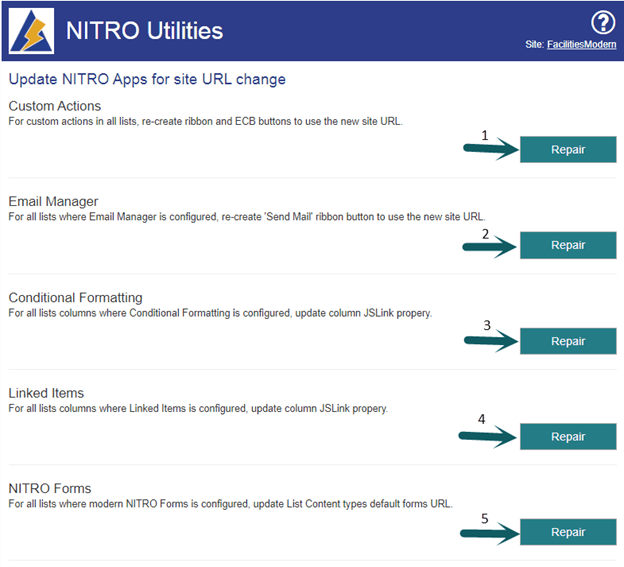
Step 2 – Update NITRO Configurations from NITRO URL Change page
After above step, “Update NITRO Apps for site URL change” page will be opened automatically. You can also navigate to this page by clicking “this page” link as shown below:

Click “Repair” button for “Custom Actions”, “Email Manager”, “Conditional Formatting”, “Linked Items” and “NITRO Forms” as shown below. These steps will do the additional updates required for these NITRO components.
Step 3 – Manual Steps
There are some manual steps required after doing the above updates. When NITRO components are added to pages in site, URL is referenced in code added to page. For some components this is updated automatically but for others few manual steps are needed as listed below.
| Component | SharePoint On-Premises | SharePoint Online – Classic UI | SharePoint Online – Modern UI |
|---|---|---|---|
| NITRO Reports | No changes are required | Update the URL in the Crow Canyon NITRO Report web parts in the pages. Go to all the pages in site where NITRO Reports are added -> Edit the Page -> Edit the web part and modify the URL with new URL as shown below: Note: In the content link, only modify the part of URL that has changed. Keep rest of the URL same as earlier. 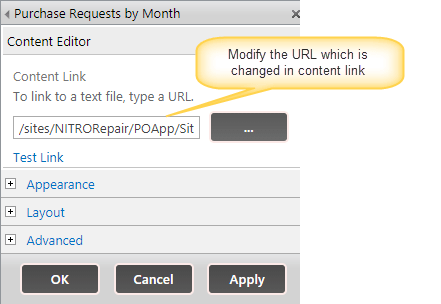 |
No changes are required |
| Advanced Lookup | No changes are required | Note: This change is required only if you are using Standard SharePoint List Forms for a list. This is not required if you are using NITRO Forms.
Go to the list where advanced lookup settings are configured ->Edit default SharePoint New and Edit forms from the list ribbon -> Edit the web part “(Hidden)CCSAdvancedLookupContentEditor” and modify the URL which is changed in the content link. Ex: /sites/NITRO/IT/SiteAssets/CCS/AdvancedLookup/CrowCanyonAdvancedLookupContent.txtIn the above example, only modify the part of URL that has changed. Keep rest of the URL same as earlier. 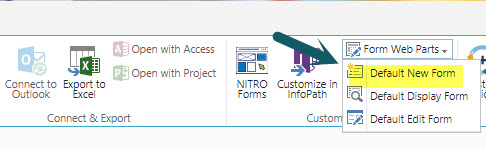 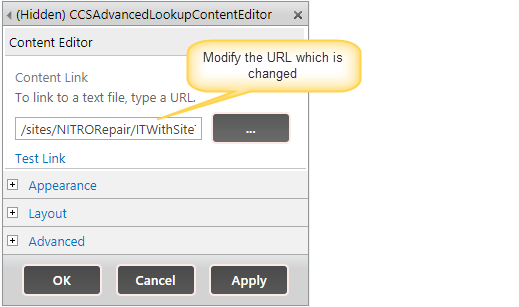 |
No changes are required |
| Branding | No changes are required | No changes are required | Update “Application Administration” links in Modern UI based applications. Go to the site -> Site Settings -> Click “Crow Canyon Branding (Modern Sites)” -> Expand “Application Administration” section -> Modify the URL and click “Save Settings” .  |
| Custom Actions | Same as SharePoint Online – Classic UI |
Update the hyperlinks which are using the site URL in mail templates in send mail actions. Go to the app (Custom Actions) -> Edit send mail actions -> Edit mail template and update the URL in the hyperlinks |
Same as SharePoint Online – Classic UI |
| NITRO Workflows | Same as Custom Actions |
Same as Custom Actions | Same as Custom Actions |
| Advanced Approvals | Not Applicable | Go to the Advanced Approval app -> Edit the advanced approval configuration -> Edit mail templates and modify the site URLs in hyperlinks. | Same as online |
| List Rollup | No changes are required | Go to all the pages in site where List Roll-ups are added -> Edit the page -> Edit the web part and modify the URL with new URL. Note: In the content link, only modify the part of URL that has changed. Keep rest of the URL same as earlier. |
No changes are required |
| List Search | No changes are required | Go to all the pages in site where list search web part is added and reconfigure the search settings | Same as SharePoint Online |
| List View | No changes are required | Go to all the pages in site where Crow Canyon list view web parts are added -> Edit the page -> Edit the list view web part and modify the URL with new URL Note: In the content link, only modify the part of URL that has changed. Keep rest of the URL same as earlier. |
Go to all the pages in site where list view web parts are added -> Edit the page and reconfigure the list view web part |
| Tiles and Dials | No changes are required | Update URLs in “Crow Canyon NITRO Apps” link tiles. Go to the site -> Site Settings -> Crow Canyon Tiles and Dials -> Edit “Crow Canyon NITRO Apps ” -> Edit each link tile and modify the URL |
Same as SharePoint online |
SharePoint Online Modern UI based application
For SharePoint Modern UI based applications, please follow the steps same as “NITRO Site Repair Feature”.
Additionally, go to ‘Site Pages’ document library in the site and verify that web parts are loading correctly in each page. If any web part is not working then edit the page and then edit the web part properties. Specify the updated URL and save the page.
Note: If NITRO branding is being used, edit the site page in Modern UI by appending “?CCSMode=1” at the end of the URL in browser.
Ex: https://contoso.sharepoint.com/sites/NITRO/IT/SitePages/Home.aspx?CCSMode=1
Power Portal
Applies to: SharePoint Online (Classic UI) and On-Premises
Portal site repair is required for following cases:
- Portal site URL or URL of parent site has changed
- Site Collection URL has changed
- Portal site shows data from one or more back end sites. If URL for any of these sites has changed then reconfiguration of portal site is required (regardless of whether portal site URL has changed or not)
Go to NITRO Apps page ->Power Portal -> Click “Repair Site” at the left bottom of the page as shown below

Additional steps
1. Check top links and quick links to verify they are pointing to new URL
2. If any custom JavaScript is used in NITRO Forms / Actions / Tiles etc. and if script is using any URLs then update them as per new site URLs
3. Modify the redirect URLs in the “New Item” quick links. Ex: “New Ticket”, “New Problem” etc.
4. Update the Ticket and Portal Ticket link URLs in the notifications for Service Request and other applications. Go to Application Administration -> Notifications -> Edit all the auto notifications (Notification on Ticket Creation/Assignment/Completion) and modify the URLs in “Ticket Link URL” and “Portal Ticket Link URL”.
5. For SharePoint Online (Classic UI) and On-Premises:
For document libraries ‘Workspaces’ and ‘Software Workspaces’, for each page check if web parts are loading correctly. If any web part is not working then edit the page and then edit the web part properties. Specify the updated URL and save the page .
Note: Ignore ‘Software Workspaces’ document library if your application doesn’t contain Crow Canyon Assets module.