Applies To:
Crow Canyon NITRO activated sites in:
SharePoint Online and On-Premises 2013/2016/2019/SharePoint Server Subscription Edition
Introduction
Most modern cloud-based software provides APIs to enable integration between different systems. Crow Canyon NITRO Studio components can connect to REST based APIs to fetch and update the data in external systems. REST integration can be added in following components:
- NITRO Custom Actions: Call REST APIs with and without authentication to fetch/update data in external systems
- NITRO Workflows: Call REST APIs with and without authentication to fetch/update data in external systems
- NITRO Forms: Using custom JavaScript option, invoke the required REST API and process the response. Response can be used to populate data on the form or update data in SharePoint list items
Web service call can be used to create/update records in external system. Or the response returned by the web service can be used to create/update records in SharePoint (list items).
Note: This document shows images from NITRO Custom Actions. Functionality is mostly similar in NITRO Workflows and document mentions wherever there is any difference.
‘Invoke Web Service’ feature in NITRO Workflows and Custom Actions
- Call web services requiring different types of authentication
- Insert/Update data in external systems as per the business flow in SharePoint. E.g., if Purchase Order is created in SharePoint application, then create/update a record in Salesforce
- Fetch data from external system and create/update records in SharePoint. For e.g., fetch details corresponding to a Purchase Order in SharePoint and update its status as per the value in external system. If response contains multiple records, then those can be created in SharePoint as separate list items with mapping of response elements to SharePoint list columns
- Placeholder support in URL, headers and data of the request. These placeholders are replaced with actual values from the SharePoint item at the time of execution
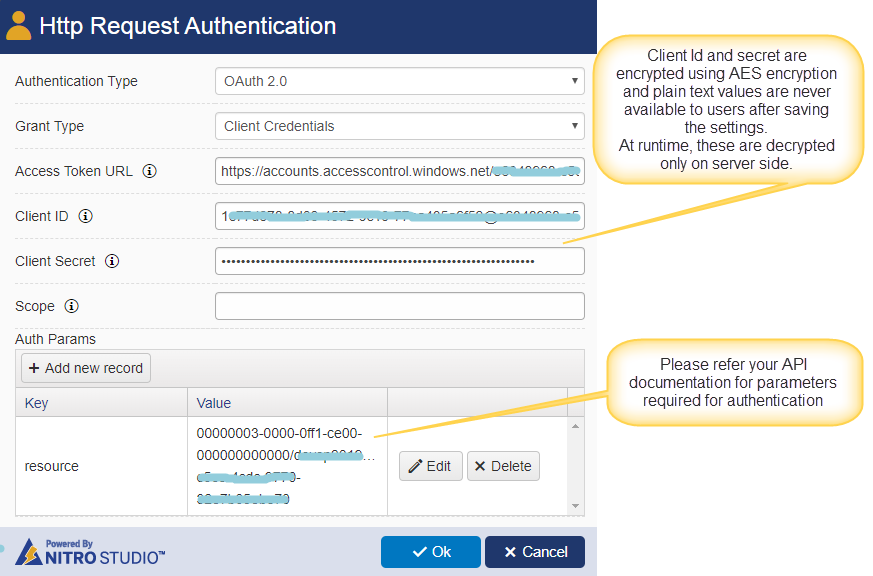
- Sensitive information like username, password, client secret etc. is encrypted using AES encryption and is never available in client side as plain text. For OAuth 2.0 authentication, initial call to get access token is made from server side only so that Client Id and Client Secret are never accessible to end users on client side
- For custom authentication scenarios, request to get access token can be done as a separate action. Pass the required data to the web service and obtain the access token. Then use this token as a placeholder in second call to perform the required web service operation
Pre-requisites to configuring web service action in NITRO components
- URL of the web service
- Authentication mechanism and corresponding details like username and password for basic authentication and Client Id/Secret etc. for Auth 2.0
- Headers required by the API (e.g. ‘Accept’ header with value ‘application/json;odata=verbose’)
- Request body syntax
- Mapping of placeholders of SharePoint data to URL, Headers, Body and Authentication settings
- Cross-origin HTTP requests are permitted for your scenario. That is, your API supports calls from SharePoint pages if using client-side execution. Refer this article for more details
- Ensure that HTTP Request can be made from the postman application with above details
- Structure of the response and how to map it to SharePoint for insert/update
- If REST service call is done from SharePoint pages (NITRO Forms and client-side option in Custom Actions), only https services can be invoked. If REST is invoked from server side (NITRO Workflows and server-side option in Custom Actions), both http and https services can be invoked
Invoke Web Service Action
Web Service Settings
Execute on
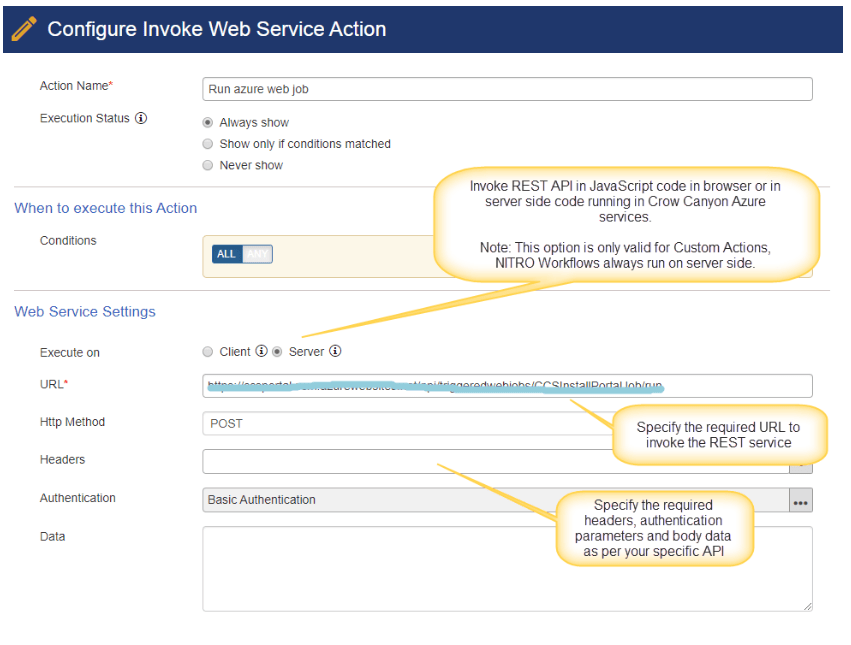
Client: HTTP request will be made using JavaScript code running in the browser. In this case it is mandatory to have an SSL enabled (https) service as SharePoint pages do not allow calling non-secure services. Also, cross-origin calls should be allowed (refer this article)
Server: HTTP Request will be made from server-side code running in Crow Canyon subscription of Microsoft Azure
Select the execution based on web service request URL accessibility.
URL
Specify the web service request URL. We can also use column placeholders in the URL
Syntax:
https://serviceURL/%%[Column Display Name|Column Internal Name]%%
Ex: https://reqres.in/api/users/%%[ID|ID]%%
Http Method
Select the required http method
- GET
- POST
- PUT
- DELETE
- JSONP
Headers
Headers are an important part of the API request and response as they represent the associated meta-data. Specify the required headers for the web service as per your API documentation. Column placeholders can be used for the headers if required.
Syntax: %%[Column Display Name|Column Internal Name]%%
Ex: %%[Title|Title]%%
Authentication
Select required authentication method used by your API:
No Authentication
For web services that doesn’t require any authentication
Basic Authentication
Username and password based authentication
OAuth 2.0
Specify the required details i.e. Grant Type, Access Token URL, Client ID, Client Secret and other auth params as required by the API. Please refer your API documentation for more details

Examples given below use OAuth 2.0 for SharePoint Online REST API. Note that parameters can be different for other APIs.
Bearer Token
Specify Bearer Token in format given below. This token can be obtained with a separate call as explained in sample cases below:
Bearer <token>
Sample configurations for invoking REST APIs
Below samples consider different cases of authentication and response types. You can refer these to configure as per the authentication required by your API and then use the response as per your use case.
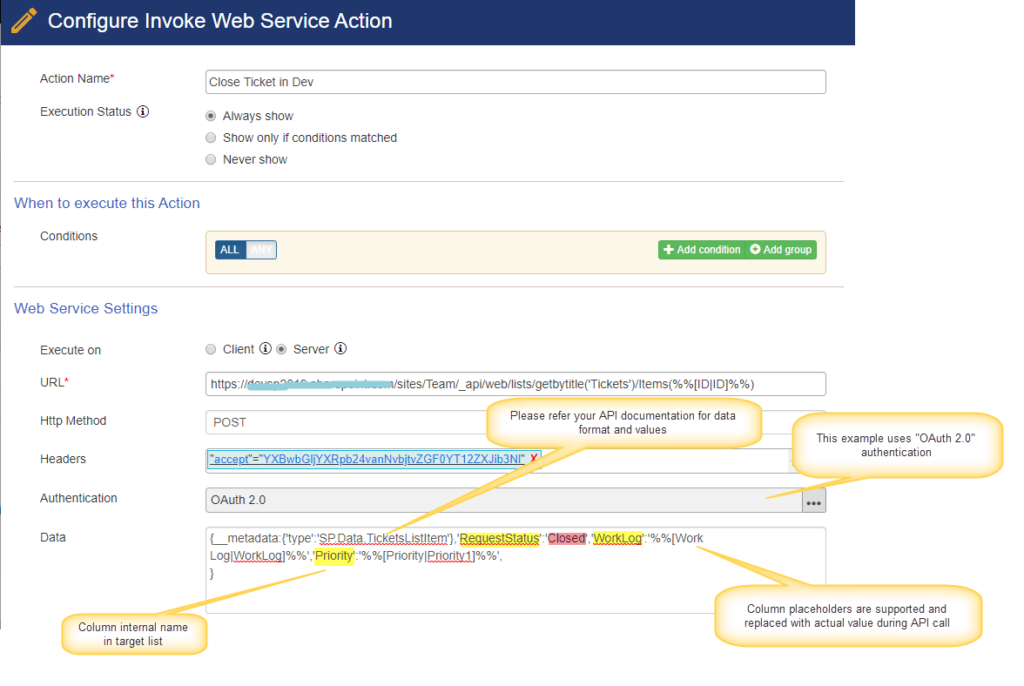
Invoke OAuth 2.0 API to update a record
In this sample we invoke REST API on a SharePoint Online tenancy (different from the tenancy in which this custom action is configured). SharePoint REST API requires OAuth 2.0 authentication. API will update a list item in target tenancy. Response of the API is not used to create/update any record in source tenancy.
In below example, item in Tickets list is updated in target SharePoint tenancy. We need the Client Id and Client Secret of an app that is installed in target site that has the required app only access permissions to update the item in Tickets list.
URL
SharePoint Web API URL that will be similar to below, replace the highlighted parts as per your site and list:
https://contoso.sharepoint.com/sites/Team/_api/web/lists/getbytitle(‘Tickets‘)/Items(%%[ID|ID]%%)
This URL will access the item in Tickets list with the required Id. Placeholder “%%[ID|ID]%%” in the above URL will be replaced by the current item Id in source SharePoint site. You can use the required placeholder column/variable or a hard-coded value as per your use case.
Http Method
Http Method: “Post”
Headers
Note that your API may require different headers, please refer the documentation of your API
| Keys | Values |
| Accept | application/json;odata=verbose |
| content-type | application/json;odata=verbose |
| IF-MATCH | * |
| X-HTTP-Method | MERGE |
Authentication
Select OAuth 2.0 as authentication type and then specify Grant Type, Access Token URL, Client ID, Client Secret
Grant Type
API may require a username and password along with client Id and secret for authentication. Some APIs can be invoked without user credentials (as in this example) and do not require a username and password
Access Token URL
Access Token URL will be like
https://accounts.accesscontrol.windows.net/{{realm}}/OAuth2/V2.0/token
{{realm}} is your SharePoint environment tenant Id. Please refer this link for details on how to get it.
Client ID
Client Id of the SharePoint add-in (app) that is installed in target site
Client Secret
Client secret of the SharePoint add-in (app) that is installed in target site
Resource
Syntax for resource parameter is:
{{principal}}/{{targetHost}}@{{realm}}
{{principal}}: “00000003-0000-0ff1-ce00-000000000000” is the identifier for SharePoint
{{targetHost}}: yourtenantname.sharepoint.com
Ex: contoso.sharepoint.com
{{realm}}: your SharePoint environment tenant Id. Refer this link for details on how to get it
Data
In this example we used data as required by SharePoint REST API to update a list item. Data can contain placeholders that will be replaced by actual values during execution.
{__metadata:{'type':'SP.Data.TicketsListItem'},'RequestStatus':'Closed','WorkLog':'%%[Work Log|Work Log]%%','Priority':'%%[Priority|Priority1]%%'
}
Syntax for column placeholders: [Column Display Name|Column Internal Name]
Example: %%[Work Log|Work Log]%%
Bearer Token Authentication
This example uses a separate action to get the access token from the API and then use it in next action to make the actual API call for the business process. This can be used if your API authentication follows a model not yet supported in NITRO. You can pass the required authentication parameters in the header and body of first action and obtain the access token. In next action this token can be used to make the required API call.
This case is similar to above case as we are updating a list item in a different SharePoint tenancy. Only difference is in terms of how the access token is obtained and used in the second action that calls the API.
Custom Action:
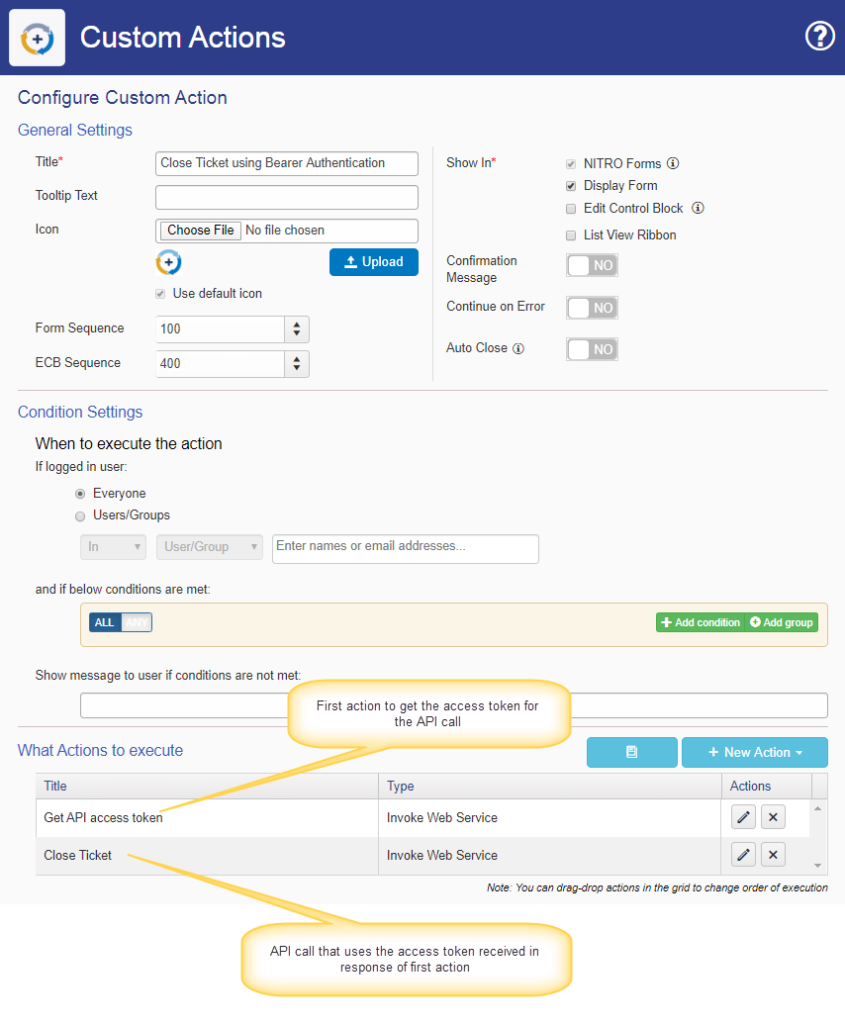
Action 1: Get API access token
This action will get the access token in the response to be used in next action for the API call. Note that this action doesn’t use any authentication. Please refer your API documentation for the header and body parameters required for this call.
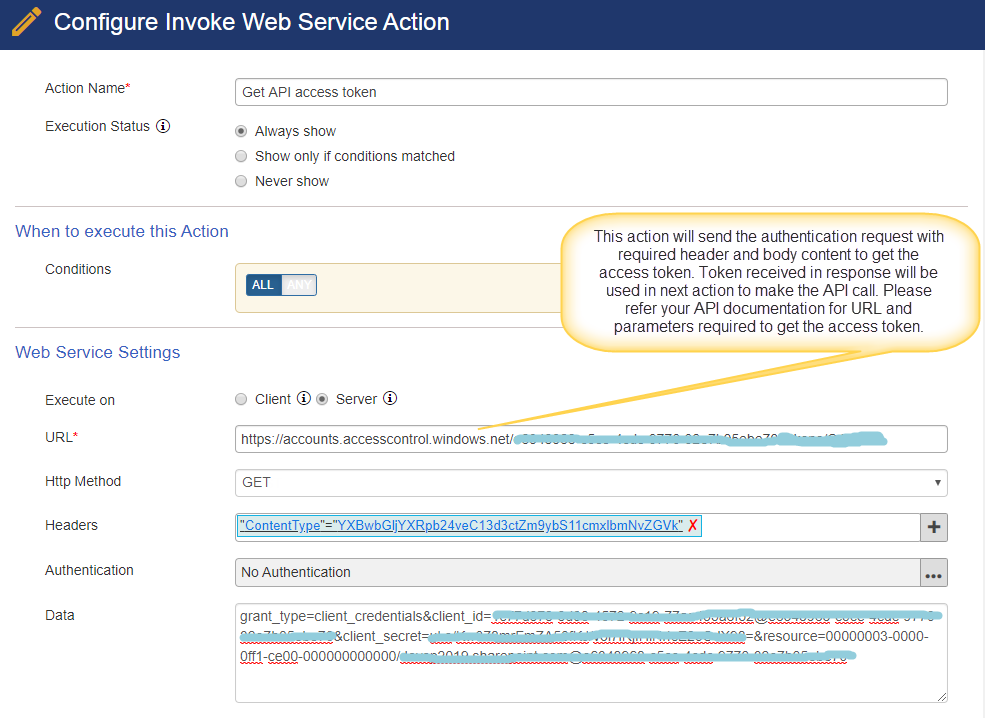
URL:
Specify the URL to get the access token:
E.g. for SharePoint Online: https://accounts.accesscontrol.windows.net/{{realm}}/OAuth2/V2.0/token
In the above URL, replace {{realm}} with your SharePoint tenant Id.
HTTP Method: POST
Headers:
| Key | Value |
| ContentType | application/x-www-form-urlencoded |
Data:
grant_type=client_credentials&client_id=<Client Id>&client_secret=<Client Secret>&resource= Specify the ResourceID parameterNote: Replace the replaceable text values with actual values from your environment. Please refer OAuth2.0 documentation for more details about the Client Id, Client Secret, resource and grant type.
Action 2: Close Ticket
This action will use the access token response from above action to invoke the actual REST API. This action will update the Tickets list item in target SharePoint tenancy as an example:

URL:
https://contoso.sharepoint.com/sites/Team/_api/web/lists/getbytitle(‘Tickets’)/Items(%%[ID|ID]%%)
Placeholder “%%[ID|ID]%%” in the above URL will be replaced by the current item id.
Http Method: Post
Headers:
| Keys | Values |
| Accept | application/json;odata=verbose |
| content-type | application/json;odata=verbose |
| IF-MATCH | * |
| X-HTTP-Method | MERGE |
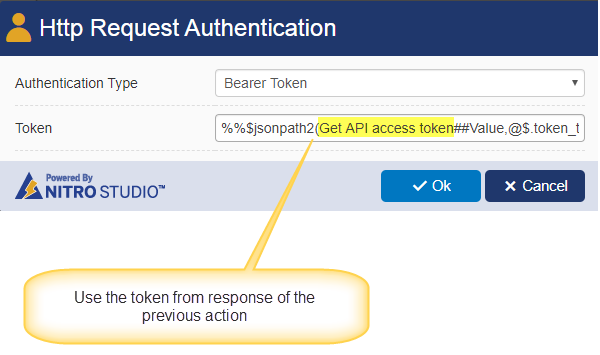
Authentication:
Authentication Type: Bearer Token
Token:
%%$jsonpath2(Get API access token##Value,@$.token_type)%% %%$jsonpath2(Get API access token##Value,@$.access_token)%%
In the above,
“%%$jsonpath2(Get API access token##Value,@$.token_type)%%” will return the token type from “GetAuth” action response.
“%%$jsonpath2(Get API access token##Value,@$.access_token)%%” will return the access token from “GetAuth” action response.
Note: We can also pass the access token in Headers by specifying the “Authorization” parameter in headers as shown below. For this case select authentication as “No Authentication”.
| Key | Value |
| Authorization | %%$jsonpath2(Get API access token##Value,@$.token_type)%% %%$jsonpath2(Get API access token##Value,@$.access_token)%% |
Data:
{__metadata:{'type':'SP.Data.TicketsListItem'},'RequestStatus':'Closed','WorkLog':'%%[Work Log|Work Log]%%','Priority':'%%[Priority|Priority1]%%'
}
In the above example, we can directly specify the column value or we can use the column placeholders.
Syntax for column placeholders: [Column Display Name|Column Internal Name]
Ex: %%[Work Log|Work Log]%%
Basic Authentication
In this configuration we will invoke a Web API that requires username and password for authentication. API response is not used to create/update any record in SharePoint.
Example API used here invokes an Azure web job
Custom Action:
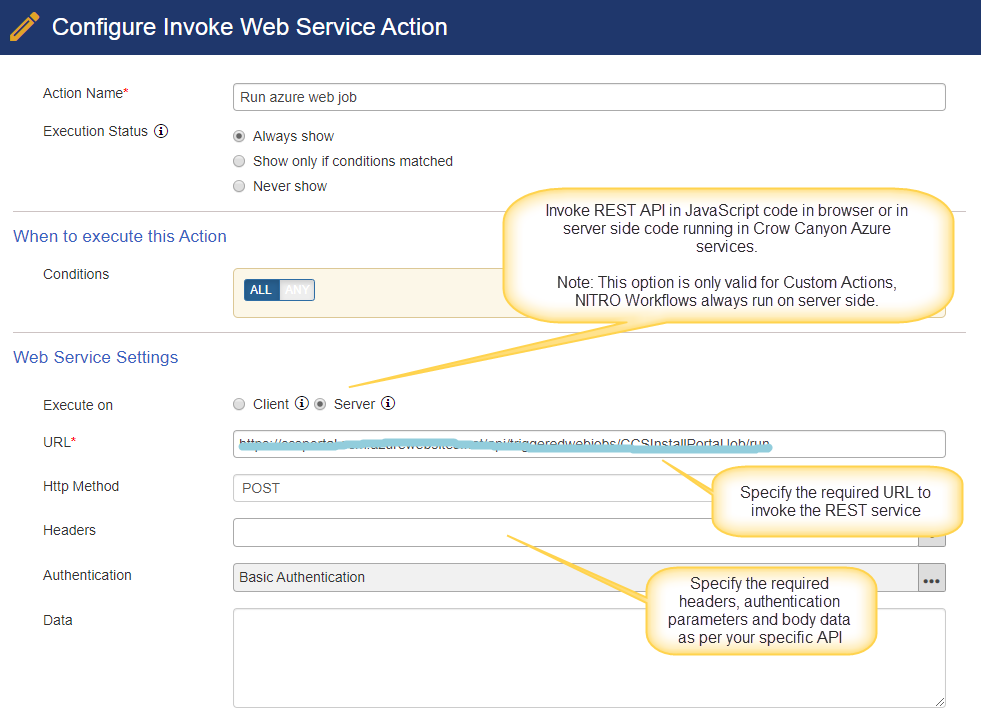
Authentication:
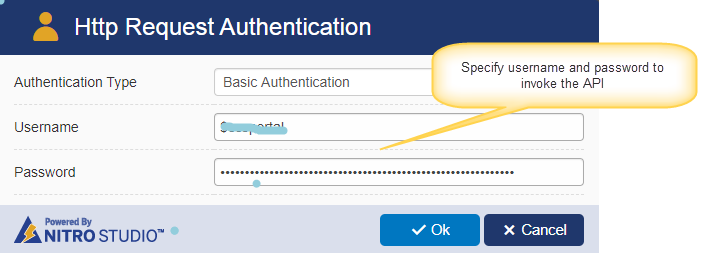
How to use web service response in Create/Update item action for single and multiple records
Examples given below use the response returned from the REST API calls to create/update list items in SharePoint. API response may contain a single record or a record set with multiple records. For illustration we are using a publicly available REST API that doesn’t require authentication:
https://reqres.in/api/users/
If your API requires authentication, then refer earlier examples in this article to add authentication parameters to the call.
Using $jsonpath() function
JSONpath2 function is used to parse REST API response that is in JSON format. It requires the response and JSON path as input and extracts the required information from the response for use in subsequent actions.
Syntax: $JSONPath2(Value/placeholder,@JSONPath)
Single Record
In this sample we invoke REST API that doesn’t require any authentication and returns a single record. Returned response is used to update SharePoint list item.
Invoke Web Service action is used to read details of a user from an external service. User details are then updated in SharePoint list item by mapping response elements like first name, last name and email to corresponding columns of the SharePoint list item using the create/update list item actions.
Web Service URL used in this example is a publicly available free REST API:
https://reqres.in/api/users/%%[UserId|UserId]%%
During execution, placeholder part in URL (“%%[UserId|UserId]%%”) will be replaced by the value of “UserId” column of the item on which custom action is invoked.
To configure this, go to the list -> List Settings -> Crow Canyon Custom Actions and configure an Invoke Web Service action as shown below.
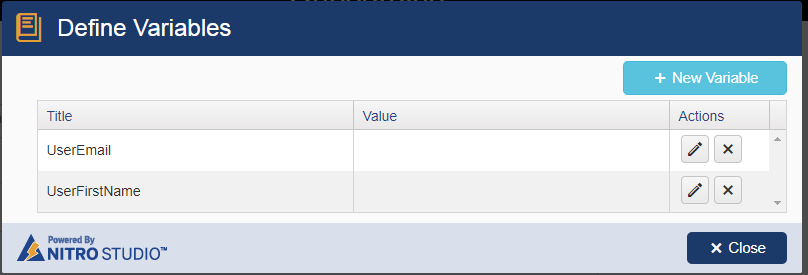
For this custom action configuration, we have defined two variables: UserEmail and UserFirstName. These variables will be used to store specific values extracted from the web service JSON response using the JSONpath2 function. These variables will then be used to set these values in columns of a list item.
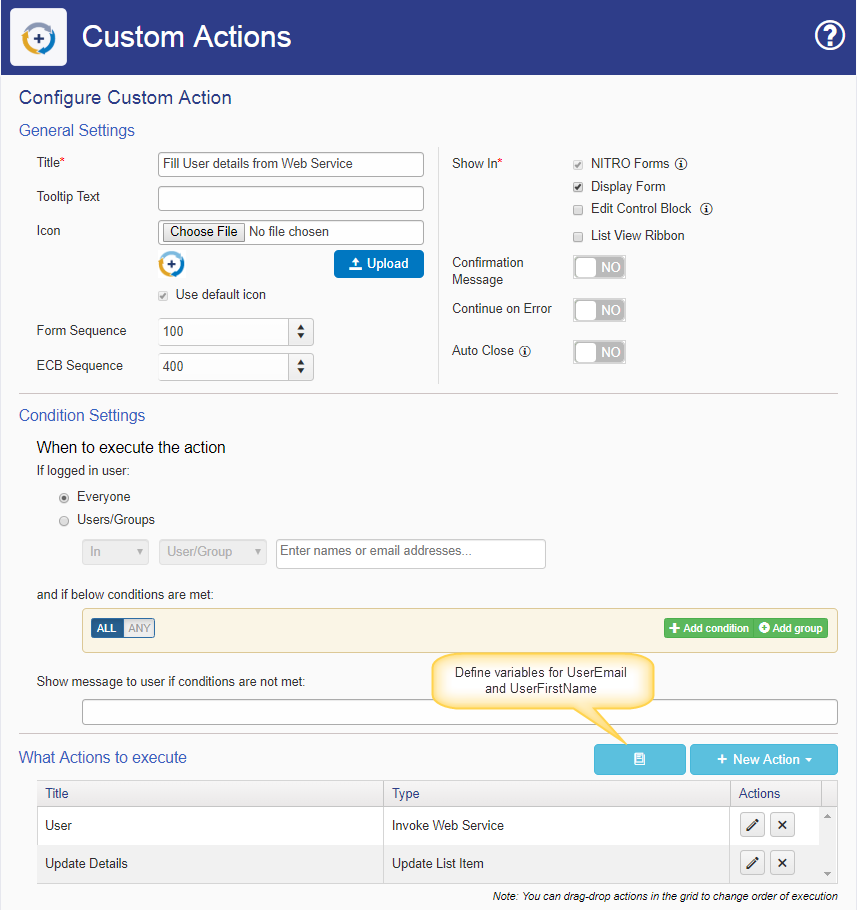
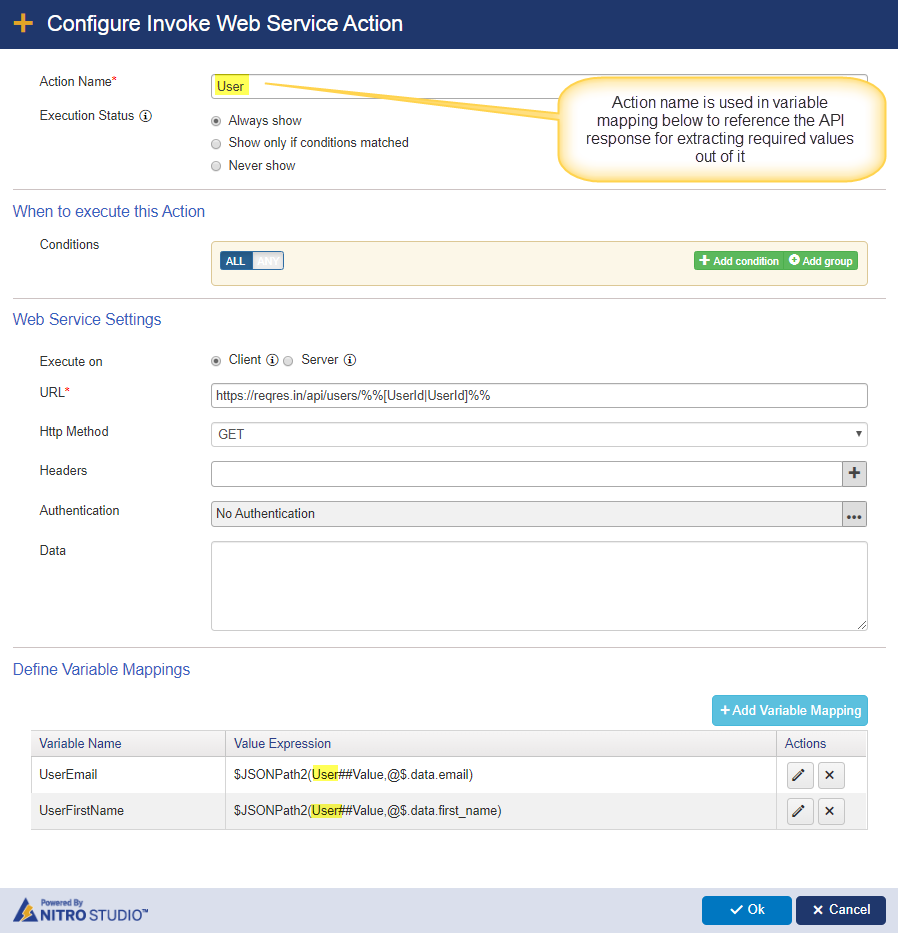
Configure Invoke Web Service action as shown below. Please note the “Define Variable Mappings” section at the bottom. Service response is a JSON and we need to extract the values as per the structure of the JSON and put it in variables for subsequent usage:
Web Service Response:
This API call returns below response. This response is available in Custom Actions as <Invoke Web Service Action Name>##Value (e.g. User##Value). We can save the entire response to a column in list by using this expression. We can parse it to extract specific values and store in variables for later use. Please note that JSON path will be different as per the response format of your API.
Response:
{
	"data": {
		"id": 2,
		"email": "janet.weaver@reqres.in",
		"first_name": "Janet",
		"last_name": "Weaver",
		"avatar": "https://s3.amazonaws.com/uifaces/faces/twitter/josephstein/128.jpg"
	}
}
Values stored in the variables using JSONPath function based on above response:
- UserEmail
- Expression configured: $JSONPath2(User##Value,@$.data.email)
- Value extracted: janet.weaver@reqres.in
- UserFirstName
- Expression configured: $JSONPath2(User##Value,@$.data.first_name)
- Value extracted: Janet
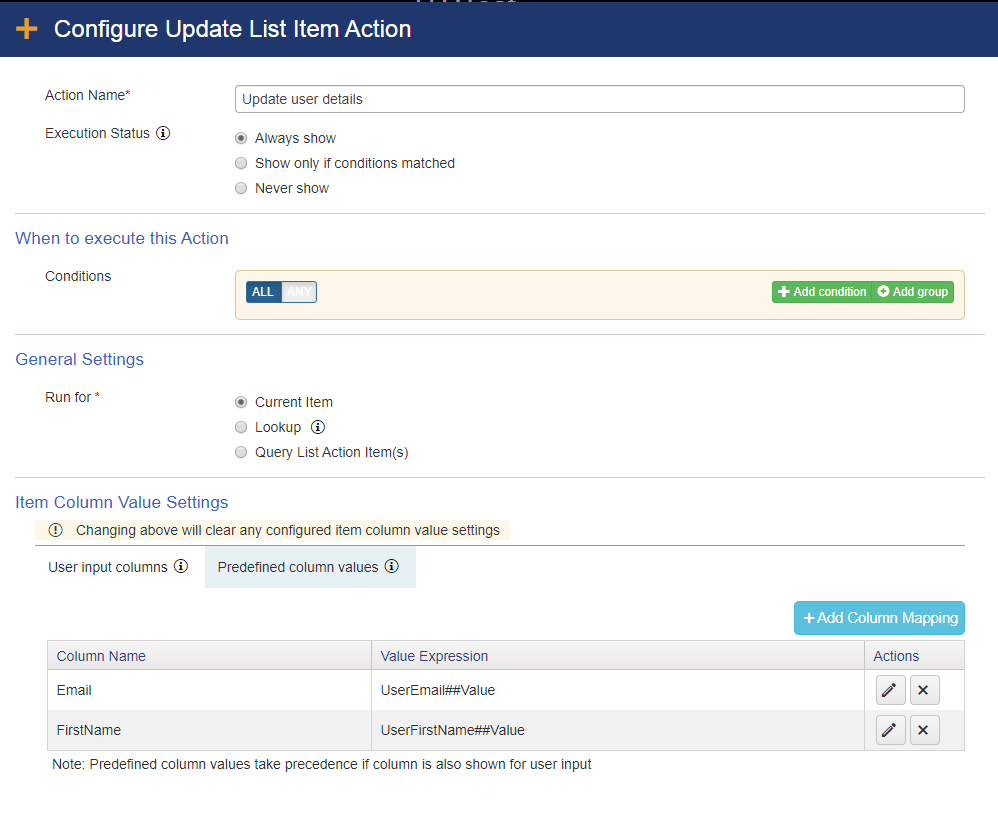
These variable values can now be used in other actions. For example, to use the email address value, we can use expression: UserEmail##Value

Please refer below image for the usage of variables in update item action:
Multiple Records
In this sample we invoke REST API that doesn’t require any authentication and returns multiple records. Returned response is used to create multiple list items in SharePoint.
Invoke Web Service action is used to read details of all users from an external service. User details from the response are used to create multiple list items in SharePoint by mapping response elements like first name, last name and email to corresponding columns of the SharePoint list item in the create item action.
Web Service used in this example is a publicly available REST API:
https://reqres.in/api/users
To configure this, go to the list -> List Settings -> Crow Canyon Custom Actions and configure an Invoke Web Service action as shown below.
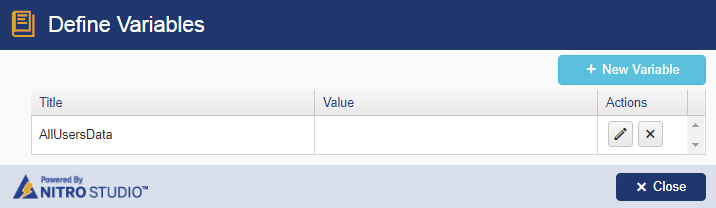
For this example, we have defined a variable: “AllUsersData”. This variable will be used to store the user records from the web service response. This variable is then to create items in a list.
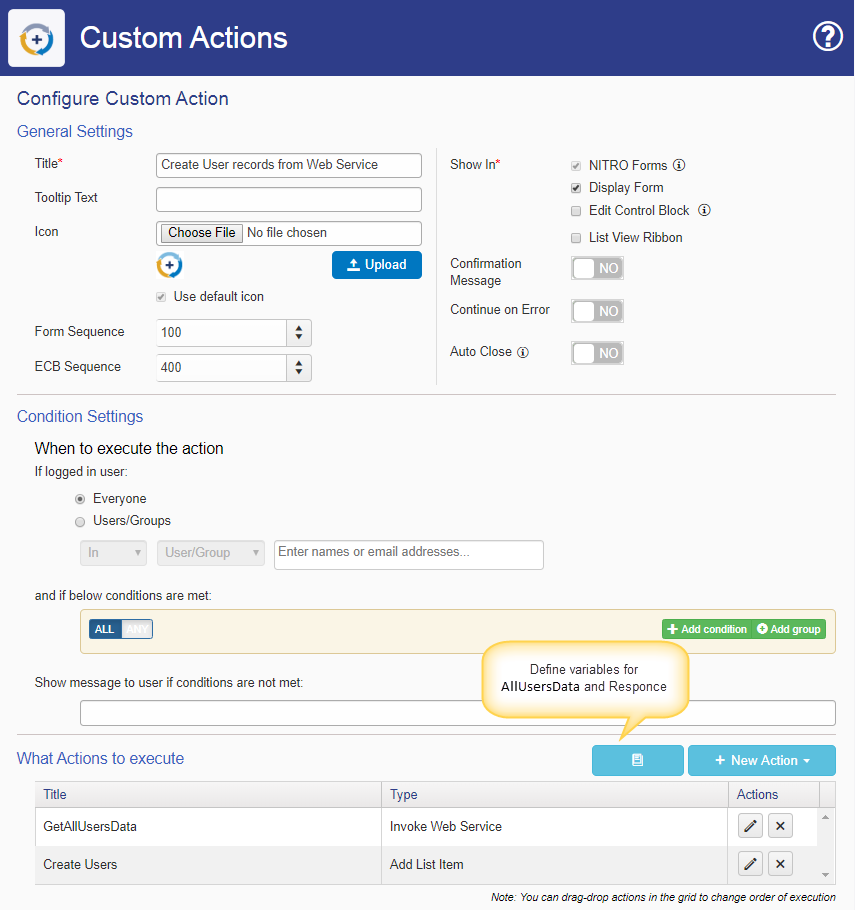
Configure Invoke Web Service action as shown below. Please note “Define Variable Mappings” section at the bottom. Service response is a JSON and we need to extract the values as per the structure of the JSON and put it in variables for subsequent usage:
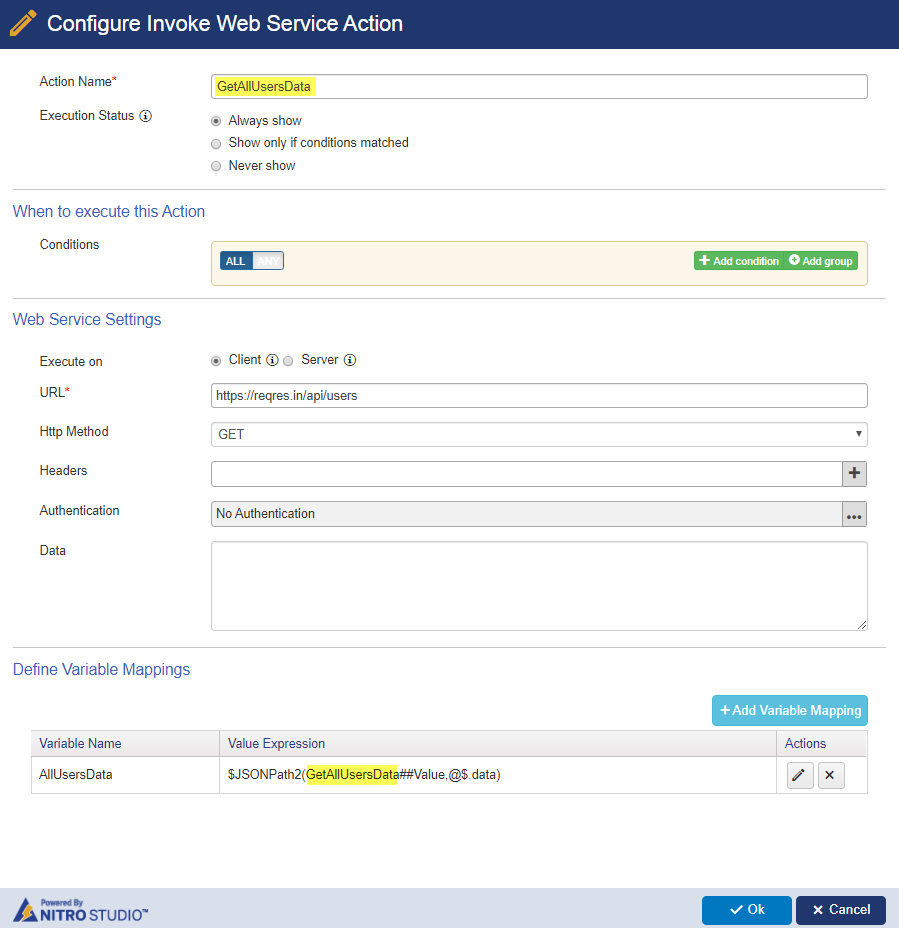
Web Service Response:
This API call returns below response. This response is available in Custom Actions as <Invoke Web Service Action Name>##Value (e.g. GetAllUsersData##Value). We can save the entire response to a column in list by using this expression. We can parse it to extract specific values and store in variables for later use. Please note that JSON path will be different as per the response format of your API.
Response (truncated) is shown below. ‘GetAllUsersData’ variable will have the highlighted part from response as it is the extracted ‘data’ element from the response:
{
	"page": 1,
	"per_page": 6,
	"total": 12,
	"total_pages": 2,
	"data": [
		{
			"id": 1,
			"email": "george.bluth@reqres.in",
			"first_name": "George",
			"last_name": "Bluth",
			"avatar": "https://s3.amazonaws.com/uifaces/faces/twitter/calebogden/128.jpg"
		},
		{
			"id": 2,
			"email": "janet.weaver@reqres.in",
			"first_name": "Janet",
			"last_name": "Weaver",
			"avatar": "https://s3.amazonaws.com/uifaces/faces/twitter/josephstein/128.jpg"
		},
		{
			"id": 3,
			"email": "emma.wong@reqres.in",
			"first_name": "Emma",
			"last_name": "Wong",
			"avatar": "https://s3.amazonaws.com/uifaces/faces/twitter/olegpogodaev/128.jpg"
		}
	]
}
Use Add List Item action to create items in SharePoint list for each of the user records in above JSON response.
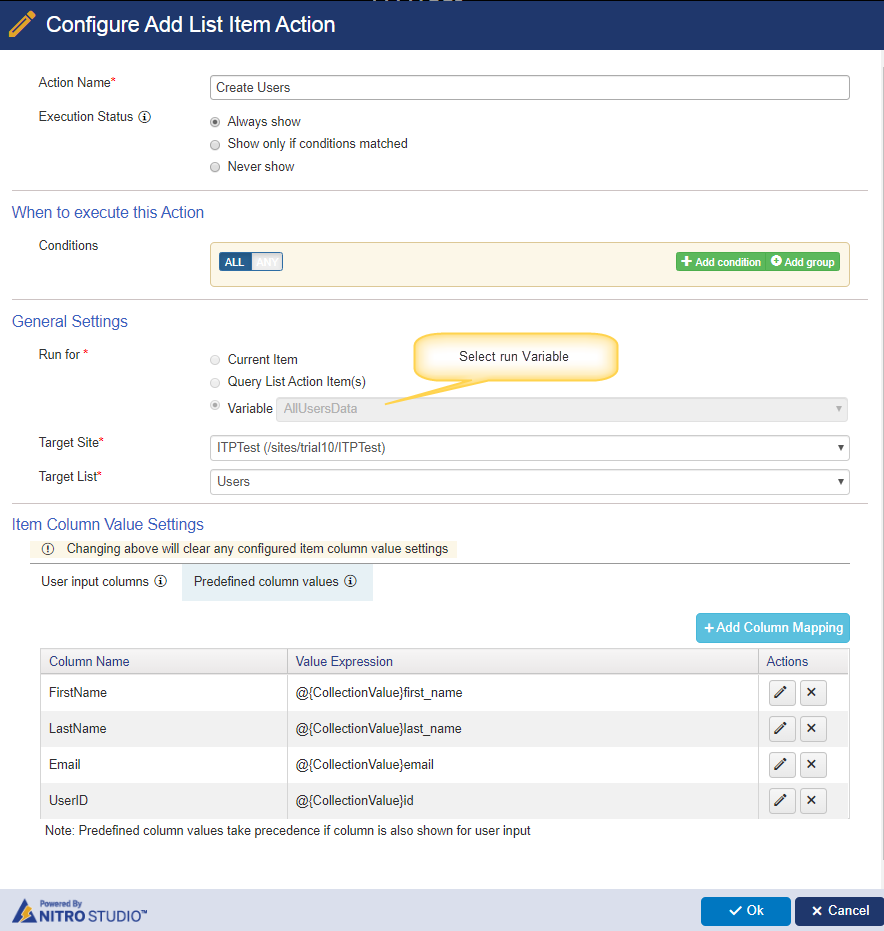
Column Mappings:
| Column Name | Value |
| FirstName | @{CollectionValue}first_name |
| LastName | @{CollectionValue}last_name |
| @{CollectionValue}email | |
| UserID | @{CollectionValue}id |
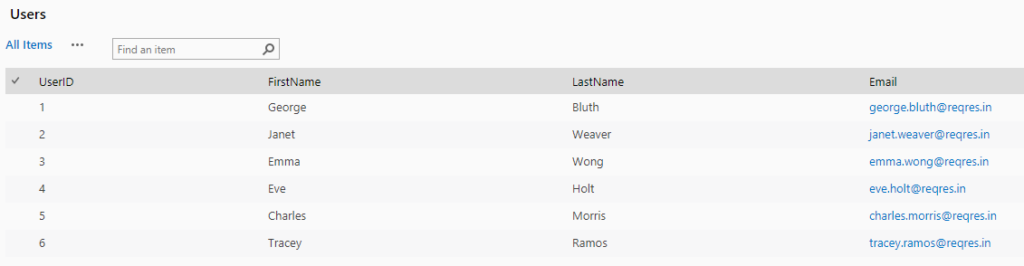
Result:
Using $xpath() function
Xpath function can be used when the web service response is in Xml format. It requires the response and Xpath as input and extracts the required information from the response for use in subsequent actions.
Syntax: $xpath(InvokeWebServiceActionName##Value,xpath)
In this example, we have configured an Invoke Web Service custom action to read the city temperature, humidity, pressure and then use these details in column mappings of Create/Update list item actions. Xpath is analogous to JSONPath2 function as it parses the response to extract the required data for subsequent usage.
Xpath function syntax is same for both NITRO Workflows and Custom Actions.
Single Record
In this sample, we invoke REST API that doesn’t require any authentication and returns a single record. Returned response is used to update SharePoint list item.
Invoke Web Service custom action is to read the weather details like temperature, humidity, pressure etc. and use these details in column mappings of create/update list item actions.
Web service URL used in this example is publicly available free REST API:
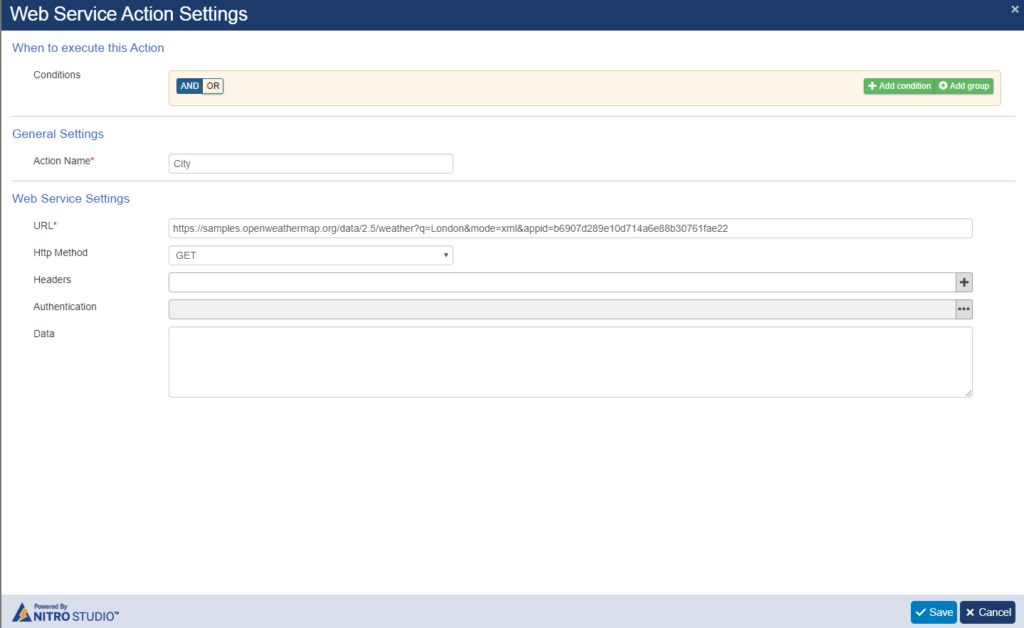
https://samples.openweathermap.org/data/2.5/weather?q=London&mode=xml&appid=b6907d289e10d714a6e88b30761fae22
To configure this, go to the list -> List Settings -> Crow Canyon Custom Actions and configure an Invoke Web Service action as shown below.
Sample Response XML:
<current>
	<city id="2643743" name="London">
		<coord lon="-0.13" lat="51.51"/>
		<country>GB</country>
		<sun rise="2017-01-30T07:40:36" set="2017-01-30T16:47:56"/>
	</city>
	<temperature value="280.15" min="278.15" max="281.15" unit="kelvin"/>
	<humidity value="81" unit="%"/>
	<pressure value="1012" unit="hPa"/>
	<wind>
		<speed value="4.6" name="Gentle Breeze"/>
		<gusts/>
		<direction value="90" code="E" name="East"/>
	</wind>
	<clouds value="90" name="overcast clouds"/>
	<visibility value="10000"/>
	<precipitation mode="no"/>
	<weather number="701" value="mist" icon="50d"/>
	<lastupdate value="2017-01-30T15:50:00"/>
</current>
In the above example, City##Value is reference to the response of the Invoke Web Service action. So, it will contain the entire XML listed above. Xpath function will extract the specific values from this Xml as per the Xml node path given in second parameter.
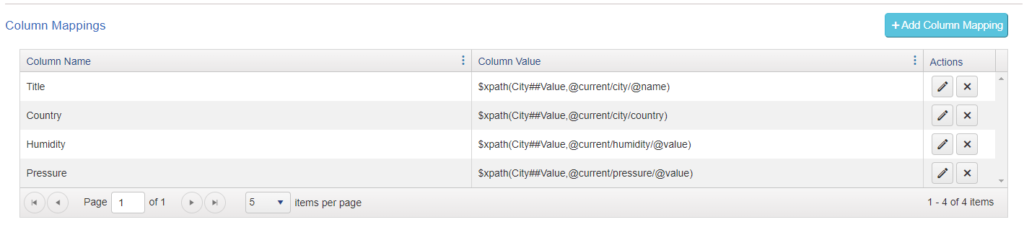
Column Mappings:
| Column Name | Value |
| Title | $xpath(City##Value,@current/city/@name) |
| Country | $xpath(City##Value,@current/city/country) |
| Humidity | $xpath(City##Value,@current/humidity/@value) |
| Pressure | $xpath(City##Value,@current/pressure/@value) |
Multiple Records:
If Xml contains a collection of nodes, then those can be used to create multiple list items in SharePoint. To use the update/create item action for attribute/element collection, save the web service Xml response in a variable with item collection and use later in field mappings of create item action by using the below syntax:
@{CollectionValue}tag/attributename
Invoke Dropbox API
Dropbox API allows users to work with files in Dropbox. In this article, we have given examples to create a folder and a file in Dropbox. This is done by using Dropbox REST API in Crow Canyon Invoke Web Service custom action.
To work with Dropbox API, we need to generate the access token for the Dropbox API. Please follow below steps to generate access token.
Generate Access Token for Dropbox API
- Login to the Dropbox in the browser and navigate to this page: https://www.dropbox.com/developers/apps/create
- Select “Dropbox API” => “Full Dropbox”, specify a name for the App and create it
- On next page, click “Generate Access Token”. Note down the token as it is required for configurations
For more details on Dropbox API, please refer this article:
https://www.dropbox.com/developers/documentation/http/documentation
Create a File in Dropbox
Below example shows how to create a file with content from the ‘Description’ and ‘Worklog’ column of the Ticket item and upload the file in “Ticket” folder. Note that Tickets is a list, and these are multi-line text columns in that list.
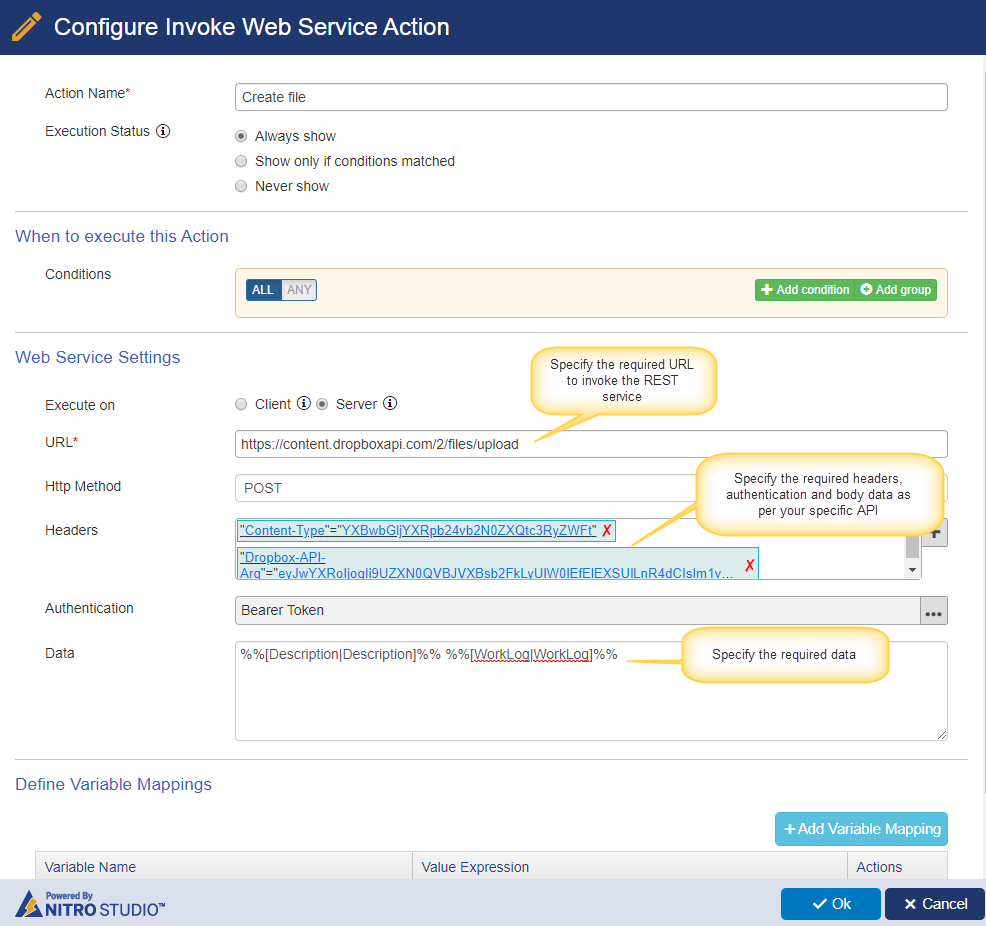
URL: https://content.dropboxapi.com/2/files/upload
HTTP Method: POST
Headers:
| Key | Value |
| Content-Type | application/octet-stream |
| Dropbox-API-Arg | {"path": "/Tickets/%%[ID|ID]%%.txt","mode": "add","autorename": true,"mute": false,"strict_conflict": false} |
In the above,
“Path”: “/Tickets/%%[ID|ID]%%.txt”
“Tickets” – Name of the folder
“%%[ID|ID]%%” – Name of the file (ID placeholder will be replaced with Id of the SharePoint list item on which this action is invoked)
Authentication:
Enter the access token generated above.
Data:
%%[Description|Description]%% %%[WorkLog|WorkLog]%%
Create a folder in Dropbox using Dropbox API
Below example shows how to create a folder in Dropbox
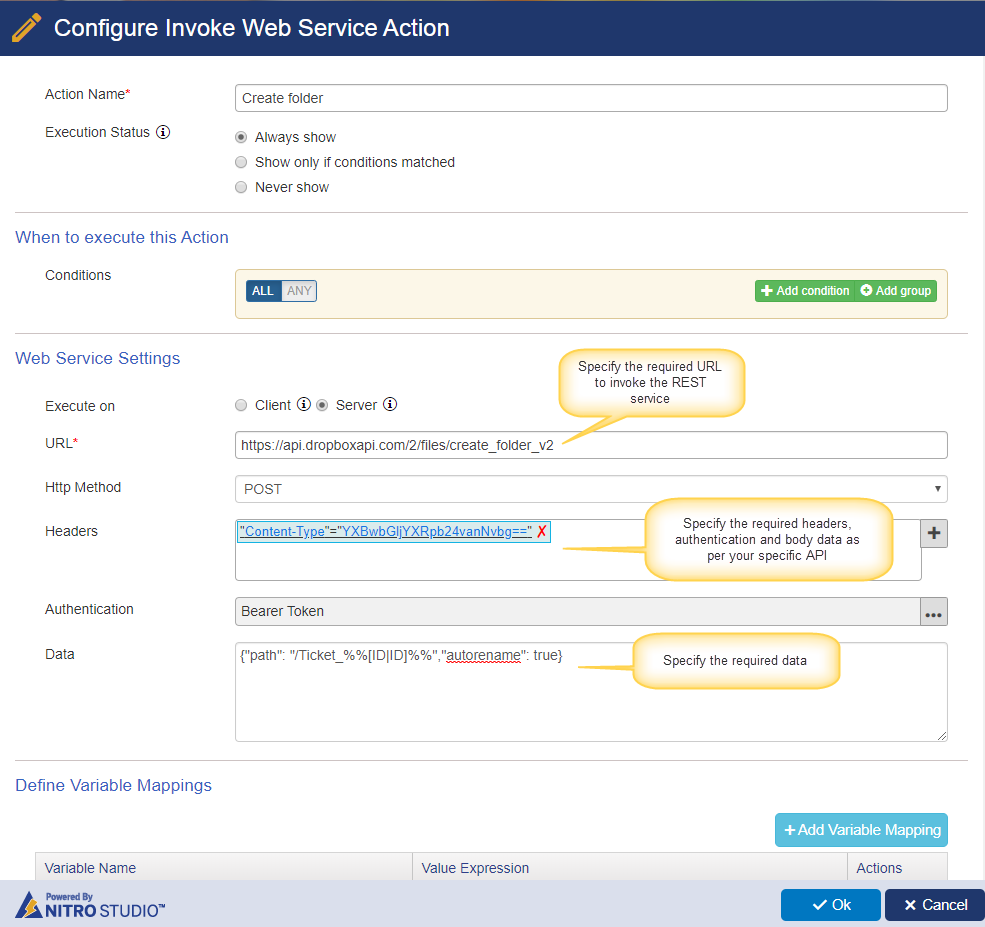
URL: https://api.dropboxapi.com/2/files/create_folder_v2
HTTP Method: POST
Headers:
| Key | Value |
| Content-Type | application/json |
Authentication:
Select “Bearer Token” and enter the access token generated above.
Data:
{“path”: “/Ticket_%%[ID|ID]%%”,”autorename”: true}
Here:
“Tickets_%%[ID|ID]%%” is the name of folder to create. ID placeholder will be replaced with Id of the SharePoint list item on which this action is invoked.
“autorename” parameter is used to rename the folder if a folder with same name already exists. More details of this and other parameters can be found in Dropbox documentation.