Applies to:
Crow Canyon NITRO activated sites in:
SharePoint Online and On-Premises 2013/2016/2019/SharePoint Server Subscription Edition
Description
The themes for NITRO forms are stored at the site level, that is, if any custom theme is created in NITRO forms designer, then that theme is available for all the lists in that site. For NITRO forms for any list, the theme can be applied from ‘Layouts and Theme’ section in the left-hand panel. If we need to apply the same theme for NITRO forms in some other site, then we can export the theme from the source site and import it in the target site. This article describes the steps to export and import a theme in NITRO Forms designer and to apply the imported theme.
Detailed steps
1. Export Theme
Navigate to NITRO Forms designer for the list -> Click “Manage Forms” button from ‘FORM’ ribbon -> Advanced Settings -> Select the required custom theme from ‘Export theme’ dropdown and click ‘Export’ button. An xml file will be downloaded.

2. Import Theme
To import the theme, navigate to the list in target site -> List settings -> ‘Crow Canyon NITRO Forms’ -> Manage Forms -> Advanced Settings -> Click “Choose File” under “Export / Import Theme” section -> Select the theme settings xml file exported in the above step and click “Import”.
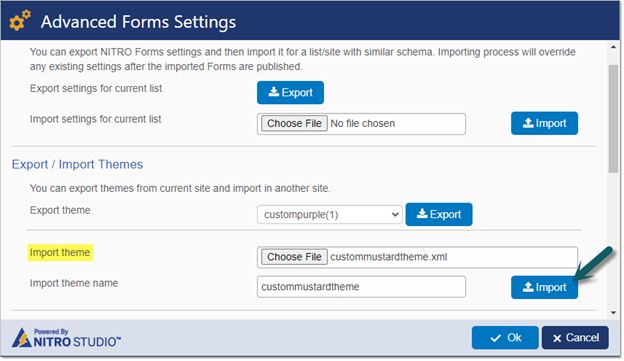
Click ‘OK’ to save the settings.
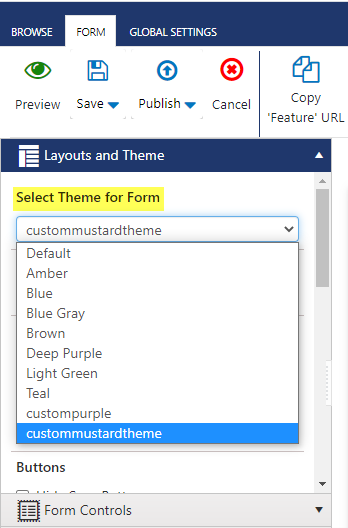
The imported custom theme will be shown in ‘Select Theme for Form’ dropdown under ‘Layouts and Theme’ section. Refer to the instructions below to apply the custom theme.
Steps to apply the imported theme:
1. Navigate to ‘Layouts and Theme’ section (in left-hand panel of NITRO forms designer) -> ‘Select Theme for Form’. Select the custom theme from the drop-down and publish the NITRO Forms.