Applies to:
Crow Canyon NITRO activated sites in:
SharePoint Online and On-Premises 2013/2016/2019/SharePoint Server Subscription Edition
Requirement
This article illustrates below capabilities:
- Show unique value violation warning as soon as user enters the data, but allow saving the item anyway.
- Enforce unique values on a combination of column values.
Description
SharePoint list columns have an option to ‘Enforce unique values’. If enabled, only one item can be created with a specific value for column. When user tries to save the item, SharePoint shows an error if item has duplicate value.
This functionality can be enhanced with NITRO in following ways:
- ‘Enforce unique values’ option is not available for calculated columns. In many cases, we need unique constraint on some combination of column data. Unique value may be based on data (full or partial) in more than column. We can use ‘Form event action’ to generate the required value that needs to be checked for uniqueness.
- We can run the duplicate value check using ‘Form event action’ as soon as user enters the data. A message can be shown to user using NITRO Forms column validations on the form itself and user does not need to click ‘Save’ button to know that value is duplicate.
- Duplicate check can be made optional. We can remove the ‘Enforce unique values’ option from column settings but still show the duplicate warning on the form. User can save the item with duplicate value if required.
Use case 1
In this sample use case, we have described below scenarios:
- Requester submits the request by specifying the Invoice number using NITRO forms.
- If request already exists for a specified invoice number, then show a warning message on the form. This will allow user to verify before submitting another request for the same invoice number.
Detailed steps
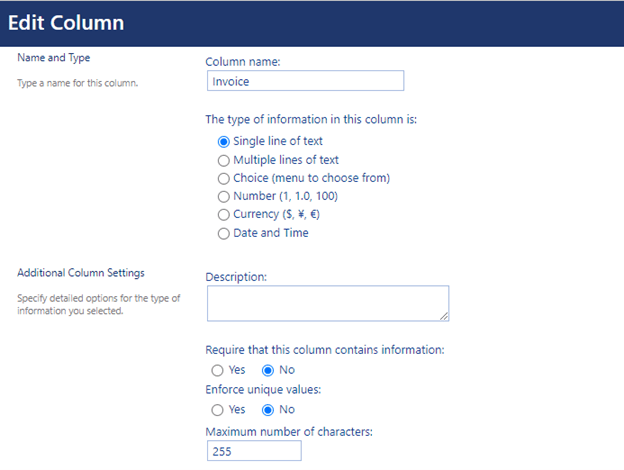
- Create “Invoice” column in the list. Based on value in this column, user ‘form event actions’ to check if another request with same invoice number already exists.
Column Internal Name: Invoice
Column Display Name: Invoice
Column Type: Single Line of Text
Note that ‘Enforce unique values’ is set to ‘No’ as user will get warning but can still save with duplicate value. Create an index on this column to improve performance and avoid SharePoint list view threshold errors.
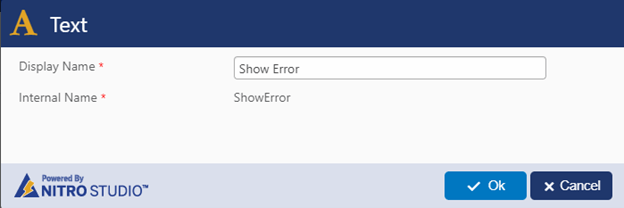
- Create “ShowError” NITRO Managed column from NITRO forms designer. This column will be set using form event actions. Based on this column value show or hide warning message in NITRO form.
Go to the list -> List Settings -> Crow Canyon NITRO Forms -> Expand “Create Column” dropdown -> Create ‘NITRO Managed Column’ as shown below:
Column Internal Name: ShowError
Column Display Name: Show Error
Column Type: NITRO Managed Column

- Drag and drop “Invoice” and “Show Error” columns on to the NITRO form.
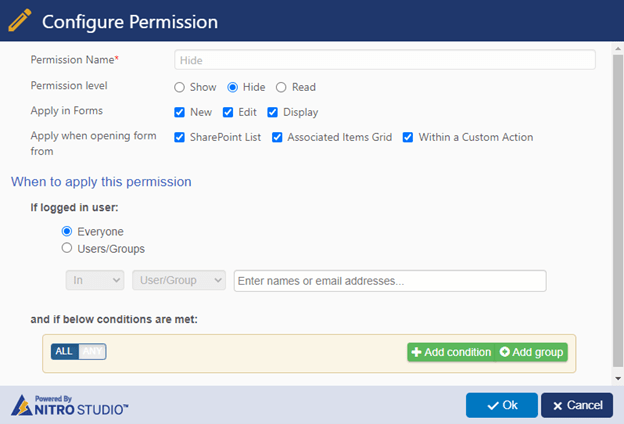
- Hide “Show Error” column on the form as it is used in column permissions and users do not need to see it.
Configure ‘Hide’ permission for ‘Show Error’ column as shown below:
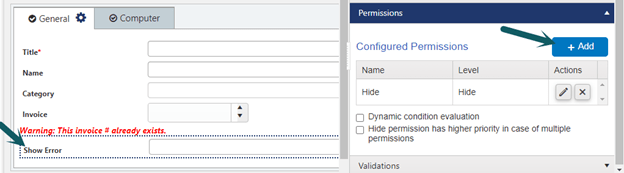
Hide for everyone.

- To show warning message, add ‘Line/HTML’ control on the form as shown below and specify the required text.
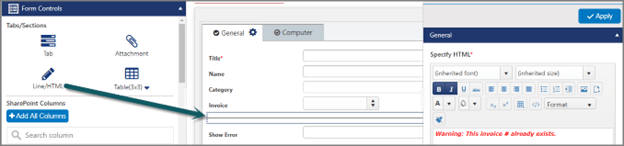
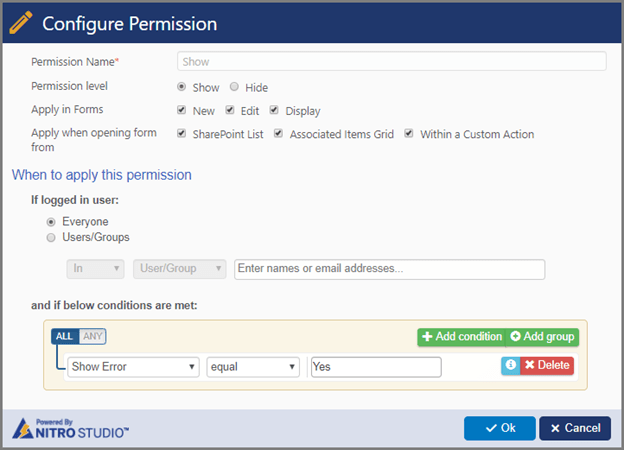
- Configure ‘Form Event Actions’ on “Invoice” column value change.
Expand ‘Advanced’ section in left hand panel -> ‘Form Event Actions’ -> Configure form event action as shown below:
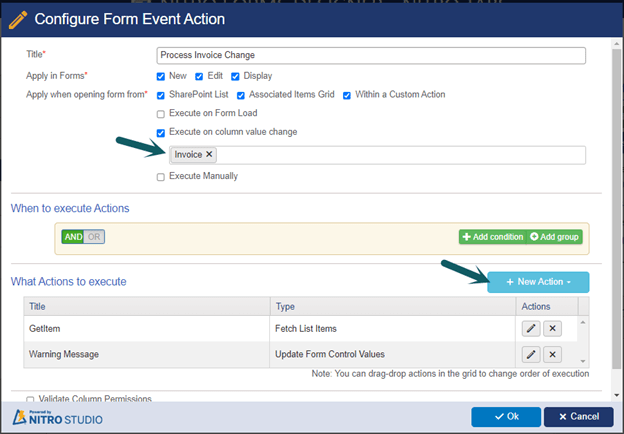
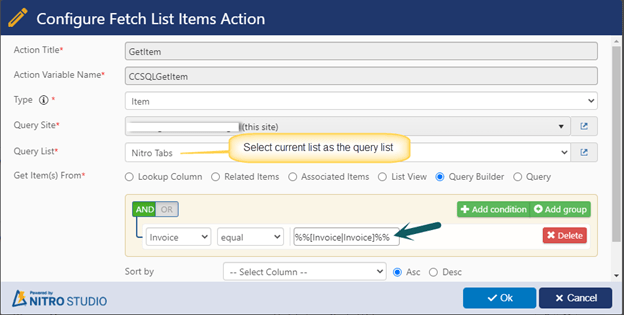
Configure ‘Fetch List Items’ action:
This action will fetch the existing item if it exists with same value as the “Invoice” number entered on the form.
Configure ‘Update Form Controls’ action:
This action will check if another item exists with same value as the “Invoice” number entered on the form using fetch list items action variable. If yes, then script will set the “Show Error” column value to “Yes” otherwise it will be set to “No”. Warning message is shown on the form if “Show Error” column value is “Yes”.

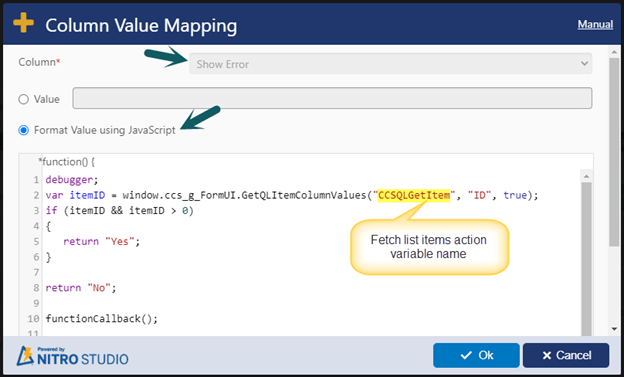
Script used above:
var itemID = window.ccs_g_FormUI.GetQLItemColumnValues("CCSQLGetItem", "ID", true);
if (itemID && itemID > 0)
{
   return "Yes";
}

return "No";

functionCallback();
- Configure permissions for ‘Line/HTML’ control (added above) so that it is shown only when “Show Error” column value is “Yes”.
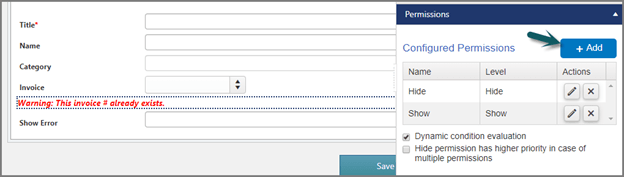
Hide:
Configure hide permission for everyone.

Show:
Configure show permission when ‘Show Error’ column value is ‘Yes’.
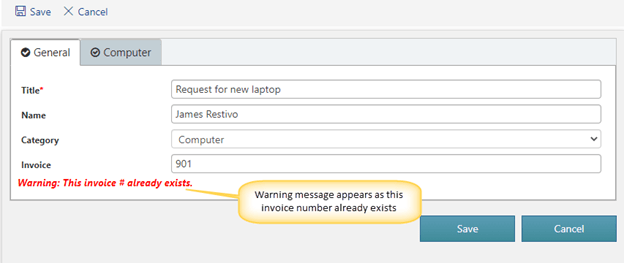
Sample output
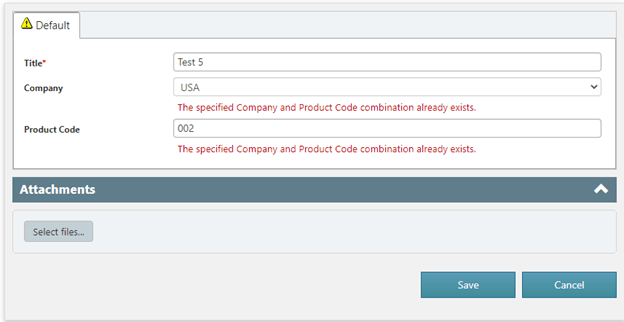
Use case 2
Enforce a unique value based on a combination of column values.
Sample list schema
- ‘Company’: Single selection choice
- ‘Product Code’: Single line of text column
- ‘Product Unique Code’: Single line of text column
- Concatenate “Company” and “Product Code” column values and map it to “Product Unique Code” column.
- Set validation to enforce unique values in “Product Unique Code” column.
- ‘Unique Value To Set’: NITRO Managed ‘Text – Short’ column
Summary of steps
- Add an index to “Product Unique Code” column.
- Create a NIRO Managed column.
- Configure form event actions:
- Concatenate ‘Company’ and ‘Product Code’ column values and map concatenated value to NITRO Managed column.
- Fetch an item from the same list if it exists with same value as the concatenated value.
- Set value in “Product Unique Code” column.
- Configure column validations on “Company” and “Product Code” columns.
Detailed steps
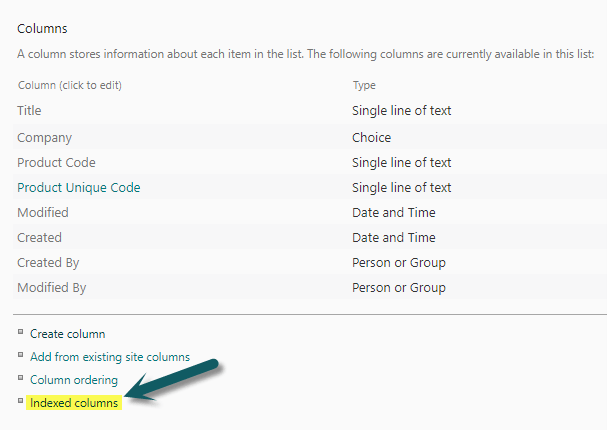
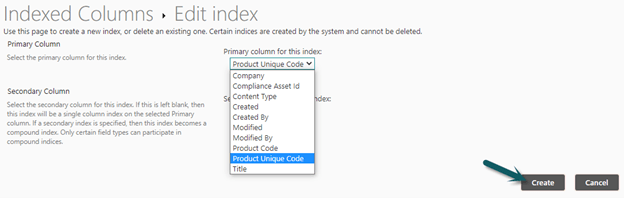
- Add an index to “Product Unique Code” column.
This is useful for improving performance and avoiding SharePoint list view threshold errors.
- Navigate to ‘List Settings’ page for the list -> ‘Indexed columns’ -> ‘Create a new index’ -> Select ‘Product Unique Code’ column from drop-down -> Click ‘Create’ as shown below:
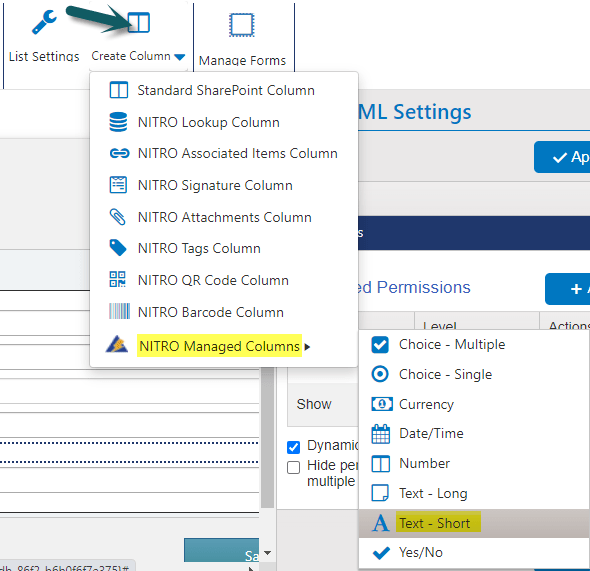
2. Create a NIRO Managed column.
- Navigate to Crow Canyon NITRO Forms designer for the list -> Click ‘Create Column’ from ‘FORM’ ribbon -> ‘NITRO Managed Columns’ -> Select ‘Text – Short’ and modify its internal and display name as shown below:
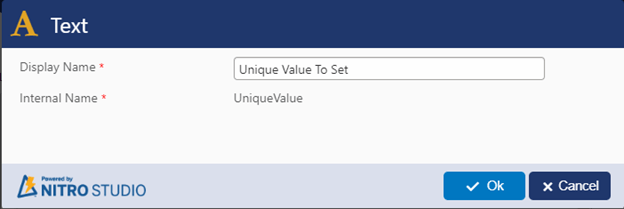
Display Name: Unique Value To Set
Internal Name: UniqueValue
- Drag and drop this column on to the form.
- Configure hide permissions for ‘Product Unique Code’ column as this column is used in column permissions and users do not need to see it.
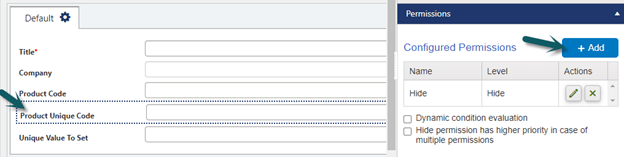
Hide for everyone.
- Similarly, configure hide permissions for ‘Unique Value To Set’ column.
3. Configure form event actions
Expand “Advanced” section from left hand panel -> Form Event Actions -> Configure a new form event action as shown below:

Action 1: Concatenate column values and map concatenated value to NITRO Managed column.
Add “Update Form Control Values” action to concatenate ‘Company’ and ‘Product Code’ column values and populate ‘Unique Value To Set’ NITRO managed column as shown below:
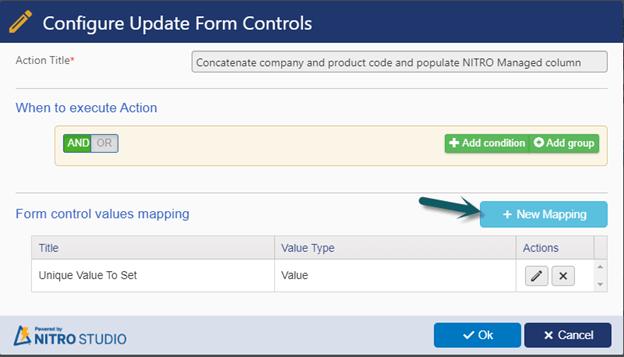
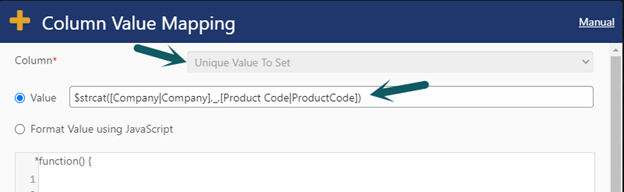
Value: $strcat([Company|Company],_,[Product Code|ProductCode])
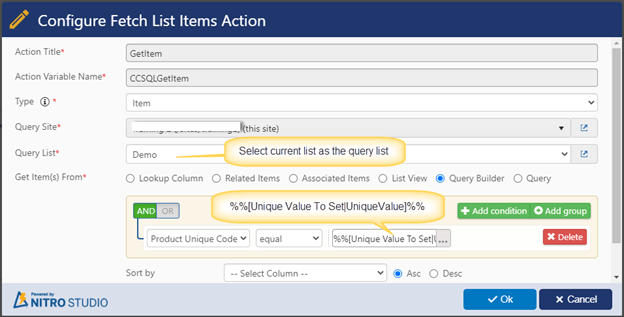
Action 2: Fetch an item from the same list if it exists with same value as the concatenated value.
Add “Fetch List Items” action to query ‘Product Unique Code’ column in the same list and fetch an item if it exists with same value as the concatenated value in ‘Unique Value To Set’ column.
Action 3: Set value in “Product Unique Code” column.
This action will check if another item exists with same value as the concatenated value in “Unique Value To Set” column using fetch list items action variable. If yes, then script will set the “Product Unique Code” column value to ‘Unique validation failed’ otherwise it will be set with the value in “Unique Value To Set” column. Validation error is shown on the form if “Product Unique Code” column value is ‘Unique validation failed’.
Add “Update Form Control Values” action to map ‘Product Unique Code’ as shown below:
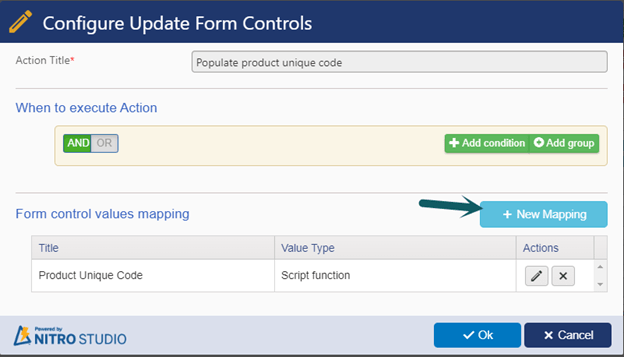
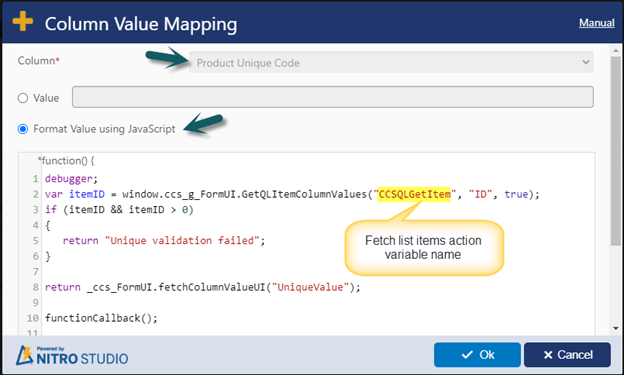
Script used above:
var itemID = window.ccs_g_FormUI.GetQLItemColumnValues("CCSQLGetItem", "ID", true);
if (itemID && itemID > 0)
{
   return "Unique validation failed";
}
return _ccs_FormUI.fetchColumnValueUI("UniqueValue");
functionCallback();
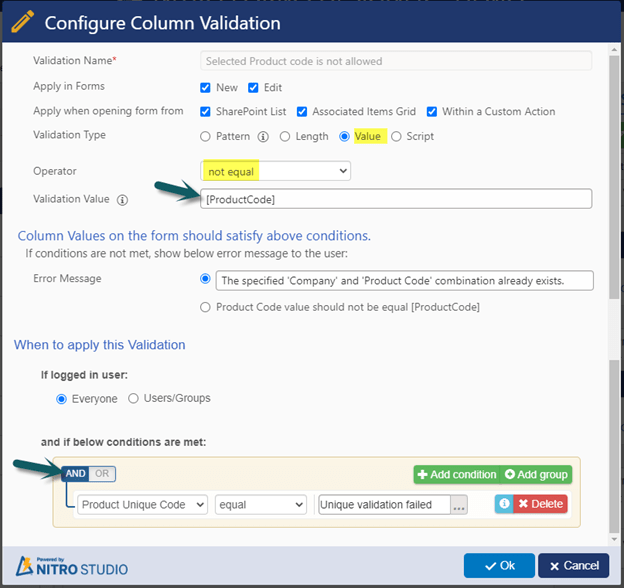
4. Configure column validations on “Company” and “Product Code” columns
Configure validation on ‘Company’ column.
Select ‘Company’ column -> Validations -> Configure validation settings as shown below -> Apply the settings.
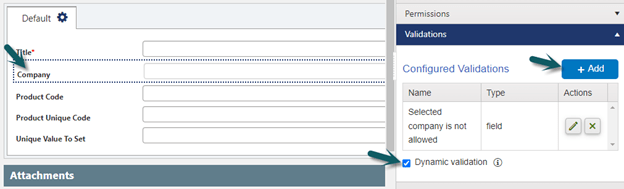
Note: “[Company]” in validation value setting is internal name of the ‘Company’ column.

Configure validation on ‘Product Code’ column.
Select ‘Product Code’ column -> Validations -> Configure validation settings as shown below -> Apply the settings.
Note: “[ProduceCode]” in validation value setting is internal name of the ‘Product Code’ column.
Sample output
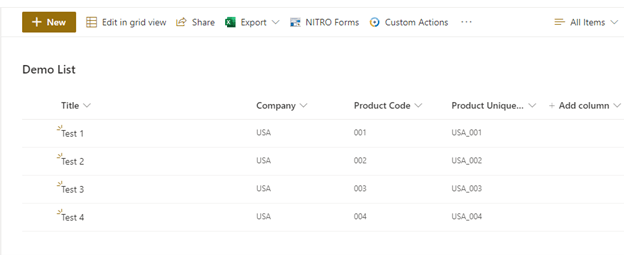
Existing list items
Specified same ‘Company’ and ‘Product Code’ combination and received validation error.