Applies To: NITRO activated sites in SharePoint Online and On-Premises (2013, 2016, 2019 and SE)
Description
Crow Canyon List View is a NITRO component that provides enhanced capabilities to view SharePoint list items. It also provides a host of features to do operations on list items.
The data shown in list view can be customized using JavaScript code. This is for advanced scenarios like data filtering that cannot be done with CAML queries or SharePoint views. Or to show item data in a format different from what is stored in the list.
Detailed Instructions
Users can customize the list view using JavaScript code in NITRO List View configuration.
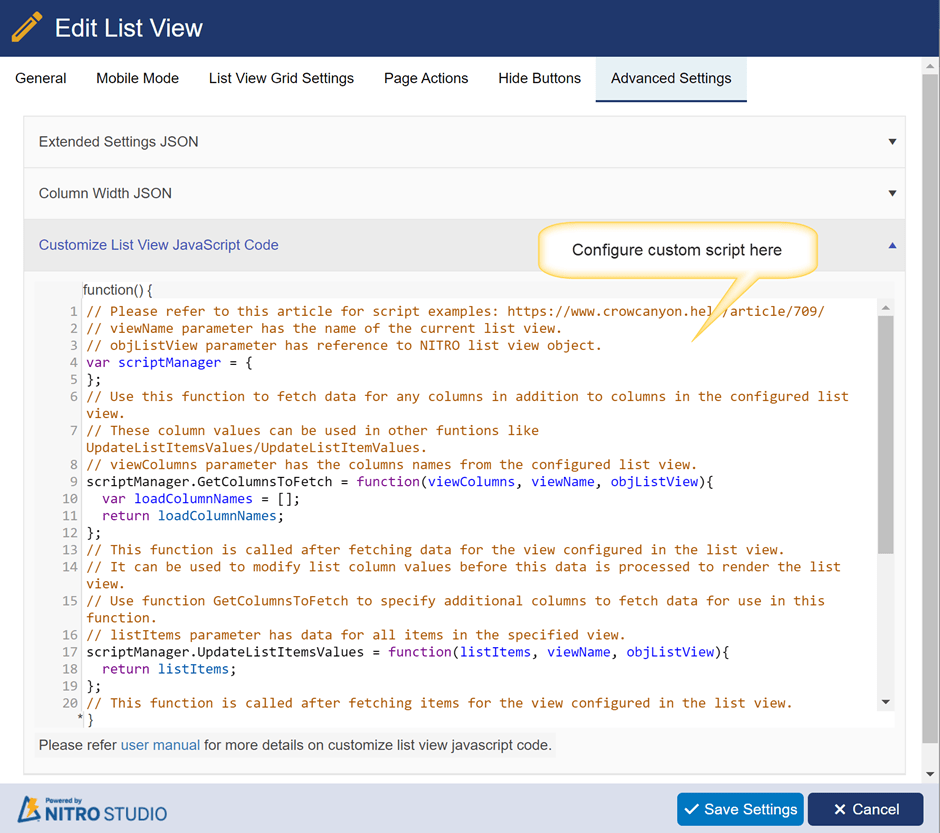
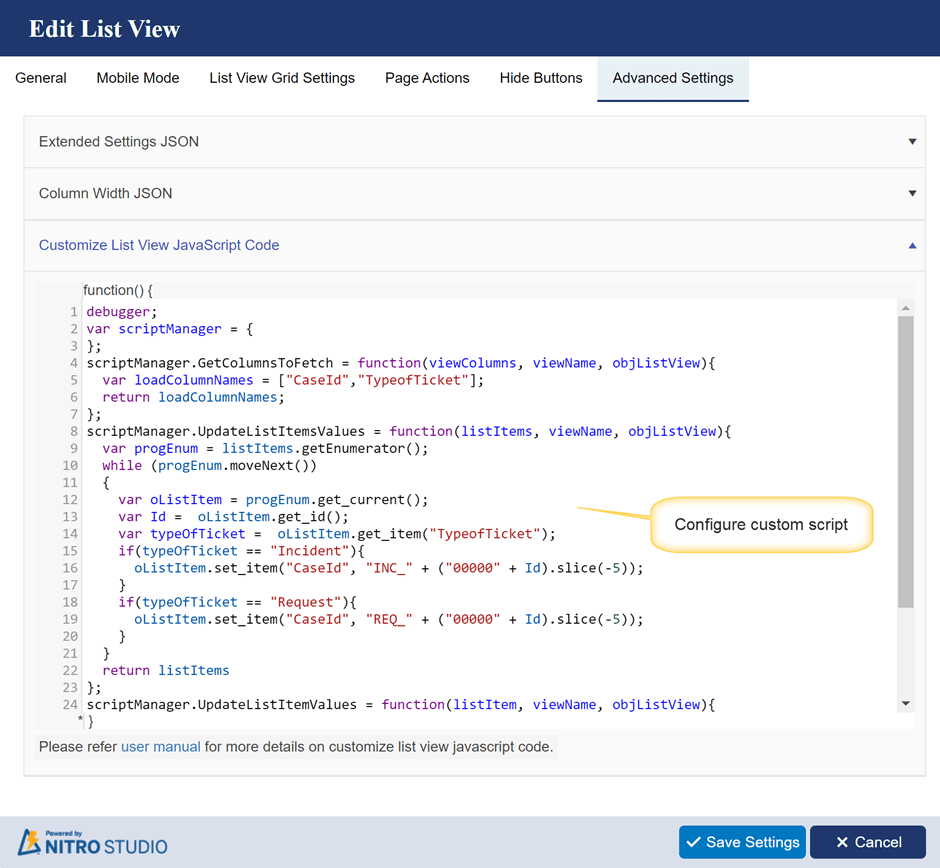
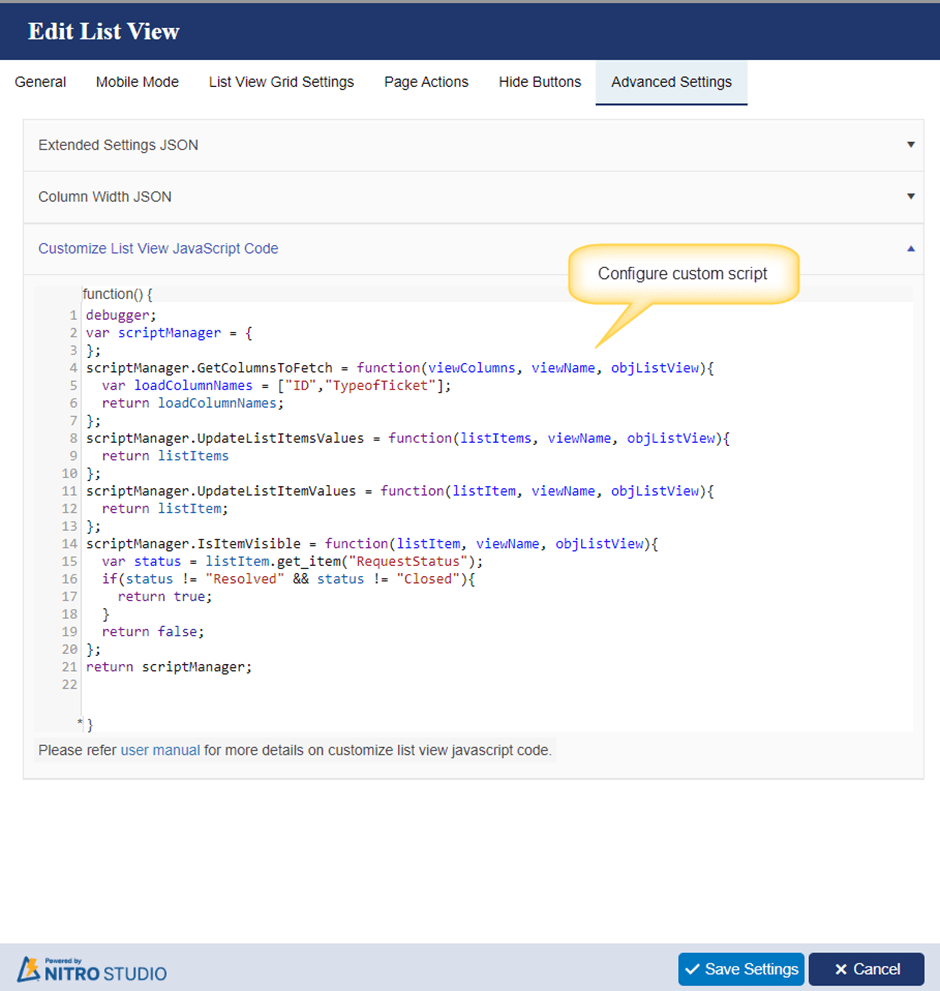
To customize the list view, go to the Site -> Site Settings -> Crow Canyon List View -> Edit the list view configuration -> Navigate to Advanced Settings -> Configure custom script in “Customize List View JavaScript Code” section as shown below:
NITRO list view has below functions in custom JavaScript.
GetColumnsToFetch
Use this function to fetch data for any columns in addition to columns in the configured list view. These column values can be used in other functions like “UpdateListItemsValues” and “UpdateListItemValues”.
Ex:
scriptManager.GetColumnsToFetch = function(viewColumns, viewName, objListView){
  var loadColumnNames = ["CaseId","Requester","AssignedStaff"];
  return loadColumnNames;
};
In above example, “CaseId”, “Requester”, and “AssignedStaff” are the column internal names in the list.
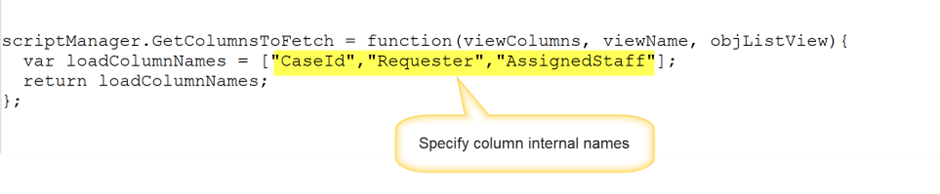
viewColumns: This parameter has the column names from the configured list view.
viewName: This parameter has the current view name in case of multiple list views configured in the list view settings.
objListView: This parameter has the JavaScript object representing the NITRO list view, it can be used in some advanced scenarios.
UpdateListItemsValues
This function will be called after fetching data for the view configured in the list view. This function can be used to modify list item column values before this data is processed to render the list view.
Ex:
scriptManager.UpdateListItemsValues = function(listItems, viewName, objListView){
  return listItems;
};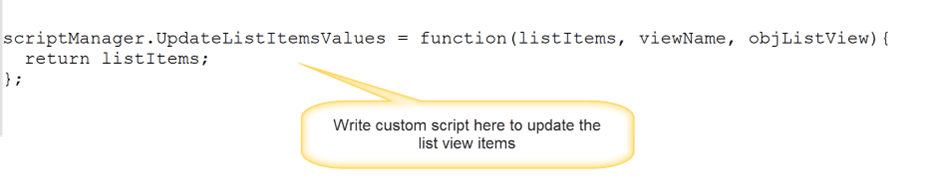
listItems: This parameter has data for all items in the specified view.
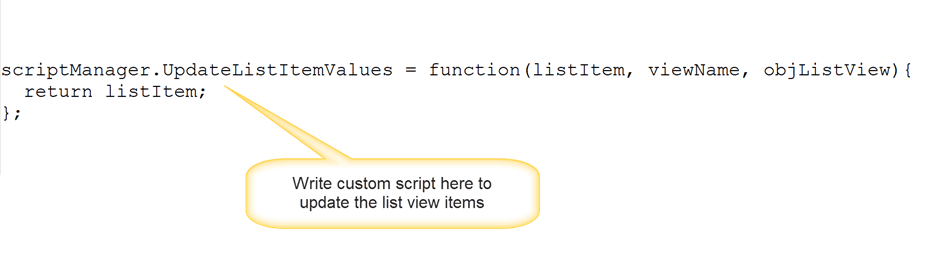
UpdateListItemValues
This function will be called after fetching items for the view configured in the list view. This function can be used to modify list column values before this data is processed to render the list view.
This function is called for each item in the list view.
Note: Use this function (UpdateListItemValues) or UpdateListItemsValues. There should not be a case to use both. Former is called for each item separately, latter is called only once with all the values.
Ex:
scriptManager.UpdateListItemValues = function(listItem, viewName, objListView){
  return listItem;
};
listItem: This parameter has the data for the list item that can be modified.
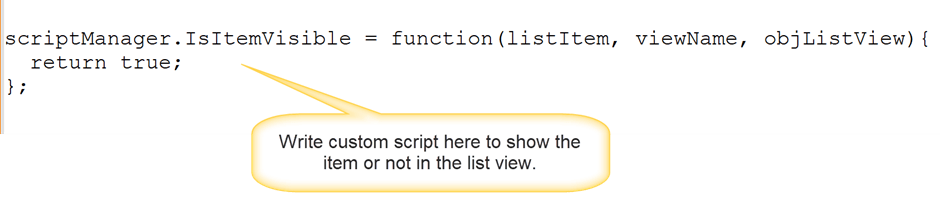
IsItemVisible
This function can be used to decide whether to show the item in the list view or not. This function can be used for advanced filtering that is not possible with CAML queries. This function will be called for each item in the list view.
Ex:
scriptManager.IsItemVisible = function(listItem, viewName, objListView){
  return true;
};
Sample Use Cases
Below sample use case are configured in NITRO list view using custom JavaScript.
Use case 1: Format Crow Canyon List View to show custom generated unique Id
This sample use case uses the “scriptManager.UpdateListItemsValues” function in the custom JavaScript. In list column there is a number value. Script code formats the number based on data in item and the formatted value is shown in list view instead of just the number value. Note that this does not update the data stored in the list, it is only to display in the list view.
Details:
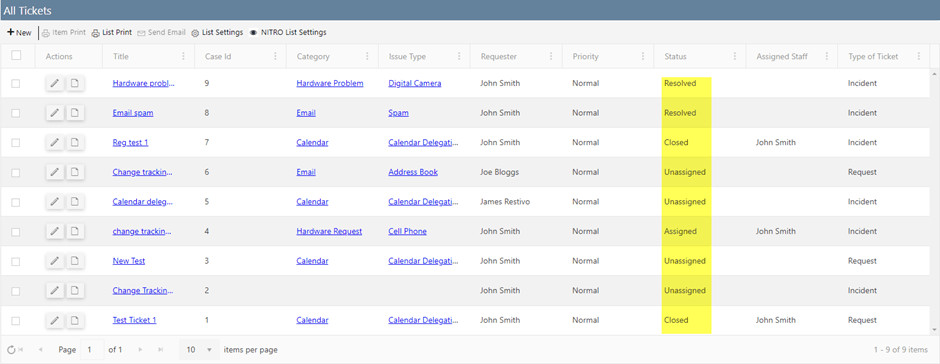
- NITRO list view is configured on Tickets list, and it has below columns in the list views.
- Title
- CaseId
- Category
- Issue Type
- Requester
- Priority
- Status
- Type of Ticket
- NITRO List View is configured with three views and list view is added to a page.
- Unassigned Tickets
- All Open Tickets
- All Items
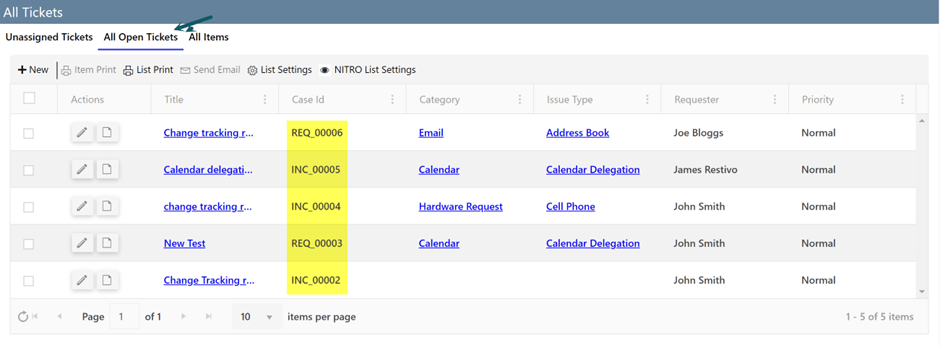
- “Case Id” column in Tickets list has the value of SharePoint generated unique ID (number). Each item has a unique value for this column. In this sample use case, we have configured custom script to show the “Case Id” column value as an alpha-numeric Id.
- For many business scenarios, it is required to have an alpha-numeric Id. For example: INC_00001 instead of just 1. Note that using NITRO Id column or NITRO Workflows, formatted value can be saved in columns. However, here we are taking the scenario where stored value is just a number but while displaying it needs to be a formatted value.
- This case Id is constructed based on values in the list item column “Type of Ticket” and the SharePoint generated item Id.
- “Type of Ticket” has two options
- Incident
- Request
- If “Type of Ticket” is “Incident” then “Case Id” will be shown as “INC_00001”
- If “Type of Ticket” is “Request” then “Case Id” will be shown as “REQ_00001”
- “Type of Ticket” has two options
Ex: INC_00001 and REQ_00001
In above example,
- “INC” and “REQ” represents the “Type of Ticket”.
- “0000” is the prefix for the item Id
- “1” is the SharePoint generated unique item Id
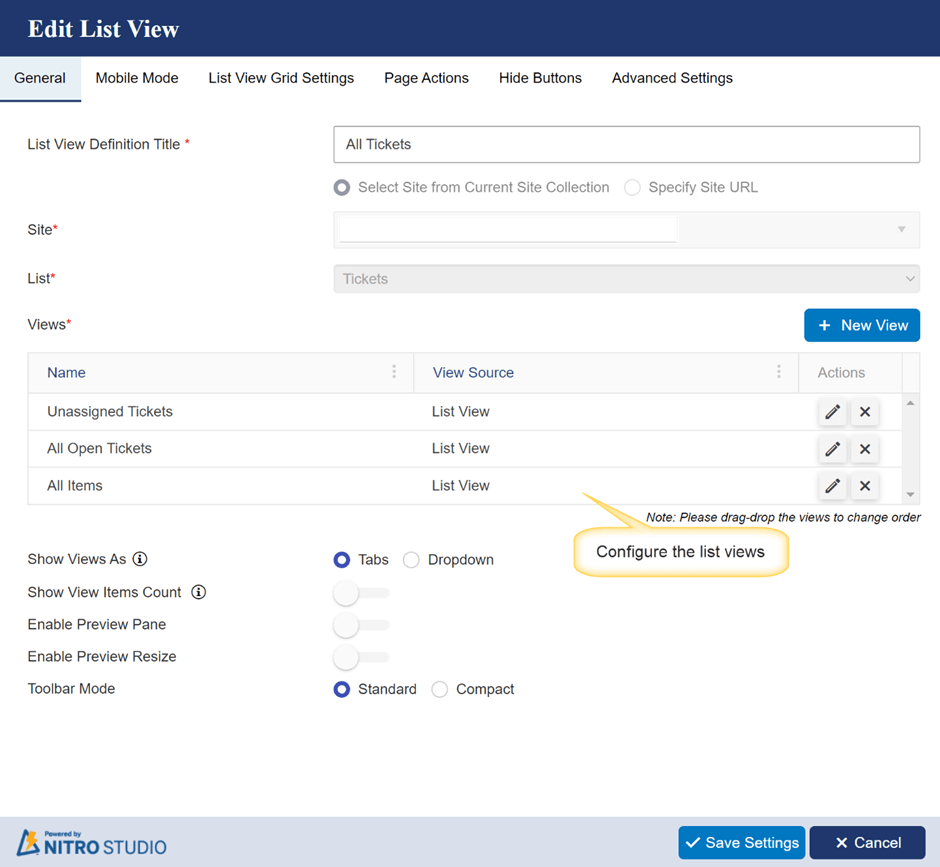
List View Configuration
Go to the Site -> Site Settings -> Crow Canyon List view and configure the list view as shown below:
Script used in above:
var scriptManager = {
};
scriptManager.GetColumnsToFetch = function(viewColumns, viewName, objListView){
  var loadColumnNames = ["ID","TypeofTicket"];
  return loadColumnNames;
};
scriptManager.UpdateListItemsValues = function(listItems, viewName, objListView){
  var oListItemsEnum = listItems.getEnumerator();
  while (oListItemsEnum.moveNext())
  {
    var oListItem = oListItemsEnum.get_current();
    var Id =  oListItem.get_id();
    var typeOfTicket =  oListItem.get_item("TypeofTicket");
    if(typeOfTicket == "Incident"){
      oListItem.set_item("CaseId", "INC_" + ("00000" + Id).slice(-5));
    }
    if(typeOfTicket == "Request"){
      oListItem.set_item("CaseId", "REQ_" + ("00000" + Id).slice(-5));
    }
  }
  return listItems
};
scriptManager.UpdateListItemValues = function(listItem, viewName, objListView){
  return listItem;
};
scriptManager.IsItemVisible = function(listItem, viewName, objListView){
  return true;
};
return scriptManager;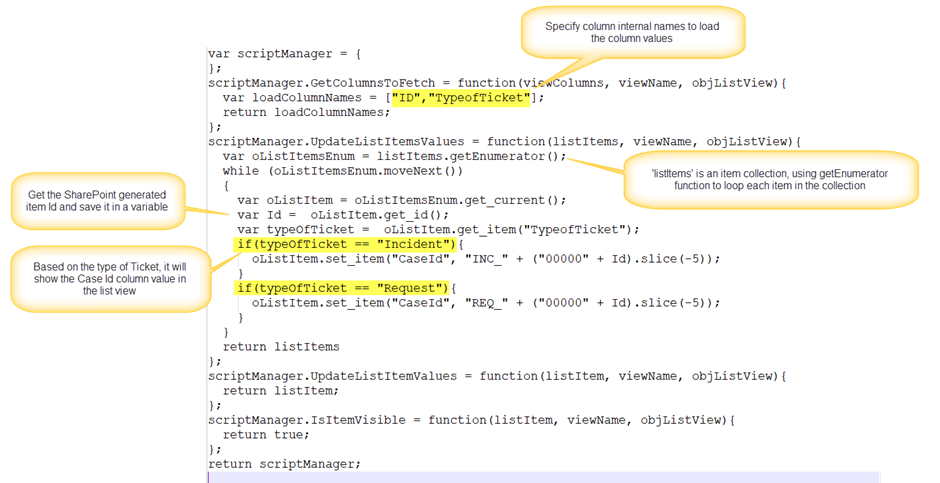
Script Details:
scriptManager.GetColumnsToFetch:
Use this function to load the columns that are not displayed in the list view but are required in the script for custom functionality. List view only loads the columns to be displayed, so we need to use this function to get data for additional columns.
In this list view, “Type of Ticket” column value is required to calculate the Case Id in the Ticket. However, “Type of Ticket” column is not there in the list view, so its value is not get loaded. Hence, it is specified in this function.
We can load additional columns if we want to use these columns in “scriptManager.UpdateListItemsValues”.
scriptManager.UpdateListItemsValues:
This function is used to set the “Case Id” column value based on the “Type of Ticket” and the SharePoint generated Id value.
- This function will iterate through each item in the list view.
- Based on the “Type of Ticket”, generate the formatted “Case Id” column value and show it in the list view.
Note:
- This will not update the column value in the Ticket list item, it is only to show the changed value in the list view.
- Above script is applicable for all the configured list views.
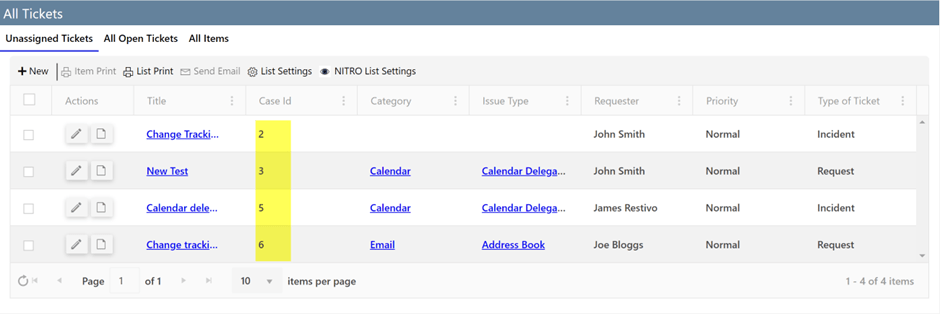
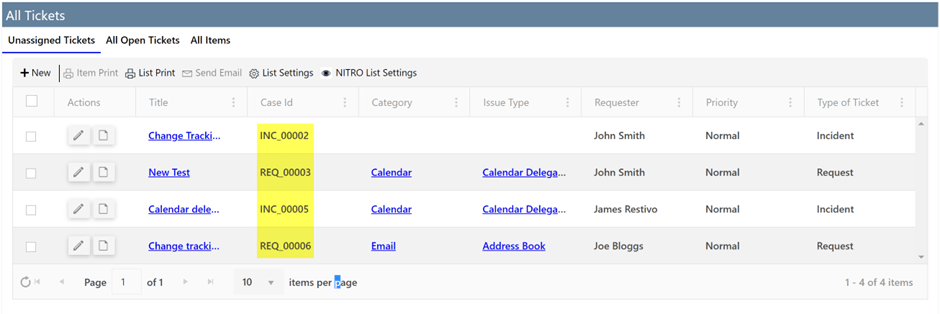
Sample output:
Before using the custom script:
After using the custom script:
For the same use case above, we can use “scriptManager.UpdateListItemValues” function. The difference is that this function is called for each item in the list view separately.
Sample script:
var scriptManager = {
};
scriptManager.GetColumnsToFetch = function(viewColumns, viewName, objListView){
  var loadColumnNames = ["ID","TypeofTicket"];
  return loadColumnNames;
};
scriptManager.UpdateListItemsValues = function(listItems, viewName, objListView){
  return listItems
};
scriptManager.UpdateListItemValues = function(listItem, viewName, objListView){
	var Id =  listItem.get_id();
	var typeOfTicket = listItem.get_item("TypeofTicket");
	if(typeOfTicket == "Incident"){
      listItem.set_item("CaseId", "INC_" + ("00000" + Id).slice(-5));
    }
    if(typeOfTicket == "Request"){
      listItem.set_item("CaseId", "REQ_" + ("00000" + Id).slice(-5));
    }
  return listItem;
};
scriptManager.IsItemVisible = function(listItem, viewName, objListView){
  return true;
};
return scriptManager;
Use case 2: Filter list view items based on a column value
- Configured a NITRO list view to show all the items from Tickets list.
- Tickets list has a “Status” column with below options:
- Unassigned
- Assigned
- Resolved
- Closed
- Configure a custom script to show only open Tickets i.e. Status is ‘Unassigned’ and ‘Assigned’.
- “scriptManager.IsItemVisible” function is to control item visibility in the list view. If ‘true’ value is returned from this function then item will be shown in the list view. If ‘false’ value is returned, then item will not be shown.
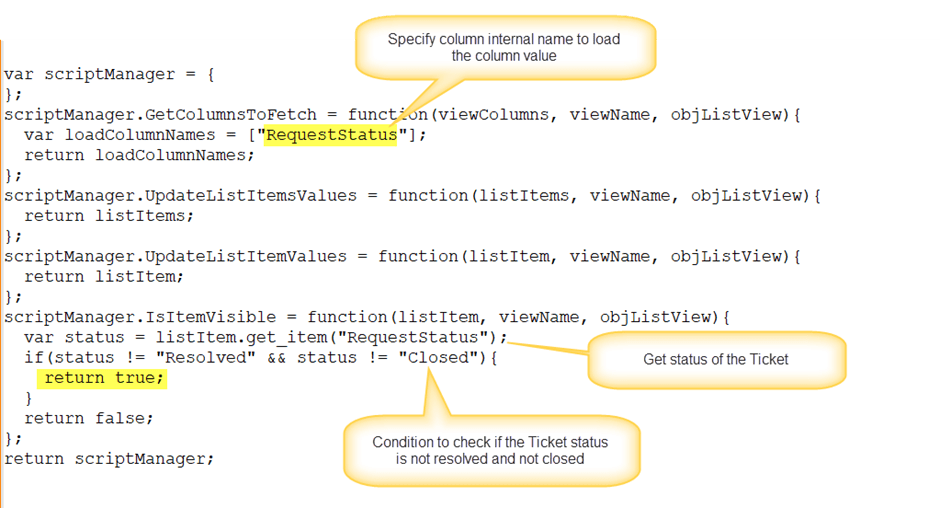
Custom Script:
var scriptManager = {
};
scriptManager.GetColumnsToFetch = function(viewColumns, viewName, objListView){
  var loadColumnNames = ["RequestStatus"];
  return loadColumnNames;
};
scriptManager.UpdateListItemsValues = function(listItems, viewName, objListView){
  return listItems;
};
scriptManager.UpdateListItemValues = function(listItem, viewName, objListView){
  return listItem;
};
scriptManager.IsItemVisible = function(listItem, viewName, objListView){
  var status = listItem.get_item("RequestStatus");
  if(status != "Resolved" && status != "Closed"){
    return true;
  }
  return false;
};
return scriptManager;
Sample output without script:
Sample output with custom script:

Use case 3: Configure common workspace/page for different roles with common list view.
This example shows how to control item visibility based on multiple rules based on logged-in user and item status. It uses the column permission schema used in NITRO Forms to configure complex conditions. Though JSON structure looks little complex, it is simpler to use than to write the code from scratch.
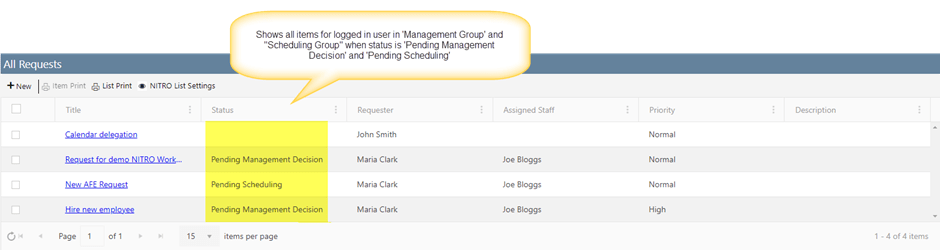
- NITRO list view is configured for Requests list, and it has below columns:
| Column Name | Column Internal Name | Column Type |
| Title | Title | Single line of text |
| Status | Status | Choice type Options: – Pending Management Decision – Pending Scheduling – In Progress – Closed |
| Assigned Staff | AssignedStaff | Person or Group |
| Requester | Requester | Person or Group |
| Description | Description | Multiple lines of text |
| Priority | Priority | Choice Options: – Low – Normal – High |
2. Below are the roles used in this example:
- End Users
- Management Group
- Scheduling Group
3. Requirement: Configure a common list view to show the items based on the ‘Status’ and role of the current logged in user. Note that this complex requirement cannot be achieved with SharePoint list views or even by writing a CAML query.
Rules:
- If logged-in user’s name is in ‘Requester’ column (user is requester of the item), then show that item regardless of the status value.
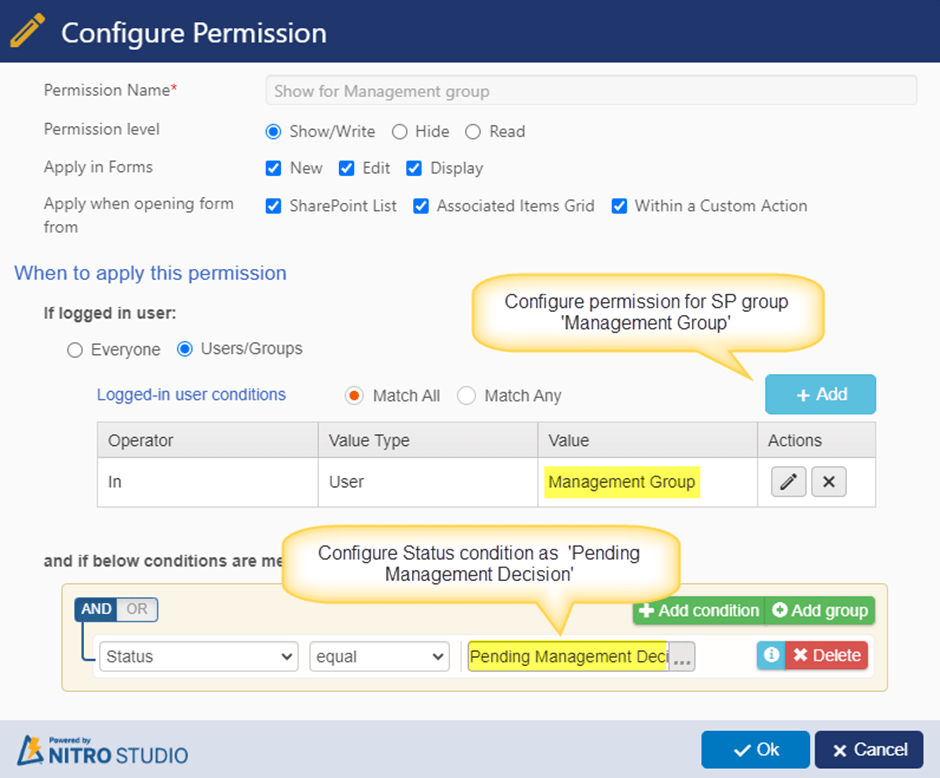
- If logged-in user is member of “Management Group” then show the item only if status is “Pending Management Decision”.
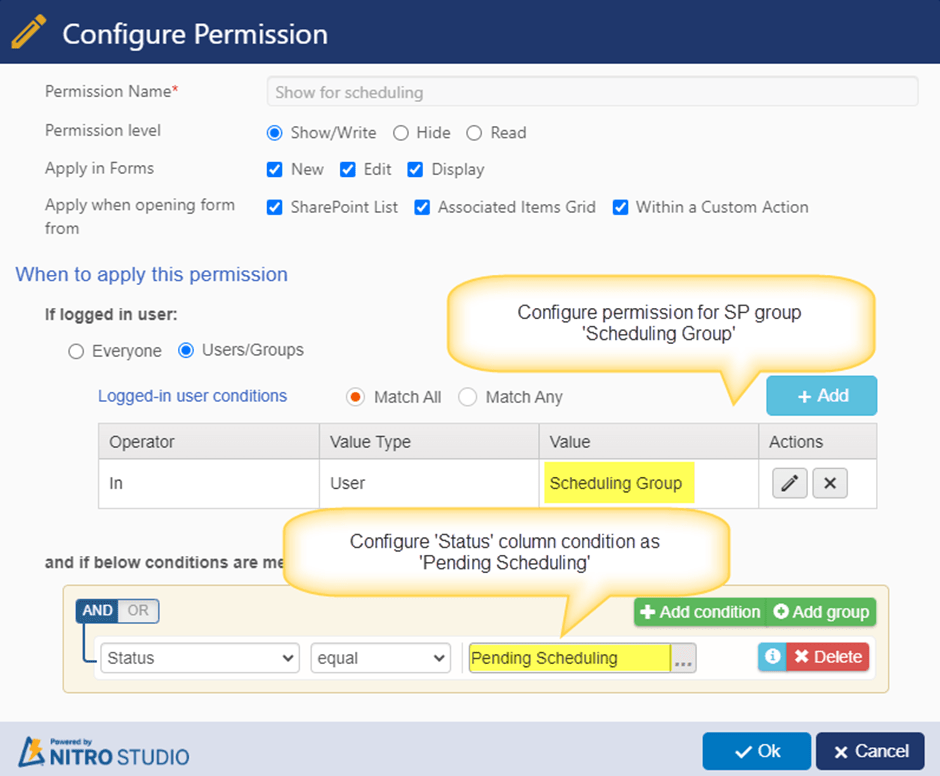
- If logged-in user is member of “Scheduling Group” when show the item only if status is “Pending Scheduling”.
- If logged-in user’s name is in ‘Assigned Staff’ column (user is assigned to work on the item), then show that item if status is “In Progress”.
4. This is a complex use case and script is complicated. If required, Crow Canyon can assist as part of professional services for such cases.
List view configuration:
Configure Crow Canyon list view for Requests.
Go to the Site -> Site Settings -> Crow Canyon List Views and configure the list view as shown below:

Script used in above:
var scriptManager = {
};
scriptManager.GetColumnsToFetch = function(viewColumns, viewName, objListView){
var loadColumnNames = [];
return loadColumnNames;
};
scriptManager.UpdateListItemsValues = function(listItems, viewName, objListView){
return listItems;
};
scriptManager.UpdateListItemValues = function(listItem, viewName, objListView){
return listItem;
};
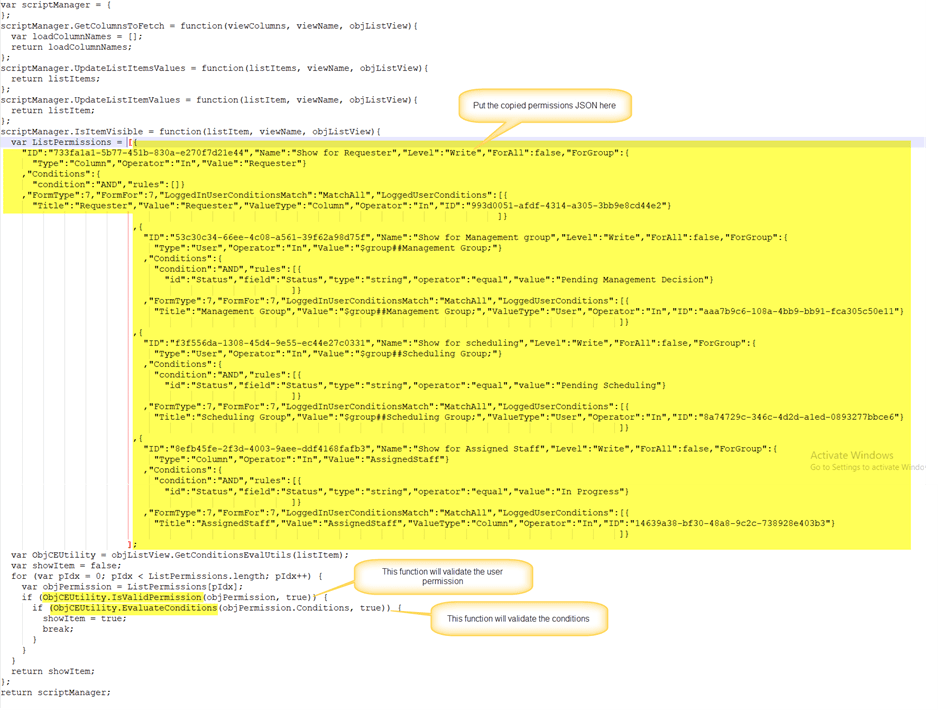
scriptManager.IsItemVisible = function(listItem, viewName, objListView){
var ListPermissions = [{"ID":"733fa1a1-5b77-451b-830a-e270f7d21e44","Name":"Show for Requester","Level":"Write","ForAll":false,"ForGroup":{"Type":"Column","Operator":"In","Value":"Requester"},"Conditions":{"condition":"AND","rules":[]},"FormType":7,"FormFor":7,"LoggedInUserConditionsMatch":"MatchAll","LoggedUserConditions":[{"Title":"Requester","Value":"Requester","ValueType":"Column","Operator":"In","ID":"993d0051-afdf-4314-a305-3bb9e8cd44e2"}]},{"ID":"53c30c34-66ee-4c08-a561-39f62a98d75f","Name":"Show for Management group","Level":"Write","ForAll":false,"ForGroup":{"Type":"User","Operator":"In","Value":"$group##Management Group;"},"Conditions":{"condition":"AND","rules":[{"id":"Status","field":"Status","type":"string","operator":"equal","value":"Pending Management Decision"}]},"FormType":7,"FormFor":7,"LoggedInUserConditionsMatch":"MatchAll","LoggedUserConditions":[{"Title":"Management Group","Value":"$group##Management Group;","ValueType":"User","Operator":"In","ID":"aaa7b9c6-108a-4bb9-bb91-fca305c50e11"}]},{"ID":"f3f556da-1308-45d4-9e55-ec44e27c0331","Name":"Show for scheduling","Level":"Write","ForAll":false,"ForGroup":{"Type":"User","Operator":"In","Value":"$group##Scheduling Group;"},"Conditions":{"condition":"AND","rules":[{"id":"Status","field":"Status","type":"string","operator":"equal","value":"Pending Scheduling"}]},"FormType":7,"FormFor":7,"LoggedInUserConditionsMatch":"MatchAll","LoggedUserConditions":[{"Title":"Scheduling Group","Value":"$group##Scheduling Group;","ValueType":"User","Operator":"In","ID":"8a74729c-346c-4d2d-a1ed-0893277bbce6"}]},{"ID":"8efb45fe-2f3d-4003-9aee-ddf4168fafb3","Name":"Show for Assigned Staff","Level":"Write","ForAll":false,"ForGroup":{"Type":"Column","Operator":"In","Value":"AssignedStaff"},"Conditions":{"condition":"AND","rules":[{"id":"Status","field":"Status","type":"string","operator":"equal","value":"In Progress"}]},"FormType":7,"FormFor":7,"LoggedInUserConditionsMatch":"MatchAll","LoggedUserConditions":[{"Title":"AssignedStaff","Value":"AssignedStaff","ValueType":"Column","Operator":"In","ID":"14639a38-bf30-48a8-9c2c-738928e403b3"}]}];
var ObjCEUtility = objListView.GetConditionsEvalUtils(listItem);
var showItem = false;
for (var pIdx = 0; pIdx < ListPermissions.length; pIdx++) {
var objPermission = ListPermissions[pIdx];
if (ObjCEUtility.IsValidPermission(objPermission, true)) {
if (ObjCEUtility.EvaluateConditions(objPermission.Conditions, true)) {
showItem = true;
break;
}
}
}
return showItem;
};
return scriptManager;Script details:
- In this custom script, we have used “scriptManager.IsItemVisible” function to show/hide the item based on the logged in user role and item status value.
- In this function, we have defined “ListPermissions” collection. This has the JSON for conditions to show/hide the item.
- Next, iterate each permission defined in the “ListPermissions” collection and verify if the permission level is valid for the list item or not.
- If item matches any of the rules, then it is shown, else hidden from the list view.
Note: We need to generate the JSON for permissions manually and put it in the script.
Follow below steps to generate the JSON for permissions.
Generate JSON for permissions:
We need to use NITRO Forms to generate the permissions JSON, follow below steps:
- Define all the permission rules that need to be setup. Refer rules given in this example above.
- Configure above permission rules in NITRO Forms on any of the columns temporarily, as shown below. These permissions can be removed after generating the required JSON.
Permissions setup:
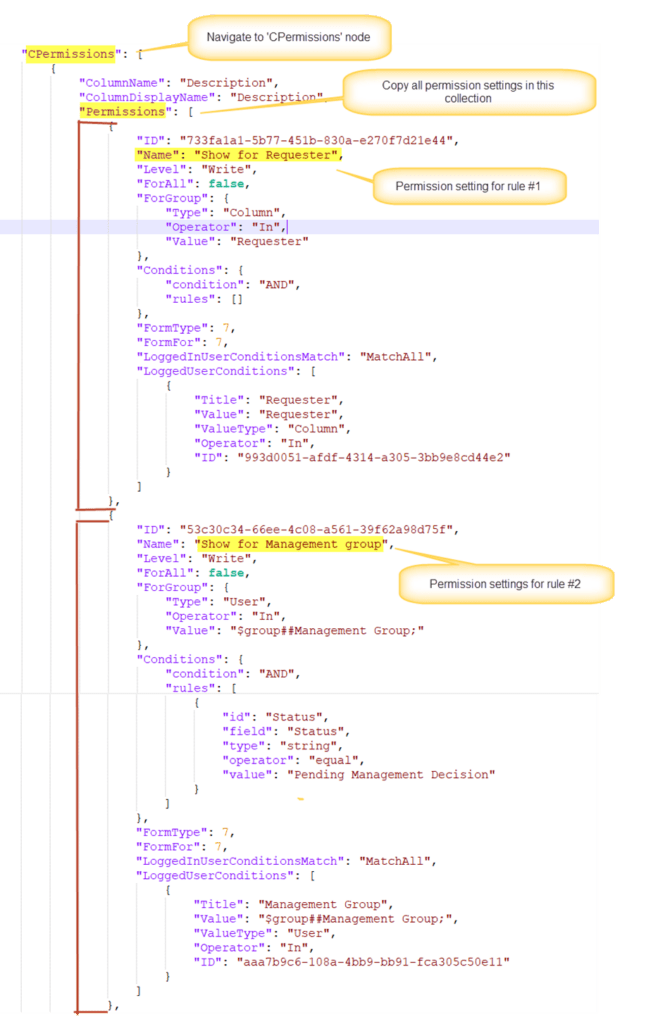
Rule 1: If logged-in user’s name is in ‘Requester’ column (user is requester of the item), then show that item regardless of the status value.
Rule 2: If logged-in user is member of “Management Group” then show the item only if status is “Pending Management Decision”.
Similarly, configure permissions for other rules.
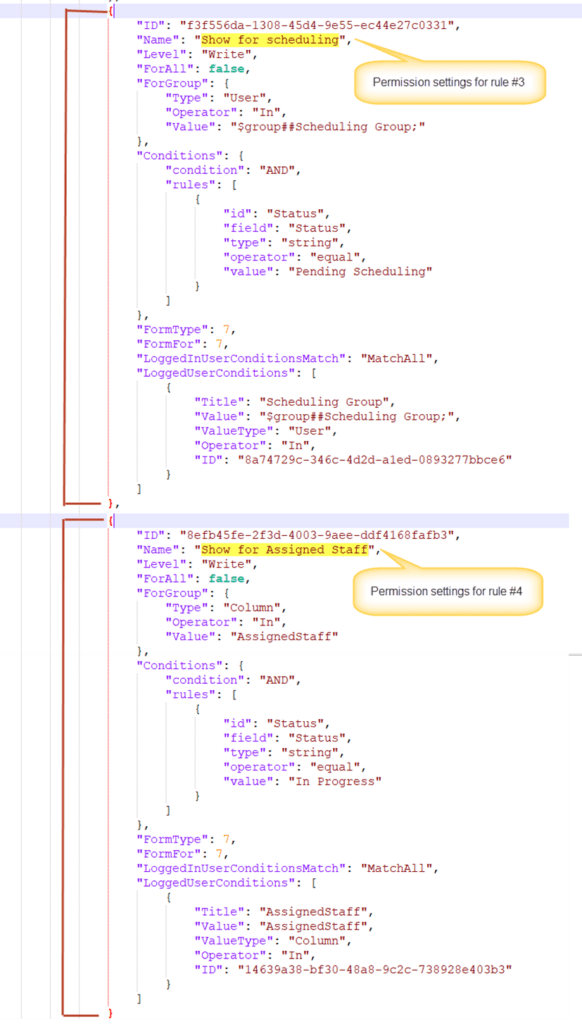
Rule 3: If logged-in user is member of “Scheduling Group” when show the item only if status is “Pending Scheduling”.
Rule 4: If logged-in user’s name is in ‘Assigned Staff’ column (user is assigned to work on the item), then show that item if status is “In Progress”.

After configuring the permissions, save the NITRO Form settings.
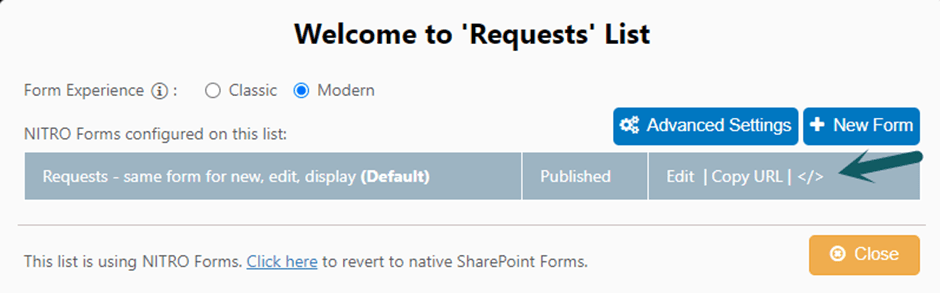
5. Next, click ‘Manage Forms’ in NITRO forms and open NITRO form settings as shown below:

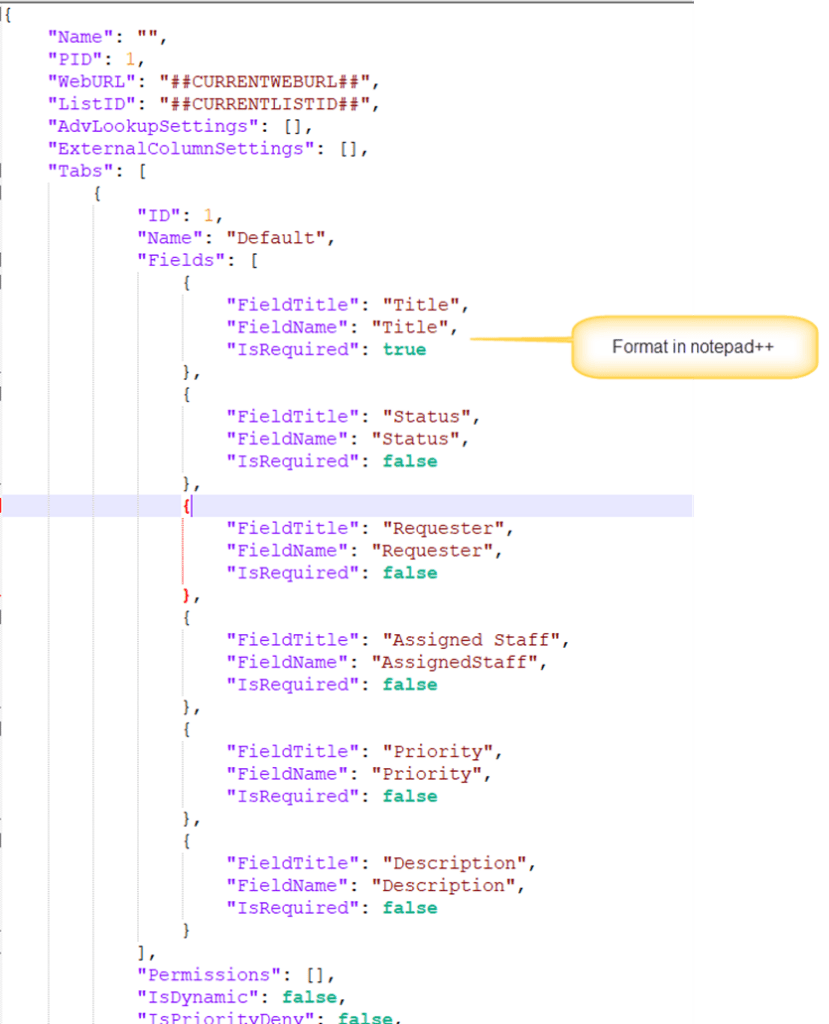
6. Copy current form settings and paste it in a notepad++ and format it as shown below:
7. Navigate to the node “CPermissions” and copy all permission levels as shown below:
6. Paste the copied permissions in a notepad++ and minimize the JS and put it in the custom script as shown below:
Sample output:
For different roles, we are using below users in this example.
| User | Role |
| Maria Clark | Requester |
| Joe Bloggs | Assigned Staff |
| John Smith | Management Group and Scheduling Group |
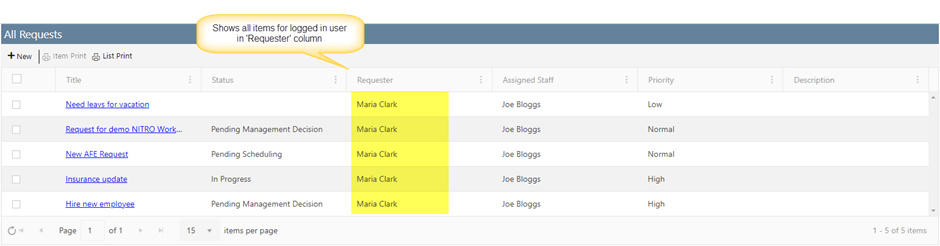
Output for logged in user as Requester:
Output for logged in user as Assigned Staff:

Output for logged in user in “Management Group” and “Scheduling Group”: