Applies to: SharePoint Online and On-premises (2013, 2016, 2019 and SE)
Application type: NITRO Helpdesk, Facilities 2020, Request Management 2020 and Customer Service 2020.
Description
Crow Canyon Service Request application by default comes with below status options in Ticket’s list.
SharePoint Online:
- Unassigned
- Assigned
- Resolved
- Closed
SharePoint On-premises:
- Not Started
- In Progress
- Resolved
- Closed
These status options can be modified as per our requirement using state management feature in service request applications.
This article describes the instructions to configure state management in Crow Canyon service request applications.
Summary of steps:
- List Schema
- Configuration of State Management
- Sample Use Cases
Detailed Instructions:
1.List Schema
1.Make sure that “State Management” column exist in “Configuration” list. If not, create the column.
Go to Site Contents -> Configurations list -> Create column as given below:
- Column: State Management
- Internal name: StateManagement
- Display name: State Management
- Column type: Multiple lines of plain text
2. Add “State Management” column to NITRO forms.
Go to Configuration list -> List Settings -> Crow Canyon NITRO Forms and add “State Management” column to the form and publish the forms.
2.Configuration of State Management
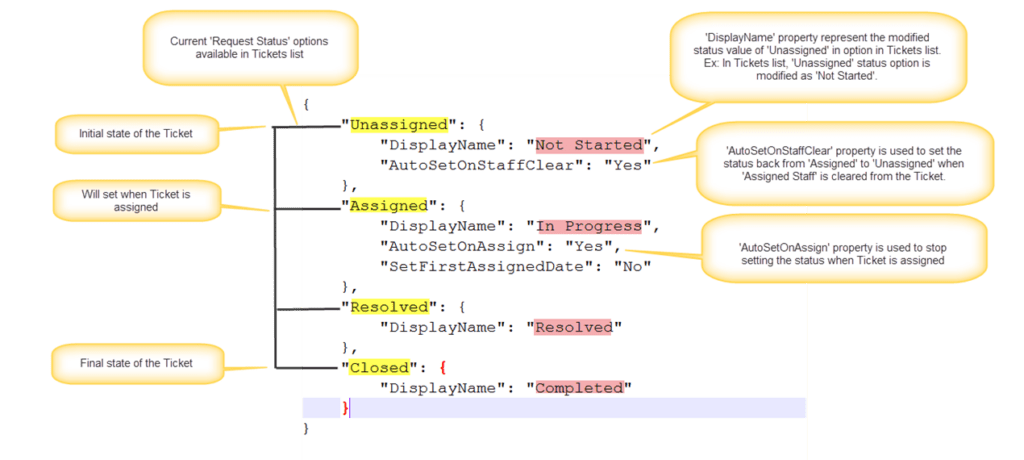
Go to Application Administration -> General Configurations and configure below JSON in the “State Management” column.
JSON:
{
	"Unassigned": {
		"DisplayName": "Not Started",
		"AutoSetOnStaffClear": "Yes"
	},
	"Assigned": {
		"DisplayName": "In Progress",
		"AutoSetOnAssign": "Yes",
		"SetFirstAssignedDate": "No"
	},
	"Resolved": {
		"DisplayName": "Resolved"
	},
	"Closed": {
		"DisplayName": "Completed"
	}
}
Note: Do not modify the keys “Unassigned”, “Assigned”, “Resolved” and “Closed” in above JSON.
In above Json:
Properties:
DisplayName:
This property represents the updated status value of ‘Unassigned’ option in Ticket’s list.
Ex: If we would like to update the status of ‘Unassigned’ to ‘Not Started’, we can use the ‘DisplayName’ for ‘Unassigned’ as ‘Not Started’.
Similarly, we can modify the status of other options i.e., ‘Assigned’, ‘Resolved’ and ‘Closed’ as per our requirement.
AutoSetOnStaffClear:
Out of the box, when ‘Assigned Staff’ is cleared from Ticket, system will automatically reset the status to initial state i.e. Unassigned.
If we would like to override this behavior, set ‘AutoSetOnStaffClear’ property value to ‘No’ in ‘State Management’.
AutoSetOnAssign:
Out of the box, when ‘Assigned Staff’ filled in a Ticket, system will automatically modify the status to ‘Assigned’.
If we would like to override this behavior, set ‘AutoSetOnAssign’ property value to ‘No’ in ‘State Management’.
SetFirstAssignedDate:
Out of the box, when a Ticket is assigned/reassigned, ‘Assigned Date’ will always updated with latest assignment date.
If we would like to capture the first assignment date in Ticket’s list, set this property to ‘Yes’.
Note: Please make sure that ‘First Assignment Date’ column is there in the Tickets list. If not, please create this column.
- Column: First Assignment Date
- Internal name: FirstAssignmentDate
- Display name: First Assignment Date
- Column type: Multiple lines of plain text
3. Sample Use Case
In this sample use case, we would like to use new status options instead of ‘Unassigned’, ‘Assigned’ and ‘Closed’.
Below table describes the current status options and the corresponding new status options.
| Current Status Option | New Status Option |
| Unassigned | New |
| Assigned | Work in progress |
| Resolved | Resolved |
| Closed | Completed |
Instructions
1. Modify the ‘Request Status’ options in Ticket’s list and Archived Ticket’s lists.
Go to the list -> List Settings -> Edit ‘Request Status’ column and add new status options.
2. Go to Application Administration -> General Configurations -> Add below JSON in ‘State Management’ column.
Note:
If there is any list view using these status options, then we need to update the list views.
State Management:
{
	"Unassigned": {
		"DisplayName": "New",
		"AutoSetOnStaffClear": "Yes"
	},
	"Assigned": {
		"DisplayName": "Work in progress",
		"AutoSetOnAssign": "Yes",
		"SetFirstAssignedDate": "Yes"
	},
	"Resolved": {
		"DisplayName": "Resolved"
	},
	"Closed": {
		"DisplayName": "Completed"
	}
}
After configuring new status options in Ticket’s list, we need to modify these new status options in different places in the application.
- Tickets and Archived Tickets list views
- Go to the Tickets and Archived Tickets list -> List Settings -> Edit the list views and modify the status options as per new statuses.
- Modify the status options in ‘Mark Closed’ and ‘Re-open’ submit actions in portal Ticket forms in Ticket’s list.
- Go to Tickets list -> List Settings -> Crow Canyon NITRO Forms -> Edit ‘PortalTicket’ forms -> Switch to edit form -> Select ‘Mark Closed’ and ‘Re-open’ submit actions -> Edit the script in submit action settings and modify the status options as per the new status options.
- Modify the status values in ‘Reopen Count’ column in ‘Tickets Status Tracking’ list.
- Go to Site Contents -> Tickets Status Tracking -> List Settings -> Edit “Reopen Count” column and modify the ‘Closed’ status option as per new status.
- Modify the status options in NITRO Workflows
- Go to Application Administration -> Crow Canyon NITRO Apps -> NITRO Workflows -> Edit all the workflows except the workflows configured on Calendar, Archived Tickets and Email Tickets list -> Modify the status options in query list actions, conditions and column mappings as per the new status options.

