Applies to: SharePoint Online and On-premises NITRO Workflows
Introduction
DocuSign is an electronic signature platform that simplifies and accelerates the document signing process. It allows users to securely sign, send, and manage documents online, eliminating the need for physical paperwork.
DocuSign action in NITRO Workflows is used to send documents within the NITRO sites for signing. Signing process can be tracked and signed documents can be stored in a separate document library.
Installation
SharePoint Online
It is installed as part of NITRO Studio and no separate steps are required.
SharePoint On-Premises:
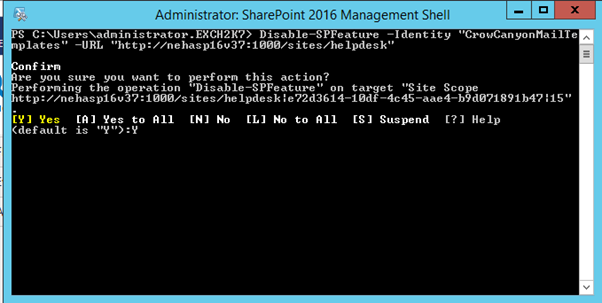
Go to SharePoint Central Administration -> Monitoring -> Review Job Definitions and ensure below timer job is created for DocuSign.
Note: Ignore this step if timer job already exists for the site collection.

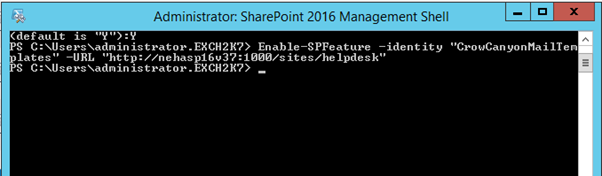
If this timer job is not created, please deactivate ‘Crow Canyon Mail Templates Administration’ feature and activate again. Follow below instructions:
Open SharePoint Management Shell in SharePoint server (run as administration) and run below commands.
Feature Name: CrowCanyonMailTemplates
Deactivate feature command:
Disable-SPFeature -Identity “CrowCanyonMailTemplates” -URL “SiteCollectionURL”
Activate feature command:
Enable-SPFeature -Identity “CrowCanyonMailTemplates” -URL “SiteCollectionURL”
Detailed Description of DocuSign action
Before DocuSign action can be used in NITRO Workflows, permissions need to be granted. Process to grant permissions is described below.
Grant Permission
NITRO application need access to user’s DocuSign account to programmatically manage the document signing process. Also known as “API consent,” it is a feature that allows applications to integrate with DocuSign’s eSignature capabilities. When a user grants permission for API access, they are authorizing a specific application to access their DocuSign account on their behalf, which can be helpful for automating document-related processes or workflows. On approval, access is granted using an access token and this process ensures the security and privacy of the user’s documents.
Grant Permission process has following steps:
- Get the DocuSign account User Id
- Select the environment and grant permissions
- Test connection
- Save the settings
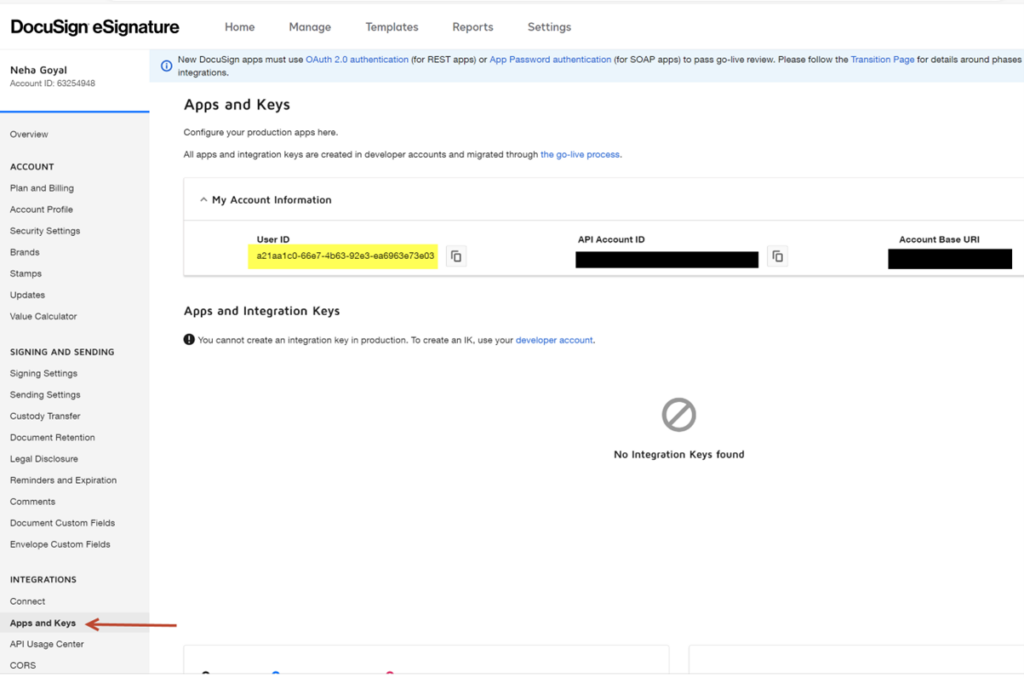
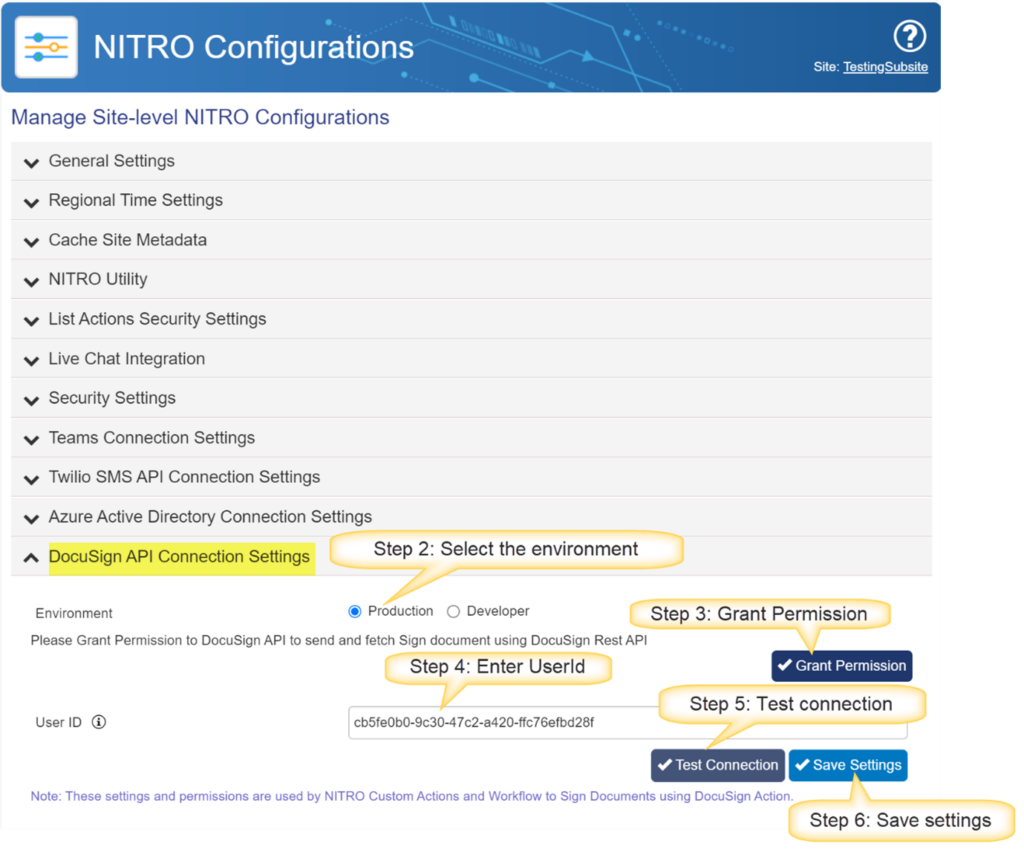
You can find the DocuSign User Id in DocuSign Portal. Click below link:
Login with your DocuSign user account -> Go to Settings in top menu -> Apps and Keys -> Copy the User ID
To grant access: Go to SharePoint Site Settings page -> Crow Canyon NITRO Site Settings -> DocuSign API Connection Settings.
Refer to below image to grant permissions.
- Select the environment as ‘Production’. ‘Developer’ environment is only for development and testing purpose.
- Click ‘Grant Permission’ button and use your DocuSign account to login and grant permissions.
- Enter your DocuSign User ID copied above and click ‘Test Connection’ button.
- If connection is successful, then save the settings.
Configuration of DocuSign action in NITRO Workflows
Go to SharePoint Site Settings -> Crow Canyon NITRO Apps -> NITRO Workflows
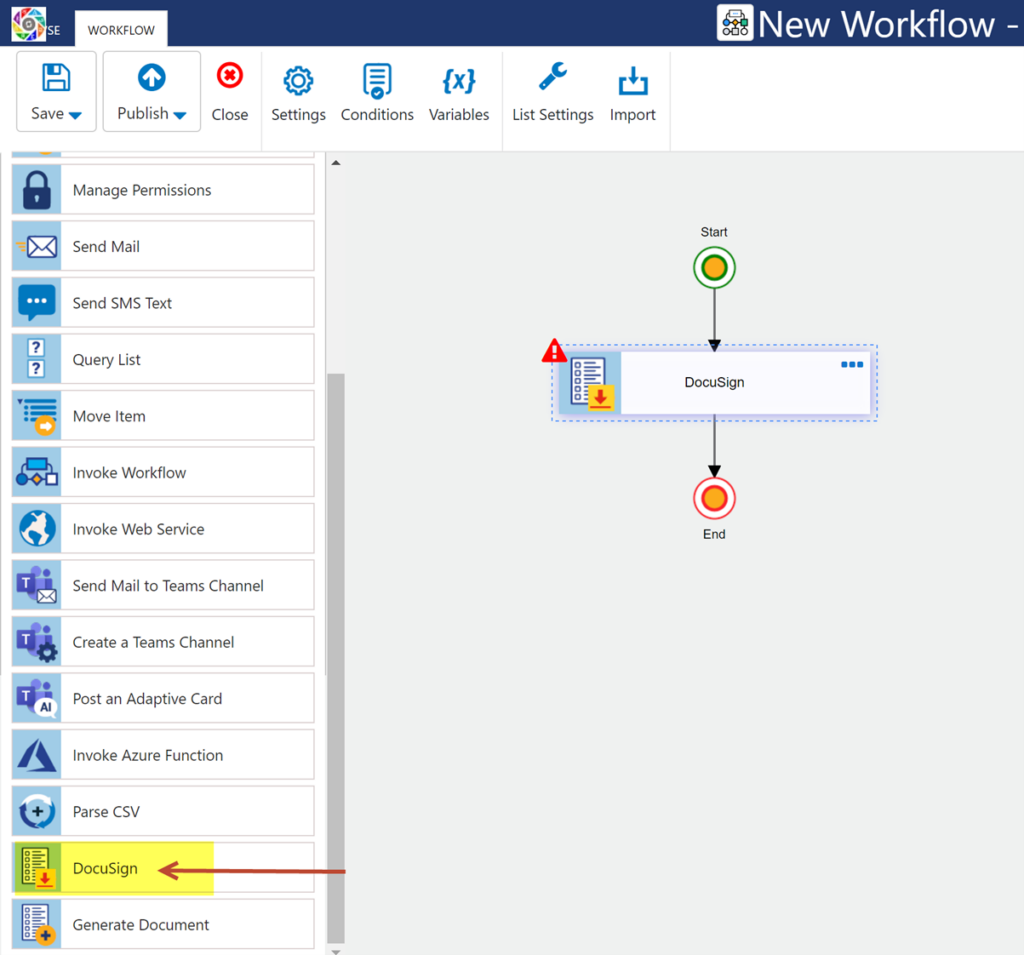
DocuSign action has two parts:
- First part is used to send the document for signing. This includes the document and the users who need to sign.
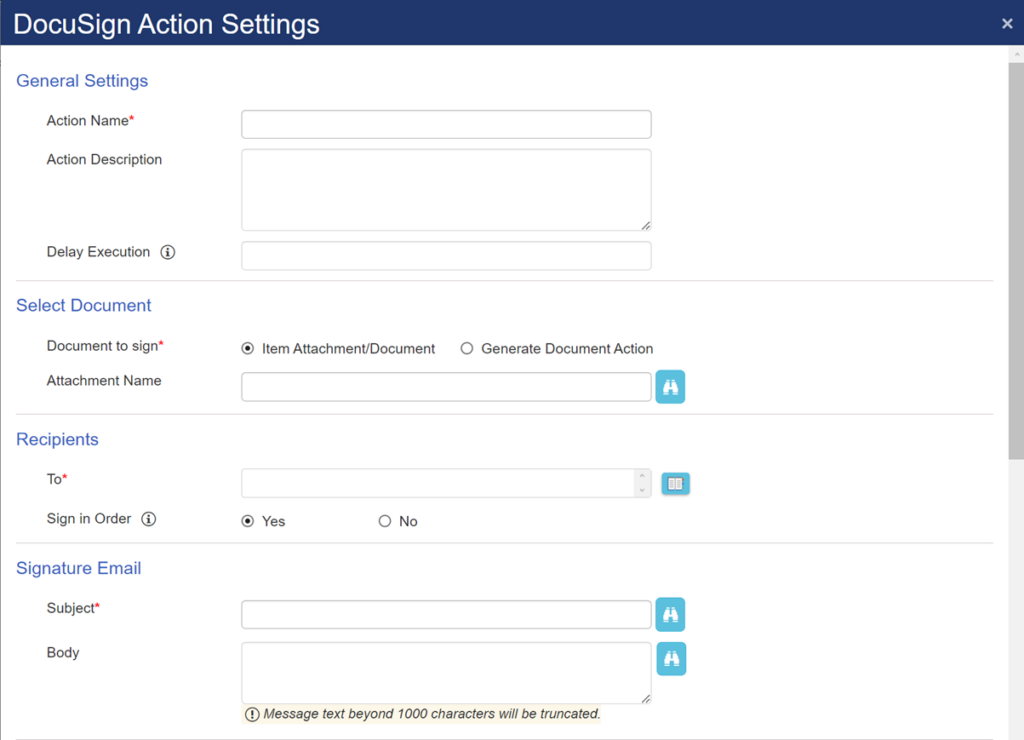
General Settings
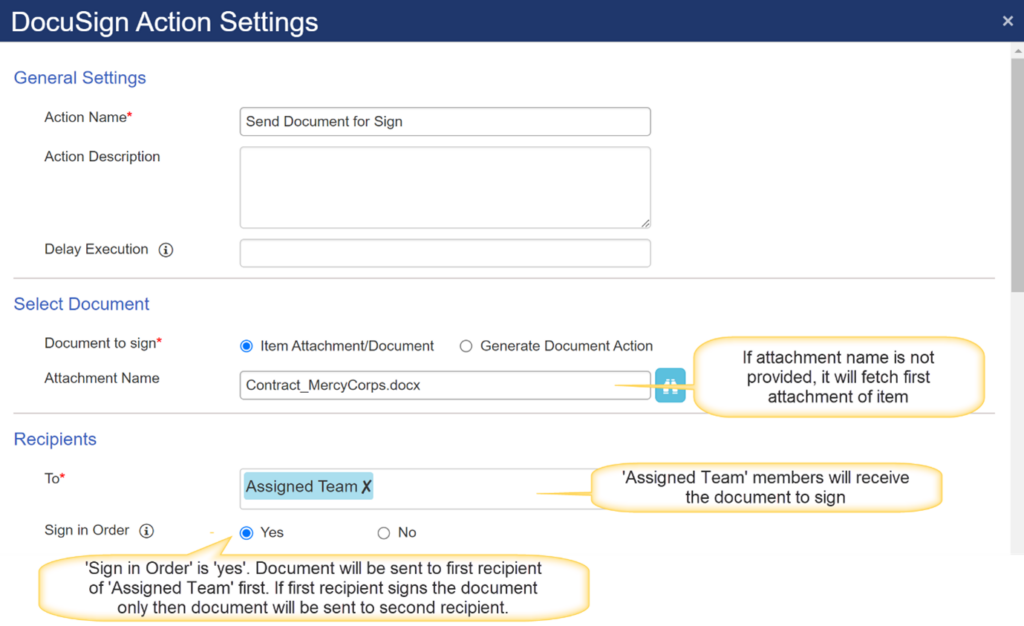
Action Name: Provide a name for the action.
Action Description: Provide a short description for the action.
Delay Execution: Provide time in seconds to delay action execution if required.
Select Document:
This section explains from where to select the document that need the signature.
Document to sign:
- Item Attachment/Document:
- Attachment file of the SharePoint list item on which workflow is being executed.
- Document of the document library item on which workflow is being executed.
- Generate Document Action:
- File that is generated via a generate document action in the same workflow.
Item Attachment/Document:
- If DocuSign action is configured on a custom list, then fetch the attachment file from current item. Attachment Name option will be visible in this case.

Attachment Name:Provide attachment name/placeholder to select the required document. Keeping ‘Attachment Name’ blank will fetch the first attachment of the item for document signing.
- If DocuSign action is configured on document library, this will fetch document on which workflows is being executed. Attachment Name option will not be visible in this case as a document library item has a single file only.

Generate Document Action:
Workflow can have one or more actions of type ‘Generate Document Action’. The generated document can be sent for signing. Select the required action in drop-down for this option. Note that generate document action should be prior to the signing action in the workflow.

Note: This action supports only a single document for signing.
Recipients:
This section describes the users who will receive the document for signing.
To: The icon at end of row opens the Recipients screen to select users. Multiple entries can be made in any of the three options:
- Select Users and Groups as recipient.
- Select column in current list that has the users.
- Provide the recipient’s email address(es).

Sign in Order: Select yes to send document to specified users in sequential order (one after another). Select no to send document to all users at the same time.
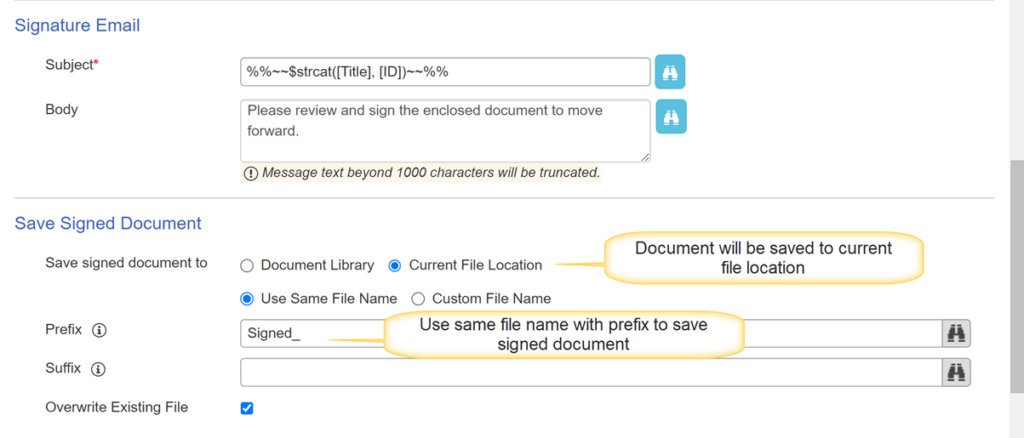
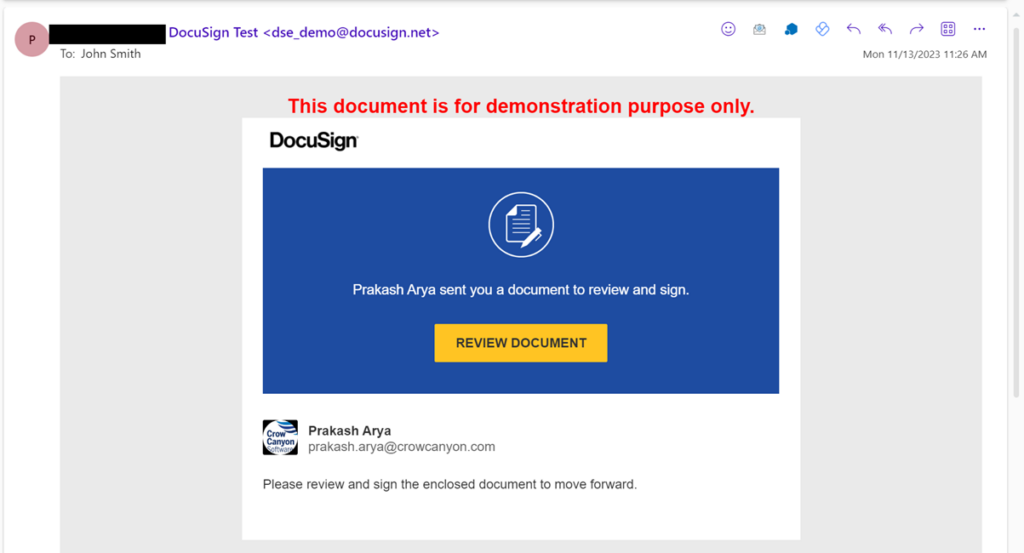
Signature Email:
Recipients will receive an email with a link to document for signing.
Subject: The Subject of the email. This can have placeholders in it.
Body: The Body of the email. This can have Placeholders in it.
2. Second part is to save the signed document and keep track of signing process.
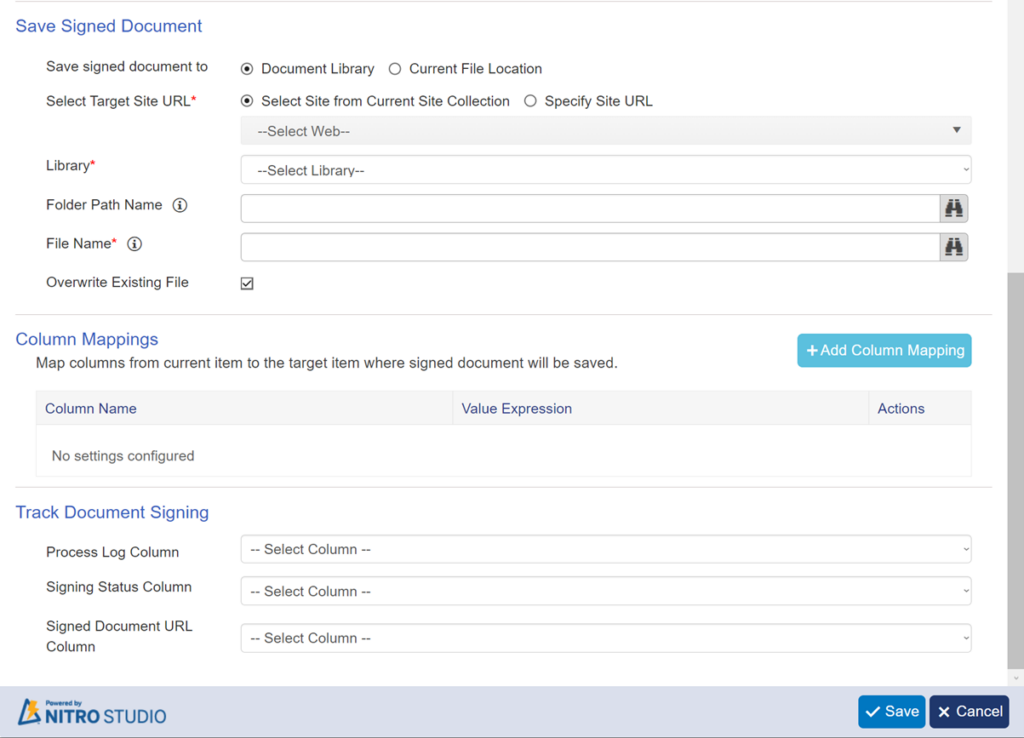
Save Signed Document
Two options are available to save the signed document:
- Document Library
- Current File Location
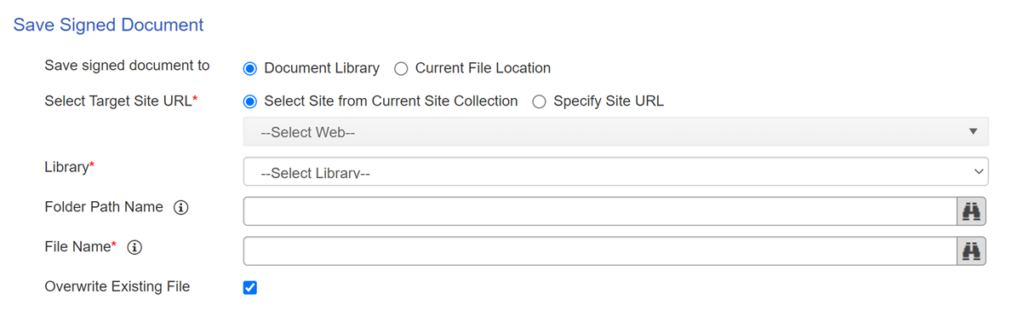
Document Library
To save the signed document in a document library, follow below steps. Note that this library can be different from the list/library on which DocuSign workflow is configured.
- Select site from current site collection or specify the site URL.
- Select document library from dropdown.
- Provide folder path name where you want to save the signed document.
- Provide file name for the signed document.
- Option to overwrite file if it already exists in the destination.
Current File Location
Save signed document in the same location as the document that was sent for signing.
It has two options:
- Use same file name: File name will be same as original file sent for signing along with any prefix/suffix that is specified. If prefix/suffix is not specified, then file name and location will be same and overwrite option should be selected.
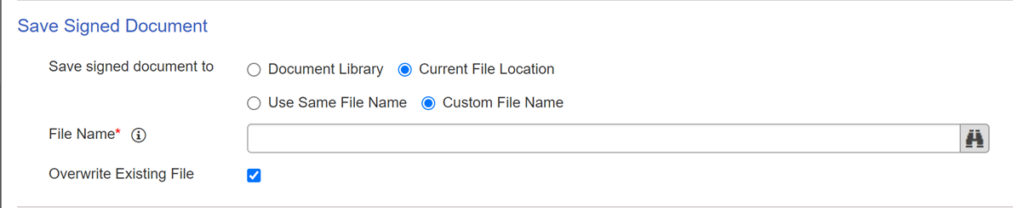
- Custom file name: Provide a file name as required which can be different from the original document.
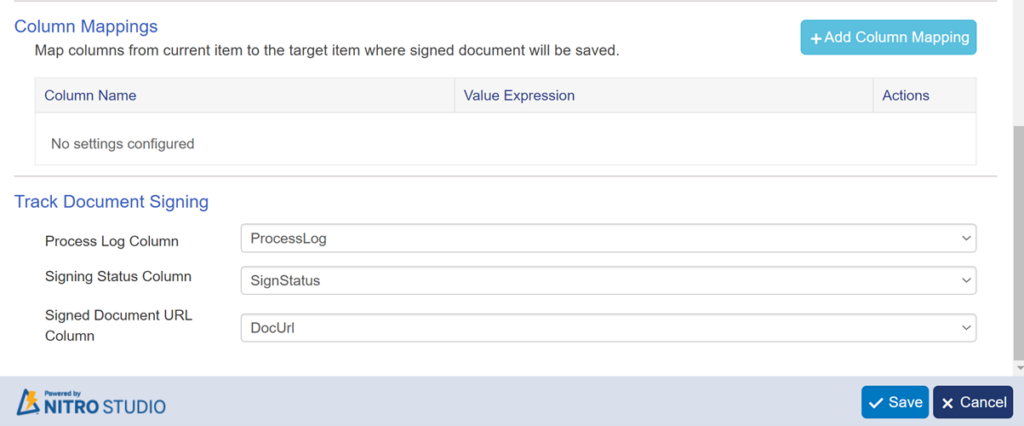
Column Mappings
This can be used to copy metadata related to the document from the original file location to the list/library where signed document is stored.
For example, if an attachment from a list item is used for signing and signed document is saved to a document library, then column mapping section can be used to copy item column values to document library columns.
Track Document Signing
DocuSign workflow can save the status and log related to the signing process in the item on which workflow is run. This is helpful to track the signing process.
Process Log: Select a multiple lines of text column with append changes enabled from the current list/library. Log related to execution of this action will be stored in this column and will include information like who signed the document and the status of the signed document.
Signing Status Column: Select single line of text column from the current list/library. This column will have the status of signed document and can be used for any further process/email etc.
Signed Document URL Column: Select hyperlink column from the current list/library. This column will have the full URL of the final signed document. It can be shown in the item form or used for any further process/email etc.
Note: NITRODocuSignHistory list is created automatically to keep track of document signing process.
DocuSignHistory column is created automatically in Current list (Custom List/Document Library). It will store the link of item created in NITRODocuSignHistory list when document signing process starts.
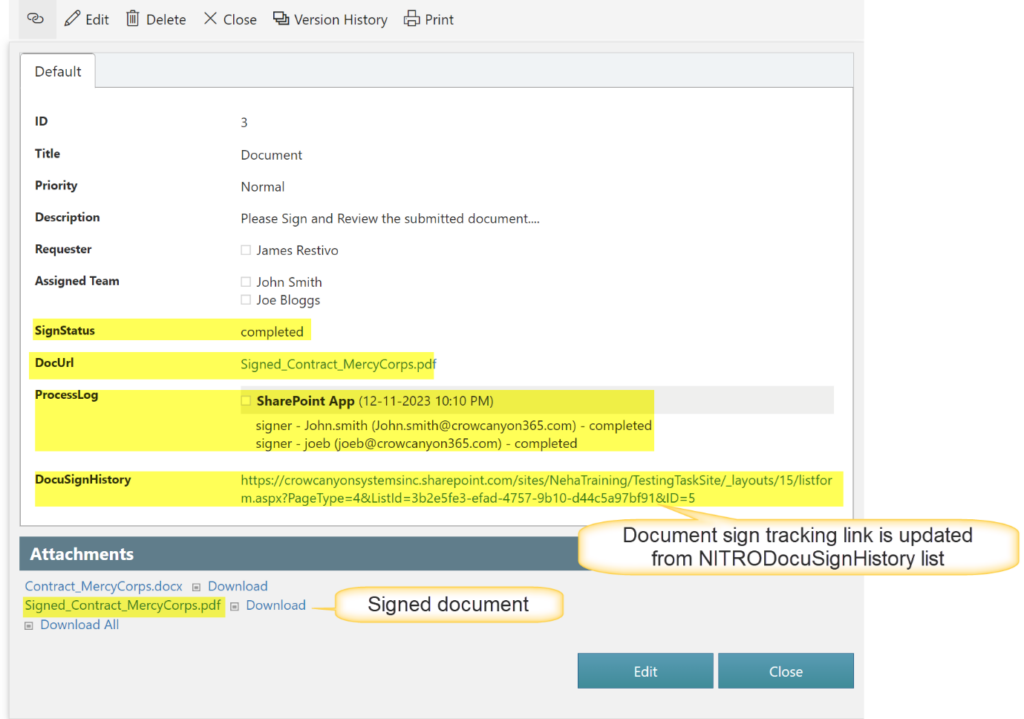
Example:
Send custom list item document for signing and save the signed document in current file location.
Workflow configuration for DocuSign Action: DocuSign Action is configured on item modified event.
In above configuration
- Attachment name is provided, it will fetch provided attachment of current item.
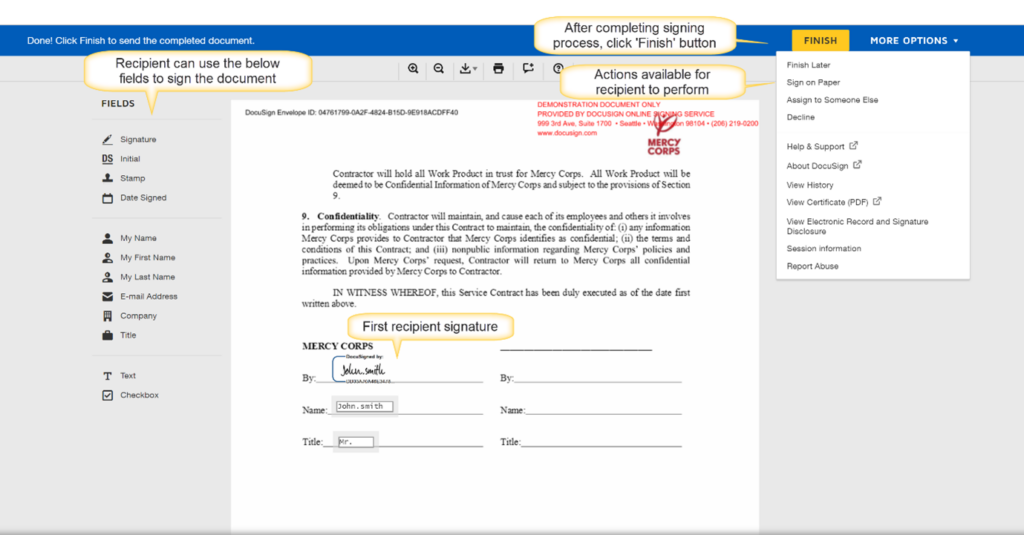
- Sign in Order is ‘Yes’. Document will be sent to first recipient first. If First recipient signs the document, only then document will be sent to second recipient for sign.
In above configuration
- Use same file name with prefix to save signed document.
Source Item
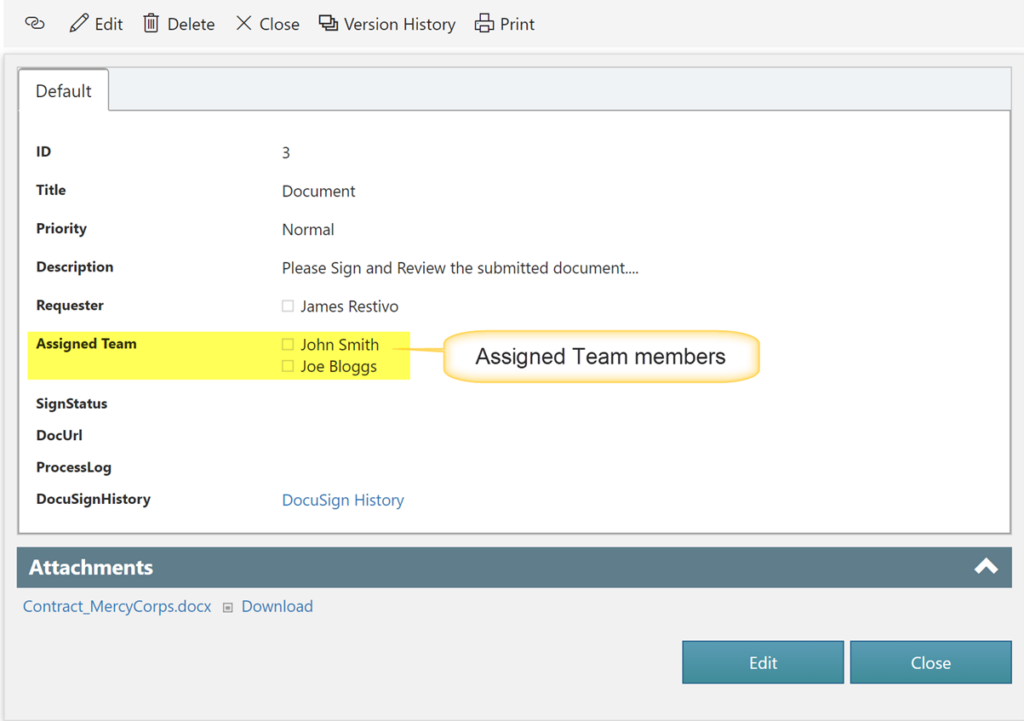
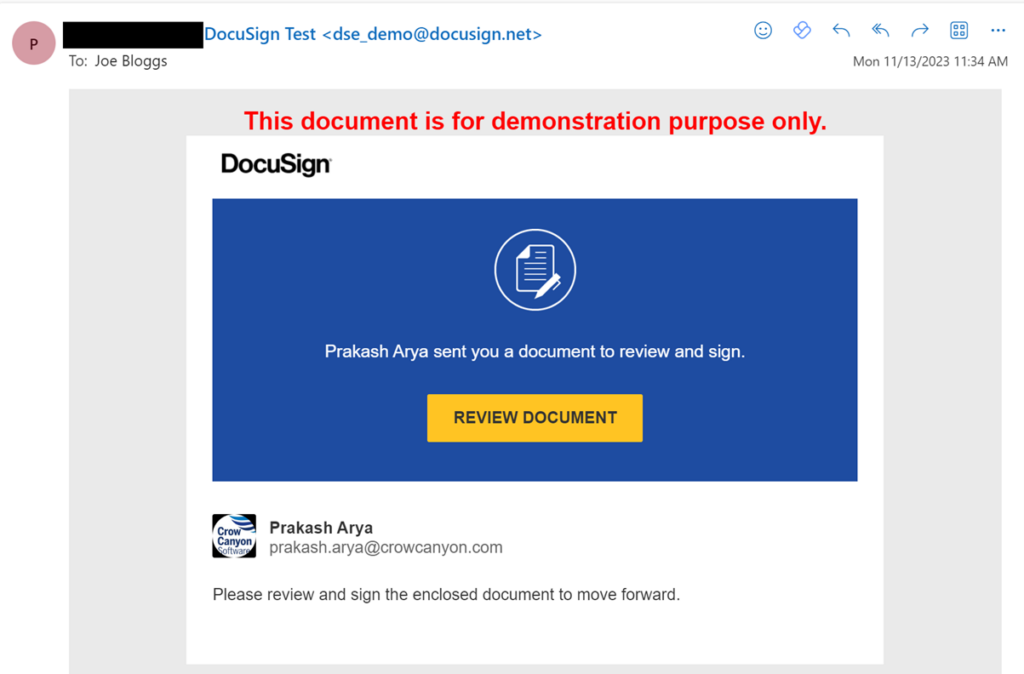
Contract_MercyCorps.docx document will be sent to first recipient John Smith (John.smith@crowcanyon365.com) for sign.
After signing is done by John Smith, mail is sent to Joe Bloggs account for signing the document.
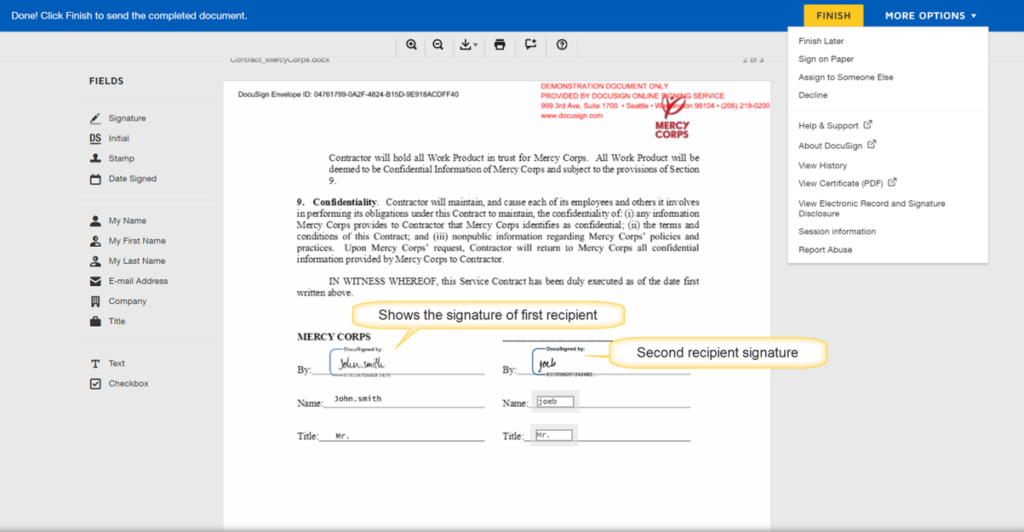
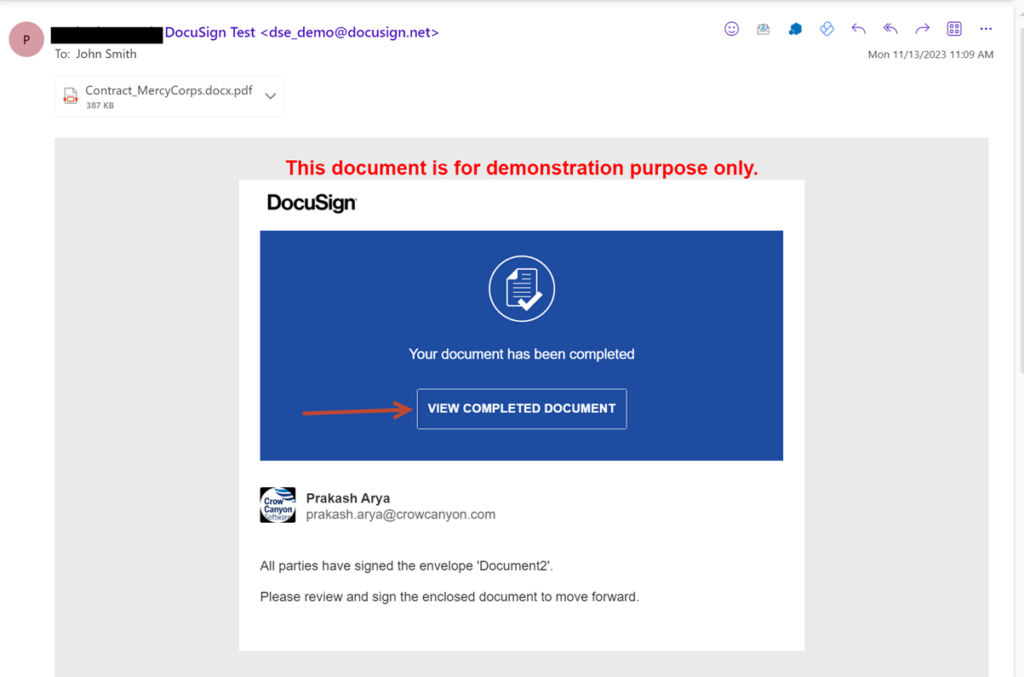
When both the recipient signs the document, process is completed and document is saved in source file location with same source file name with prefix and suffix added. DocURL, SignStatus and Process Log fields of source item will be updated. And document sign completed mail will be sent to recipients.
Sample Output: