Applies To: SharePoint online (NITRO version 2.5.0.42 onwards) and Onprem
Note: Latest NITRO installs CSV Import file.
Description:
This article describes the steps to add data in the SharePoint list from a CSV file using Crow Canyon CSV Import web part.
A CSV (Comma-separated values) file is a delimited text file that uses a comma to separate values. Each line of the file is a data record. Each record consists of one or more columns, separated by commas.
Excel data is different from CSV. To convert the excel file to a CSV file, open the excel data file -> File tab -> Click Save As -> Select save as CSV file.

The CSV Import webpart is used to create items in a SharePoint list using the records from CSV data. It can also be used to update or delete existing items in the list using a matching criterion.
Summary of Steps:
- Add CSV Import webpart to a page
- Import CSV file data to the SharePoint list
Detailed Steps:
Add CSV Import webpart to a page
Add CSV Import web Part in Online and Onprem NITRO Secure and Onprem NITRO Azure Modern Page
- Go to site contents –> Site Pages -> Click Site Pages in ‘New’ dropdown

2. Add “NITRO Container – Crow Canyon” webpart in the page as shown below
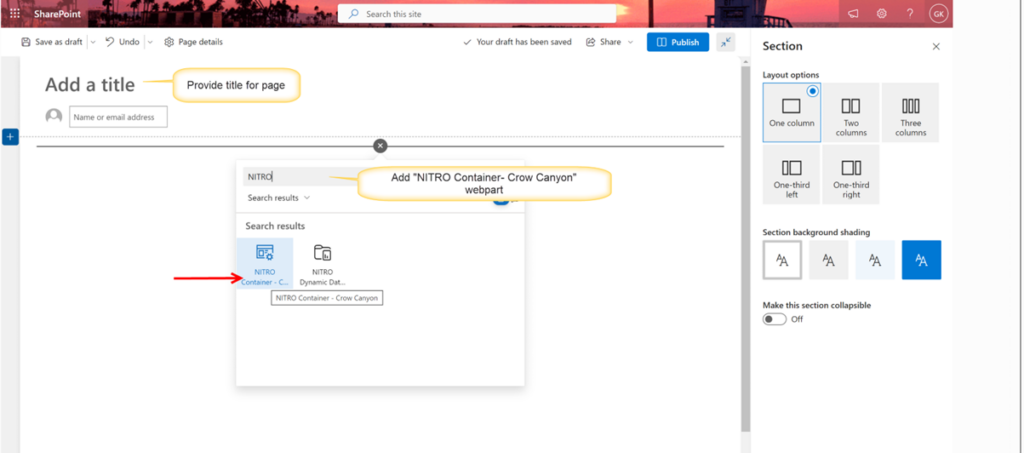
3. After Adding webpart, edit the webpart and select CSV Import in Settings in right panel

4. Publish the page
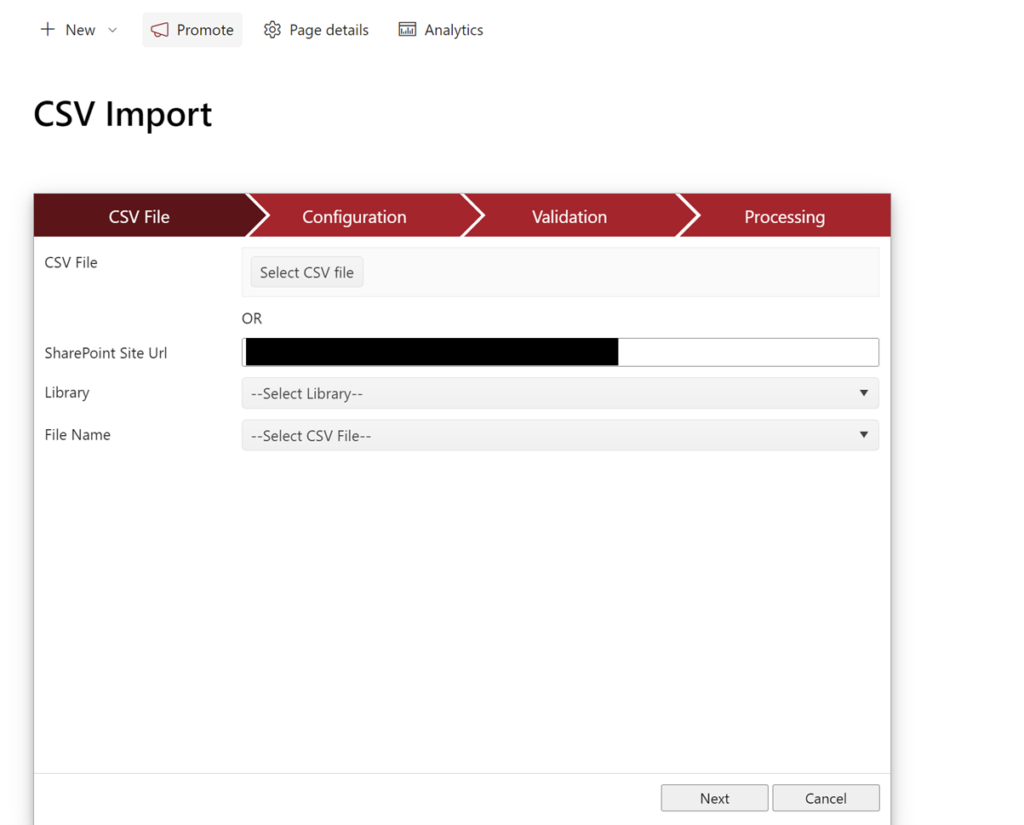
5. After publishing, page will show CSV import webpart as shown below:
Add CSV Import web Part in Online and Onprem (Azure based NITRO (Nonsecure)) Classic Page
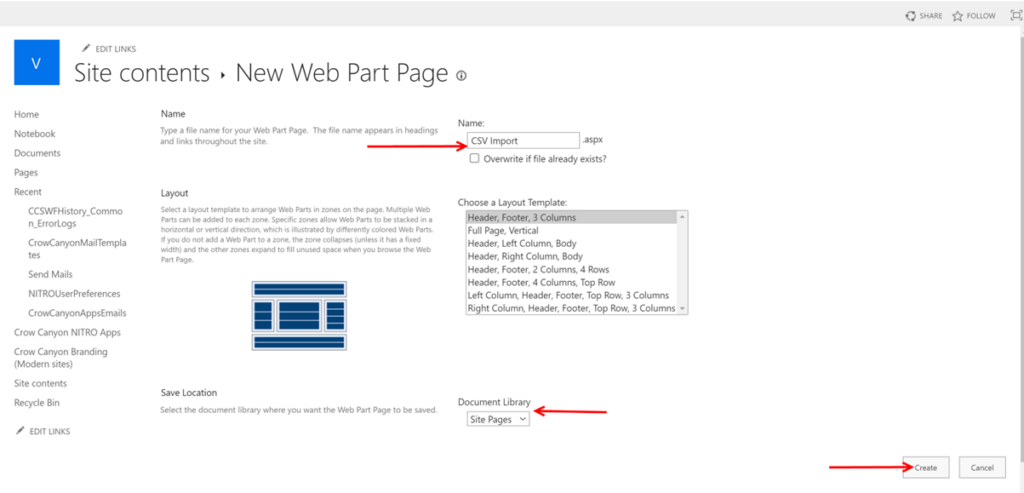
- To create a web part page (Classic), go to site contents –> Site Pages -> click Web Part Page in ‘New’ dropdown and add a web part page

2. Specify the page name, choose the appropriate layout, and select the target document library as shown below:
3. After adding Web Part Page, Click edit web part -> select ’Media and Content’ in Categories -> select ‘Content Editor’ in Parts -> click ‘Add’ button
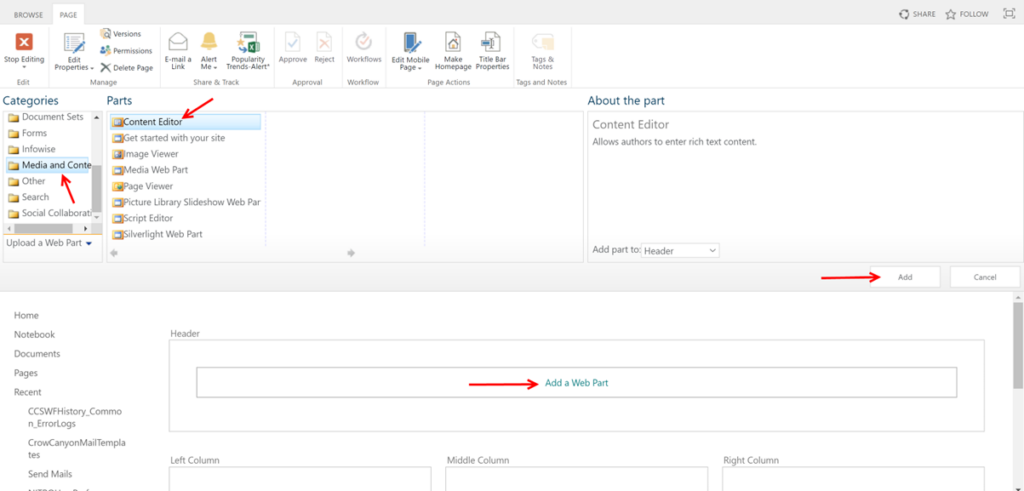
4. After adding ‘Content Editor’ webpart, edit the webpart as shown below
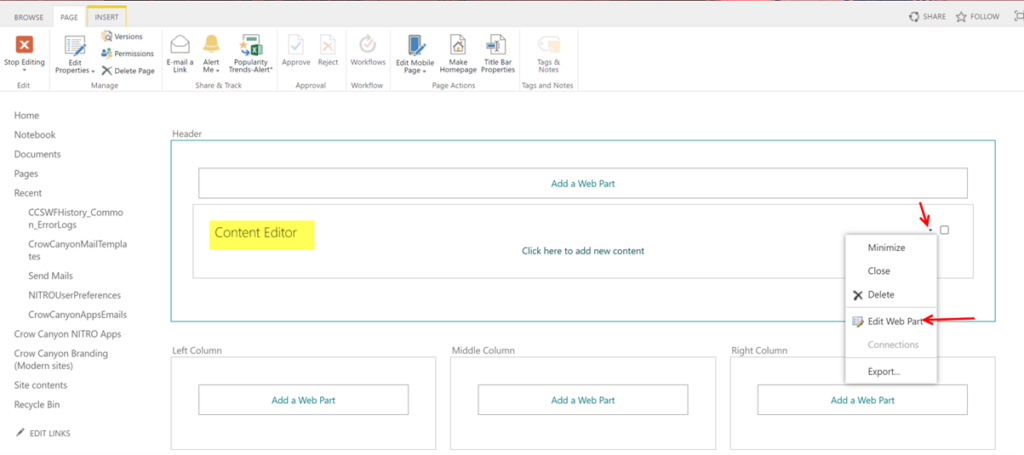
5. Provide below content file URL in ‘Content Link’ in right side of the page. Also, user can select appearance, layout and other settings as per their choice. Click ‘Ok’ or ‘Apply’ button in bottom.
Link for Online webpart and Azure based NITRO (Nonsecure) – https://crowcanyon.azureedge.net/CSVImport/Content/Classic/CSVImportContentWP.xml
- Link for Secure NITRO – #SiteCollectionURL#/CrowCanyonNITRO/CDN/CSVImport/Content/Classic/CSVImportContentWP.xml
Note: For Secure Nitro replace #SiteCollectionURL# with SharePoint Site Collection URL.
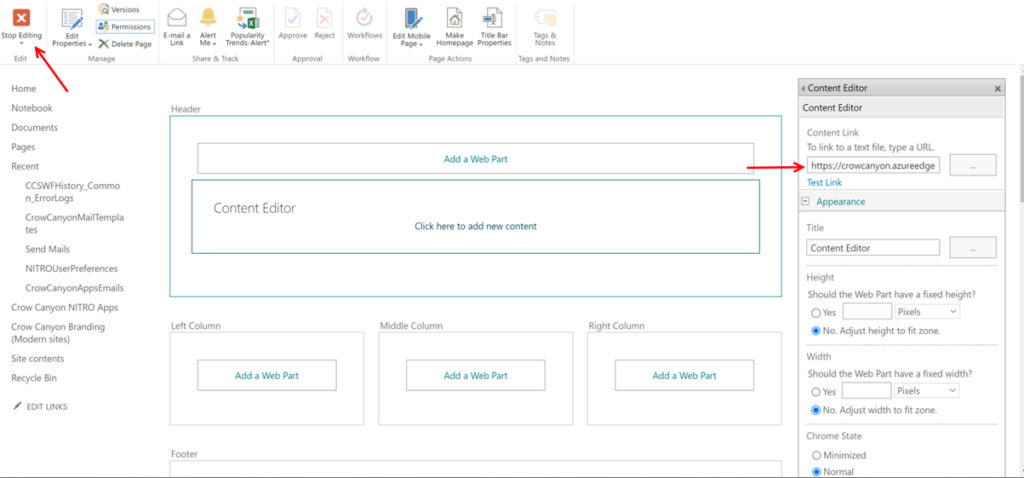
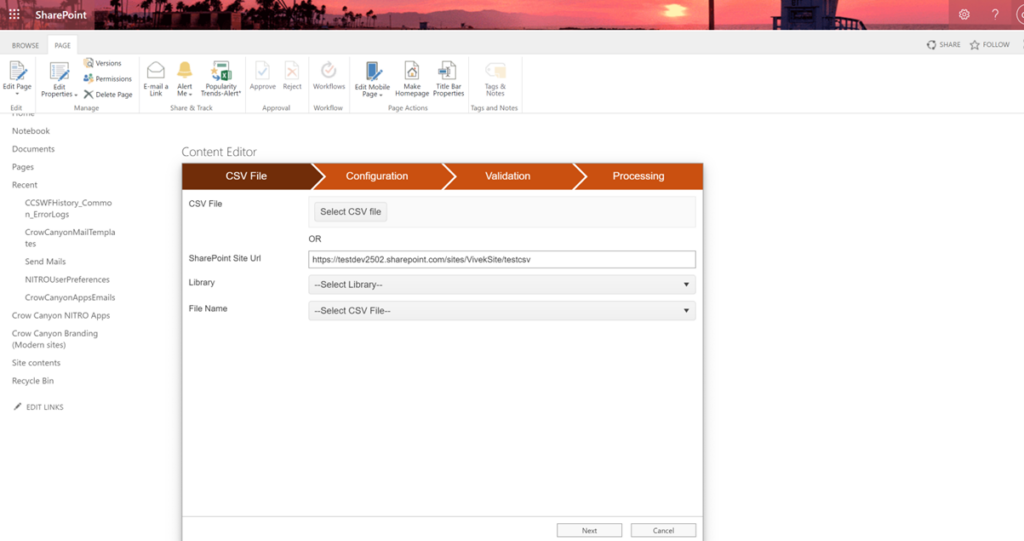
6. Click stop editing webpart in upper left corner. Web Part page will contain CSV Import Webpart as shown below
Import CSV file data to the SharePoint list
Functionality of CSV Import
CSV import webpart is used to import CSV file column data and map it to SharePoint list columns.
CSV Import webpart consists of 4 stages
- CSV File
- Configuration
- Validation
- Processing
CSV File
This stage is used to input CSV file.
Step 1: Prepare the CSV file:
Below table describes the syntax to put value for different column types:
| Column Type | Column Value | Example |
| Single line of text | Specify direct text | Printer is not working |
| Multiple line of text | Specify direct text | Printer is not working |
| Lookup Column (Single and Multi) | Specify lookup column value or lookup id (specify multiple values using semicolon hash (;#) separator) | Single Value: Email Multiple Values: Email;#Network |
| Choice (Single and Multi) | Specify Choice options ( to specify multiple choice use separator comma(,), semicolon(;) or semicolon hash(;#)) | Single Choice: High Multiple Choice: Calendar;Email |
| Date and Time | The value entered in the CSV file must be as per the SharePoint site regional settings. Enter the time in 24 hours format. Syntax: Month-Date-Year Hours:Minutes:Seconds | 08-18-2022 5:30:00 |
| Person or Group (Single and Multi) | Specify display name or login name or user email or user id of user or group | User display name (Single): James Restivo SharePoint group display name (Single): Helpdesk Owners User Ids (Multi): 15;#7:25 Login name (Multi): James Restivo;#Scott Restivo |
| Number and Currency | Specify number values | 500 or 550.50 |
| Yes/No | Specify Yes or No values | yes |
| Hyperlink | Specify hyperlink value | http://www.google.com |
| Metadata (Single and Multi) | Speciy Metadata value (For Multiple values use separator semicolon(;)) | Single Value: Marketing Multiple Values: HR;Marketing |
| Folder | Specify folder path | /sites/NITRO/Helpdesk/ Site Assets/Folder1 |
| Files (Single and Multi) | Specify Files path ( use separator semicolon hash (;#) for multiple files | /sites/NITRO/Helpdesk/ Site Assets/Folder1/logs.txt;# /sites/NITRO/Helpdesk/ Site Assets/Folder1/logs1.txt |
Excel data is different from CSV. To convert the excel file to a CSV file, open the excel data file -> File tab -> Click Save As -> Select save as CSV file.

Or you can export SharePoint list data as CSV file to import this data into another list as shown below:

Sample CSV file


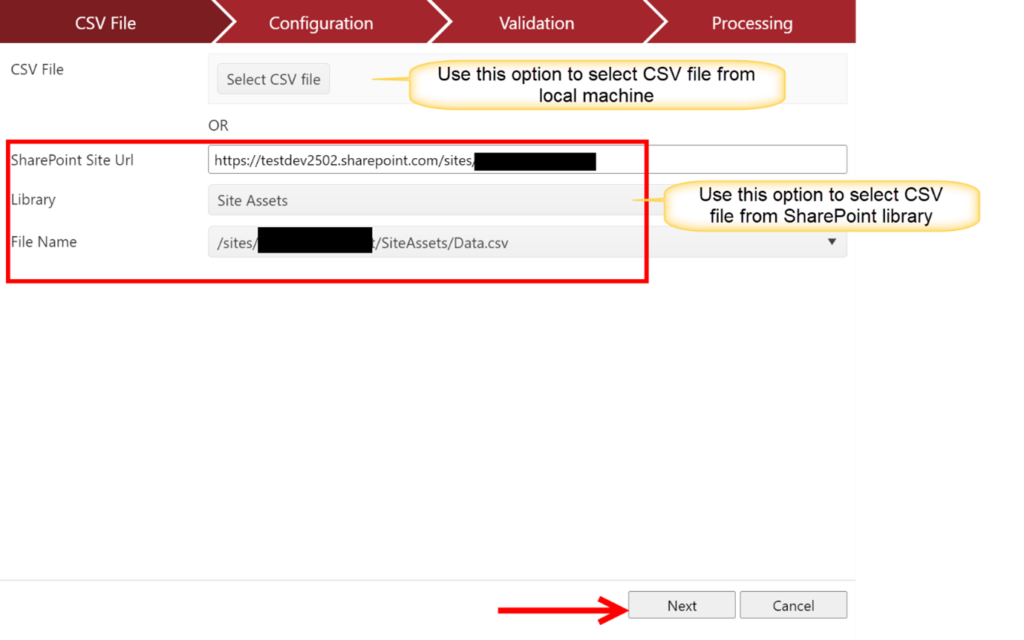
Step 2: Input the CSV file
There are two ways to input CSV File in CSV Import tool
- Select the CSV file using the ‘Select CSV File’ button from the local machine
- Select a CSV file from the SharePoint Library
Click ‘Next’ button to load CSV file
Configuration Stage
In this stage, CSV file columns to SharePoint column mapping is done to create, update or delete items in SharePoint list that matches the criteria.
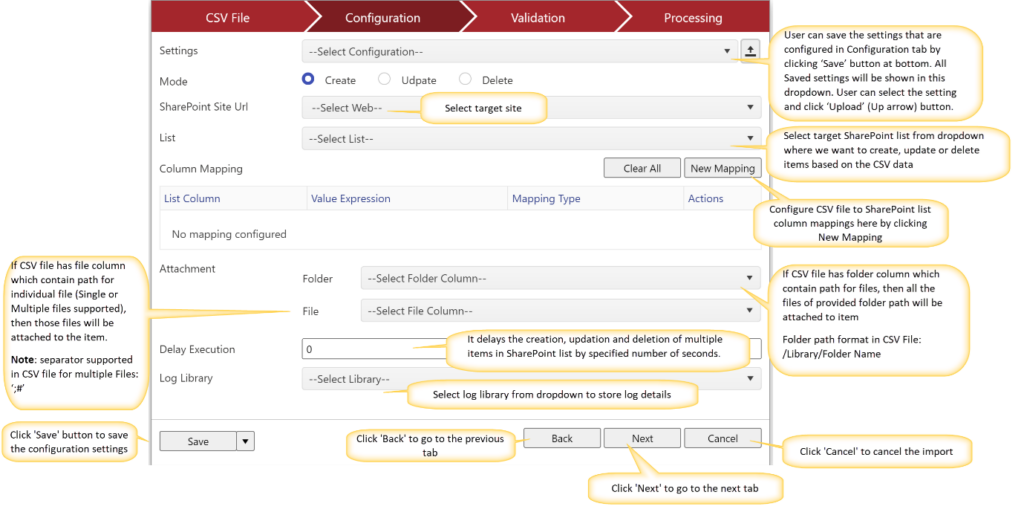
Settings: User can save the settings that are configured in Configuration tab by clicking ‘Save’ button at bottom. All Saved settings will be shown in Settings column dropdown. User can select the setting and click ‘Upload’ button. User can make further changes in the uploaded setting.
Example:
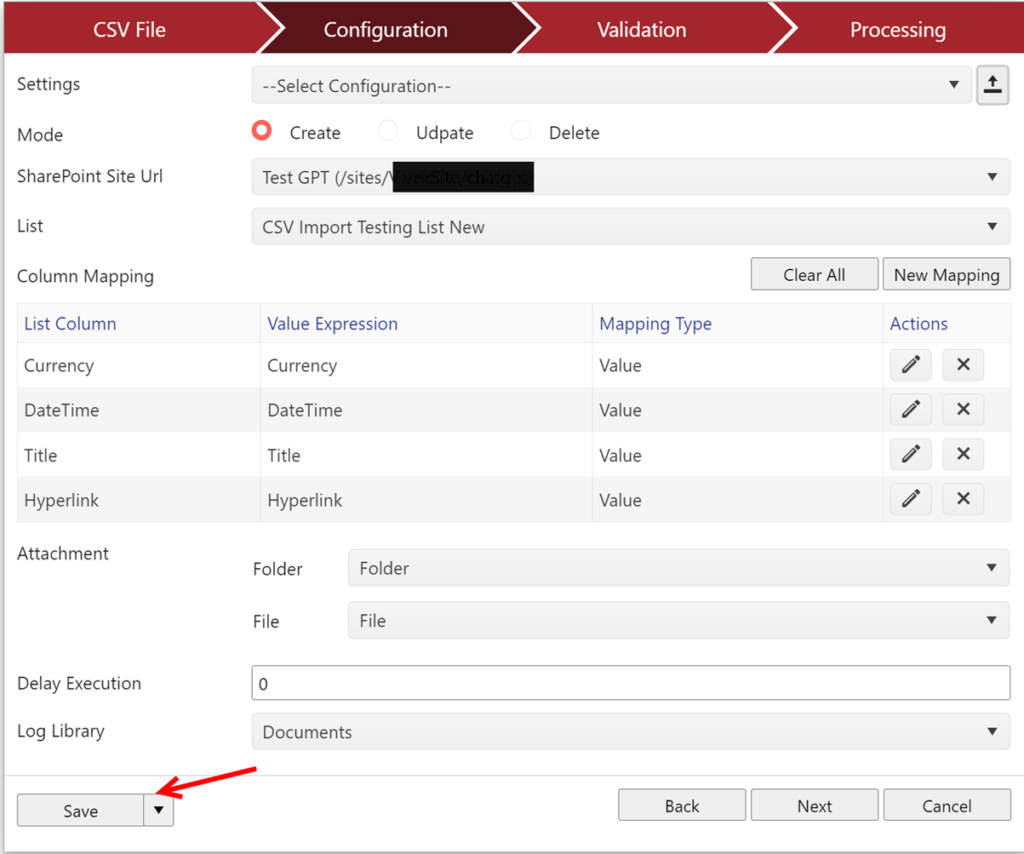
Click Save button to save the above configured settings.
Save Configuration window will pop up. Provide ‘Configuration Name’ and click ‘Ok’

These saved Configurations will be available in ‘Settings’ column dropdown as shown below
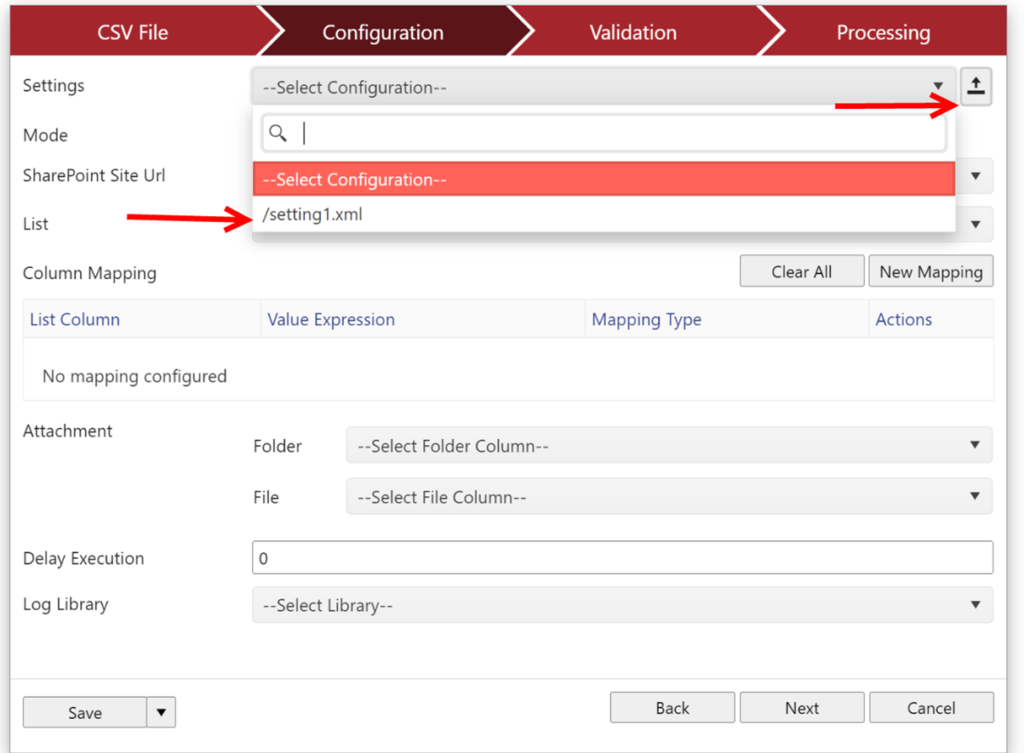
Select the setting and click ‘Upload’ button. This will load the settings configured in selected xml file as shown below.
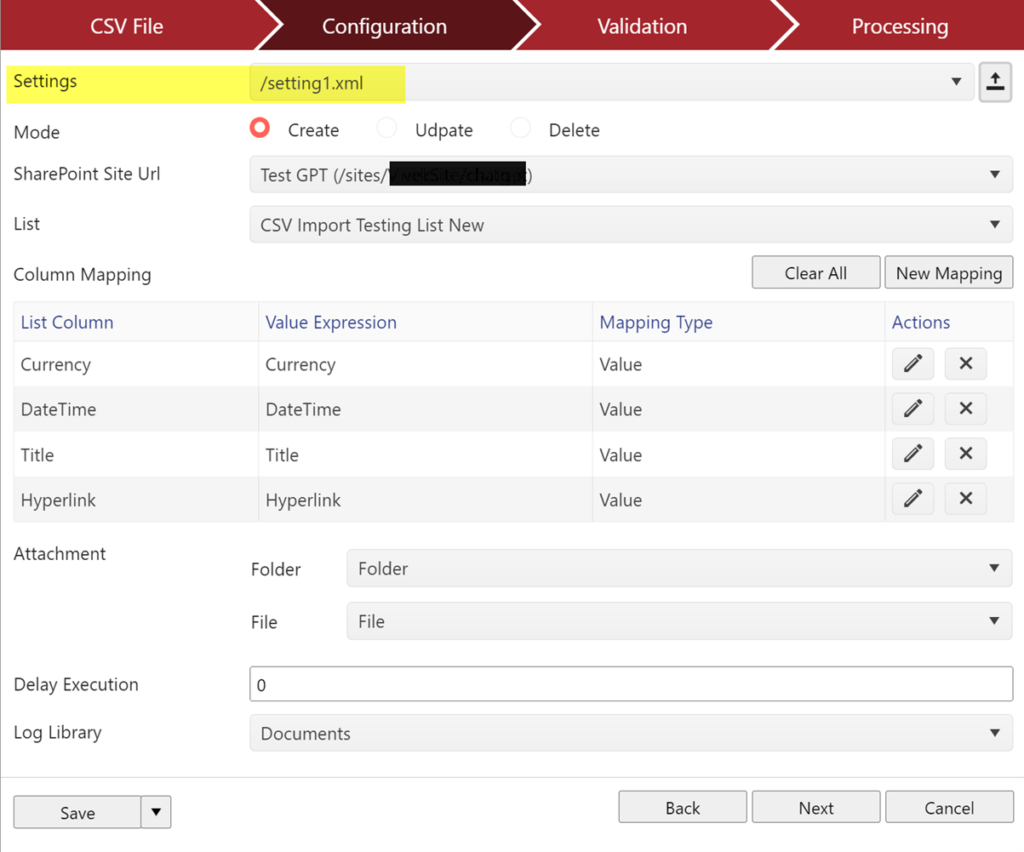
CSV file.
Create: To create items in SharePoint List
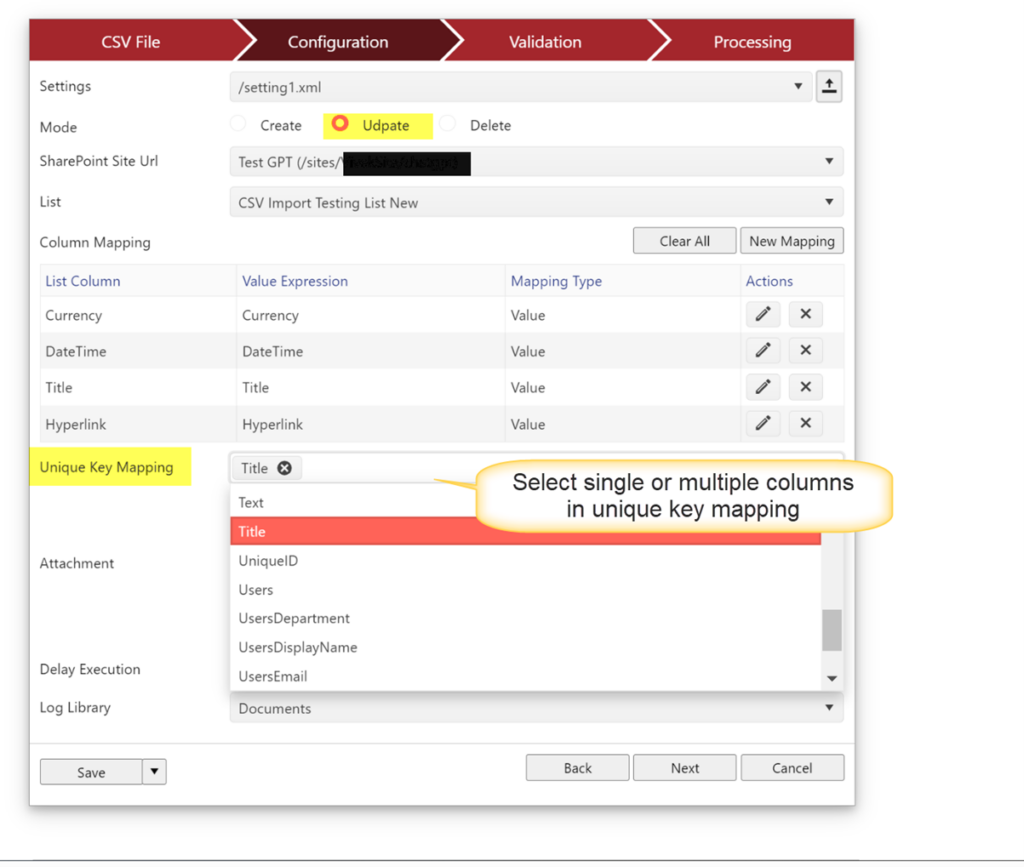
Update: To update SharePoint List Items by providing ‘Unique key’.
This will check if an item is already present in target SharePoint list based on ‘Unique key mapping’
- If item not found, it will create list item as per the column mappings and CSV file content.
- If item found, then it will update existing list item as per the column mappings and CSV file content.
Note: Unique Key selected in update mode should be mapped in Column Mapping too.
Example:
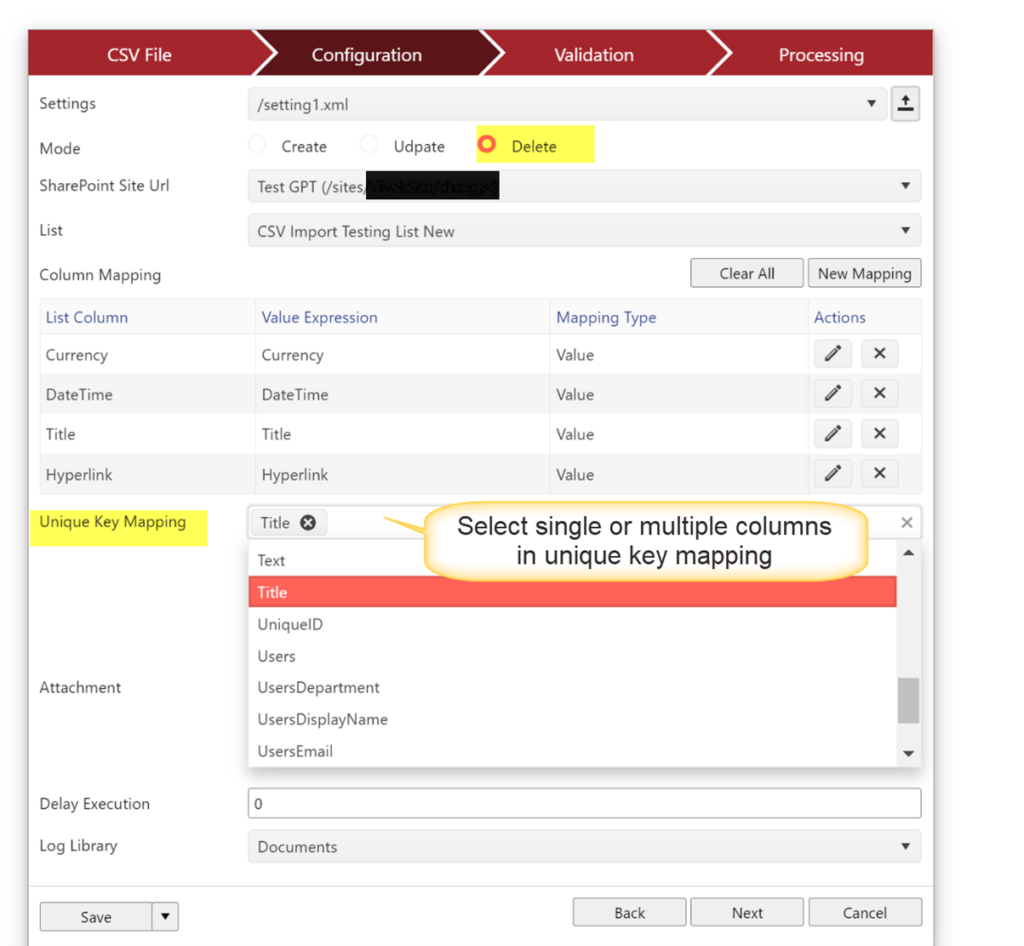
Delete: To delete SharePoint List Items by Providing ’Unique Key’.
System will check if an item is already present in target SharePoint list based on ‘Unique key mapping’
- If item found, then recycle the item.
- If item not found, no action required.
Note: Unique Key selected in delete mode should be mapped in Column Mapping too.
Example:
SharePoint Site URL: Select target SharePoint site URL from dropdown.
List: Select SharePoint list from dropdown where you want to create, update or delete items based on the CSV data.
Column Mapping: Configure CSV file to SharePoint list column mappings as required by clicking ‘New Mapping’ button.
Attachment:
Folder: If CSV file has folder column which contain path for files, then all the files of provided folder path will be attached to item
Folder path format in CSV File: /Library/Folder Name
File: If CSV file has file column which contain path for individual file (Single or Multiple files supported), then those files will be attached to the item.
Note: separator supported in CSV file for multiple Files: ‘;#’
Example: File and Folder column in CSV file are shown below:

Delay execution: It delays the creation, updation and deletion of multiple items in SharePoint list by specified number of seconds.
Log Library: Select log library from dropdown to store log details.
Click ‘Next’ button to go to validation stage.
Validation Stage
This will check the validation of columns mapped (check that mapped columns are valid or invalid) in previous step. Also, it will show the mapped column count.
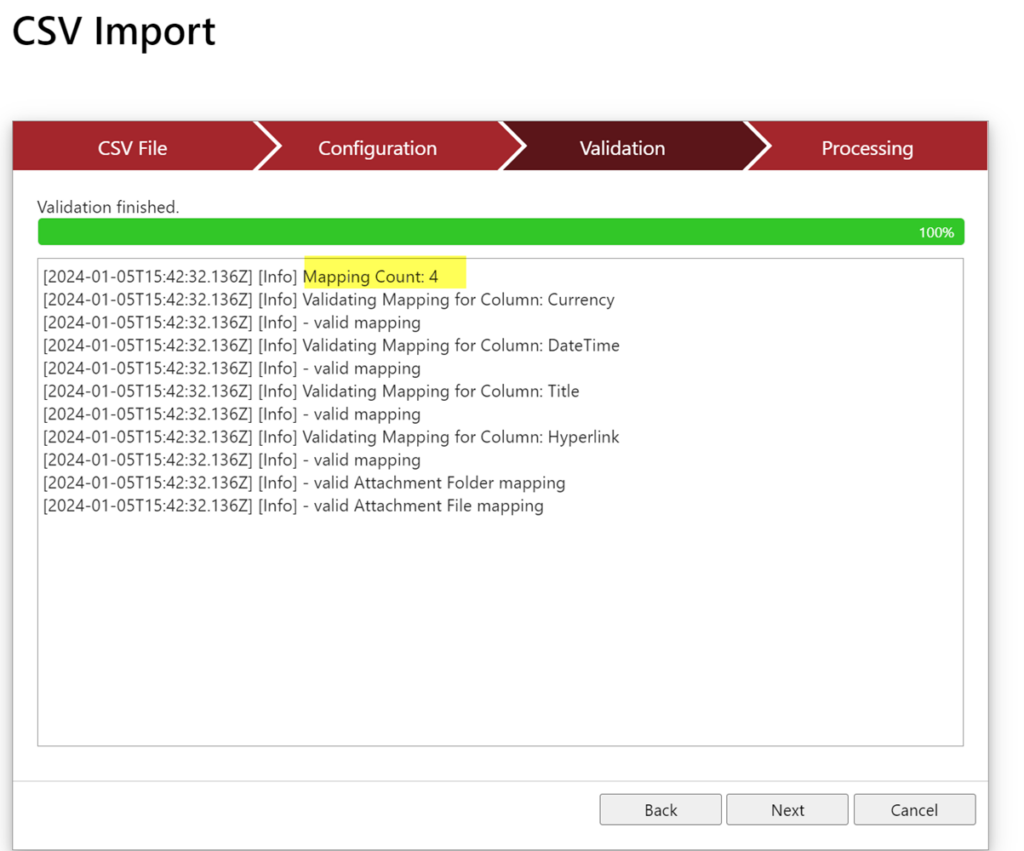
Click ‘Next’ button to go to processing stage.
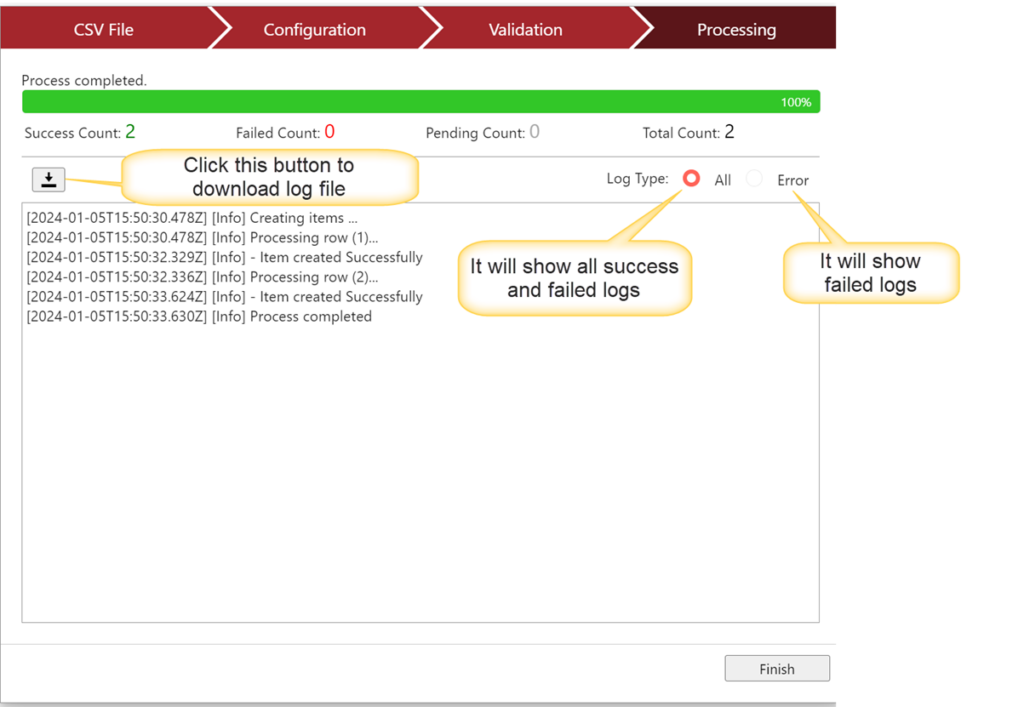
Processing Stage
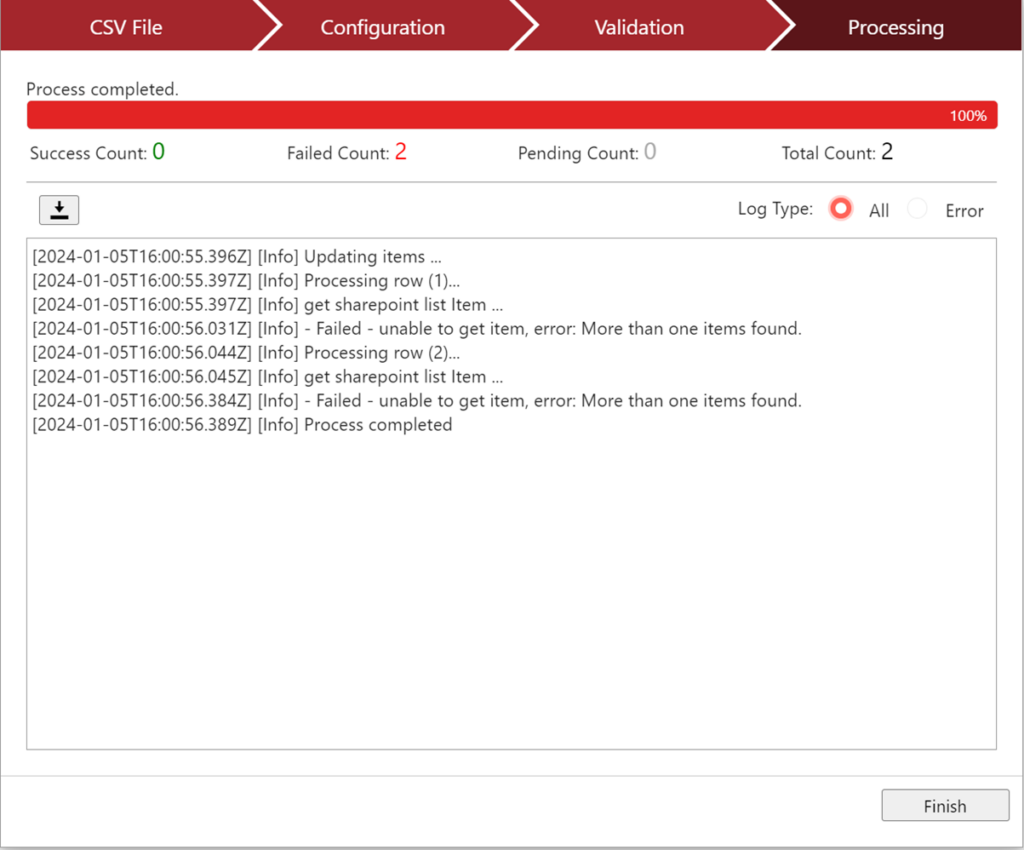
This step will show the
- Success count of item which are successfully created in the target SharePoint list
- Failed Count to show the items which are causing error in creating items in target list
- Pending Count to show the pending items count to map to target list
- Total Count: to show total number of items mapped to target SharePoint list
- Log Type:
All: It will show all success and Failed logs
Error: It will show all failed logs
In Update mode: If selected unique Key fetch more than one item, then error will occur as shown below:
