Applies to: NITRO Help Desk Online
Application Type: NITRO Help Desk
Description
SLAs (service Level Agreements) are a documented agreement between a service provider and a customer that identifies both the services required and the expected level of service. These agreements can be formal or informal.
Web level settings for SLAs applies to all the SLAs. For example: Setting up of business days and business hours will apply for calculation of time for all the SLAs
List Level settings for SLAs are configurable options applied to each SLA that define various attributes of SLA like priority, due date, request status etc.
In the context of ITSM (IT Service Management), SLAs help set and manage the expectations of end users when they raise a request or report an incident. In IT service desks, SLAs are primarily used to define the time it takes for services to be delivered and incidents to be resolved.
SLA feature is now added in Crow Canyon IT helpdesk applications. This article is useful for configuring the SLA feature in standard IT helpdesk applications.
SLA Configurations
Navigation
Go to Application Administration -> Service Level Agreements Tab -> Click SLA tile, this will open the SLA configuration page as shown below:
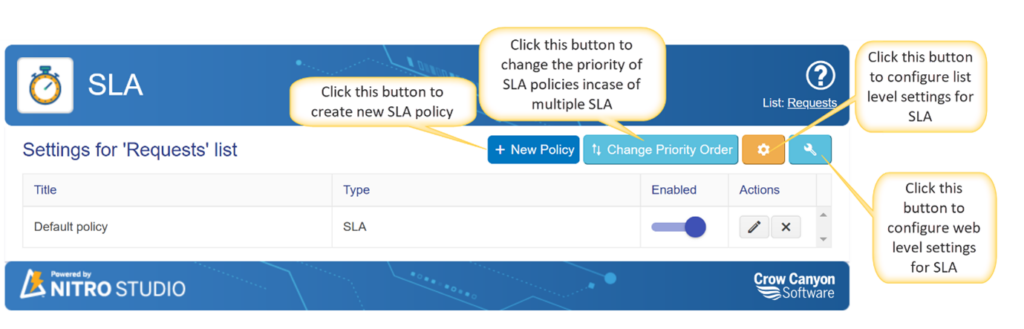
New Policy: Click this button to create new SLA Policy.
Change Priority Order: Click this button to change the priority of SLA policies in case of multiple SLA.
List Level settings: Click this button to configure List level settings for SLA.
Web Level settings: Click this button to configure web level settings for SLA.
Web Level Settings
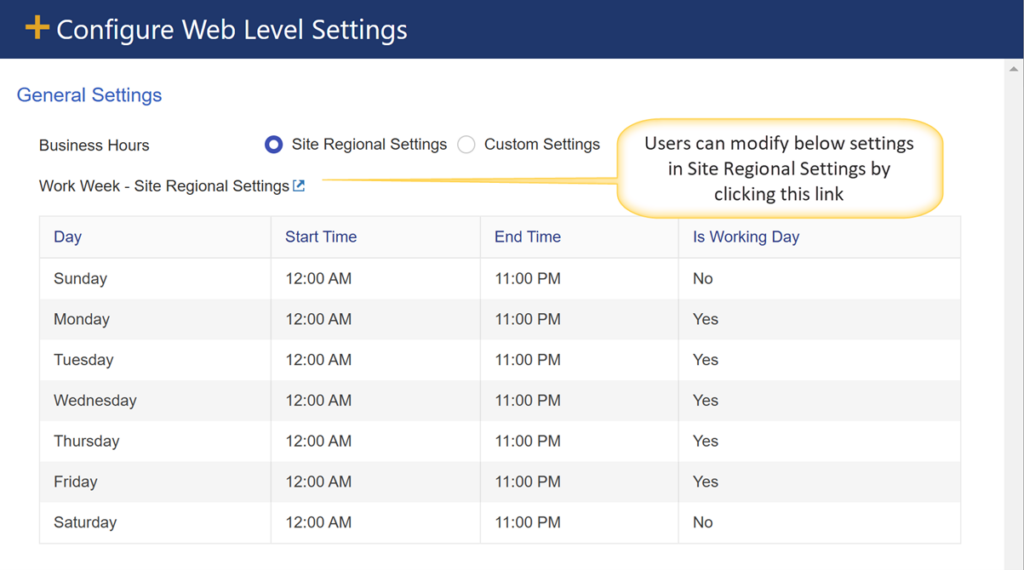
Web Level Settings in SLA determine the business hours during which SLAs are applied and calculated. These settings ensure that SLA timers only run during specified working hours, preventing unnecessary breaches due to non-working hours.
There are two ways to configure Web Level Settings:
- Site Regional Settings: By default, Web Level Settings are automatically populated based on the site’s regional settings. This ensures consistency across the system. If users need to make adjustments, they must navigate to the Site Regional Settings and modify the working hours there.
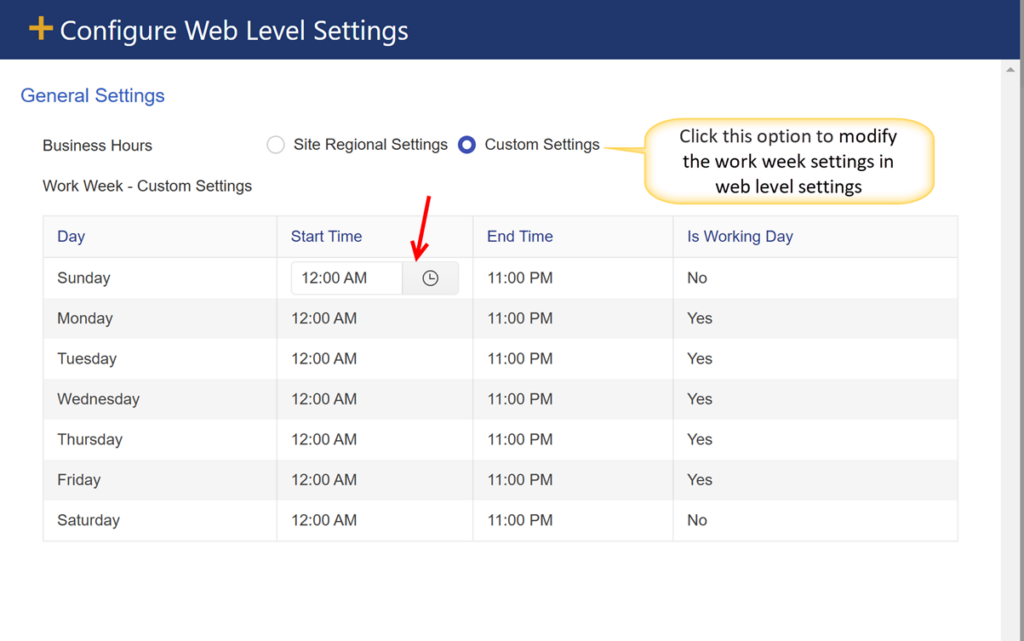
- Custom Settings: If users prefer more control, they can override the default settings and define their own work week directly within Web Level Settings. This allows them to customize working days and hours as per specific business needs. Once these settings are updated, SLAs will be applied according to the newly configured schedule.
Site Regional Settings:
Custom Settings:
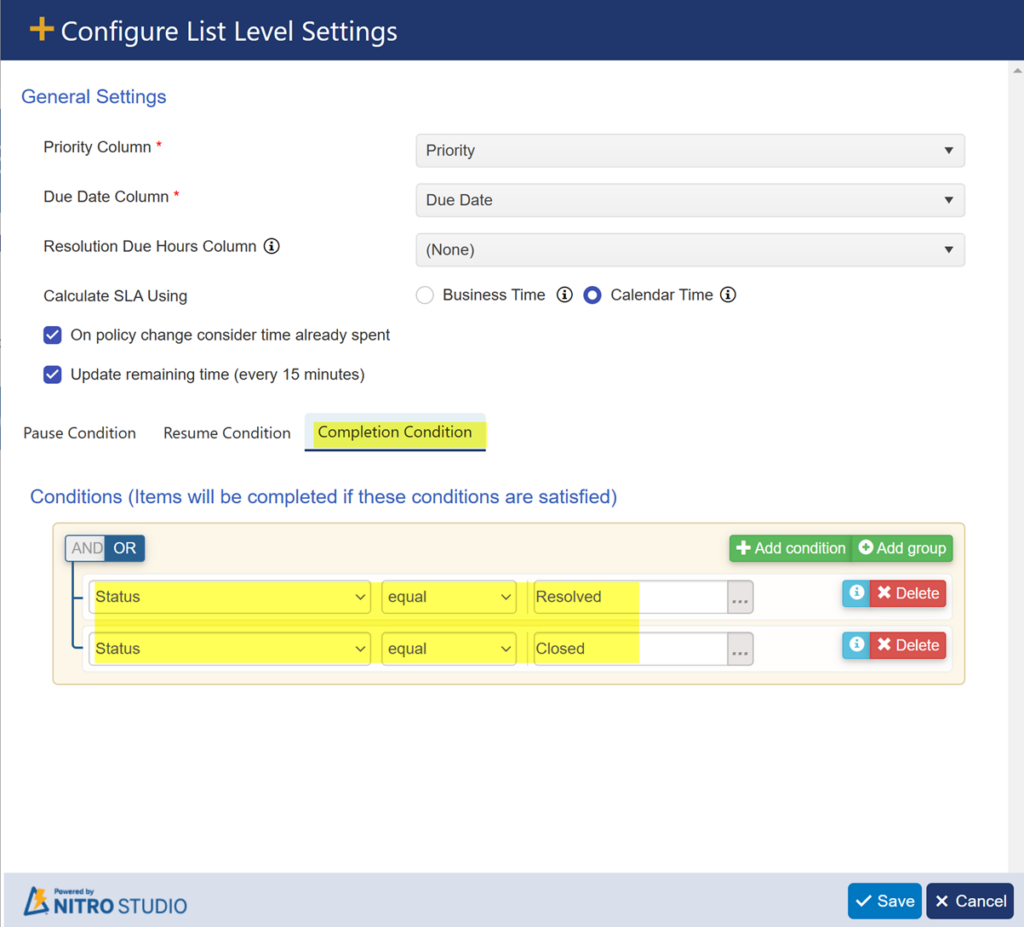
List Level Settings
List Level Settings are used to set various conditions for the SLA like priority, due date, request status etc. These settings can be configured for list level as shown below:
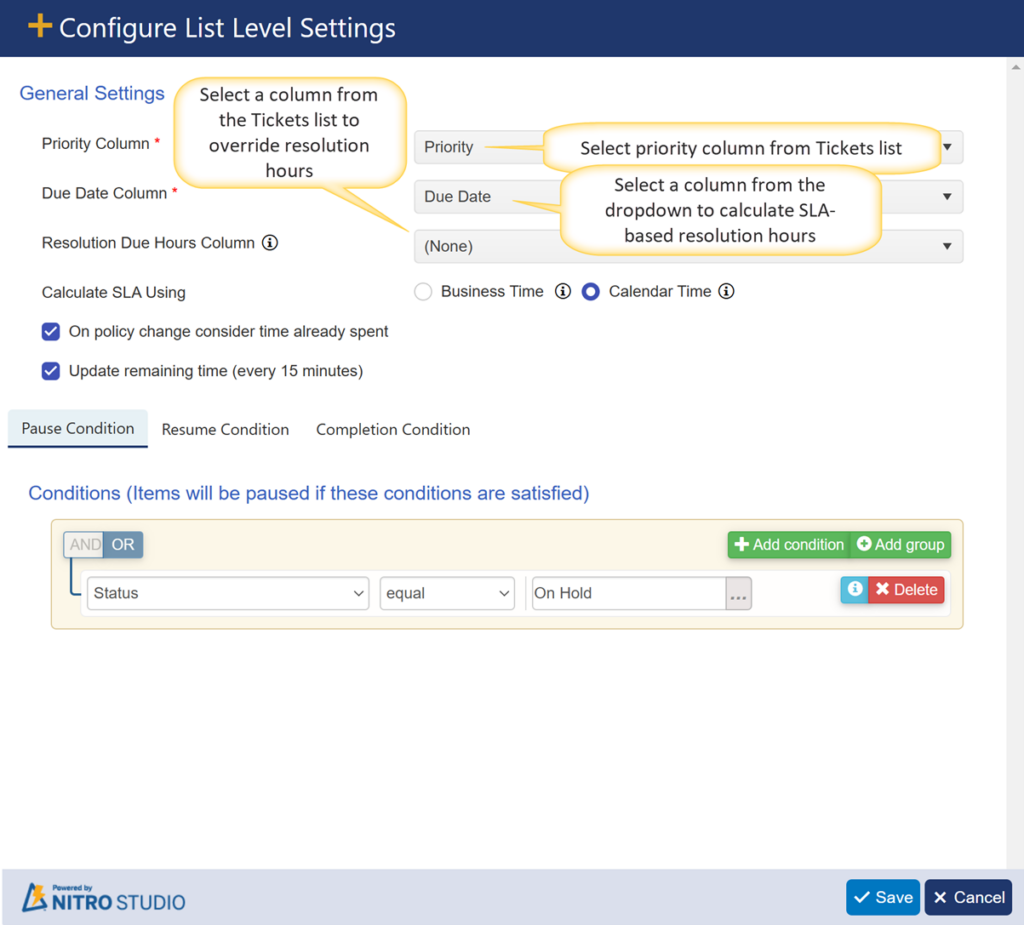
Priority Column: This dropdown will show all choice type of columns from Tickets list. SLA policies will be configured based on the selected priority column.
In this sample use case, we have configured ‘Priority’ column from Tickets list. Below are the options in ‘Priority’ column in Tickets list.
- Low
- Normal
- High
Due Date Column: This dropdown will show all date and time type of columns from Tickets list. Resolution due date will be updated in the selected column in this dropdown.
In this sample use case, resolution due date will be updated in ‘Due Date’ column in the Tickets list.
Resolution Due Hours Column: This dropdown will show all number type of columns from Tickets list. We can use this column to override the resolution hours specified in the SLA policy when calculating the resolution due date.
Note: Value specified in this column will be considered as hours.
If we specify value in the selected column in the Ticket then ‘Due Date’ will be calculated based on the hours specified in this column by overriding the resolution hours configured in the SLA policy, otherwise it will consider the resolution hours specified in the SLA policy.
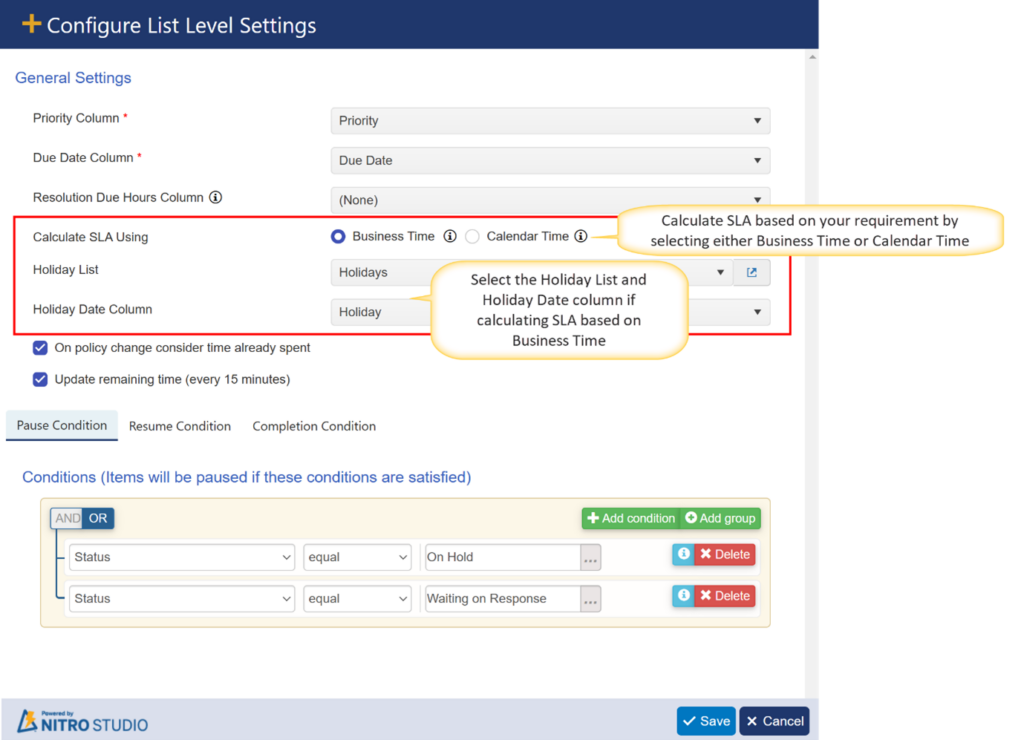
Calculate SLA Using:
SLA will be calculated in below ways:
- Calendar Time
- Business Time
Calendar Time: Selecting this option will calculate the SLA in 24×7 format.
Business Time: Selecting this option will calculate the SLA as per business time settings configured in web level settings in SLA.
Holiday List: Select a custom list which is used to maintain all holidays in this list.
Holiday Date Column: Select date column from above selected list.
Note: Holidays configured in this list will be ignored while calculating the SLA.
On policy change consider time already spent: Enable this setting to consider the time that is already spent on the Ticket on policy change.
For example, initially a Ticket is created with low priority after its escalation priority of the Ticket is changed to high then in this case, SLA will be calculated by considering the time that is already spent on the Ticket. Otherwise, it will calculate the SLA as per the new policy.
Update remaining time (every 15 minutes): Enable this setting to update the remaining times for a Ticket every 15 minutes.
Remaining times for all Tickets will be updated in a custom list “Tickets_SLA_Data” and the reminder and escalation workflows will be triggered by the service.
SLA States:
We have below states in SLA configurations
- Pause: It will stop calculating the SLA times when the specified conditions are matched for this rule
- Resume: It will resume the SLA calculations when the specified conditions are matched for this rule
- Completion: It will finish the SLA calculations when the specified conditions are matched.
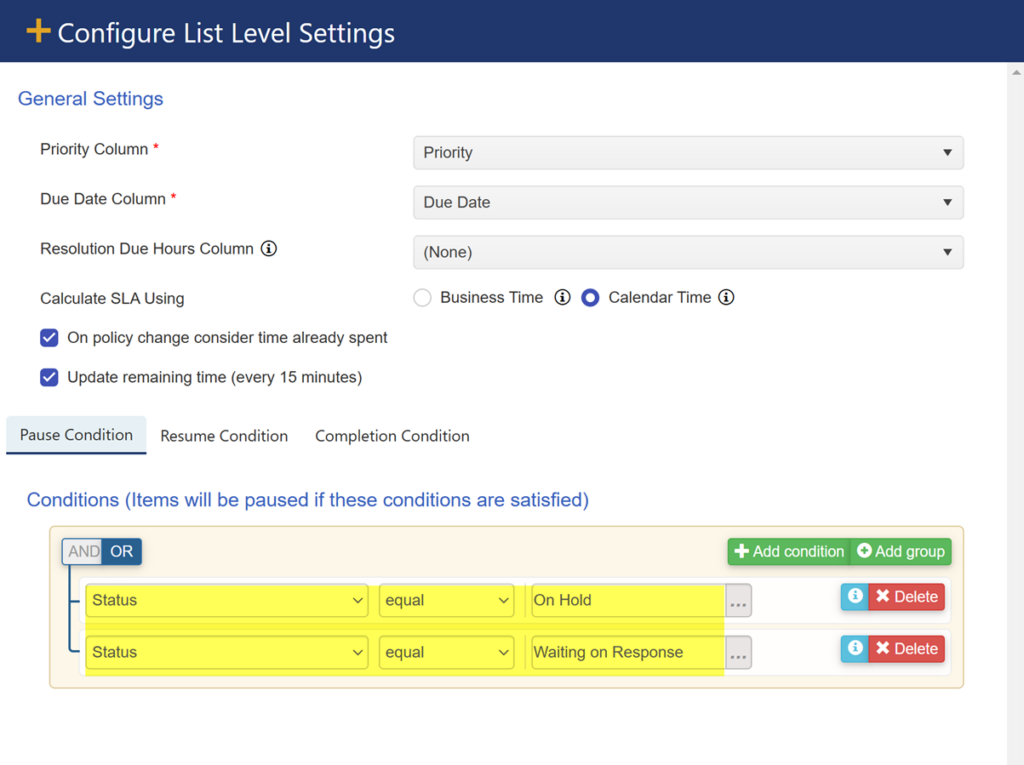
In this sample use case, we have configured Pause, Resume and Completion conditions based on the Ticket status.
Pause Conditions:
When Ticket status is ‘On Hold’ or ‘Waiting on Customer’ then system will stop calculating the SLA times.
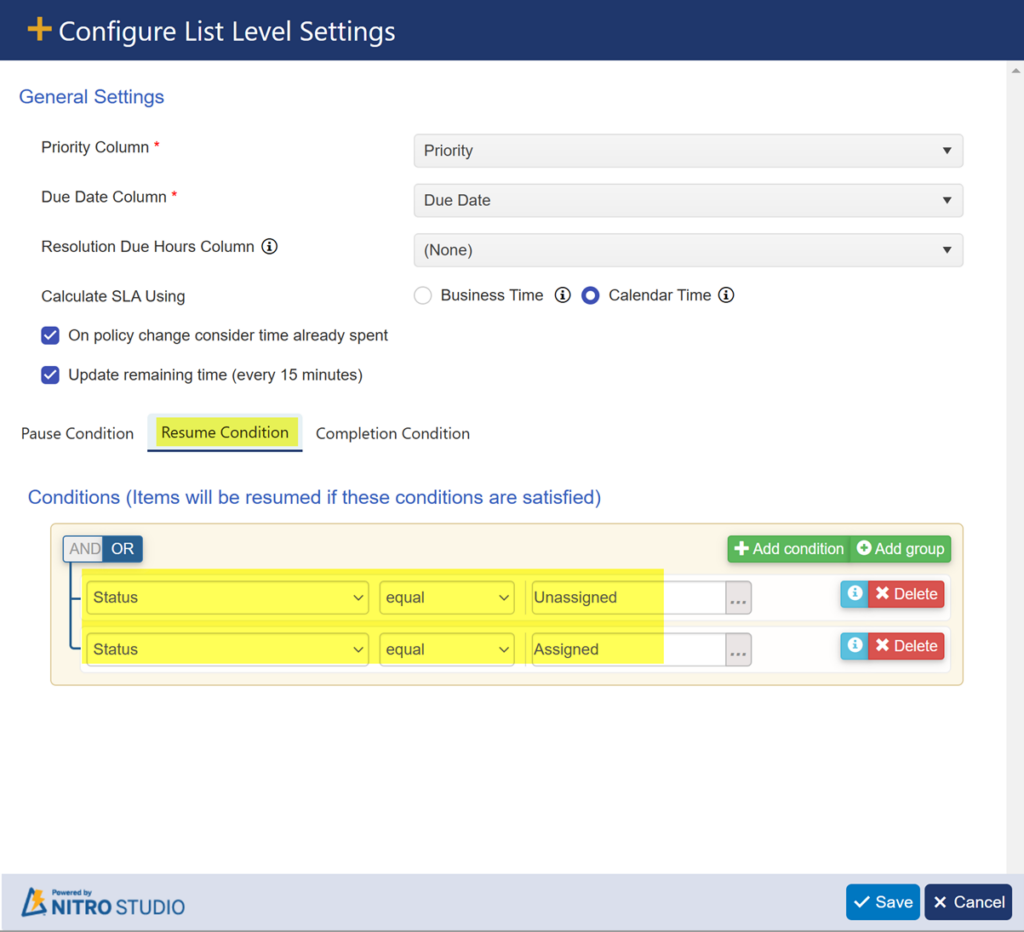
Resume Conditions:
When Ticket status is ‘Unassigned’ or ‘Assigned’ then system will start or resume the SLA calculations.
Completion Condition:
When Ticket status is ‘Resolved’ or ‘Closed’ then system will finish the SLA calculations.
SLA Policies
Define SLA policies as required. Based on the specified criteria, if any of the Ticket is matched then system will apply that SLA policy.
We can define one or more SLA policies based on our requirement. Click ‘New Policy’ button to create the policies.
Note: Conditions are required to create a policy except for default policy.
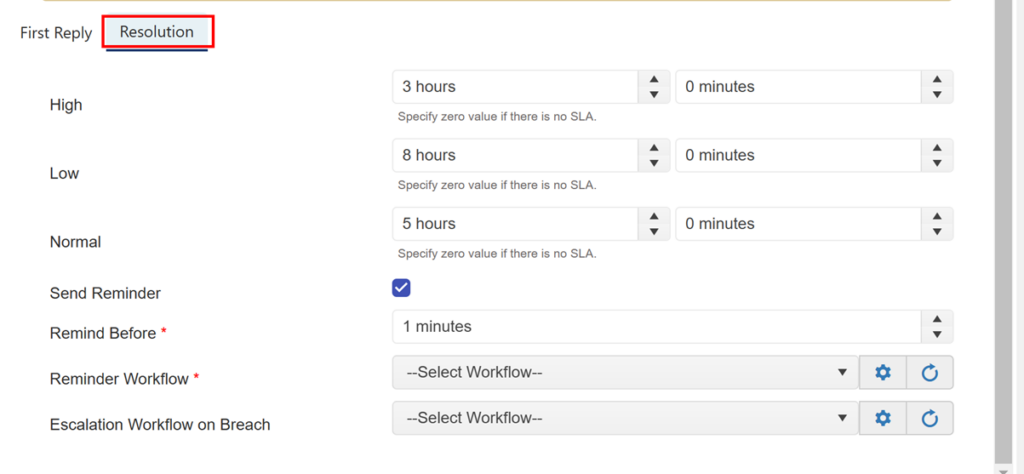
When ‘Send Reminder’ is enabled, the ‘Remind Before’ and ‘Reminder Workflow’ columns become visible.

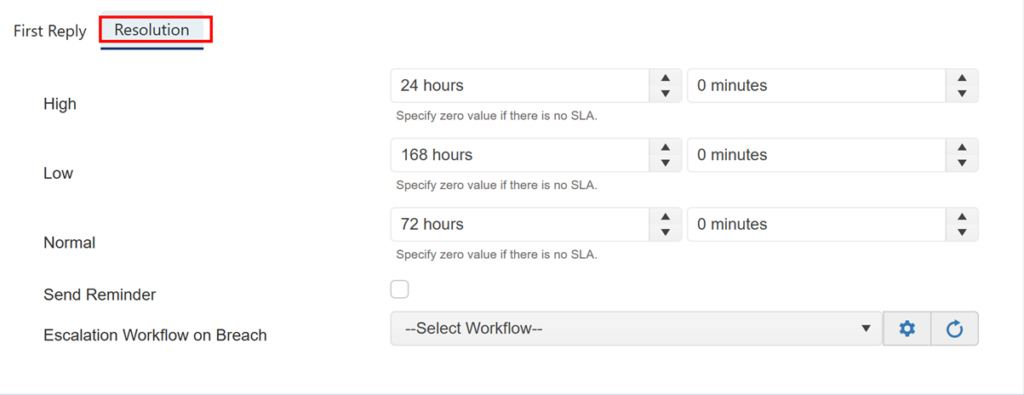
Resolution Tab:
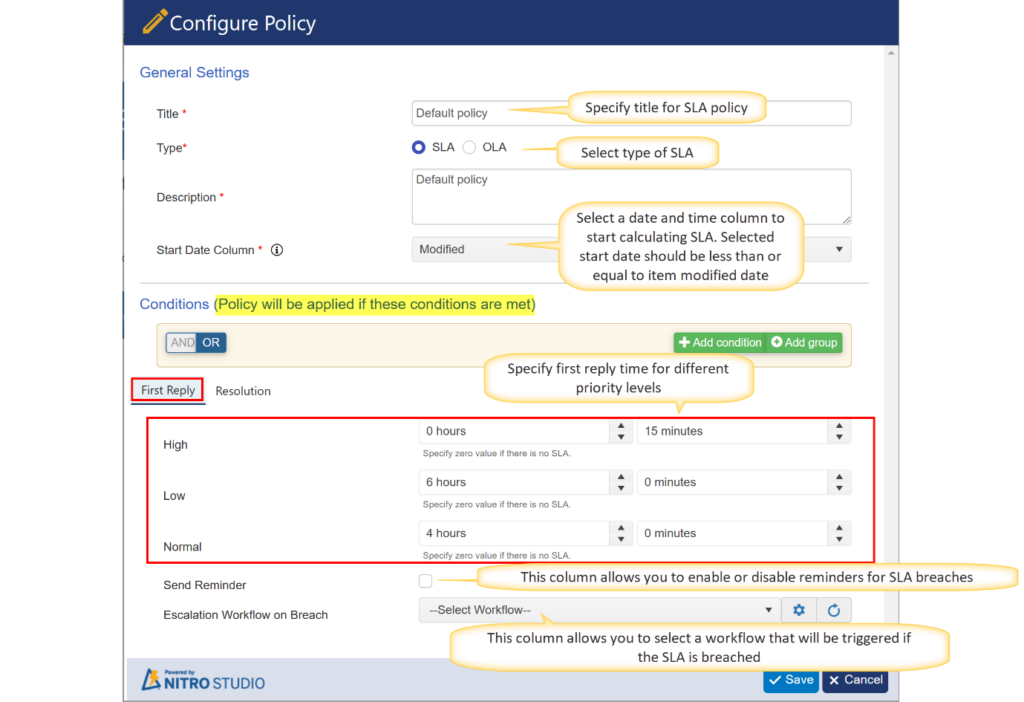
- Title – This is the name of the SLA, which helps users identify the specific agreement being applied. It should be descriptive and meaningful, such as “High Priority Incident SLA” or “Standard Customer Support SLA.”
- Description – This field provides additional details about the SLA, including its purpose, scope, and any specific conditions or rules. The description helps users understand what the SLA covers and under what circumstances it applies.
- Start Date – This defines when the SLA becomes active. It could be the date when the agreement is signed, the date a service contract begins, or the date when a request/ticket is created in the system.
- Conditions – Define the rules for when the SLA is applied.
- Priority Levels: This column allows you to set different priority levels for tickets, such as High, Normal, and Low. Each priority level can have its own first reply/resolution time.
- First Reply Time: This column sets the time frame within which the first response to a ticket should be made. This helps ensure that users receive timely acknowledgment of their requests.
- Resolution Time: This column specifies the time frame within which tickets of a particular priority level should be resolved. For example, High priority tickets might have a resolution time of 24 hours, while Low priority tickets might have a resolution time of 168 hours (7 days).
- Send Reminder: This column allows you to enable or disable reminders for SLA breaches. If enabled, reminders will be sent when the SLA is breached, prompting action to resolve the ticket.
- Escalation Workflow: This column allows you to select a workflow that will be triggered if the SLA is breached. These workflows will be triggered if response or resolution times are breached.This ensures that appropriate actions are taken to address the breach and resolve the ticket.
Each of these columns serves a specific purpose in managing and prioritizing support tickets effectively, ensuring that users receive timely responses and resolutions based on the priority of their requests.
Sample Configuration:
Note:
- If we specify resolution time as ‘0’ then that policy will not be applied.
- If we specify first reply time as ‘0’ then first reply will not be applied for the Ticket, only resolution time will be applied for the Ticket.
Default Policy
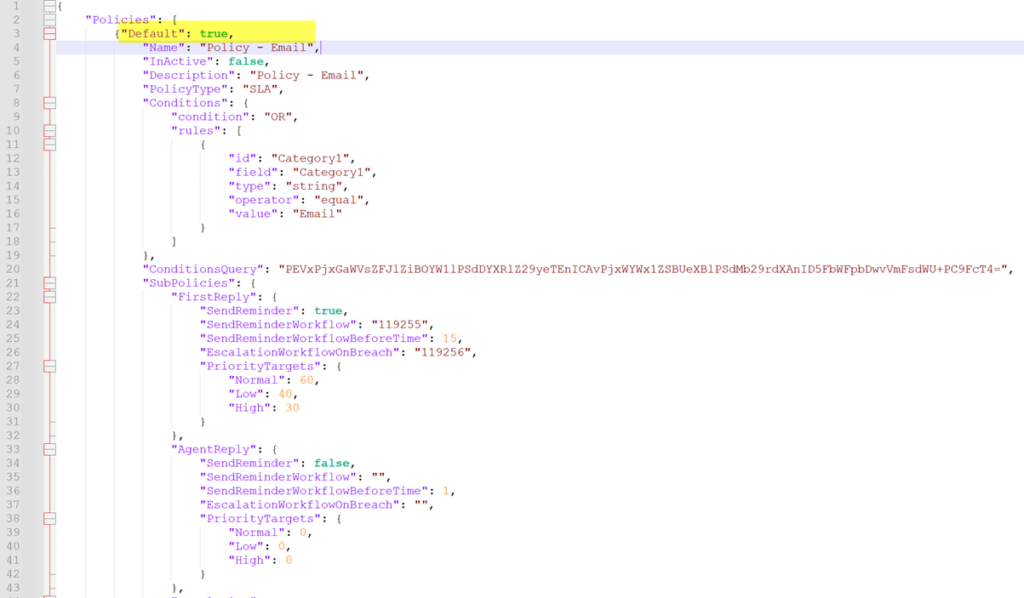
We cannot create default policies from the SLA page directly. After creating a policy, we can make the policy as default by adding the ‘DefaultPolicy’ property in the SLA settings file saved in Site Assets.
To make a policy as default, go to the Site à Site Assets à Download the policy settings file and put ‘DefaultPolicy’ property as shown below:
After updating the default property, upload the settings file again in the same location.
Note:
- Default policy can be configured with or without any conditions.
- We cannot change the priority of default policy. Priority of default policy should always be at last in the page.
- Default policy will not be shown in ‘Change Priority Order’ setting page
SLA Columns
SLA feature uses below list of columns in Tickets list. These columns will be created automatically when we save the settings at list level or create a new SLA policy in SLA configuration page.
Make sure all below columns are created in Tickets list.
| Column Name | Column Type | Description |
| SLAOverdueStatus | Single line of Text | Specifies if the Ticket is overdue or not |
| SLAStartTime | Date and Time | Captures the time when the SLA policy is applied |
| SLATotalTimeSpent | Number | Specifies the total time taken to resolve or close the Ticket |
| SLAType | Single line of Text | Specifies the type of SLA i.e., SLA or OLA |
| SLAStatus | Single line of Text | Specifies the state (Active or Inactive) of SLA for a Ticket |
| SLAPolicyId | Single line of Text | Applied SLA policy Id will be captured in this column |
| SLAPolicyApplied | Single line of Text | Applied SLA policy name will be captured in this column |
| SLAPolicyJSON | Multiple lines of Text | Applied policy configuration settings will be saved as JSON in this column |
| SLAReminderResolutionDate | Date and Time | Reminder date for Ticket resolution |
| SLAReminderFirstReplyDate | Date and Time | Reminder date for first reply to the Ticket |
| SLAFirstReplyDueDate | Date and Time | Due date for first reply |
| SLAFirstReplyRemainingTime | Number | Remaining time for the first reply will be captured in this column |
| SLAResolutionRemainingTime | Number | Remaining time for Ticket resolution will be captured in this column |
| SLAResumeDate | Date and Time | Captures the time on which the SLA calculation is resumed |
| SLAPausedDate | Date and Time | Capture the time on which the SLA calculation is paused |
| SLAFirstReplyBreached | Yes/No | Specifies whether the Ticket is responded within the first reply due date or not |
| SLAResolutionBreached | Yes/No | Specifies whether the Ticket is resolved within the due date or not |
| SLAWorkLog | Multiple lines of Text | Used to capture the SLA process log in this column. |
| SLAAvailableTime | Number | Used to capture the time available to resolve or close the Ticket |
| SLAFirstReplyEscalationWFSent | Yes/No | Specifies whether the escalation workflow triggered on Ticket first reply overdue or not |
| SLAResolutionEscalationWFSent | Yes/No | Specifies whether the escalation workflow triggered on Ticket resolution overdue |
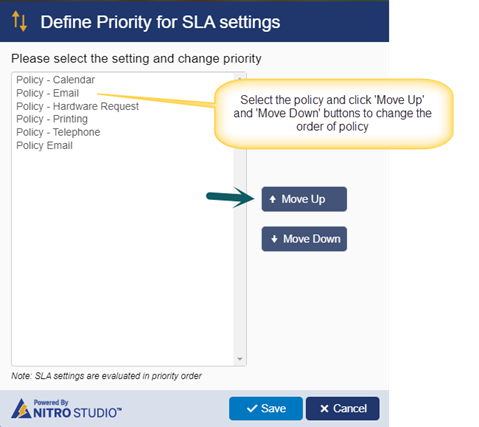
Change Priority Order
Giving priority order to policy settings is useful when there are multiple policies configured with same conditions. This option will give the ability to prioritize the policies.
SLA Response Indication
First reply will be captured below ways for a Ticket.
- Incoming Email
- Item Update
- Outgoing Email
To capture the first reply response in a Ticket, we need to enable the response indication feature in configuration item.
Instructions to enable SLA response Indication:
This feature uses below columns. Make sure all below columns exist in the corresponding lists, if not, create all the columns.
| List Name | Column Name | Column Type | Description |
| Configurations | Internal Name: KPISettings Display Name: KPI Settings | Multiple lines of plain text | This column will be used to enable or disable the response indication feature |
| Tickets | Internal Name: FirstAssignedStaff Display Name: First Assigned Staff | Single line of text or person or group | Used to capture the first staff assigned for a Ticket |
| Tickets | Internal Name: FirstRespondedBy Display Name: First Responded By | Single line of text or person or group | Used to capture the user who is first responded for a Ticket |
| Tickets | Internal Name: FirstRespondedVia Display Name: First Responded Via | Single line of text | Captures the first response indication type |
| Tickets | Internal Name: FirstAssignmentDate Display Name: First Assignment Date | Date and Time | Capture the time when Ticket is assigned first time |
| Tickets | Internal Name: FirstResponseDateTime Display Name: First Responded On | Date and Time | Capture the time when the Ticket is first responded |
| Tickets | Internal Name: TimeToAssign Display Name: Time To Assign | Number | Time taken to assign a Ticket from its creation |
| Tickets | Internal Name: FirstResponseTime Display Name: First Response Time | Number | Time taken to respond to a Ticket from its creation |
| Tickets | Internal Name: TimeToRespondAfterAssign Display Name: Time To Respond After Assign | Number | Time taken to respond to a Tickets from its assignment |
- Add ‘KPISettings’ column to ‘Configuration’ list form
Go to Configurations list -> List Settings -> Crow Canyon NITRO Forms -> Add ‘KPI Settings’ column in ‘Extended Settings’ tab.
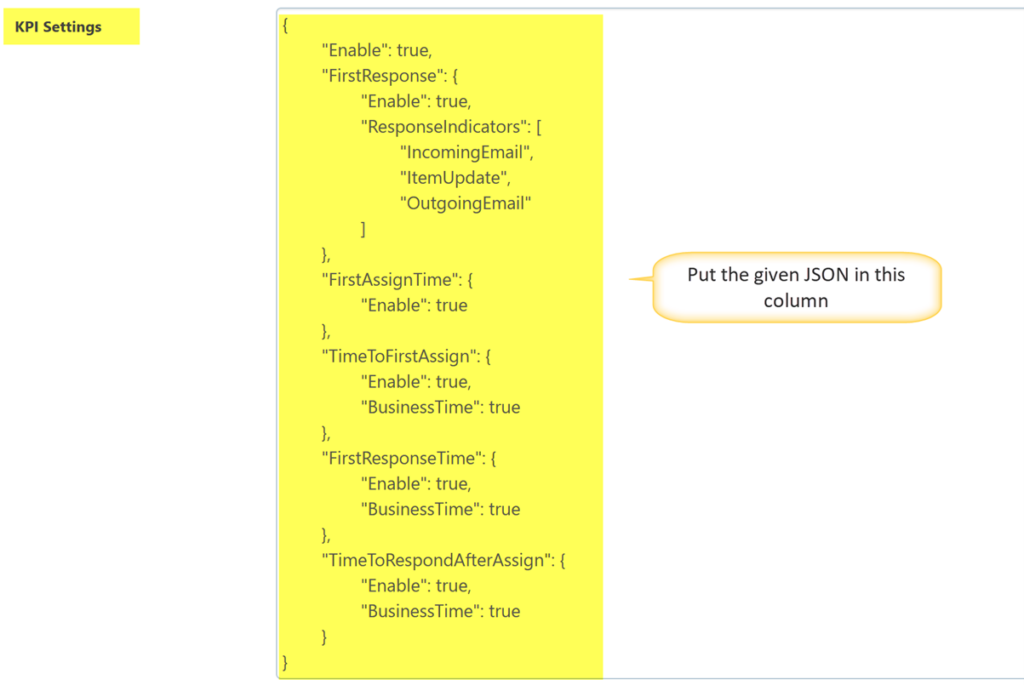
- Configure below JSON in ‘KPI Settings’ in configuration item.
Go to Application Administration -> General Settings -> Navigate to Extended Settings -> Configure the below JSON in ‘KPI Settings’
JSON:
{
	"Enable": true,
	"FirstResponse": {
		"Enable": true,
		"ResponseIndicators": [
			"IncomingEmail",
			"ItemUpdate",
			"OutgoingEmail"
		]
	},
	"FirstAssignTime": {
		"Enable": true
	},
	"TimeToFirstAssign": {
		"Enable": true,
		"BusinessTime": true
	},
	"FirstResponseTime": {
		"Enable": true,
		"BusinessTime": true
	},
	"TimeToRespondAfterAssign": {
		"Enable": true,
		"BusinessTime": true
	}
}
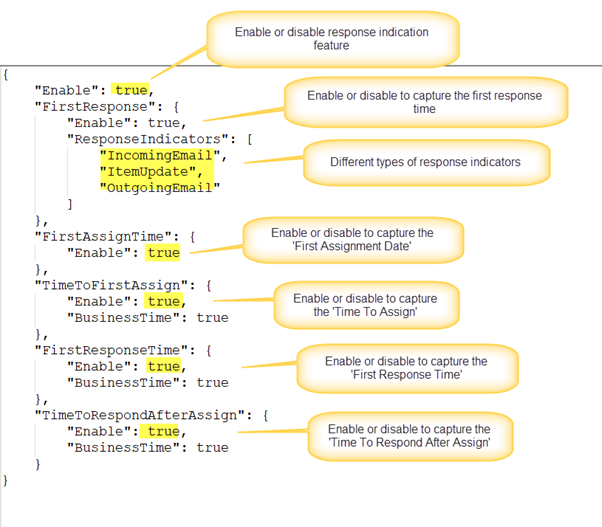
FirstResponse:
Enabling this property will update the below columns in Tickets when user responded for a Ticket.
Below are the response indicators:
Incoming Email: When non-requester sends an email to an existing Ticket.
Item Update: When non-requester updated the Ticket directly in the site.
Outgoing Email: When non-requester sends mail directly from the Ticket using ‘Send Mail’ button.
In all above cases, below columns will be updated.
- First Responded By
- First Responded Via
- First Responded On
FirstAssignTime:
Enable this property to capture the staff assignment information in below columns:
- FirstAssignedStaff
- FirstAssignmentDate
TimeToFirstAssign:
Enable this property to capture the time taken to assign the staff for a Ticket. Time will be updated in ‘Time To Assign’ column in the Ticket.
FirstResponseTime:
Enable this property to capture the time taken to respond for a Ticket. Time will be captured in ‘First Response Time’ column.
TimeToRespondAfterAssign:
Enable this property to capture the time taken to respond to a Ticket after staff assignment. Time will be captured in ‘Time To Respond After Assign’ column.
SLA Reports Dashboard
“SLA Reports” dashboard page will be created in “Site Pages” library.
This page will show default reports configured on SLA.
Below are the reports for SLA
- Tickets overdue (Last 7 days)
- Tickets overdue by week
- Resolution SLA Breach by Staff
- Resolution SLA Breach by Category and Issue Type
- Resolution SLA Breach by Priority
- Response SLA Breach by Staff
- Response SLA Breach by Category and Issue Type
- Response SLA Breech by Priority
- Resolution SLA Status
- Response SLA Status

1. Tickets overdue (Last 7 days) –
- This report shows the number of Tickets that are overdue in the last 7 days.
- On hovering the mouse over dots in the report it will show the number of Tickets “overdue” or “not overdue”.
- On clicking the dot, it will navigate to the Ticket page showing the details of those Tickets.
On clicking “Overdue: 2”, it will show the overdue Tickets in last 7 days as shown below:

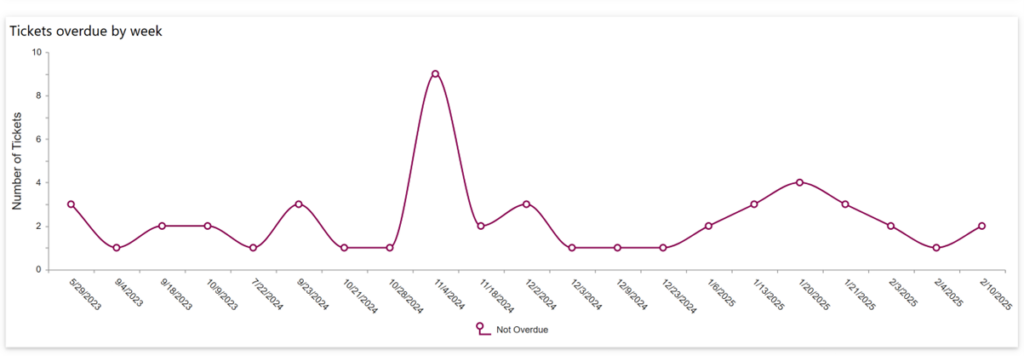
2. Tickets overdue by week –
- This report shows the number of Tickets that are overdue in every week over past 12 weeks.
- On hovering the mouse over dots in the report it will show the number of Tickets “overdue” or “not overdue”.
- On clicking the dot, it will navigate to the Ticket page showing the details of those Tickets.

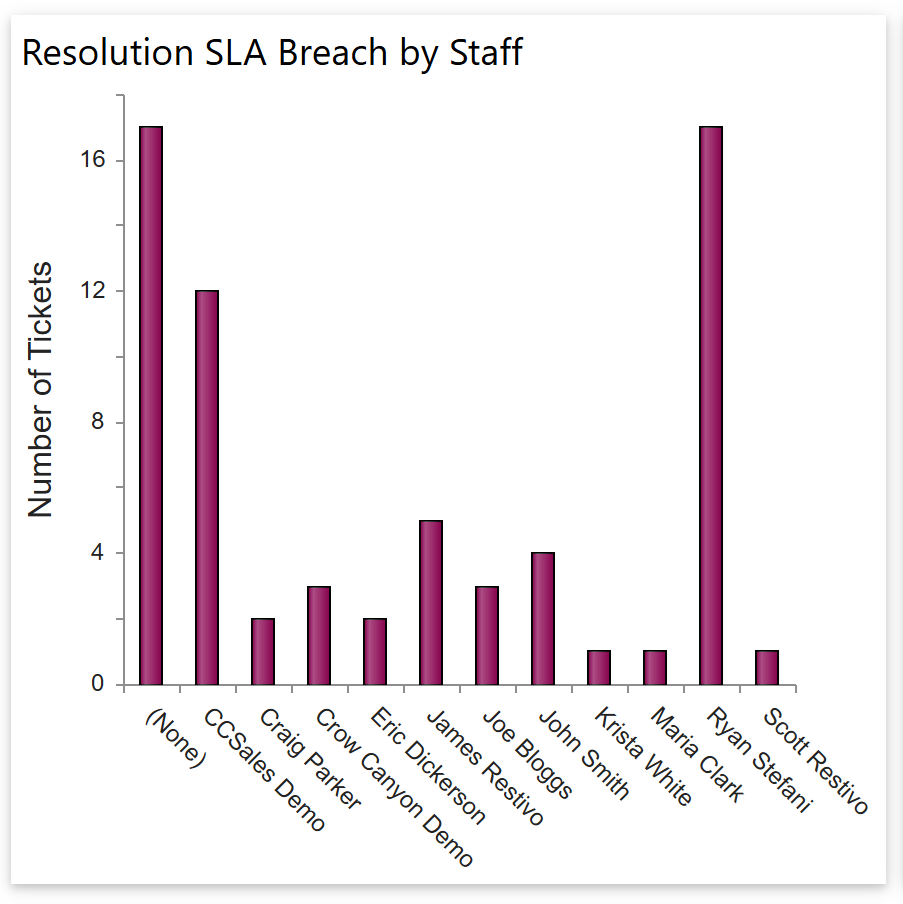
3. Resolution SLA breach by Staff –
- This report will show the number of Tickets for which resolution SLA has been breached by each Staff member
- The report is represented in Bar Diagram
- Ticket details can be seen by clicking on a Bar. It will navigate to the “SLA Breach Tickets” page for that assigned staff.
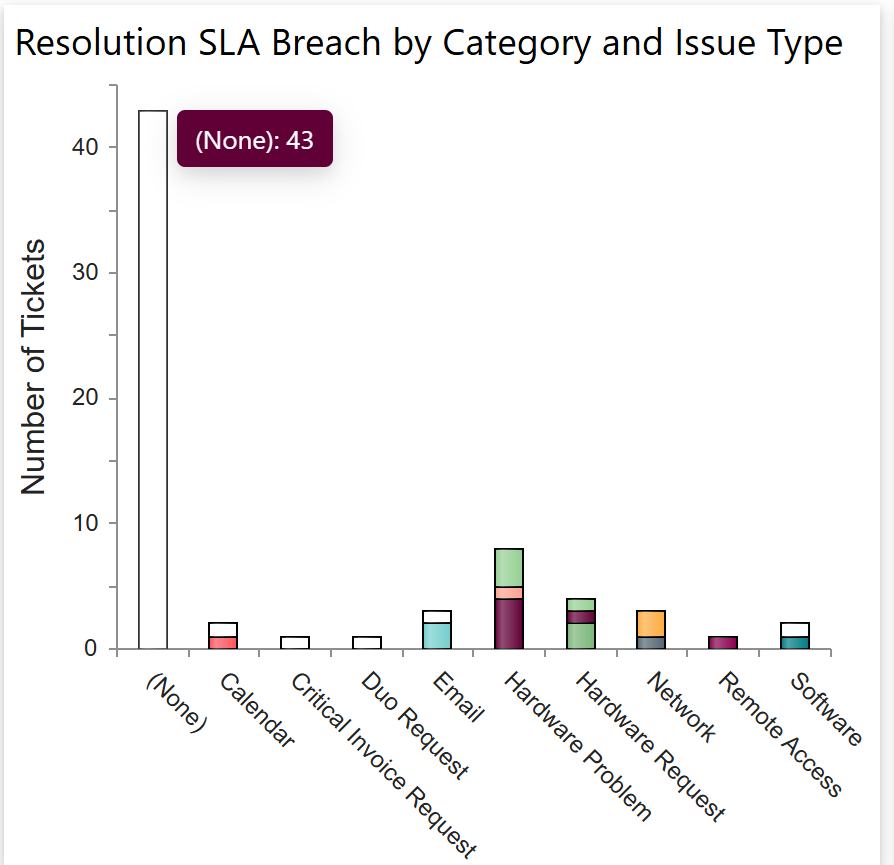
4. Resolution SLA Breach by Category and Issue Type –
- This report shows the number of Tickets for which resolution SLA has been breached for each Category and Issue Type
- The report is represented in Bar Diagram with horizontal axis representing the category.
- For each category the Bar represents the number of Tickets for which resolution SLA has been breached. Each Issue type for which resolution SLA has been breached is represented by a colour on the bar and shows a separate count of Ticket.
- Ticket details can be seen by clicking on a Bar. It will navigate to the “SLA Breach Tickets” page for that Category.
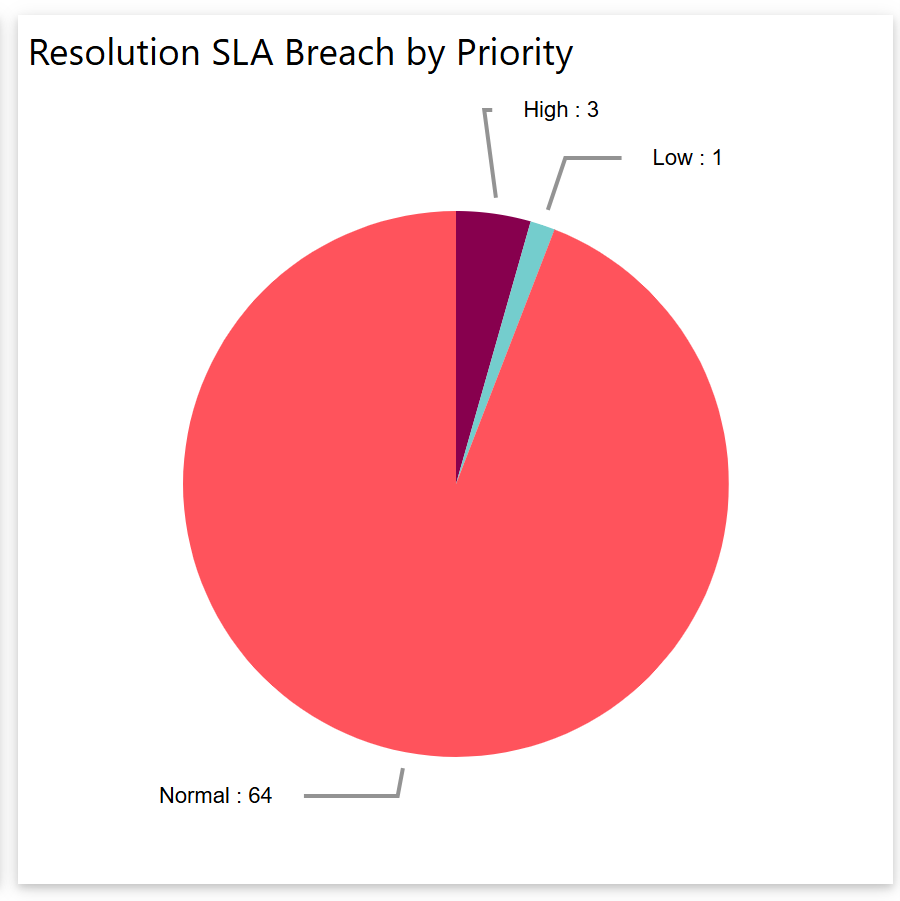
5. Resolution SLA Breach by Priority –
- This report shows the number of Tickets for which resolution SLA has been breached grouped by “Priority” of the Ticket
- This report is represented in a Pie-Chart.
- To see the details of Tickets for which resolution SLA has been breached for a particular “Priority”, click on the corresponding area of the pie-chart. This will open “SLA Breach Tickets” page listing Tickets for which SLA has been breached for that “Priority”
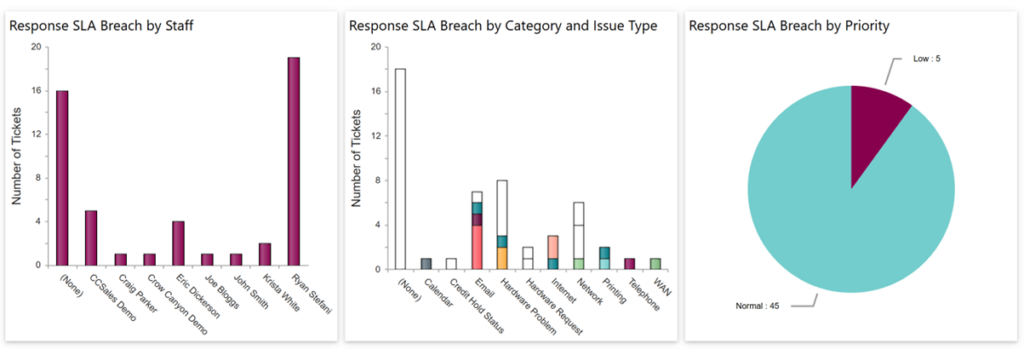
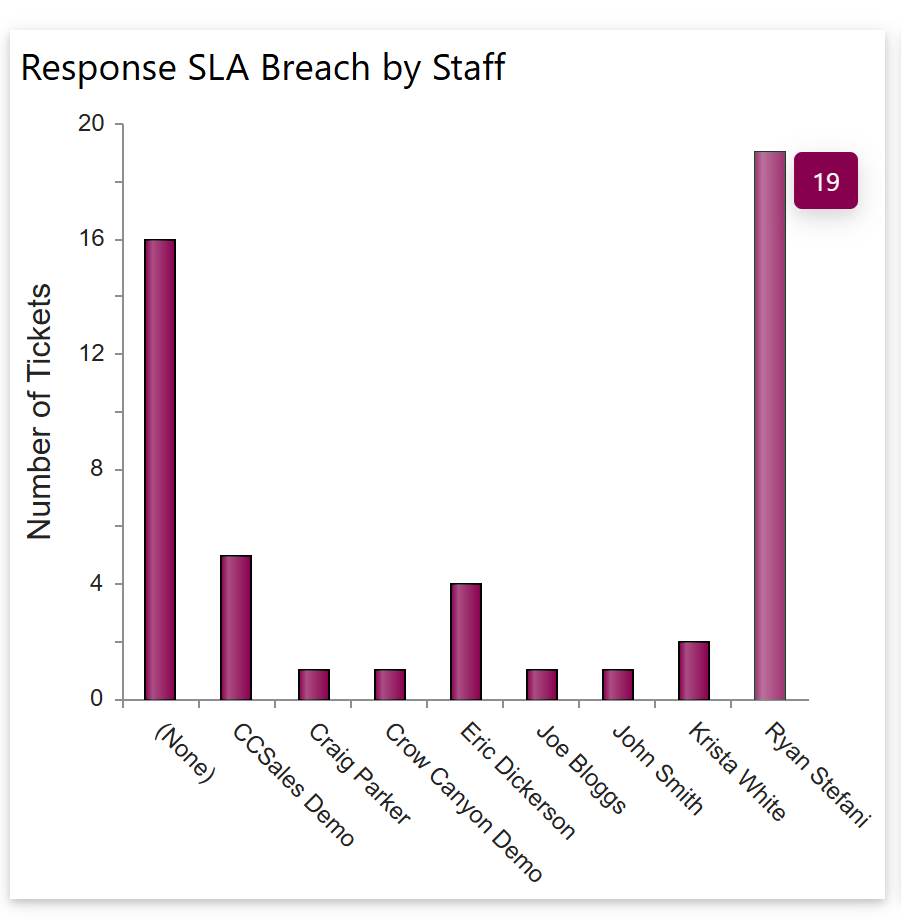
6. Response SLA breach by Staff –
- This report will show the number of Tickets for which response SLA has been breached by each Staff member
- The report is represented in Bar Diagram
- Ticket details can be seen by clicking on a Bar. It will navigate to the “SLA Breach Tickets” page for that assigned staff.
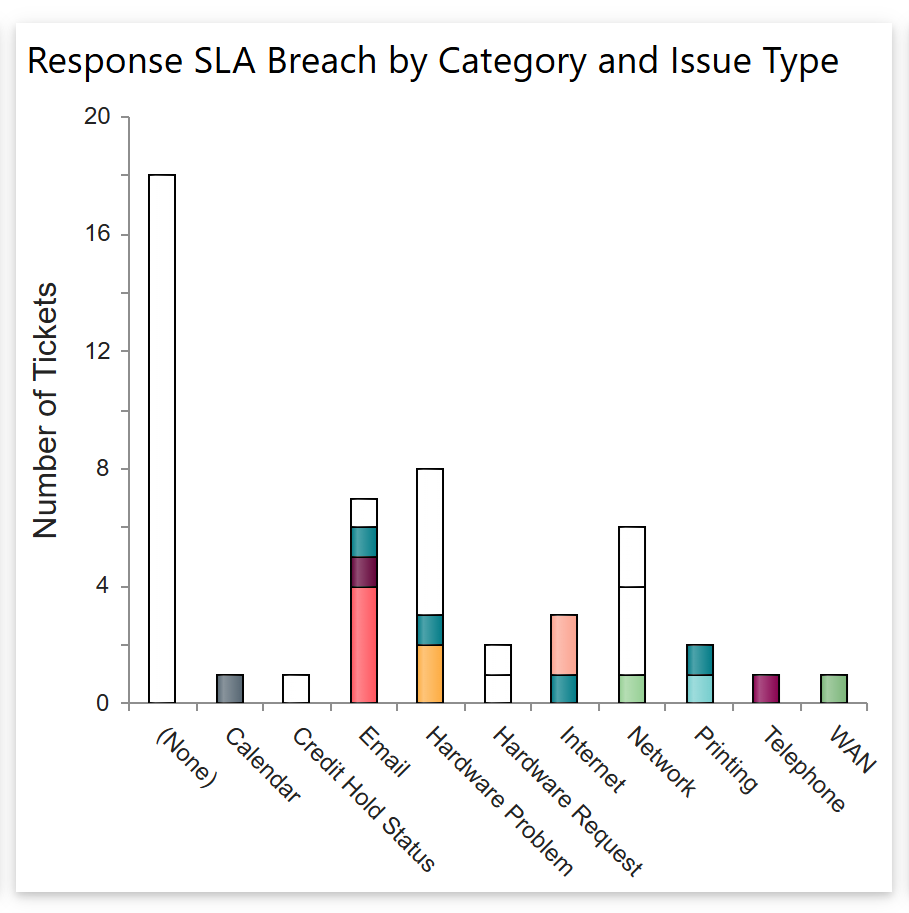
7. Response SLA Breach by Category and Issue Type –
- This report shows the number of Tickets for which response SLA has been breached for each Category and Issue Type
- The report is represented in Bar Diagram with horizontal axis representing the category.
- For each category the Bar represents the number of Tickets for which response SLA has been breached. Each Issue type for which response SLA has been breached is represented by a color on the bar and shows a separate count of Ticket.
- Ticket details can be seen by clicking on a Bar. It will navigate to the “SLA Breach Tickets” page for that Category.
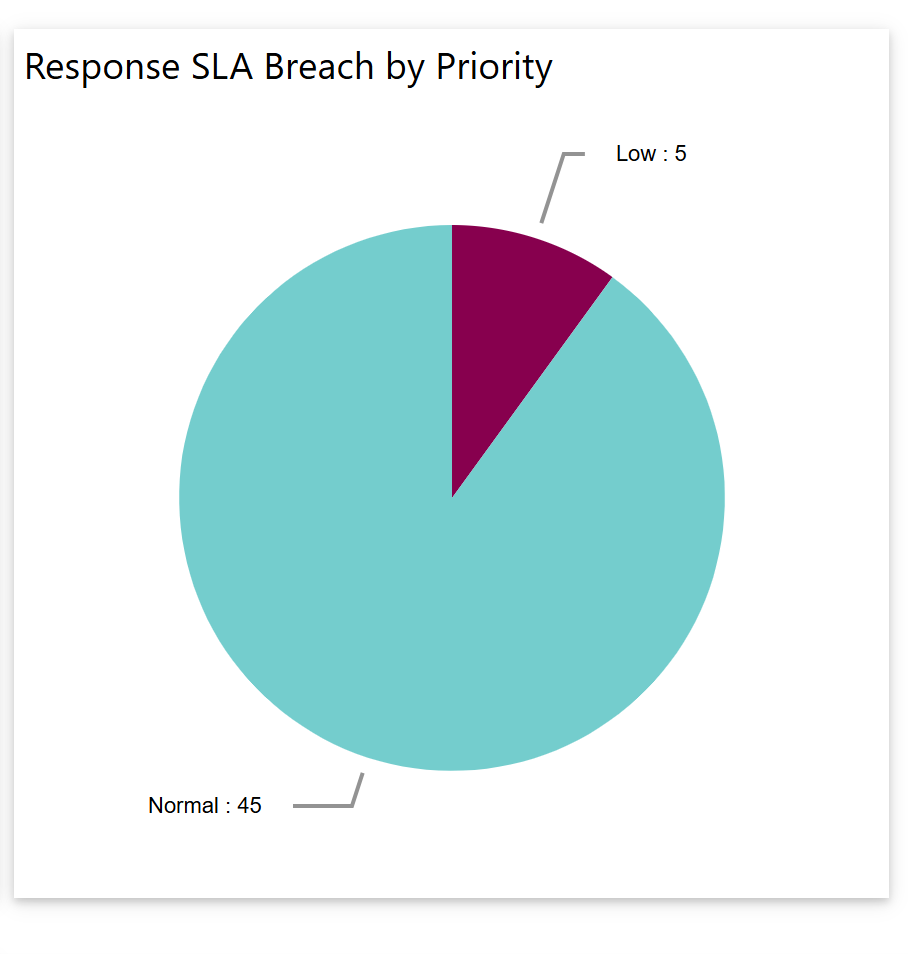
8. Response SLA Breach by Priority –
- This report shows the number of Tickets for which response SLA has been breached grouped by “Priority” of the Ticket
- This report is represented in a Pie-Chart.
- To see the details of Tickets for which response SLA has been breached for a particular “Priority”, click on the corresponding area of the pie-chart. This will open “SLA Breach Tickets” page listing Tickets for which SLA has been breached for that “Priority”
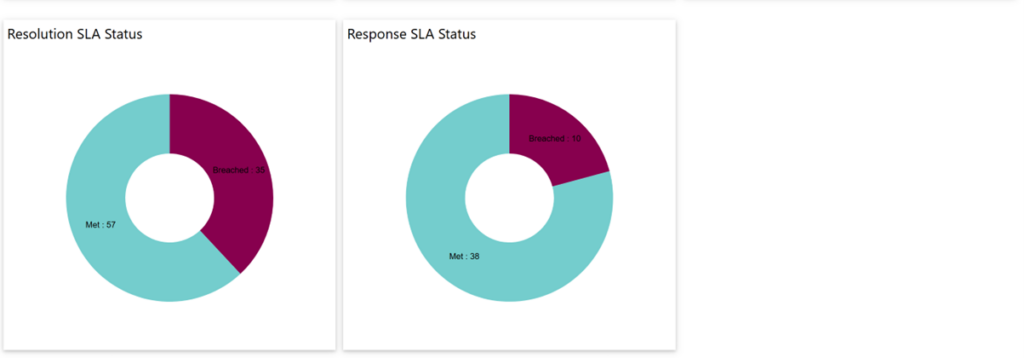
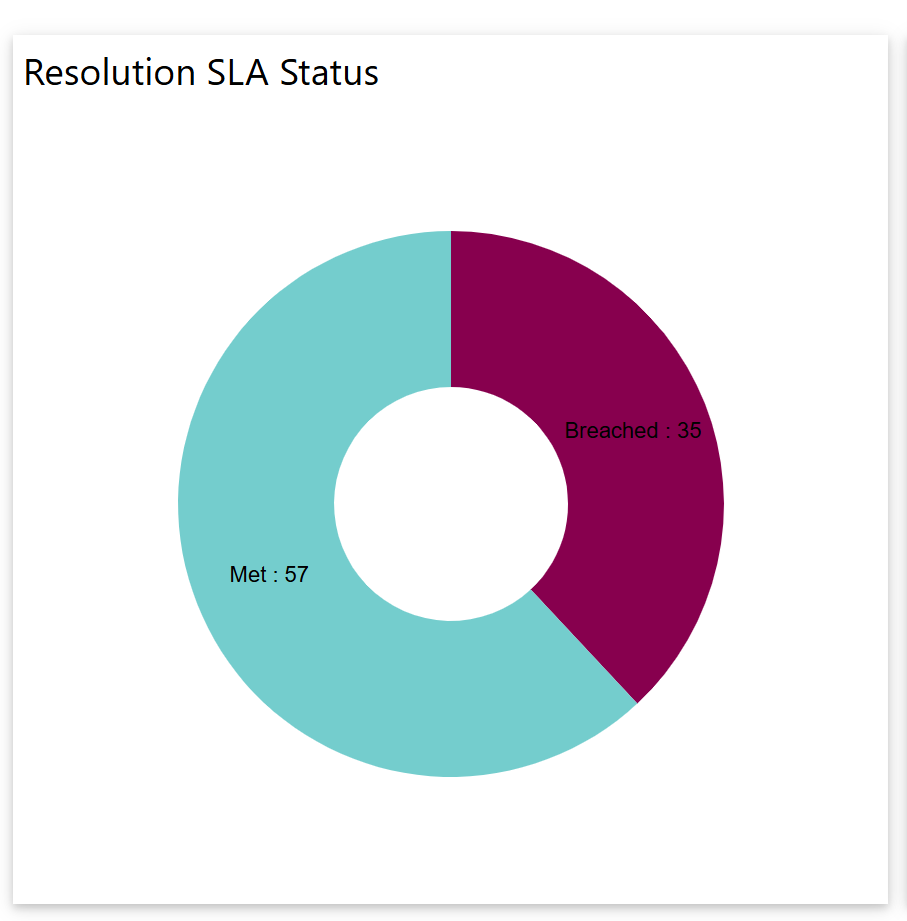
9. Resolution SLA Status –
- This report shows the count of Tickets for which resolution SLA status was met or breached.
- To see the details of Tickets for which resolution SLA has been met or breached, click on the corresponding area of the chart. This will open “SLA Breach Tickets” page listing Tickets for which SLA has been met or breached.
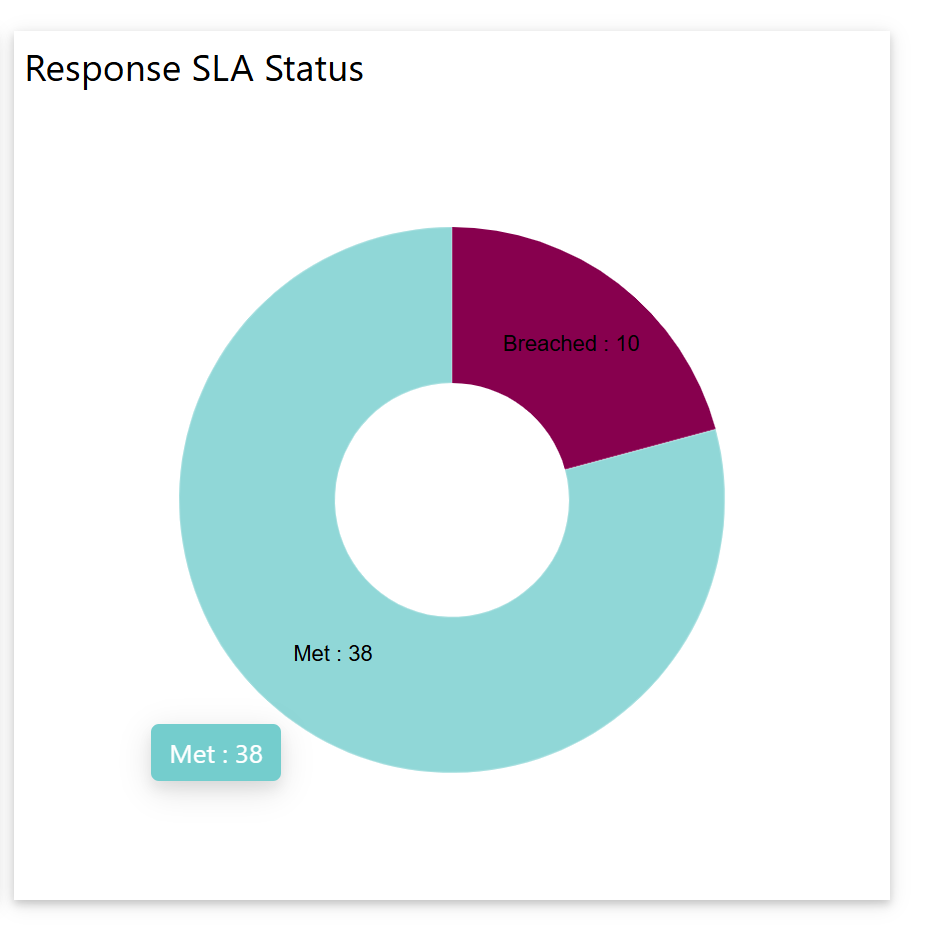
10. Response SLA Status –
- This report shows the count of Tickets for which response SLA status was met or breached.
- To see the details of Tickets for which response SLA has been met or breached, click on the corresponding area of the chart. This will open “SLA Breach Tickets” page listing Tickets for which SLA has been met or breached.