Applies To: NITRO Helpdesk Application
Description
This article describes the detail of General Configuration of NITRO Helpdesk Application. Typically, the General Configuration fields are filled out by Crow Canyon upon initial implementation of the program, and for any future adjustments. Unless directed by Crow Canyon Support, these field values should not be changed. The following document outlines the standard configurations that come with the out-of-the-box application.
General Configuration
For advanced or custom setup of program, general configuration is provided.
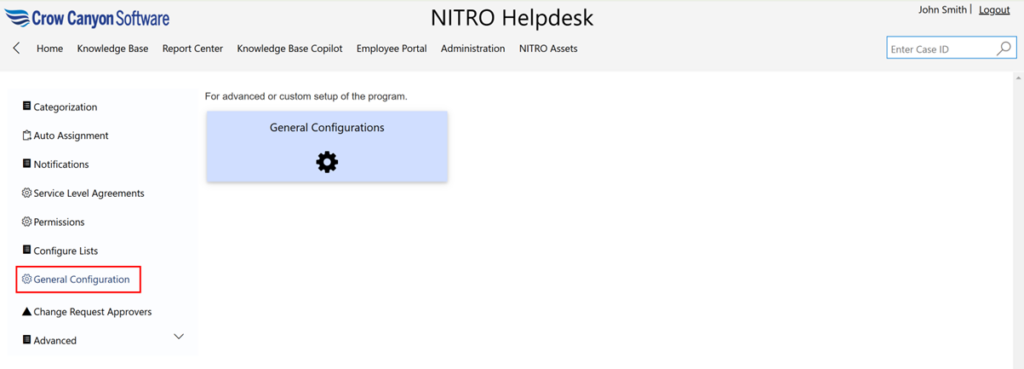
Click ‘General Configurations’ tile to see settings as shown below:

In General Configuration, configure settings or Ticket list. Product app will work according to these settings.
In General tab:
Title: Provide Title
Product: Select product type
Ticket list name: Provide name of Ticket list
Case Id Format: Specify the prefix to parse the Ticket ID in the incoming/outgoing emails.
Ticket Link Description: Provide Ticket link description
Ticket URL: provide Ticket Form URL here
Portal Ticket Link URL: Provide portal Ticket link URL here
Portal Ticket Link Description: provide Portal Ticket Link Description here
SR logs Retention Days: provide Retention days here
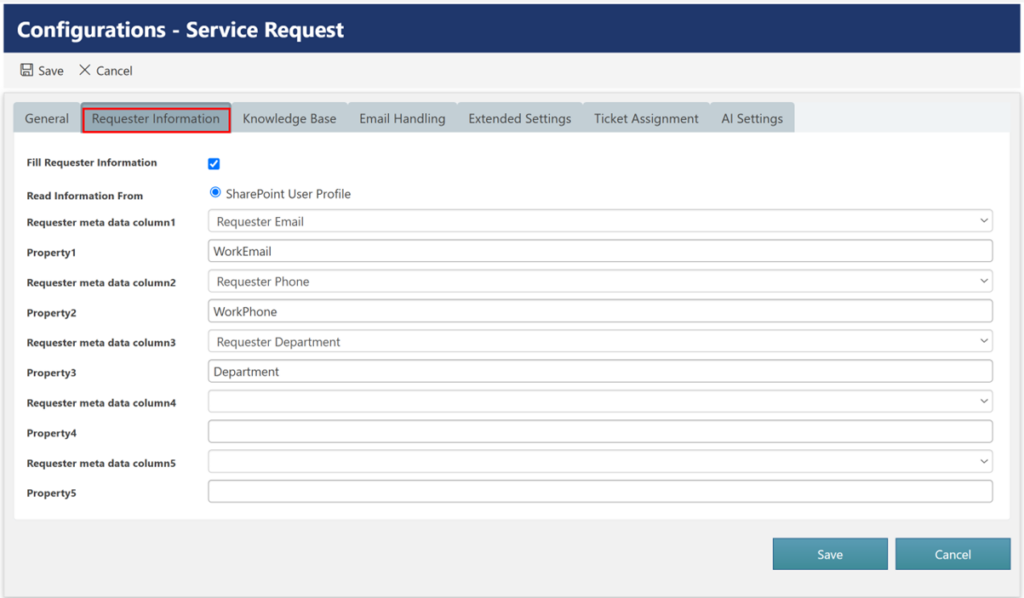
Requester Information Tab:
The “Requester Information” tab in the General Configuration of the NITRO Helpdesk application allows automatic population of requester details in the ticket based on their SharePoint user profile. Below is an explanation of the key fields in this tab:
Fill Requester Information
- This checkbox enables or disables the automatic filling of requester details in the ticket.
Read Information From
- SharePoint User Profile: If selected, requester details are fetched from the SharePoint user profile properties.
Requester Meta Data Columns & Properties
These fields define how information from the SharePoint User Profile is mapped to the ticket fields:
- Requester meta data column1 : Defines a ticket field (e.g., “Requester Email”).
- Property1 : Corresponding SharePoint user profile property (e.g., “WorkEmail”).
- Requester meta data column2 : Defines another ticket field (e.g., “Requester Phone”).
- Property2 : Corresponding SharePoint property (e.g., “WorkPhone”).
- Requester meta data column3 : Defines the requester’s department in the ticket.
- Property3 : Corresponding SharePoint property (e.g., “Department”).
Additional Fields (Optional)
- Requester meta data column4 & 5 : These allow mapping additional requester details if required.
- Property4 & 5 : Corresponding SharePoint user profile properties for additional metadata.
Provide Requester related information under this tab as shown below:
Knowledge Base Tab:
Provide knowledge base related mapping under this tab as shown below:
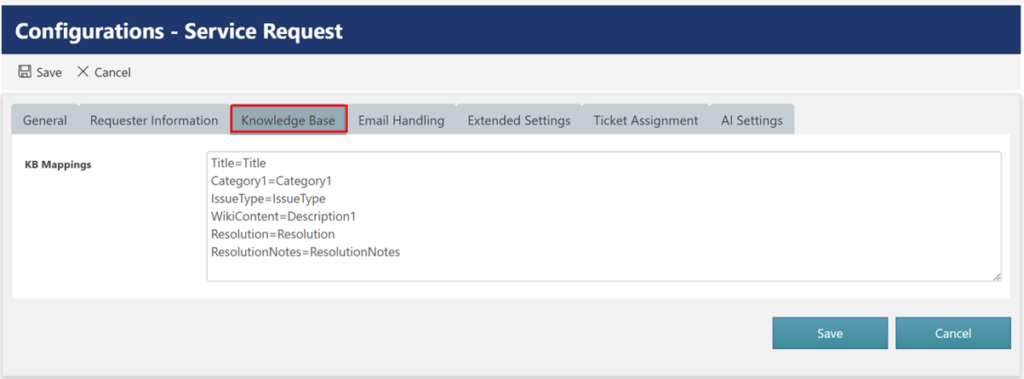
The Knowledge Base tab in the General Configuration of the NITRO Helpdesk application allows administrators to map fields between the Tickets list and the Knowledge Base (KB) list. This configuration ensures that relevant ticket information is accurately transferred to the knowledge base for future reference and streamlined issue resolution.
Configuration in the Knowledge Base Tab
- KB Mappings
- This section enables the mapping of fields from the Tickets list to the corresponding fields in the Knowledge Base list.
- The mapping follows the format:
Knowledge Base Field = Ticket Field
Example:
Title=Title
Category1=Category1
IssueType=IssueType
WikiContent=Description1
Resolution=Resolution
ResolutionNotes=ResolutionNotes
- This ensures that when a resolved ticket is converted into a knowledge base article, the relevant details are automatically populated in the appropriate fields.
Use Cases
- Auto-Generating Knowledge Base Articles: When a support agent resolves a ticket, they can create a KB article with resolution details to assist with similar future cases.
- Ensuring Consistency: Standardized field mapping ensures uniform data entry across tickets and KB articles.
- Enhanced Search and Categorization: Mapping fields like Category1 and IssueType helps in organizing KB articles for easy retrieval and reference.
Email Handing:
Configure settings in email sync app for this. Provide settings for handing emails under this tab as shown below:
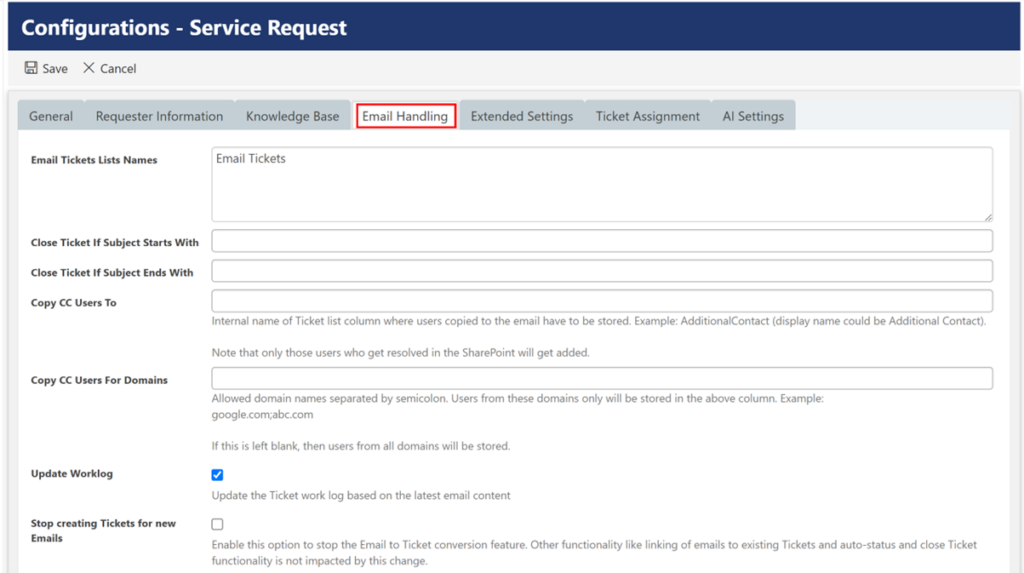
Email Tickets Lists Names: Provide name of Email Ticket list
Close Ticket if Subject starts with: If an email (with case id in subject) is send which starts with ‘Helpdesk’ in the subject, then it should close the Ticket.
Close Ticket If Subject Ends with: If an email (with case id in subject) is send which ends with ‘Close’ in the subject, then it should close the Ticket.
Copy CC Users To: Internal name of Ticket list column where users copied to the email have to be stored. Example: AdditionalContact (display name could be Additional Contact). Note that only those users who get resolved in the SharePoint will get added.
Copy CC Users to Domains: Allowed domain names separated by semicolon. Users from these domains only will be stored in the above column. Example: google.com; abc.com If this is left blank, then users from all domains will be stored.
Update Worklog: If an email is sent for existing Ticket (case id in subject), then it will add the email content to Ticket worklog.
Stop Creating Tickets for new Emails: Enable this option to stop the Email to Ticket conversion feature. Other functionality like linking of emails to existing Tickets and auto-status and close Ticket functionality is not impacted by this change.
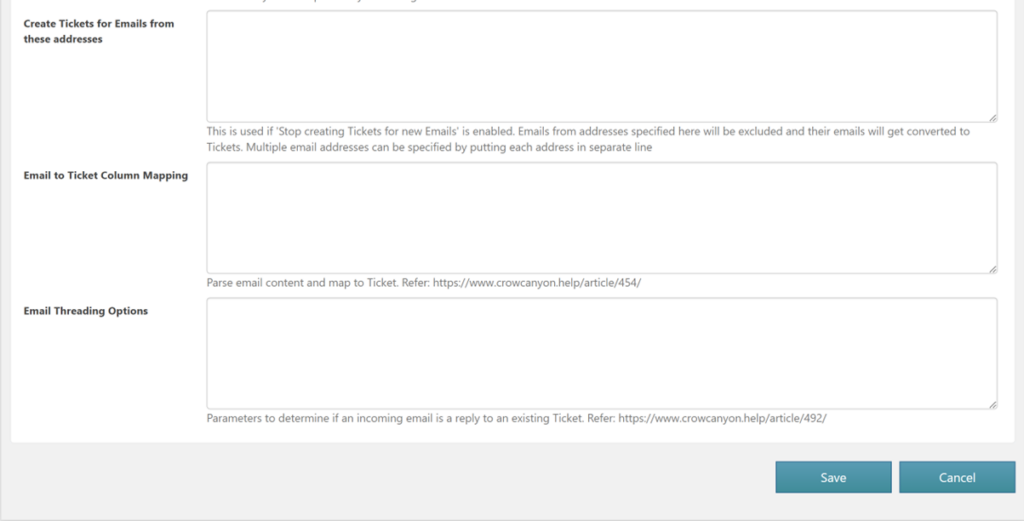
Create Tickets for Emails from these addresses: This is used if ‘Stop creating Tickets for new Emails’ is enabled. Emails from addresses specified here will be excluded and their emails will get converted to Tickets. Multiple email addresses can be specified by putting each address in separate line
Email to Ticket Column Mapping: Parse email content and map to Ticket. Refer: https://www.crowcanyon.help/article/454/
Email Threading Options: Parameters to determine if an incoming email is a reply to an existing Ticket. Refer: https://www.crowcanyon.help/article/492/
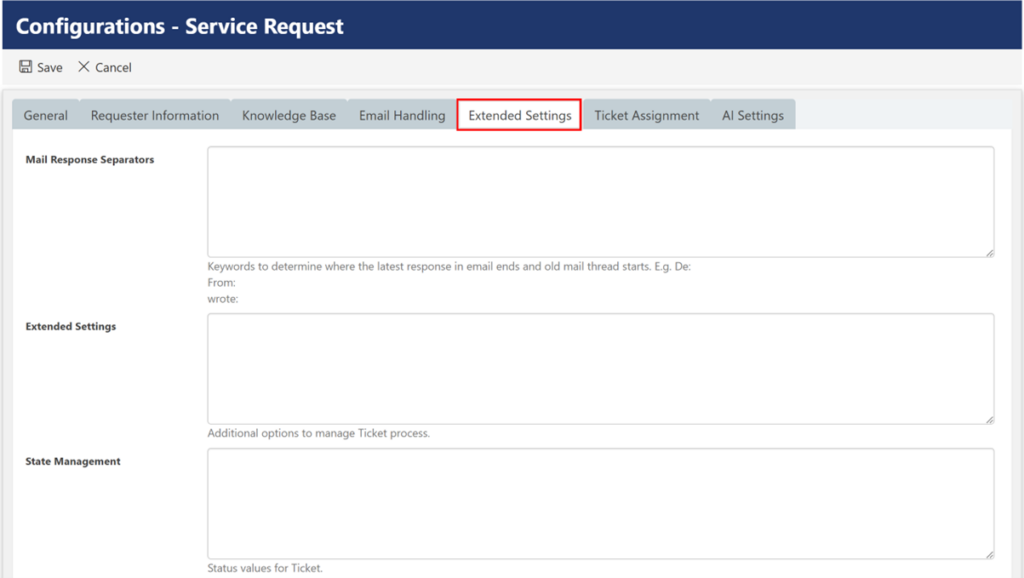
Extended Settings Tab:
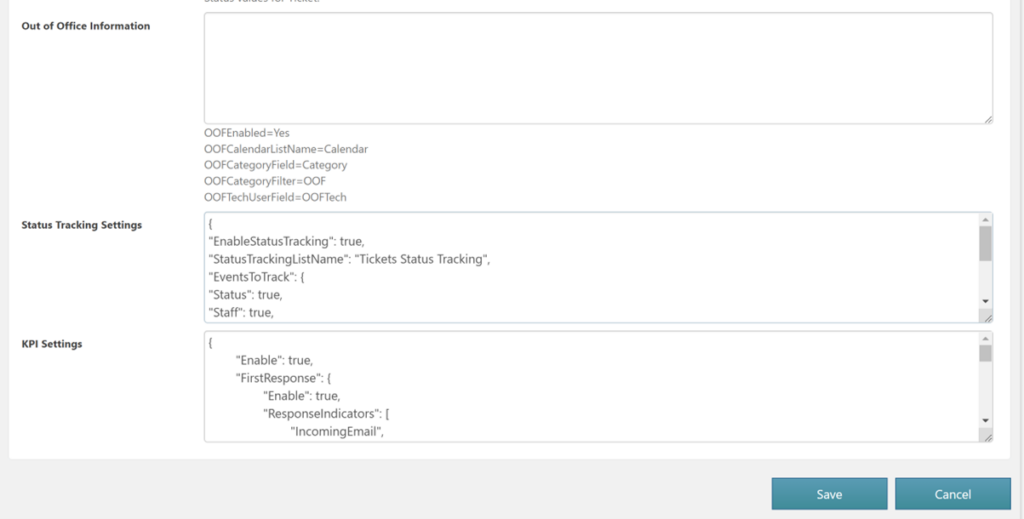
Mail Response Separators: Keywords to determine where the latest response in email ends and old mail thread starts. E.g., De: From: wrote:
Extended Settings: Additional options to manage Ticket process.
State Management: Status values for Ticket.
{
	"Unassigned": {
		"DisplayName": "New",
		"AutoSetOnStaffClear": "Yes"
	},
	"Assigned": {
		"DisplayName": "In Progress",
		"AutoSetOnAssign": "Yes",
		"SetFirstAssignedDate": "Yes"
	},
	"Resolved": {
		"DisplayName": "Resolved"
	},
	"Closed": {
		"DisplayName": "Closed"
	}
}
For example:
Here, ‘Unassigned’ can be changed to ‘New’ (DisplayName will remain same ‘New’)
‘Assigned’ can be changed to ‘In Progress’ (Display Name will remain same’ In Progress’)
Status Tracking Settings: Provide bellow settings in this column for Status tracking of Ticket
{
"EnableStatusTracking": true,
"StatusTrackingListName": "Tickets Status Tracking",
"EventsToTrack": {
"Status": true,
"Staff": true,
"Team": true,
"Priority": true,
"Team and Staff": true
},
"AdditionalColumnMappings": []
}
- If ‘Request Status’ of Ticket is changed then an entry gets created in ‘Tickets Status Tracking’ list with ‘Type of change’ column value ‘Status’, show ‘Previous Status and ‘New Status’ value of Ticket
- If ‘Assigned Staff’ of Ticket is changed then an entry gets created in ‘Tickets Status Tracking’ list with ‘Type of change’ column value ‘Staff’
- If ‘Assigned Team’ of Ticket is changed then an entry gets created in ‘Tickets Status Tracking’ list with ‘Type of change’ column value ‘Team’
- If ’Priority’ of Ticket is changed then an entry gets created in ‘Tickets Status Tracking’ list with ‘Type of change’ value ‘Priority’
- If ’Assigned Staff’ and ‘Assigned Team’ of Ticket is changed altogether then an entry gets created in ‘Tickets Status Tracking’ list with ‘Type of change’ value ‘Team and Staff’.
KPI Settings: Key Performance Indicators (KPI) settings are as shown below:
{
	"Enable": true,
	"FirstResponse": {
		"Enable": true,
		"ResponseIndicators": [
			"IncomingEmail",
			"ItemUpdate",
			"OutgoingEmail"
		]
	},
	"FirstAssignTime": {
		"Enable": true
	},
	"TimeToFirstAssign": {
		"Enable": true,
		"BusinessTime": true
	},
	"FirstResponseTime": {
		"Enable": true,
		"BusinessTime": true
	},
	"TimeToRespondAfterAssign": {
		"Enable": true,
		"BusinessTime": true
	}
}
Ticket Assignment Tab:

Auto-assignment Staff Selection: Create a Ticket with ‘Category’ and ‘Issue Type’, ‘Assigned staff’ is filled in Ticket based on ‘Issue Type’ first, if ‘IssueType’ is not having staff then it will come according to ‘Category’. If ‘Category’ is also not having staff then it will come according to ‘Staff List’.
Auto assign ‘Category’ and ‘Issue Type on email conversion to Ticket: If receivers are set in ‘Issue Type’, then ‘Issue Type’ is filled, based on ‘Issue Type’ corresponding ‘Category’ is also filled automatically in email to Ticket conversion. Similarly, if ‘Associated from Email Address or Email Tickets List Name’ is filled in ‘Category’ then ‘Category’ is autofill in email to Ticket conversion. If ‘Receivers’ and ‘Associated From Email Address or Email Tickets List Name’ filled in multiple categories and issuetypes then first one will be filled in Tickets.
Auto-Assign Mode: Two types of auto-assign mode are
- Round Robin
- Load balance
Round Robin distributes tasks equally among team members, while Load Balancing distributes tasks based on the current workload of each team member.
Override Team: Enable this option if user wants to change the assigned team if ‘Category’ or ‘Issue Type’ change in the Ticket.
Override Assigned Staff: Enable this option if the user wants to change the assigned staff if ‘Category’ or ‘Issue Type’ change in the Ticket.
Business Time Configuration: configure business time configuration as shown below:
Enabled=Yes/No
BusinessTimeType=Site/Custom
StartTime=9 (as per site time zone)
EndTime=18
BusinessDays=Number (127 for all days)
HolidaysCalendarList=Calendar
 HolidayCalendarFieldValue=Category,Holiday
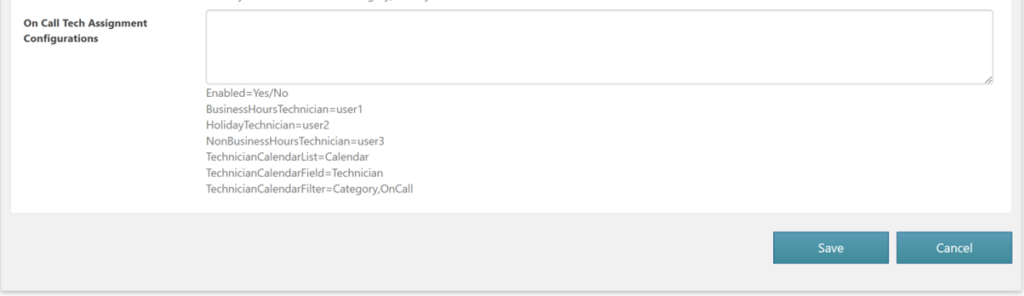
On Call Tech Assignment Configurations: Configure this setting as shown below:
Enabled=Yes/No
BusinessHoursTechnician=user1
HolidayTechnician=user2
NonBusinessHoursTechnician=user3
TechnicianCalendarList=Calendar
TechnicianCalendarField=Technician
TechnicianCalendarFilter=Category,OnCall
AI Settings Tab:
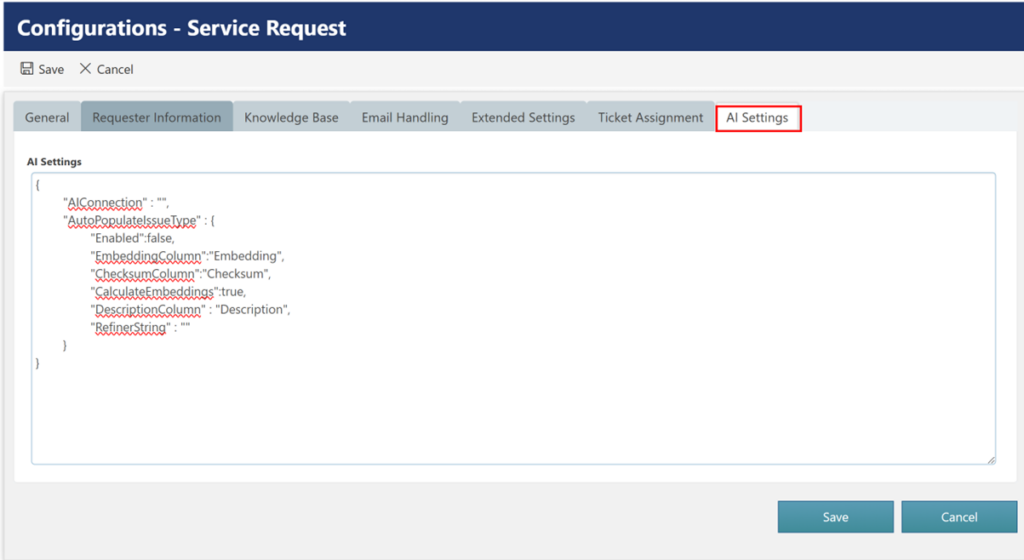
Configure AI settings in ‘General Configurations’ in helpdesk applications.
Go to application administration -> General Configurations tab -> Click ‘General Configurations’ tile -> ‘AI Connection Settings’ -> Specify below JSON settings in the ‘AISettingsJSON’ column.
This JSON tells the system how to use AI for Ticket classification.
Enter below JSON in AISettingsJSON
{
	"AIConnection" : "Azure Open AI",
	"AutoPopulateIssueType" : {
		"Enabled":true,
		"EmbeddingColumn":"Embedding",
		"ChecksumColumn":"Checksum",
		"CalculateEmbeddings":true,
		"DescriptionColumn" : "Description",
		"RefinerString" : ""
	}
}
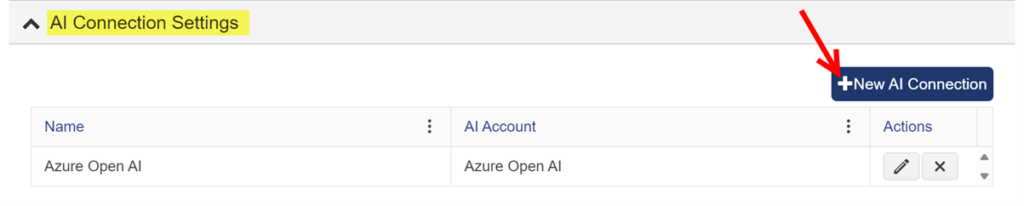
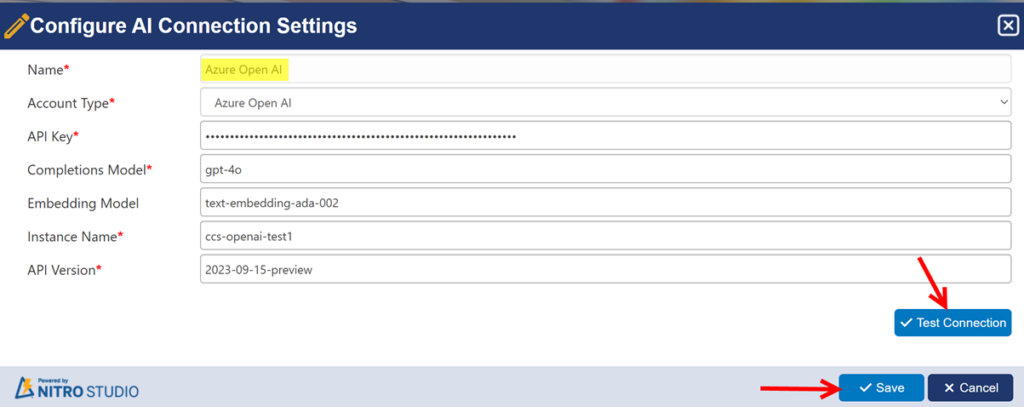
- AIConnection: Specifies the AI service (in this case, Azure Open AI) name configured in the Crow Canyon NITRO Site Settings.
If AI connection is not configured, the application will use SharePoint search to find the matching category/issue type. However, for proper matching, it is recommended that AI settings are configured.
To create azure services, refer this article: https://www.crowcanyon.help/article/747/
To configure AI connection settings in NITRO Site Settings, go to site settings -> Crow Canyon NITRO Site Settings -> AI Connection Settings -> New AI Connection
- AutoPopulateIssueType: Enabling this setting will auto set category/issue type based on the Ticket subject and description.
- EmbeddingColumn: Specify internal name of the ‘Embedding’ column created in category/issue type lists.
- Checksum Column: Specify internal name of the ‘Checksum’ column created in category/issue type lists.
- Calculate Embeddings: Enable this to generate embeddings (requires AI connection setup) for the category/issue types.
- DescriptionColumn: Specify internal name of the ‘Description’ column created in category/issue type lists.
Please refer below article for more details on AI settings:
Use AI to Auto-Set Category and Issue Type – Crow Canyon Software Support