Applies to:
SharePoint Online and SharePoint On-Premises
Description
Workspace acts as a centralized location for viewing information related to libraries and lists on a page.
The overall process of creating a workspace involves creating a web page and adding the required web parts to that page.
The below steps explain the process of creating and configuring a workspace using Crow Canyon NITRO Apps.
Steps to create a workspace page
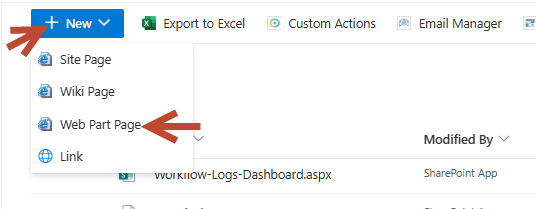
For Classic UI Sites
- Navigate to the SharePoint site -> Site Contents -> Site Pages -> Click ‘New’ button -> Select ‘Web Part Page’ as shown below:
2. Specify details for the new web part page as shown below:

3. We can add required webparts to the page by clicking ‘Add a Web Part’ link from any section of the page.

Refer to the below manual links to add different Crow Canyon NITRO web parts to a web part page (classic UI):
- Crow Canyon NITRO Reports/Report Centre
- Crow Canyon List Rollup
- Crow Canyon List View
- Crow Canyon List Search
- Crow Canyon Tiles and Dials
For Modern UI Sites
- Navigate to the SharePoint site -> Site Contents -> Site Pages -> Click ‘New’ -> Select ‘Site Page’ as shown below:

2. Specify details for the new site page as shown below:

Refer to the below manual links to add different Crow Canyon NITRO web parts to a site page (modern UI):
- Crow Canyon NITRO Reports/Report Centre: Refer to “To add Report or Report Centre to Modern page” section.
- Crow Canyon List Rollup
- Crow Canyon List View
- Crow Canyon List Search
- Crow Canyon Tiles and Dials