Setting permissions requires having users in the correct SharePoint groups in order to permission the groups accordingly. First, you’ll want to define a SharePoint Group that contains your end users. This could be a group that contains an All Domain Users AD group. Also, you may want to define a new Permission Level such as Contribute without Delete in order to remove the ability for users to delete Tickets. To set Permission Levels, please see this technet article: http://technet.microsoft.com/en-us/library/cc721640%28v=office.15%29.aspx. The article refers to SharePoint 2013, but there is an option on the site to select the articles for SharePoint 2007 and SharePoint 2010.
NOTE: Before proceeding to the next steps, make sure that the person who is configuring these permissions and any other users who require access to the Service Area are in a separate SharePoint Group. This group or these groups will retain their access. However, if the users are not in a separate SharePoint Group, their access will also be removed for the Service Area.
Once you have your SharePoint Group and Permission Level defined, go to the top level of the service area:

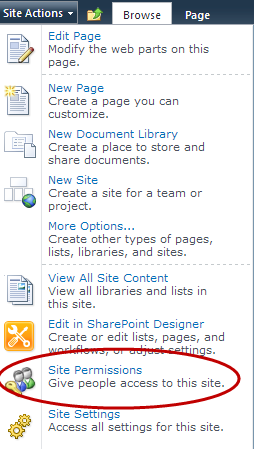
For SP 2010, navigate to Site Actions in the upper left corner of the screen and select Site Permissions:
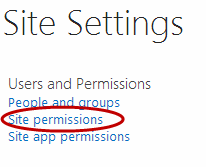
For SP 2013, navigate to the gear icon in the upper right corner of the screen and select Site Settings:

Then select Site Permissions under Users and Permissions:
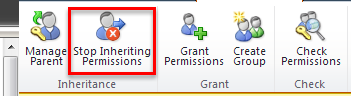
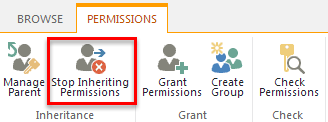
In either version, click Stop Inheriting Permissions:
2010:
2013:
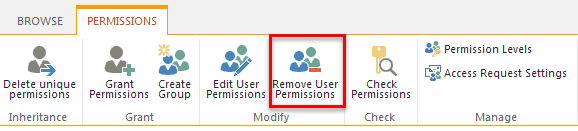
Select the SharePoint Group which contains your end users, and then click Remove User Permissions:
2010:

2013:
This will now prevent your end users from accessing the Service Area. The next steps will allow the end users to submit and update Tickets only. There are several lists within the Service Area to which end users will need either Read or Contribute (without Delete) access in order to submit and update Tickets.
Open up the Calendar list, and navigate to the permissions section for this list. The easiest way to do this is to go to View All Site Content (2010, under Site Actions) or Site Contents (2013, under the gear icon). Click on the given list or library name. At the top, there is a List ribbon. Open this ribbon and click List Settings on the right-hand side:
2010:

2013:

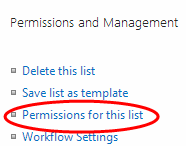
In both 2010 and 2013, choose “Permissions for this list” under the Permissions and Managment section:
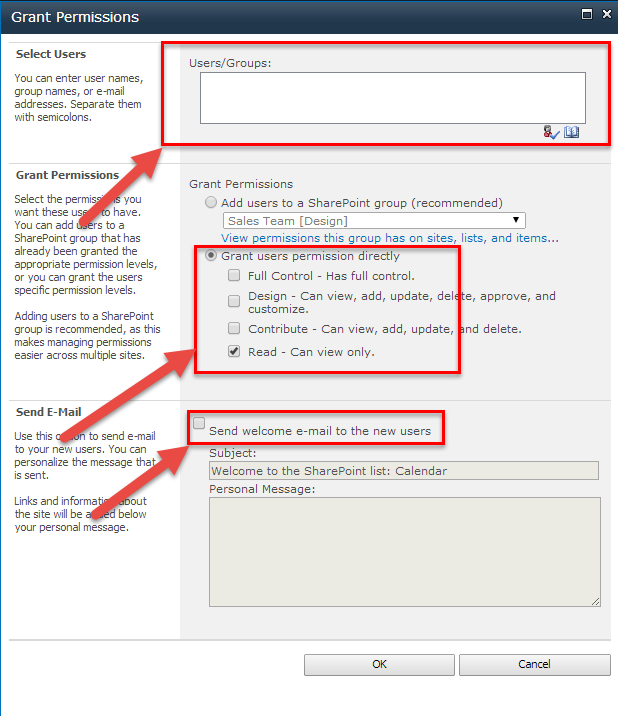
Follow the steps above to break inheritance from the parent site. Then choose Grant Permissions to give Read permissions back to the end users.
In 2010, select the Group in the Users/Groups section. Select Grant users permission directly. Then choose the Read permission. Uncheck the Send welcome e-mail to the new users (unless you want to send an email to all end users):
In 2013, select the Group in the Invite People section. Click Show Options to choose whether to send an email invitation or not and to select the permission level being granted:

Repeat the above steps for each list and library which need to be modifed. The following is the list of lists, and the access required:
Read only lists and libraries:
1. Calendar
2. Category
3. Configurations
4. Issue type
5. IT Support Tasks
6. Knowledge Base
7. Script Documents
Contribute (or new permission level) lists and libraries:
Email Tickets
Tickets