Applies to: Sharepoint Online.
Description: All Crow Canyon provider hosted apps(Workflow Manger, Advanced Approvals, Email Sync) now have Site Collection level permissions, these apps should be installed in the root site preferably and there is no need to install in sub-sites.
Steps provided below will guide you to move the apps to root site and create a link in the sub-sites to the app.
Step 1: Download zip files from CrowCanyon.ApprovalWorkflow, CrowCanyon.EmailSync , and CrowCanyon.WorkflowManager, extract the apps and add to the app catalog.
Step 2: Remove the old app from the web (Sub-Site)
Step 3: Add the new app to the root web (root-site)
Step 4: Right click on the app and click ‘Copy Link address’ (Google Chrome) or ‘Copy Shortcut’ (Internet Explorer) or ‘Copy Link Location’ (Mozilla Firefox) to copy the app link.
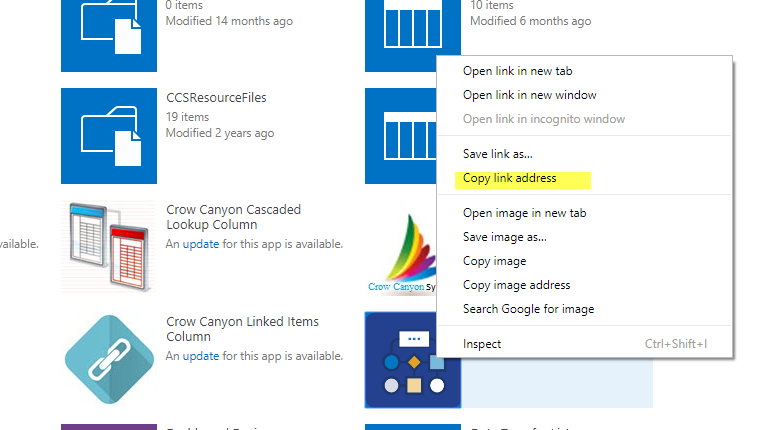
An app link like ‘https://companyname.sharepoint.com/sites/nitro/_layouts/15/appredirect.aspx?instance_id={25EBAB29-FF45-4E84-764F-A9C9E14252464}‘ will be copied.
Step 5: Now append “&redirect_uri=[[Your Sub-Site URL]]&webId=[[Your Sub-Site Id]]” at the end of the link copied in the above step. The result link will be like ‘https://companyname.sharepoint.com/sites/nitro/_layouts/15/appredirect.aspx?instance_id={25EBAB29-FF45-4E84-764F-A9C9E14252464}&redirect_uri=https://companyname.sharepoint.com/sites/nitro/itpremium&webId=d205fdef-840a-4c11-919e-469114e84265′
To get your subsite id use rest api call “[[Sub-Site Url]]+/_api/web/id” from your browser . Eg: ‘https://companyname.sharepoint.com/sites/nitro/itpremium/_api/web/id’.
you will get your Sub-Site Id(web id) in the browser

Repeat above steps for “Email Sync, Nitro Workflows, Advanced Approval” apps and construct URLs.
Download ‘CCSProviderHosted.txt’ file from CCSProviderHosted, edit the file and replace the text “##NitroWorkflowsLink##”, “##EmailSyncLink##”, “##AdvancedApprovalsLink##’ with the respective App links that were constructed in the above steps.
Upload ‘CCSProviderHosted.txt’ file to CrowCanyon folder of Site Assets library in sub-site after updating the links as mentioned in the above step.
Now go to your subsite and open ‘Tiles’ list and switch to ‘All Promoted Links’ view of the list. Find the items with title ‘Crow Canyon Workflow Manager App’, ‘Crow Canyon Approval Workflow App’, ‘Crow Canyon Email Sync App’ and delete them.
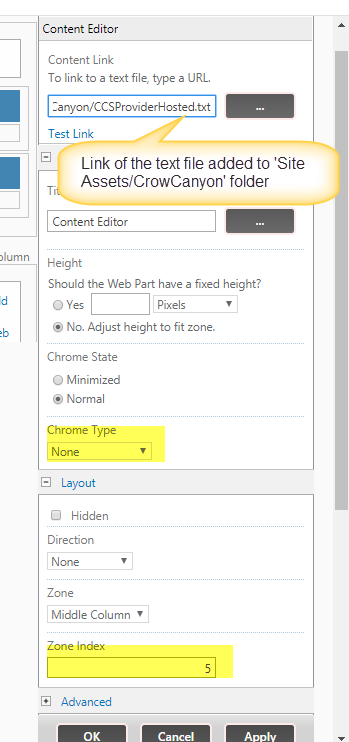
Now go to Application Administration, navigate to ‘Crow Canyon NITRO Apps’ or ‘Crow Canyon Apps’ page, edit the page and add a content editor web part to ‘Middle Column’ zone. Edit the content editor web part, in the Content Link section give the link of the file (CCSProviderHosted.txt) that was added to the ‘Crow Canyon’ folder in Site Assets library. In the Appearance section select Chrome Type as ‘None’, in the Layout section give Zone Index ‘5’ and click on ok.
OUTPUT:
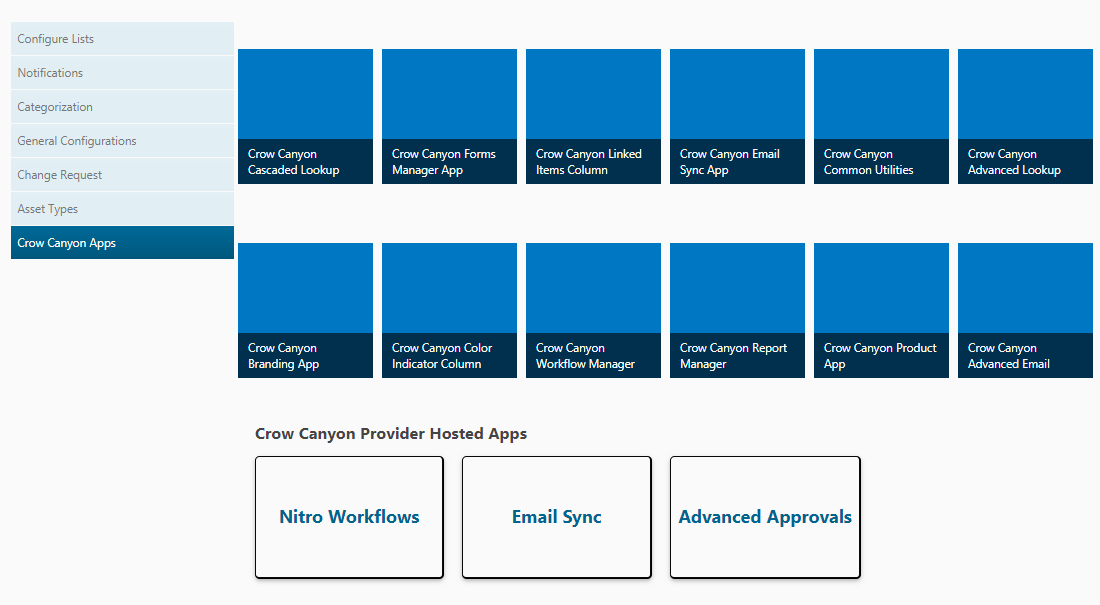
We will see three tiles under Crow Canyon Provider Hosted Apps section as shown in the below screenshot.
Note: One who has manage web permissions on the sub site can only use and configure these apps.