Applies To: SharePoint On-Premises
Description:
This article describes the process for upgrading the Crow Canyon Forms Manger forms to NITRO Forms in our application.
Summary of Steps:
- Install/upgrade latest solutions in the SharePoint Server and activate new features
- Configure NITRO Forms
- Configure Custom Actions as a replacement for Batch Ticket Editor
- Portal Ticket URL in Configurations
- Quick Launch and Top Link bar link URL changes
- Additional configurations
- Portal upgrade
Detailed Steps:
-
Install/upgrade latest solutions in the SharePoint Server and activate new features
List of solutions to be installed/upgraded:
- crowcanyon.advancedforms.wsp
- crowcanyon.commonutils.wsp
- crowcanyon.customactions.wsp
- crowcanyon.configurableportal.wsp
- crowcanyon.advancedemail.wsp
- crowcanyon.colorkpi.wsp
- crowcanyon.workflowmanager.wsp
- crowcanyon.licensemanager.wsp
Refer https://www.crowcanyon.help/article/382/ for the instructions to install and deploy the crow canyon solutions in the SharePoint Server. Also refer the feature activation instructions in the same article and activate the related features that are installed along with dependency features using the preferred activation method.
Important Note: Portal feature “Crow Canyon Configurable Portal” and its dependency feature “Crow Canyon Forms Attachments” need to be re-activated only for the portal sub site. All other “Web” scoped features needs to be activated to the back end site.
-
Configure NITRO Forms
To start configuring NITRO Forms for a list, please go to list settings –> Click on Crow Canyon NITRO Forms. It prompts to select whether to use NITRO Forms or native SharePoint Forms.
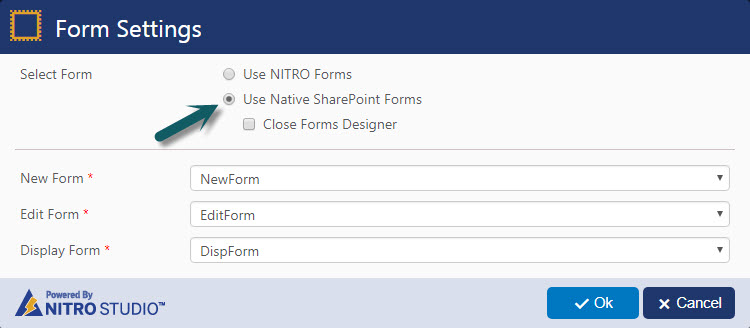
“Use Native SharePoint Forms” option uses the forms configured using the forms manager solution. To proceed with NITRO Forms configurations, please select “Use NITRO Forms” and click ok as shown in the below screenshot.
Once we choose the “NITRO Forms” in the above step, the NITRO Forms settings page (designer surface) appears and the NITRO Forms will be set as default forms.
However, we do not want to make the NITRO Forms as default forms until all the required configurations are complete so the users can keep use the current system without any downtime. To continue configuring the NITRO Forms while users are using the current system, go to Form Settings in the top menu –> click on “Use Native SharePoint Forms” and uncheck the “Close Forms Designer” option and click on Ok. This will set the default forms as native SharePoint Form but will allow us to continue design the NITRO Forms for the list. See sample screenshot below
Please refer sample video tutorials in managing NITRO Forms from https://www.nitro.studio/video-library/
Refer the forms manager settings like tabs and columns, advanced column permissions, advanced column validations and design the NITRO Forms accordingly. Previous forms manager configurations are common for all different forms (new form, display form and edit forms), and in our NITRO Forms, we can use different forms similar to standard SharePoint or we can use the same form configuration.
Different areas to consider in NITRO Forms configurations:
- Tabs and Tab Permissions – https://www.nitro.studio/advanced-approvals-video/
- Column Permissions – https://www.nitro.studio/advanced-approvals-video/
- Column Validations – https://www.nitro.studio/advanced-approvals-video/
- Cascaded Lookup Settings – https://www.nitro.studio/nitro-forms-video/
- Associated Item Settings
- Auto-Fill User Information Settings – https://www.nitro.studio/user-info-filler-video/
Let us take an example use case where “Case Id” column needs to be hidden in the New Form and make it read-only in edit form. In such cases we cannot use the same form configuration. We need to split the forms as described below.
Before splitting the forms, first configure all the tabs and columns by referring the forms manager configurations and then go to “Form Settings” in the menu –> Click on use different forms and select the custom design option. See sample screenshot below.
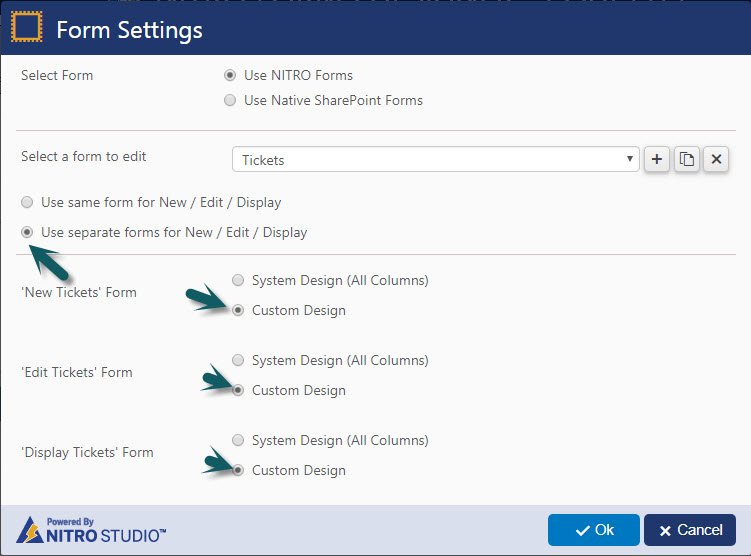
This splits the single form to multiple forms for the list and copies the same configuration to all three forms (new, display and edit forms). Now, configure all the required unique configurations like the above example “Hide ‘Case Id’ in new form and make it read-only in edit form” and save the configuration. Please make sure that we are not publishing the forms until all the lists are configured.
Once all the lists are configured, we can then Publish NITRO Forms for all the required lists. This sets the NITRO forms as default forms for all these lists.
Different lists that needs to be configured in our standard application:
- Actions
- Approver Tasks
- Change Requests
- Change Request Tasks
- CR Approver Tasks
- Configurations
- Email Tickets
- IT Support Tasks
- Knowledge Base
- Problems
- Problem Tasks
- Recurring Schedule
- Recurring Ticket Templates
- Report Schedule
- Tickets
- Archived Tickets
- Archived Change Requests
- Archived Problems
- Archived Email Tickets
- Archived IT Support Tasks
- Archived Time Tracking
Note: Change Requests and Problems related lists exists only for IT Premium Version. Ignore if these lists are not existing in the site contents
-
Configure Custom Actions as a replacement for Batch Ticket Editor
Please refer sample video tutorial for Custom Actions from https://www.nitro.studio/custom-action-video/
Configure custom actions for the Tickets list for “Self Assign”, “Assign to Someone” and “Close” actions on the “Tickets” list.
-
Portal Ticket URL in Configurations
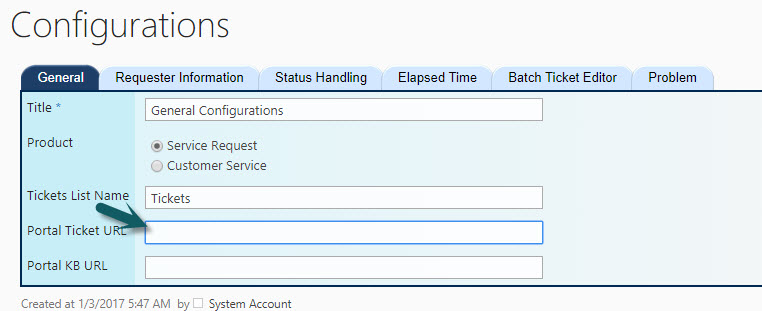
We need to modify the Portal Ticket Link URL in the configurations utility after the portal is upgraded to the latest version that has the designer forms.
Please go to Application Administration –> General Configurations –> replace the Portal Ticket URL like below
http://contoso/sites/CCS/IT/Portal/SitePages/DisplayForm.aspx?lfid=1&FormKey=Tickets&ItemID=<<ID>>. See sample screenshot below
-
Quick Launch and Top link bar link URL Changes
New Ticket/New Problem/New Change Request links in the quick launch need to be reconfigured with the new form URL of the NITRO Forms. In order to get the New form URL for any list, please go to list settings –> Crow Canyon NITRO Forms –> Form Settings –> click on Copy button and this will copy the New form URL for the Ticket NITRO Form. See sample screenshot below

Now go to site settings –> Look and Feel –> Quick Launch and reconfigure the link with the NITRO Form URL copied above. Please refer https://support.office.com/en-us/article/customize-site-navigation-c040f014-acbb-4c98-8174-48428cf02b25#bm1f for more details to edit the quick launch links
-
Additional Configurations:
(i) Configure Email History in NITRO Forms:
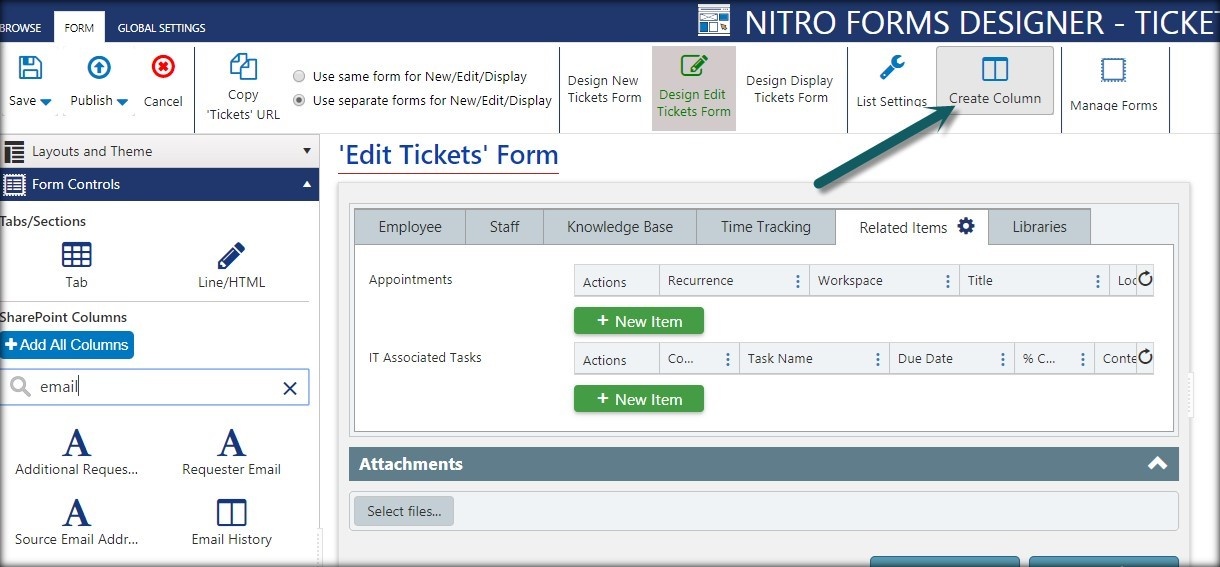
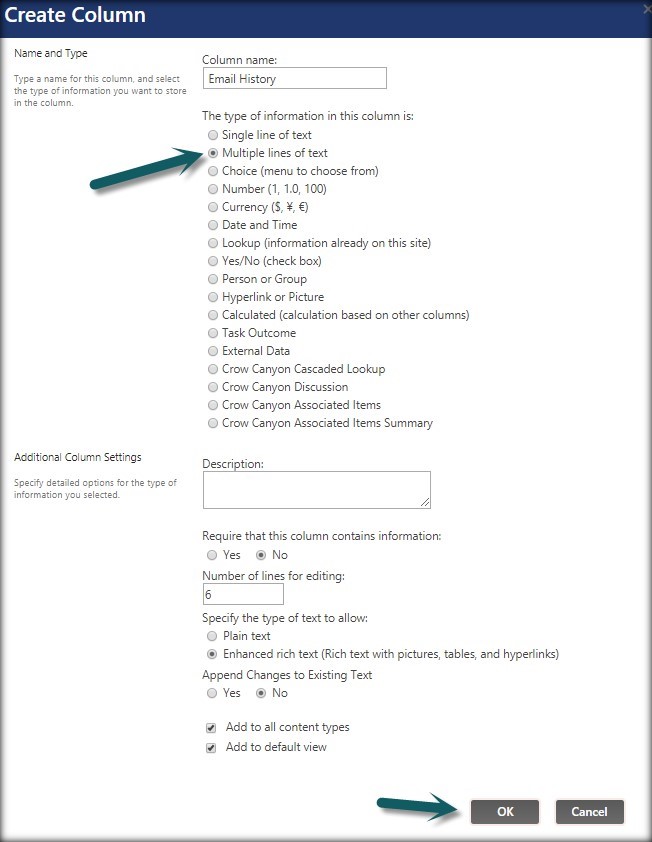
In our Forms Manager based application, Email History is configured as a web part in display form of the ticket. This need to be reconfigured as Associated item in our NITRO Forms. Go to Application Administration –> Configure Lists –> Crow Canyon NITRO Forms –> Create a multi line text column “Email History” as shown below
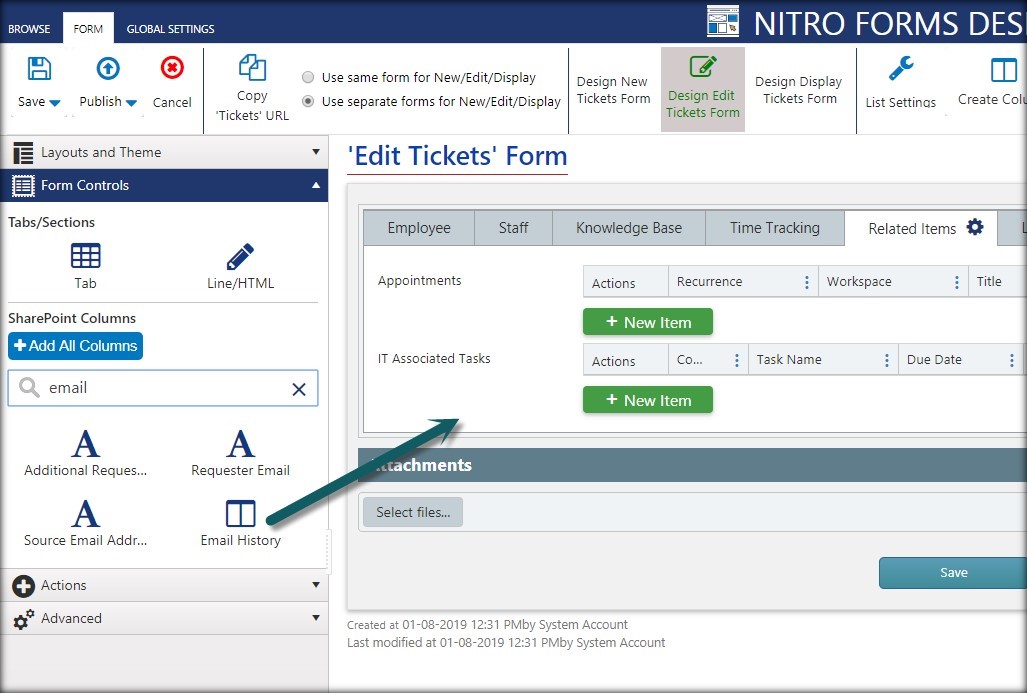
Add Email History column to both Display and Edit forms of the Tickets list under Related Items tab. See screenshots below
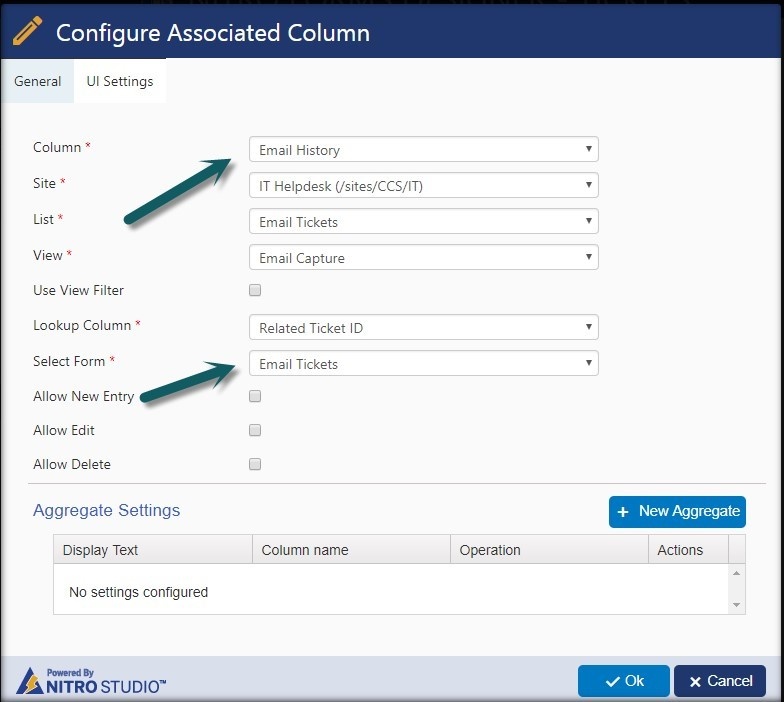
Go to Advanced section in left hand side panel –> Associated Item Settings –> create a new configuration for Email History column like below
(ii) Configure Email Handling Utility
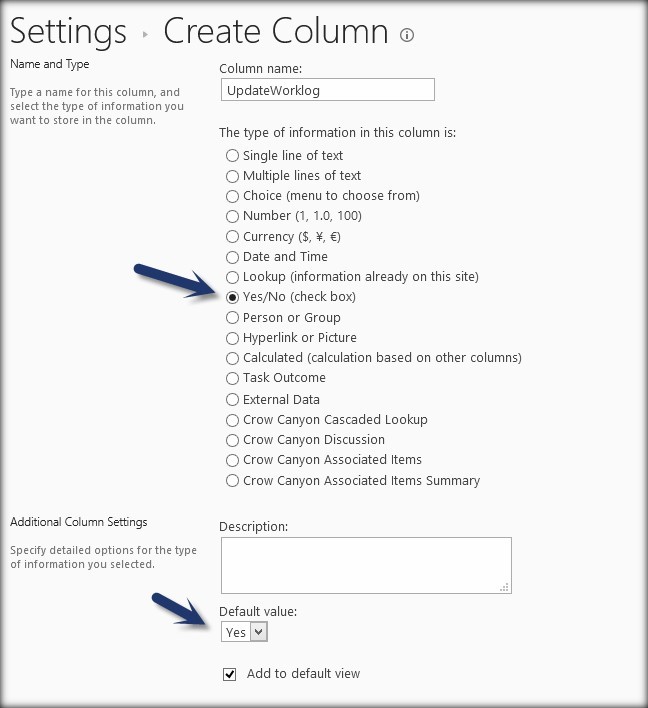
We have a feature that captures the content of the incoming email and adds it to the Work log of the ticket. In order to configure this, go to IT Helpdesk site –>site contents –> Incoming Email Processing list –> list settings –> Create a Yes/no column with name “UpdateWorklog” with default value as Yes. See sample screenshot below
Now go to Application Administration –> Email Configurations –> enable the checkbox for “UpdateWorklog” column, save the settings.

-
Portal Upgrade
After the “crowcanyon.configurable.wsp and crowcanyon.commonutils.wsp” solutions are upgraded and reactivating the features as part of step #1 in this article, go to Portal site –> Portal Settings, and this upgrades all the forms automatically. Please wait until the success message appears (screenshot below).
Next, reconfigure the security settings for the portal site. Please refer #6 from https://www.crowcanyon.help/article/227/ for instructions.


