Applies to: SharePoint online
Description
Crow Canyon NITRO Studio has excellent functionality for integrating both incoming and outgoing emails for business scenarios. Items in the list having business data (for e.g. Contract, Purchase Order or Ticket etc.) can be enabled for emails and entire email functionality is directly available in SharePoint itself.
‘Crow Canyon Advanced Email’ App enables outgoing emails directly from SharePoint list items and supports item column placeholders, predefined mail templates, attachments, item links etc. to quickly send mails with relevant SharePoint item content. These emails are also saved in SharePoint list and linked to the original item. Using Crow Canyon Linked Items App these mails are directly available on the main list item forms (and views) for easy referencing.
‘Crow Canyon Email Sync’ App enables incoming emails to be brought into SharePoint and then be linked to the corresponding items in business list. These emails are also available on the main list item form like outgoing emails. Incoming email can also trigger a business flow depending on the mail content (e.g. closing a Ticket) using Crow Canyon Workflow Manager App. Mail content can be added to a multi-line column in main list and a notification can be sent to the concerned person for further action when a mail is received.
Pre-requisites
- An announcement type list for the incoming and outgoing email items
- Above list should have a lookup column to the main business list (in this FAQ, we will take example of a Contracts list)
Summary of steps
- Activate NITRO on the site having the Contract list
Note: If you are using non-NITRO based site then ensure that Email Sync and Advanced Email Apps are installed in the site
- Configure Crow Canyon Email Sync settings to enable incoming emails
- Configure Crow Canyon Advanced Email Settings for outgoing emails
- Configure Email History in Contracts site
- Configure a workflow using Crow Canyon Workflow Manager to link the incoming emails to the corresponding contracts
Detailed Instructions
1. Activate NITRO on the site having the Contract list
Go to root site –> Crow Canyon Nitro Studio and activate the Nitro for the site having the Contract list
Note: If you are using non-Nitro based site then ensure that Email Sync and Advanced Email Apps are installed in the site
If you do not have the Crow Canyon Email Sync App, please contact Crow Canyon Support (crowcanyonsupport@crowcanyon.com) to get the latest Crow Canyon Email Sync App.
Refer instructions to add Crow Canyon Email Sync App to the App Catalog site from: https://www.crowcanyon.info/nitro/appmanual_v2/install-package-in-appcatalog.html
After adding Crow Canyon Email Sync App to the App Catalog site, add the Crow Canyon Email Sync app to root site.
2. Configure Crow Canyon Email Sync settings to enable incoming emails
Please refer instructions to configure Crow Canyon Email Sync App settings from: https://www.crowcanyon.info/nitro/appmanual_v2/configuring-email-sync.html
3. Configure Crow Canyon Advanced Email Settings for outgoing emails
Please refer Email Manager section in below link to configure the Advanced Email settings for outgoing emails and email history etc.
https://www.crowcanyon.info/nitro/appmanual_v2/
4. Configure Email History in Contracts site
Since Email list has a lookup to the Contract list, related emails for a Contract can be shown in the list view of Contracts and also in the Contract item forms. Please refer Linked Items App documentation for more details: https://www.crowcanyon.info/nitro/appmanual_v2/configuring-linked-items.html
At a high level, following needs to be done:
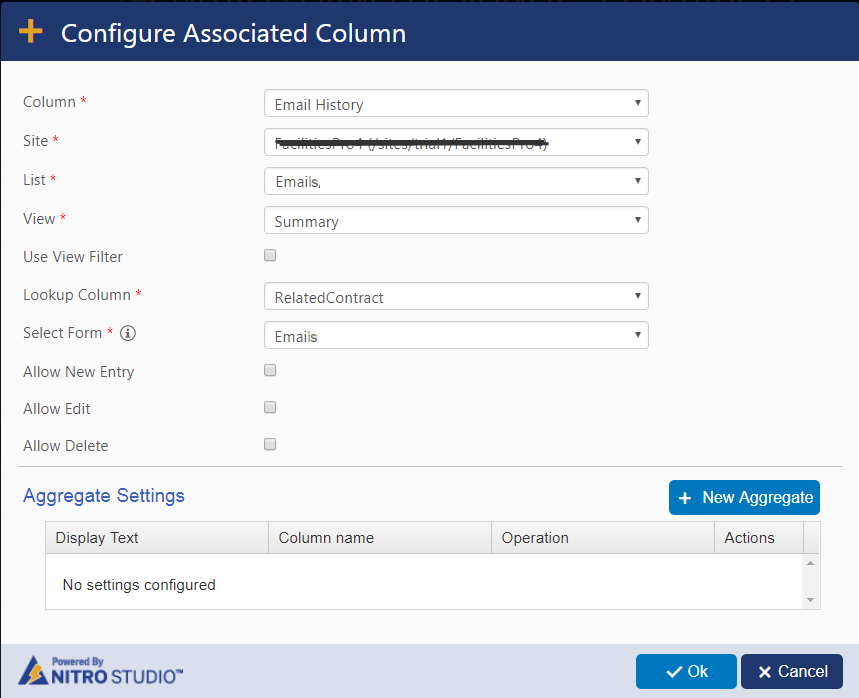
Create “Email History” multiline text column and configure Associated item Settings in the Nitro forms.
Go to Contracts list settings –> Crow Canyon Nitro Forms –> New designer forms –> Add Email History column to the Email History tab and configure Associated item Settings as shown below and do the same configuration in Edit and Display forms.
5. Configure a workflow using Crow Canyon Workflow Manager to link the incoming emails to the corresponding contracts
1. Configure a Workflow on Emails list as shown below. This workflow will link the incoming emails to the related contract. Incoming email should have a pre-defined placeholder format to identify the Id of the related Contract. In this example, we are using “ContractId: <actual Id of the contract>” in the mail subject.
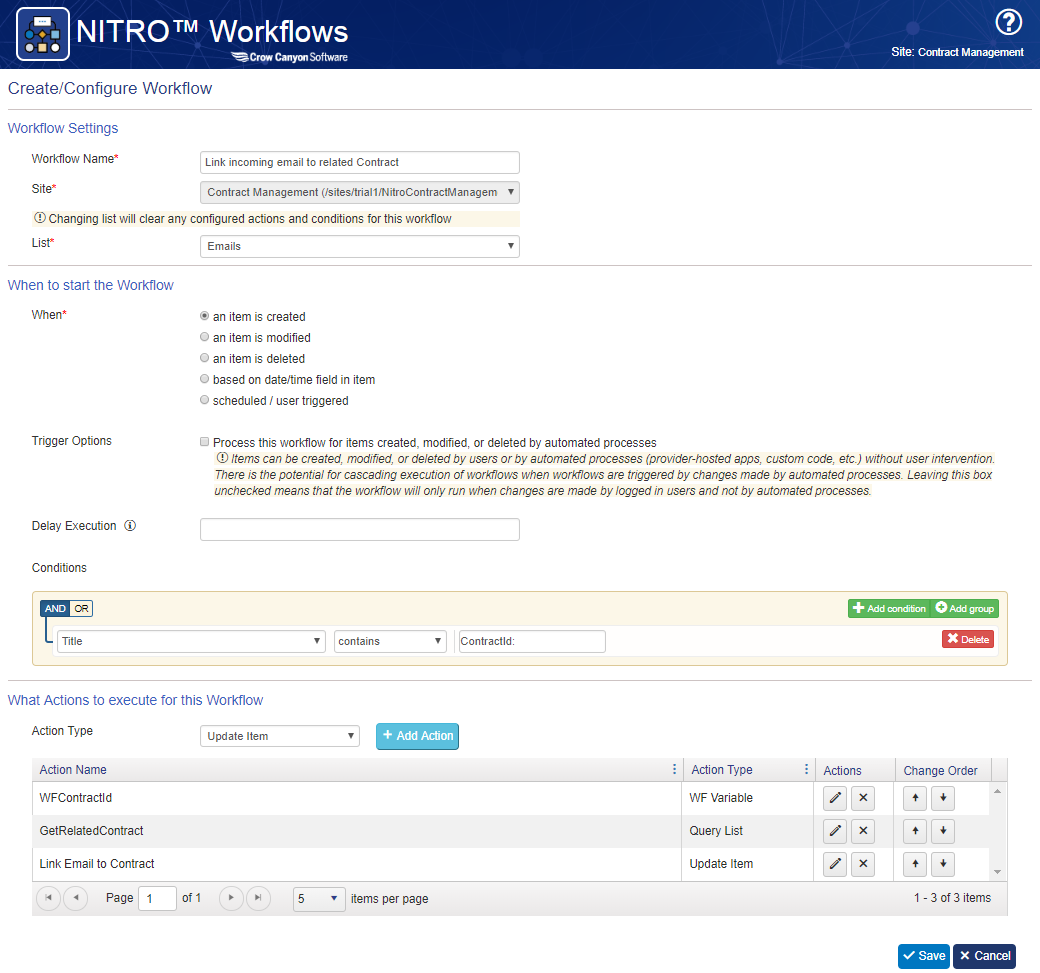
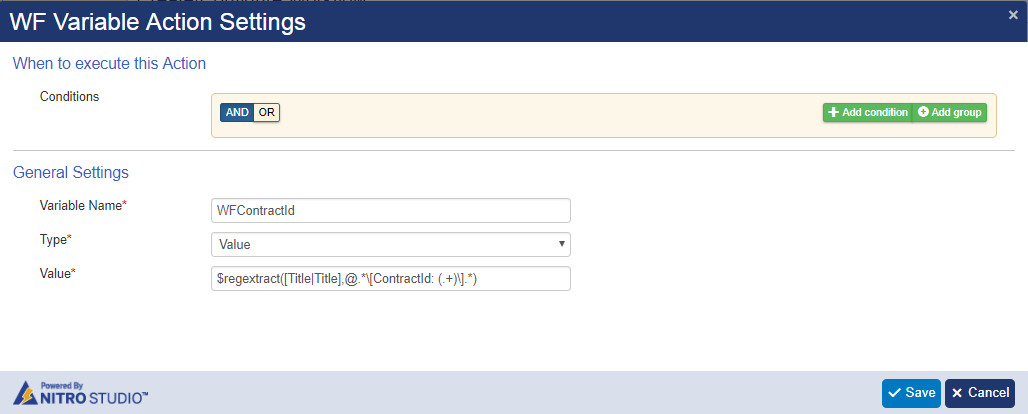
2. WF Variable action
If the incoming email contains ContractId then this action will extract the “Related Contract ID” from mail subject.
Sample mail subject: Internship Agreement – [ContractId:35]
Regex for ContractId is given below, you can use a different text than ContractId:
$regextract([Title|Title],@.*\[ContractId: (.+)\].*)
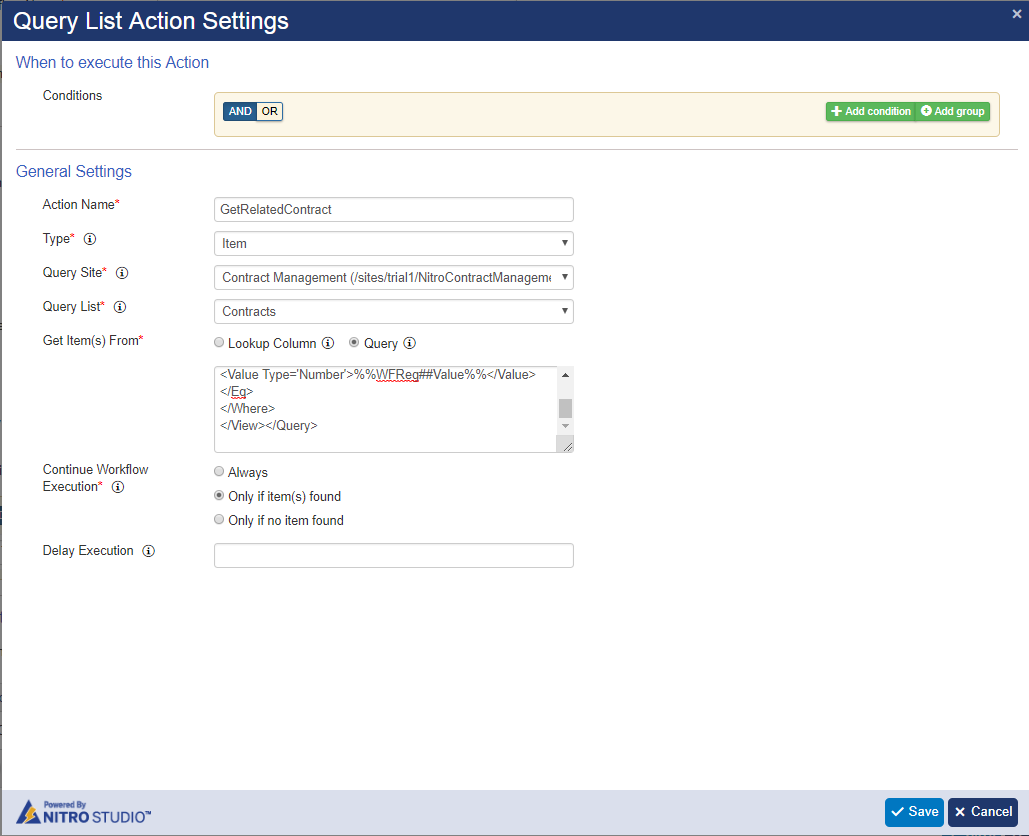
3. Query list Action
This action will get the Contract having the Id specified in the subject of incoming email
Query:
<View><Query>
<Where>
<Eq>
<FieldRef Name='ID' />
<Value Type='Number'>%%WFContractId##Value%%</Value>
</Eq>
</Where>
</View></Query>
4. Update Action
This action will link the Email item to the Related Contract
Column Mapping
RelatedContract: GetRelatedContract##ID
