Applies to: SharePoint Online
Description
Crow Canyon Support Bot application utilizes your existing data to solve common user issues using sophisticated NLP bases search and Crow Canyon’s proprietary matching and ranking algorithm. Bot “learns’ from resolved and unresolved cases to get better at solving user problems over time. Click here to see more detailed diagram.
This article describes the steps to configure the Crow Canyon Bot application.
Detailed Steps
There are four steps to configure the Bot.
Getting started to configure the Bot application:
Go to the site collection root site, open the Crow Canyon NITRO Studio, that takes us to “NITRO Admin Home” page. Click on the “AI Applications” link available on the top link bar section, this navigates us to the page that shows existing configurations and we can start new configuration from the same page.
Click on “New Bot Application” link to get started.
1. Bot Application Configuration
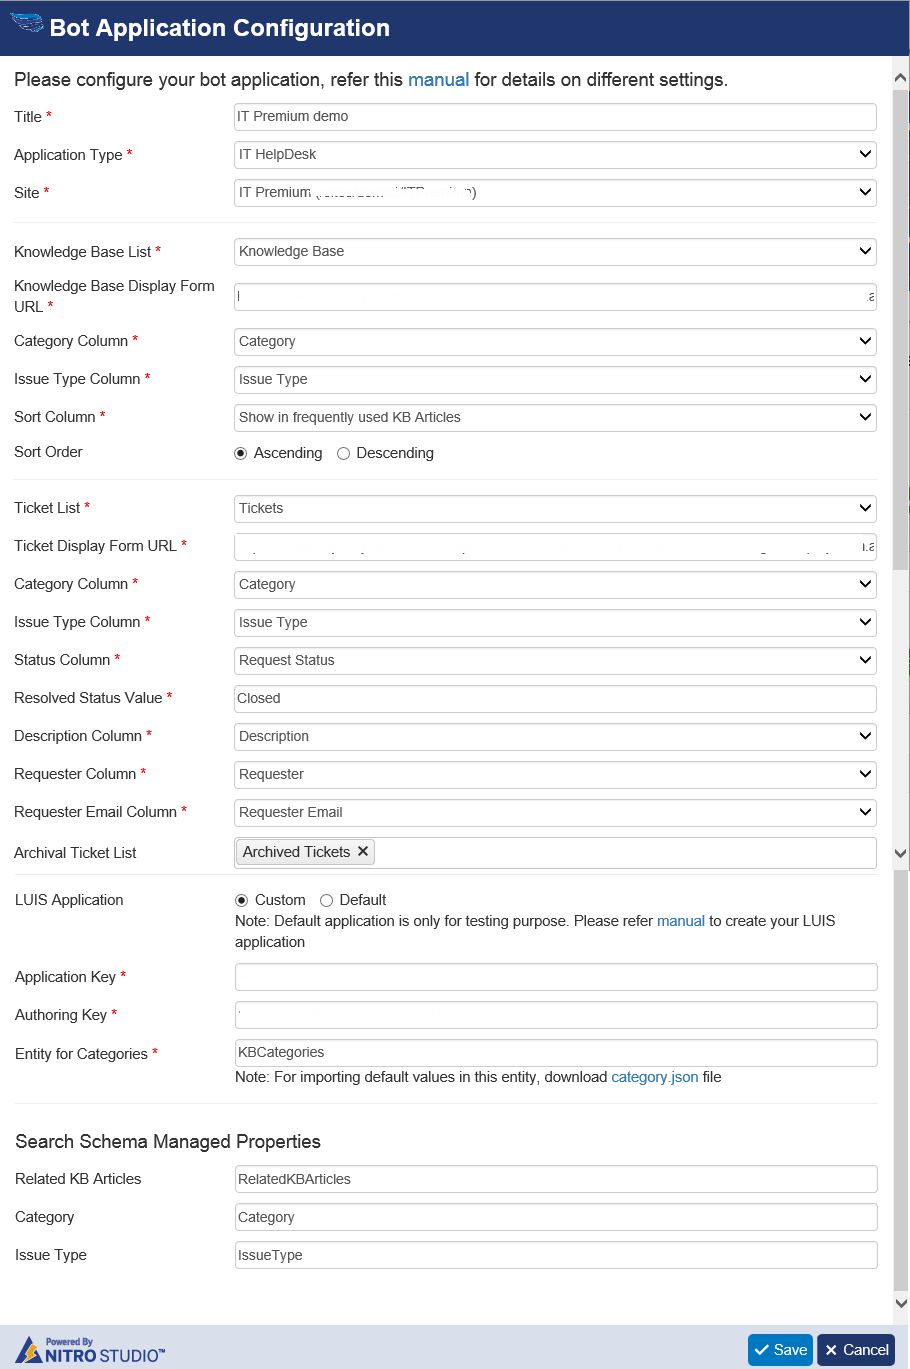
1.a. Site Configuration
- Title: If bot is used for multiple applications then users select the application for which they need assistance for (e.g. “IT HelpDesk”, “Request Management” etc.). It should be unique across tenancy
- Application Type: Type of the application for which this bot is configured
- Site: SharePoint Site where Crow Canyon application is installed. This is used for searching the solution and creating Ticket/Request/Work Order etc. Once the Crow Canyon application site is selected, all the other properties “Knowledge Base List”, “Sort Column”, “Tickets List”, “Category Column”, “Issue Type Column”, “Description Column”, “Requester Column”, and “Requester Email Column” options will be auto populated.
1.b. Knowledge Base List Configurations
Knowledge Base List: Bot will search this list for the solutions based on user input text
- Knowledge Base Display Form URL: It auto populates the KB list’s back end default form URL, if required we can replace with corresponding portal form URL. It supports
##ItemID##placeholder to construct the URL. - Category Column: This column is used to search KB articles with matched pass phrases that are resolved to categories
- Issue Type Column: This column is also used to search KB articles with matched pass phrases that are resolved to issue types
- Sort Column: This column is used to sort the KB articles when top 5 articles are required to be shown to user
- Sort Order: Sorting order for KB articles for the above sort column
1.c. Tickets List Configurations
Ticket List: This list configuration is used for two different purposes.
- Used for creating Ticket/Request/Work Order as per user input when problem is not resolved.
- Used to find solutions based on existing items for similar problems
For Ticket/Request/Work Order Creation, select below mentioned columns:
- Ticket Display Form URL
- It auto populates the Ticket list’s back end default form URL, if required we can replace with corresponding portal form URL. It supports
##ItemID##placeholder to construct the URL.
- It auto populates the Ticket list’s back end default form URL, if required we can replace with corresponding portal form URL. It supports
- Category Column
- Issue Type Column
- Description Column
- Requester Column
- Requester Email Column
- Status Column
- Used to search for tickets that are resolved (Resolved/Closed based on Resolved Status value configured) and find the linked KB articles to the result resolved tickets and show in search results in Bot.
- Resolved Status Value
- Archived Tickets List
- Crow Canyon application has archival feature to address SharePoint list view threshold and performance. Multiple archived tickets list can be configured in the application based on the tickets frequency. This configuration in Bot application configuration is used to search archived tickets in addition to tickets data and find the linked KB articles and show them in search result in Bot.
1.d. LUIS Application Configuration
LUIS Application: Please create the LUIS application and specify the details after selecting custom option. Details of creating LUIS application are given below. Default is only for testing purpose and should not be used for production bot.
To create the LUIS application, refer Creating LUIS App section in this article below.
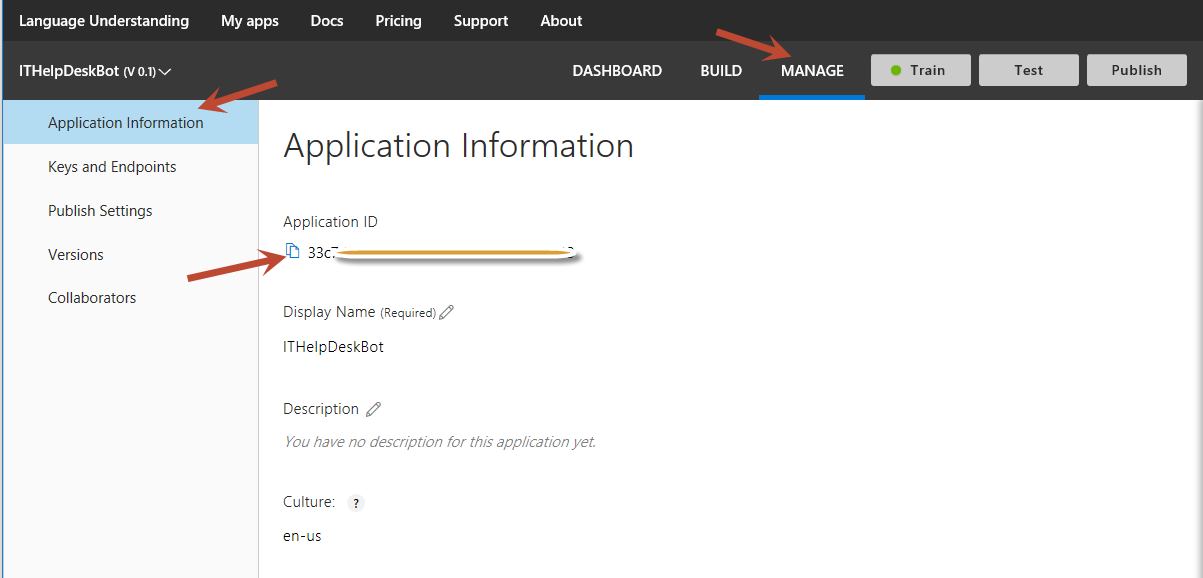
- Application Key: The ID of your LUIS application
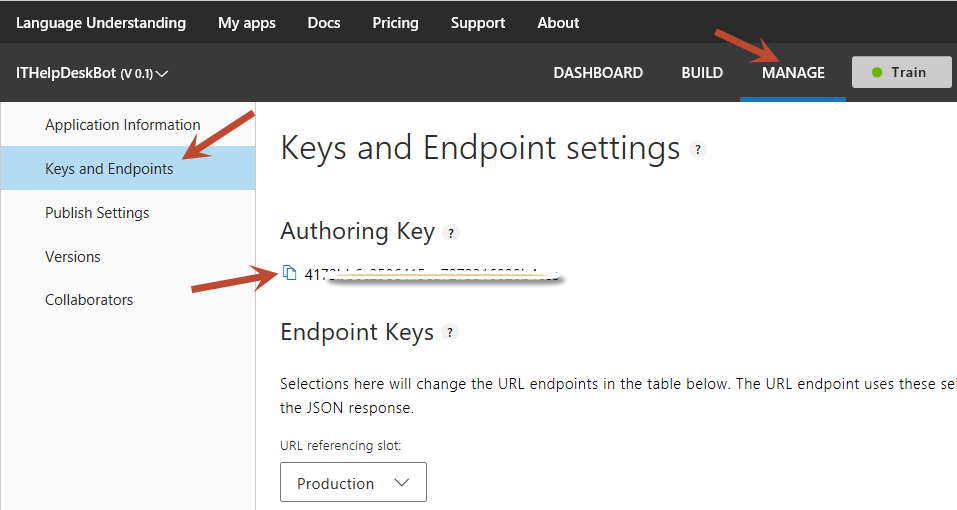
- Subscription Key: Authoring Key, available in Luis.ai site under Account Settings
- Entity for Category: Define Entity name that has the values for Ticket/Request/Work Order. We need to enter the categories entity name that we have configured in the Luis application.
1.e. Search Schema Manage Properties: More Info
Search discovers information by crawling items on your site. The discovered content and metadata are called properties of the item. The search schema has a list of crawled properties that helps the crawler decide what content and metadata to extract.
- Related KB Articles: Enter Related KB Articles Managed Property alias. If it doesn’t exist, then create managed property for Related KB Articles column (in Ticket list). Refer Search Configurations in site
- Category: Enter Category Managed Property alias. If it doesn’t exist, then create managed property for Category column (in Knowledge Base list)
- Issue Type: Enter Managed Property alias. If it doesn’t exist, then create managed property for Issue Type column (Knowledge Base List) in crawled properties
Note: If we do not find the crawled property to map (for example, ows_RelatedKBArticles), go the list that has this column, list settings, Advanced Settings, click “Reindex List”. We can continue with other configurations as SharePoint may take time to get the re-indexing done for the list.
2. Email Domains
Bot prompts user to login with their Microsoft O365 account. It uses the domain of logged in user to identify the bot applications that user can access. It is mandatory to specify all the required domains in this section. If no domains are added then BOT won’t respond for anyone.
3. Bot Analytics Configurations
Go to Crow Canyon NITRO Studio, NITRO Admin Home, Nitro Applications, Updates, click on “BOT ANALYTICS”, select the site and click OK. This creates the “Chat Bot Admin Dashboard” and “Performance Reports”. This helps admins recognize the area of improvements to Knowledge Base system so Bot “learns” more at solving user problems over time.
4. Bot Channels
There are three possible channels for the Bot as listed below. “Teams” is the only supported channel for Crow Canyon Bot.
- Teams
- Web Chat
- Skype
| Channel Name | Login Method | Option Selection | Supported? |
| Teams | Additional login is not required | Clickabe
Sample options are like below:
|
Yes |
| Skype | Outside the app | Clickable | No support is provided by Crow Canyon |
| Web Chat | Outside the app | Not Clickable, user has to type/copy paste the options | No support is provided by Crow Canyon |
How to add Bot to Teams Account
Teams is a convenient channel for bot as it doesn’t require you to login. Click this link to add bot to the Teams account.
How to add Skype in SharePoint site page (classic page)
Note: No Support is provided by Crow Canyon
- Open SharePoint Page in Internet Explorer
- Click on Edit Page menu under Gear icon (top right Corner), click on add web part, select “Content Editor” under “Content and Management” group, add Content Editor Web Part on Page with below Content. Please add the below content as it is including id.
<span class="skype-button bubble" data-bot-id="bb501dd9-6ae5-4ec8-9f8c-e0dae444efde"></span>

<script src="https://swc.cdn.skype.com/sdk/v1/sdk.min.js"></script>

// Note: If above is not working, you can try the below script which may have newer but not yet released changes

// <script src="https://latest-swc.cdn.skype.com/sdk/v1/sdk.js"></script>
How to add Web Chat in SharePoint site page (classic page)
Note: No Support is provided by Crow Canyon
- Open SharePoint Page in Internet Explorer
- Click on Edit Page menu under Gear icon (top right Corner), click on add web part, select “Content Editor” under “Content and Management” group, add Content Editor Web Part on Page with below Content.
<iframe src='https://webchat.botframework.com/embed/CrowCanyonDemoBot?s=dmkPOKKXbhw.cwA.A5g.QFeixgAlW1nJTADi49eabQu3s82ZC_-OjMh7iHE3ClE' style='min-width: 400px; width: 100%; min-height: 500px;'></iframe>
Search configurations in site
To create search schema manage properties, please follow below steps:
1.Go to Root Site – Site Settings
2. Under Site Collection Administration, click on “Search Schema” Link
3. Filter “RefinableString” Managed Property
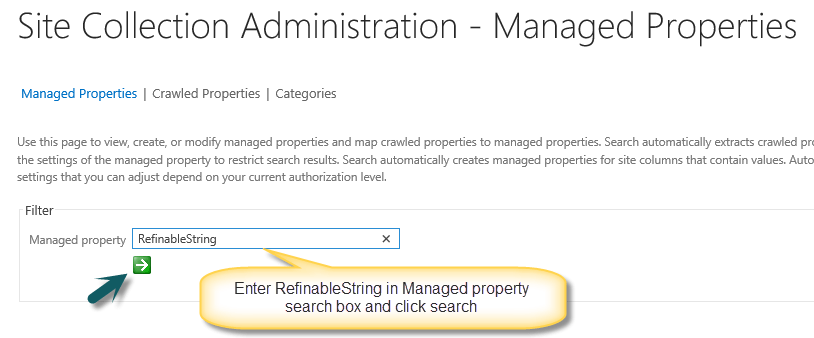
4. Click on unused RefinableString__ property

5. Specify alias name for property, use this alias in Bot configuration – search schema Column Property
6. Scroll to “Mappings to crawled properties” section, click on Add a Mapping button:
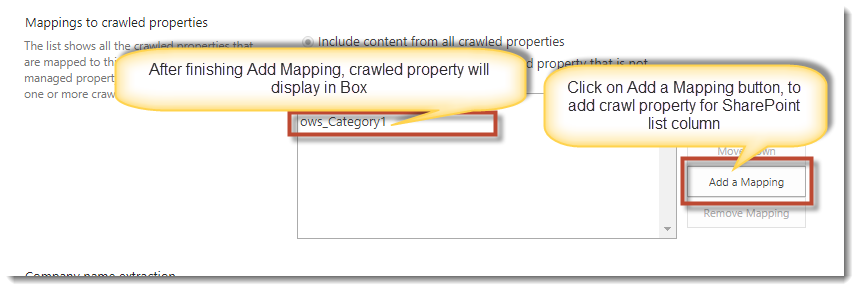
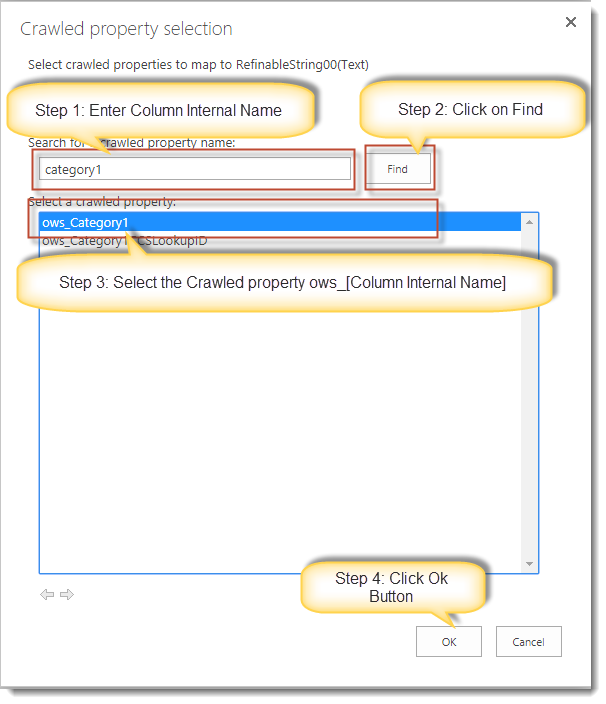
7. Search crawled property with column internal Name for which you want to create manage property. Then select the property (starts with ows_[Column Internal Name]) and click Ok.
8. Property is now added in Mappings to crawled properties List box
9. Click on Save Button.
10. Re-index List: Go to List Settings Page => Click on Advanced Settings => Click on Re-index Button.
Note: If you are unable to find crawled property for list columns then re-index the list. It takes about an hour to re-index the list
Creating a LUIS App
- Create a LUIS app in the LUIS site (https://www.luis.ai/)
- Sign-in with O365 credentials
- On My Apps page, select Create new app
- In the dialog box, name your application (For ex. “LUIS HelpDesk Bot”)
- Choose your application culture (for LUIS HelpDesk Bot app, choose English), and then click Done
- Click on the created App (LUIS HelpDesk Bot)
- Click on Entities (Left Side Navigation Panel)
- Click on “Add prebuilt entity”
- In Dialog, Type keyPhrase inside the search box and then select keyPhrase entity and then select Done.
- Click on “Create new entity”
- Enter Entity Name (such as ITCategories)
- Select “List” Entity type, and then select Done.
- Click on Category Entity to Configure Values (import values form category.json, to generate this file go to Bot Application Page and In Luis custom section click on download Category.json file). Note, you can modify this file to enter more variations for issues type text
- Click on “Train” button on right top corner (Initially Train button has red dot indication and once we clicked, it changes to green dot indication)
- Once the Train is completed (green) then click on “Publish” button and wait to see “Publishing complete” message
How to Use Bot application?
This section shows the sample usage along with sample output screenshots.
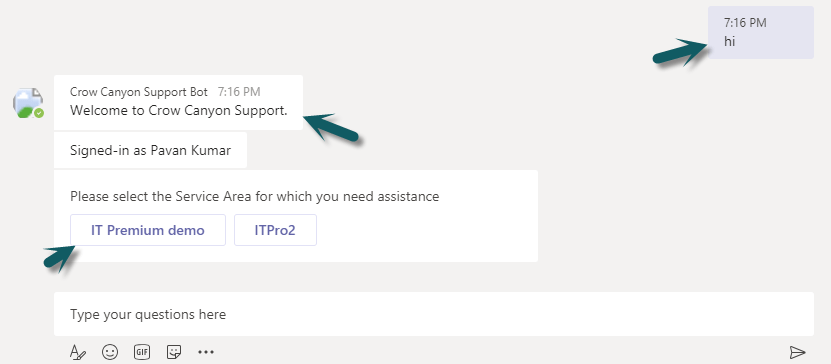
1. Open Microsoft Teams (It supports both Desktop/Web versions), go to “Crow Canyon Support Bot”, type “hi”. It does not require additional sign-in. It prompts to select the bot application if there are multiple bot applications configured as shown below.
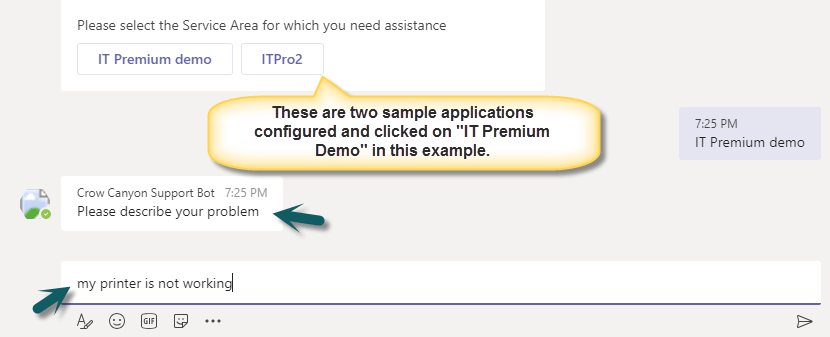
2. Click on the desired application then it asks to describe your problem as shown below. Enter the problem and hit Enter.
5. Based on the problem description (Keywords in the question), it shows the KB Article links. We can click and open the KB Article and see the information as shown below.
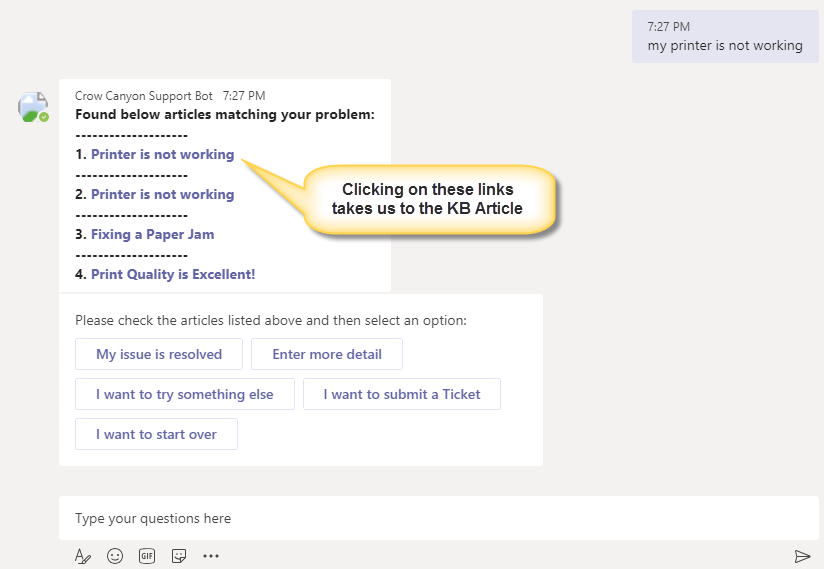
6. Based on whether the article is helpful or not, one can click one of the available options (My issue is resolved, Enter more details, I want to try something else, I want to submit a ticket, I want to start over).
-
- If we click on either “My issue is resolved”, it shows the “Thank You. Have a nice day!” message. then again the process starts from #2 i.e. we have to start from “hi” but this time we don’t need to sign-in again.
- If we click on “Enter more details”, we can enter the problem description in different words.
- If we click on “I want to start over” then it shows the available bots and we can choose the required service area bot and start again.
- If we click on “I want to try something else” then it shows all the stored categories so we can select required category then it shows available issue types and then it shows articles based on the issue type selection.
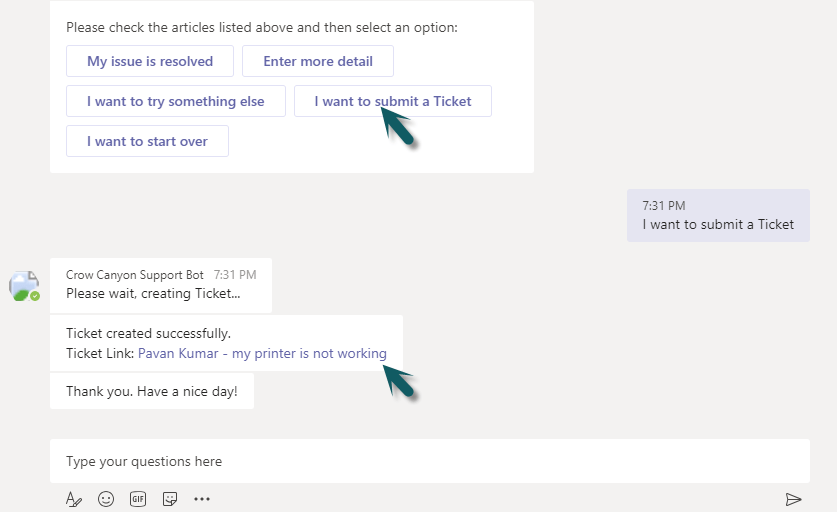
- If we click on “I want to submit a Ticket”, it creates a ticket with title, category, issue type, description, and requester information and shows the ticket edit form link as shown below.
Troubleshooting Bot application issues
Symptom
Bot application conversation chat is disabled with a message like “Sending new messages to this bot has been disabled by your administrator” as shown below.
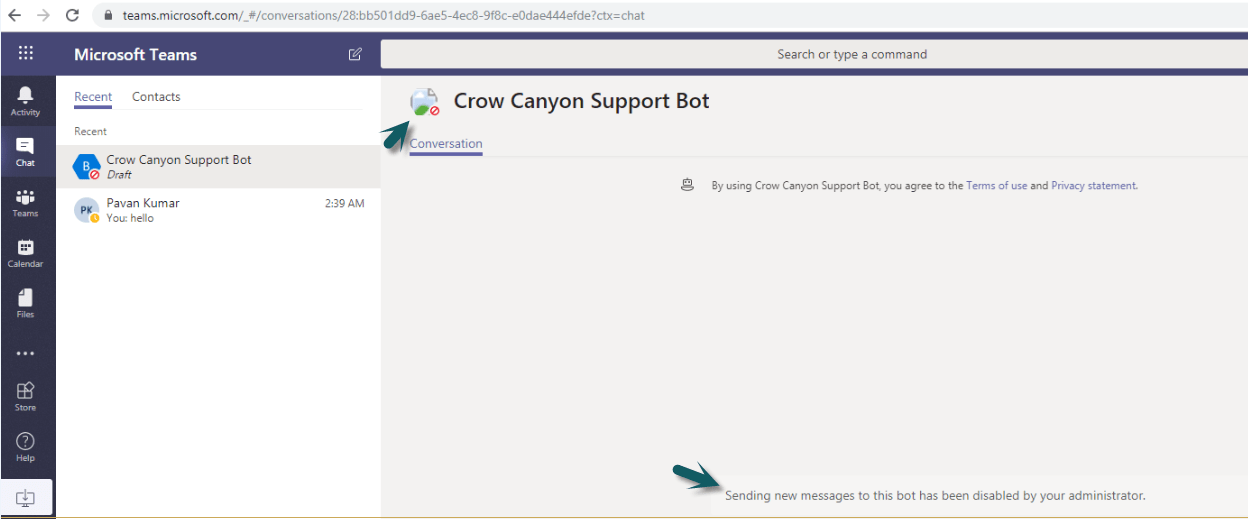
Cause
“Allow Uploading custom apps” is disabled in Teams Admin Center.
Resolution
Go to O365 Admin Center, open “Teams” Admin Center, expand “Teams apps”, click on “Setup policies”, open “Global (Org-wide default)”, please turn on “Allow uploading custom apps” option as shown below.
