Applies to: SharePoint Online and SharePoint On-Premises
Description
NITRO Forms have lot of built-in functionality for layout, design and functionality. For any specific cases not covered directly by the configurations, custom JavaScript and CSS can be added. These custom scripts can be invoked on form load, on column values change and before/after item submit. For all these cases, scripts can be invoked conditionally based on values entered in the form.
This article lists some of the use cases and configuration steps for custom scripts:
- Switch to a tab on the form when a specific value is selected in a column
- Include one or more custom JavaScript files in NITRO forms
- Show a popup message on column value change
- Open Portal Quick link tiles in modal dialog
- How can we configure a hyperlink in the “Safety Data Sheet” document library whenever a new “SDS image” is uploaded or edited?
- How to configure Print feature in Portal forms?
- Copy SharePoint column value to clipboard on button click
Switch to a tab on the form when a specific value is selected in a column
This example is based on following configurations on the form:
- A tab is added to form with name “Spam”
- Tab permissions are configured to show this tab only when Category column value is ‘Email’ and ‘Issue Type’ column value is Spam
When user selects the ‘Issue Type’ as Spam, focus should automatically shift to this tab in the NITRO forms (that is, this tab should get selected).
This can be configured using NITRO Forms advanced options.
Go to List Settings -> Crow Canyon NITRO Forms -> Advanced Section -> Form Event Actions.
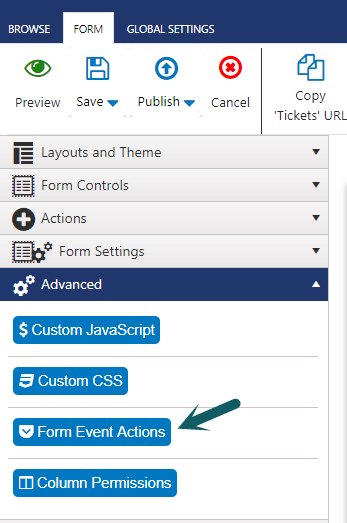
Note: If “Form Event Actions” option is not available in the NITRO forms, please upgrade the NITRO Studio for the site to latest version. Go to site -> Application Administration -> Crow Canyon NITRO Studio -> Click “Update This Site” link.
With “Form Event Actions” we can invoke script code on column change event or during form load. In this scenario, we will configure a form event action on ‘Issue Type’ column change to switch focus to “Spam” tab.
Click “Form Event Actions” button and configure a new action that will be executed when user changes “Issue Type” column value to “Spam” on the form:
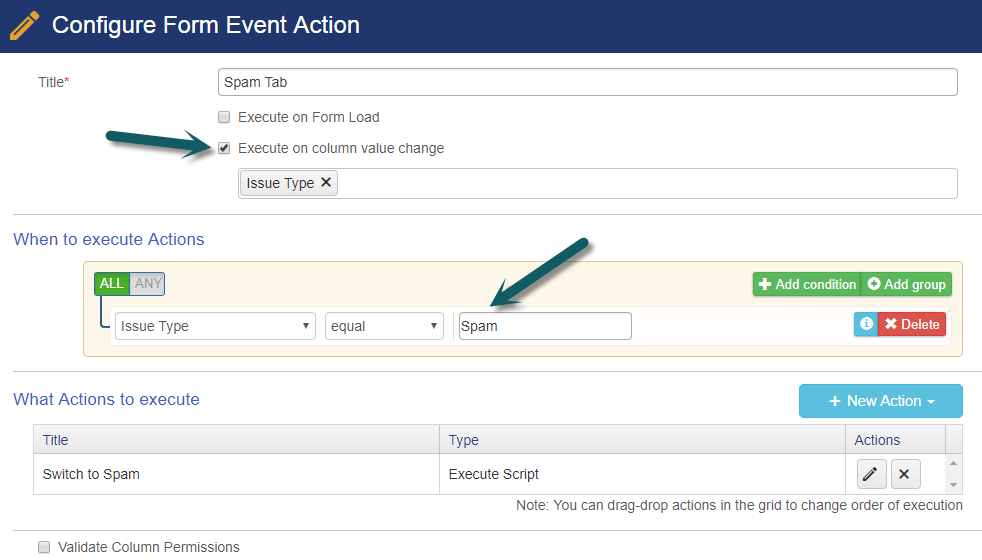
Next, configure an “Execute Script” action to switch to specific tab:
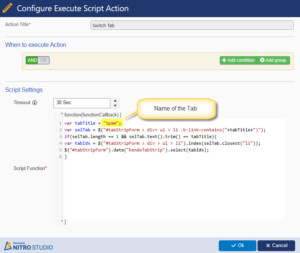
Script used above:
var tabTitle = "NAMEOFTAB";
var selTab = $("#tabStripForm > div> ul > li .k-link:contains("+tabTitle+")");
if(selTab.length == 1 && selTab.text().trim() == tabTitle){
var tabIdx = $("#tabStripForm > div > ul > li").index(selTab.closest("li"));
$("#tabStripForm").data("kendoTabStrip").select(tabIdx);
Note: Please rename “NAMEOFTAB” with the required tab in the above script
Next, save the settings and publish the NITRO Forms. You may have to refresh NITRO Form a couple of times for new settings to take effect as settings are cached to improve performance.
Include one or more Custom JavaScript files in NITRO forms
We can add custom JavaScript that is loaded at the time of form load. We can put the script in a file and include the link to the file in the form settings. In this example we have described the configuration to add one or more custom JavaScript files in NITRO forms.
Instructions:
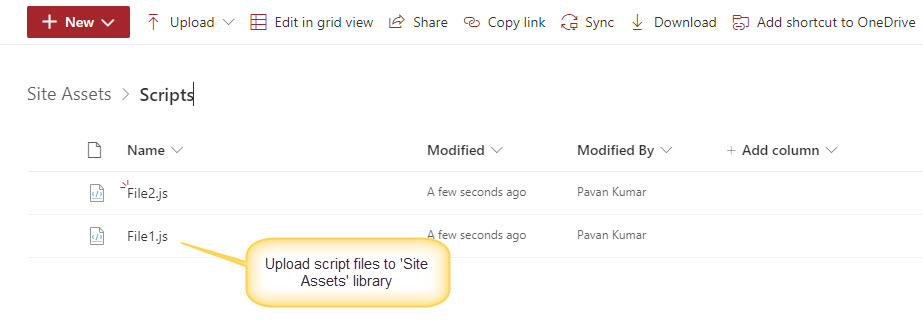
- Upload script files to ‘Site Assets’ library in the site. In this sample use case, we have uploaded custom script files to ‘Scripts’ folder in the ‘Site Assets’ library.
URLs:
https://contoso.sharepoint.com/sites/Helpdesk/IT/SiteAssets/Scripts/File1.js
https://contoso.sharepoint.com/sites/Helpdesk/IT/SiteAssets/Scripts/File2.js
2. Configure custom JavaScript files in NITRO Forms.
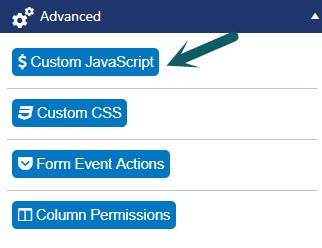
Go to List Settings -> Open NITRO forms -> Click on Advanced Settings -> Click on Custom JavaScript
1.Link – If we would like to add only one custom JavaScript link to the form then we can use this option.
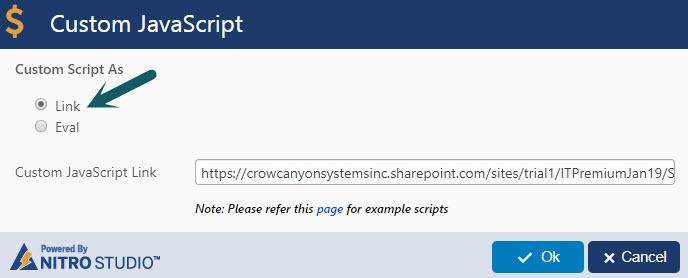
2. Eval
To include two or more Custom JavaScript links to the form follow below instructions.
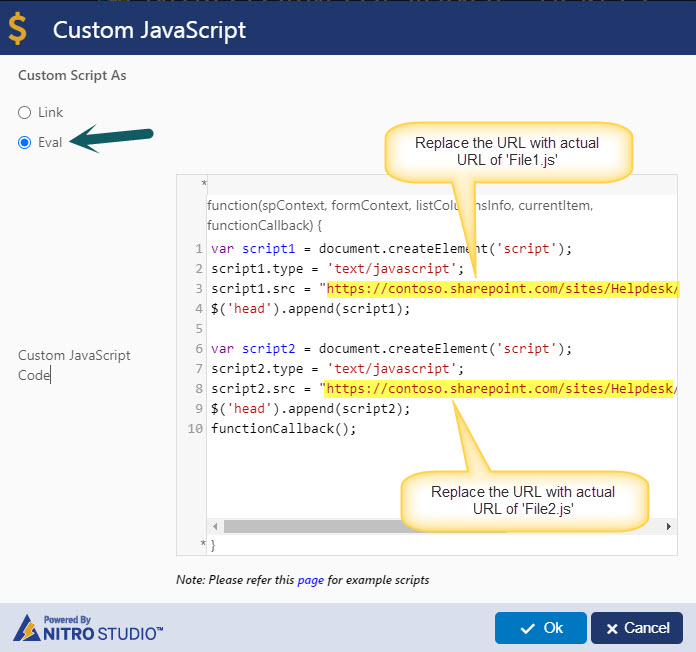
Note: Please note that File1.js and File2.js URLs (highlighted in above image) in the above script need to be replaced with the actual locations of the JS file(s).
Script used in the above screenshot :
var script1 = document.createElement('script');script1.type = 'text/javascript';script1.src = "https://contoso.sharepoint.com/sites/Helpdesk/IT/SiteAssets/Scripts/File1.js";$('head').append(script1);var script2 = document.createElement('script');script2.type = 'text/javascript';script2.src = "https://contoso.sharepoint.com/sites/Helpdesk/IT/SiteAssets/Scripts/File2.js";$('head').append(script2);functionCallback();
After configuring the forms, save the settings and publish the NITRO Forms.
3. How to configure Form Event actions to show a popup message?
In this example, we have configured Form Event actions such that if the “Number of Employees” more than 1 then we can show a popup message i.e. “Please attach spreadsheet with employee data”.
Instructions:
Go to list -> List Settings -> Crow Canyon NITRO Forms -> Advanced Settings -> Form Event Actions and configure the execute script action as shown below.
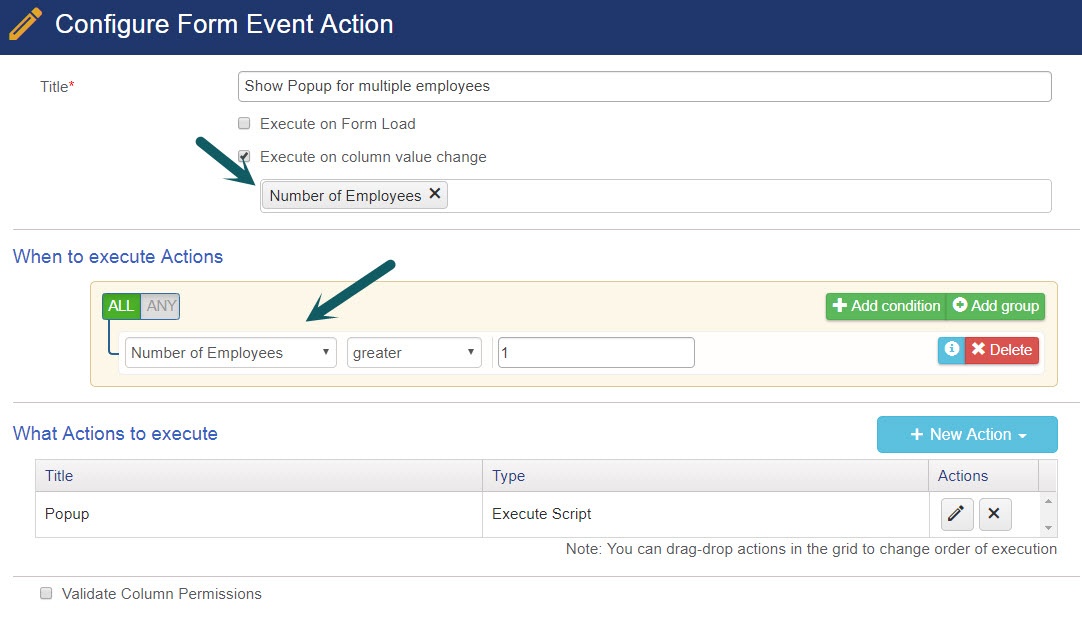
Script
window.alert("Please attach spreadsheet with employee data");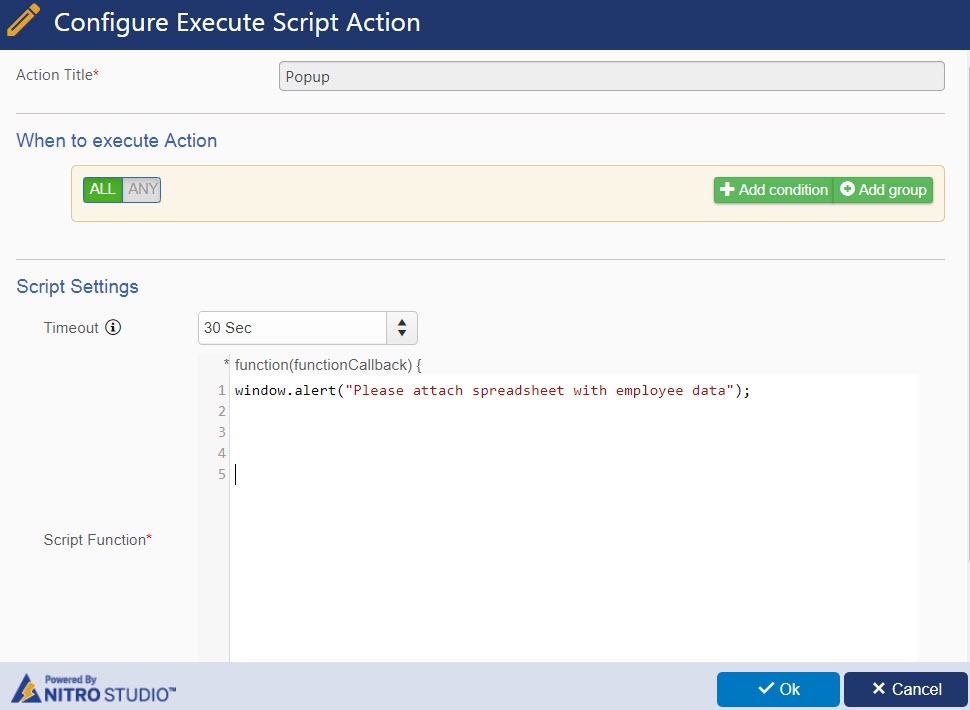
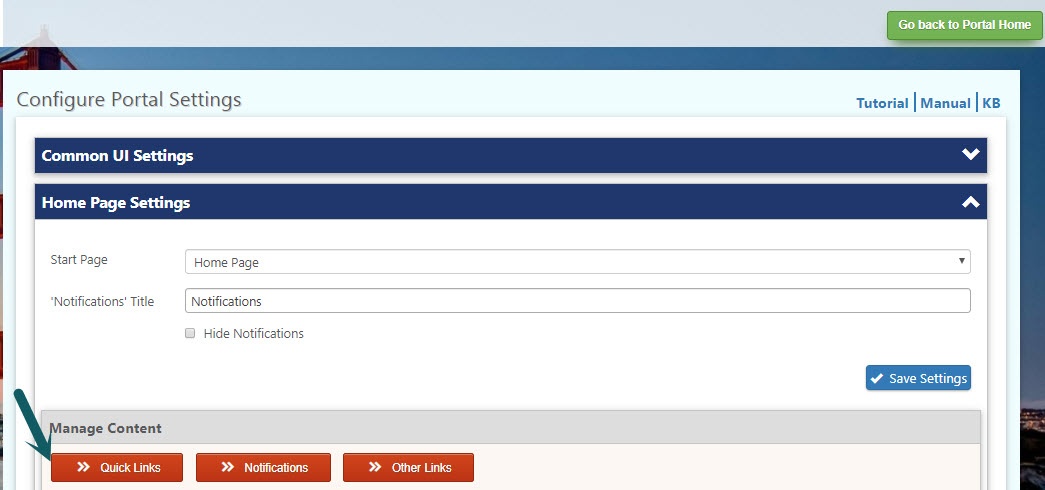
4. How to open Portal Quick link tiles in modal dialog?
In this example, we have configured Portal Quick Link tiles open in model dialog.
Follow the instructions below to open quick link tiles in model dialog.
Instructions
Step1: Go to Portal Settings -> Home Page Settings -> edit the Quick Link
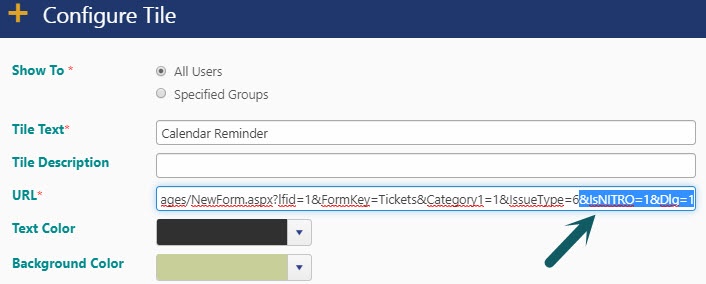
Step2: Append “&IsNITRO=1&Dlg=1” in the URL of the quick link as shown below.
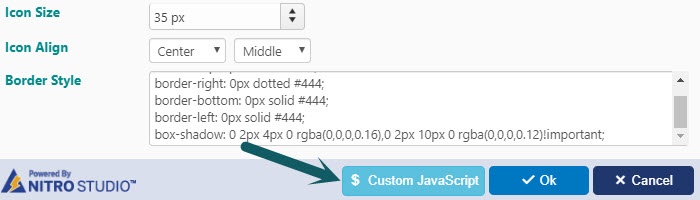
Step3: Go to “Custom JavaScript” button for the quick link and add the attached script as shown below and save the settings.

Script used in above action:
paramTileInfo.IsPopup = true;

setTimeout(function(){

functionCallback(paramTileInfo);

},10);
After that refresh the page and click on the Quick Link it will be open in dialog.
Note: Above steps need to be repeated for all the Quick Tickets needed as per our business scenario.
5. How can we configure a hyperlink in the “Safety Data Sheet” document library whenever a new “SDS image” is uploaded or edited?
We can populate a hyperlink in the Safety Data Sheet” item that has the direct link to the “SDS Image”.
Find the instructions to configure below.
Detailed Steps
- Create a Library and it is named as “Safety Data Sheet”
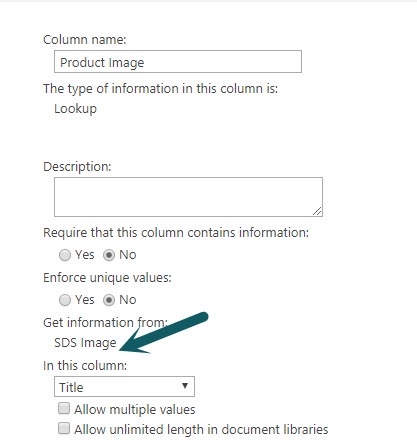
- Create a lookup column in the “Safety Data Sheet” Library and it is named as ‘Product Image’ as shown below.
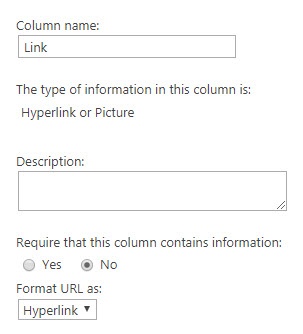
- Create a hyperlink type of column with name ‘Link’ as shown below.
- Create an another Library and it’s named as “SDS Image”
When we are uploading the images in this folder that image hyperlink will be auto-fill in the edit form of “Safety Data Sheet” while selecting the ‘Product Image’.
Instructions
Step1: Go to Site Contents -> Safety Data Sheet document library -> Library Settings -> Crow Canyon NITRO Forms.
Step2: Go to Advanced section in left hand panel -> Form Event Actions -> Create a new configuration as shown below
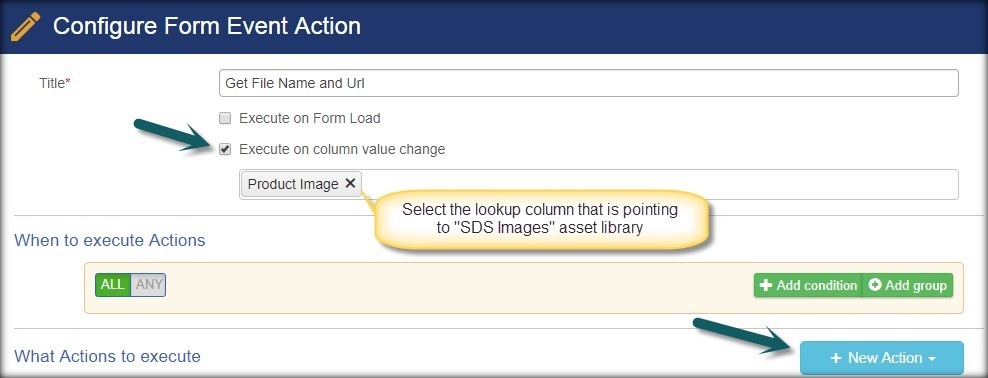
Configure a new action as shown below
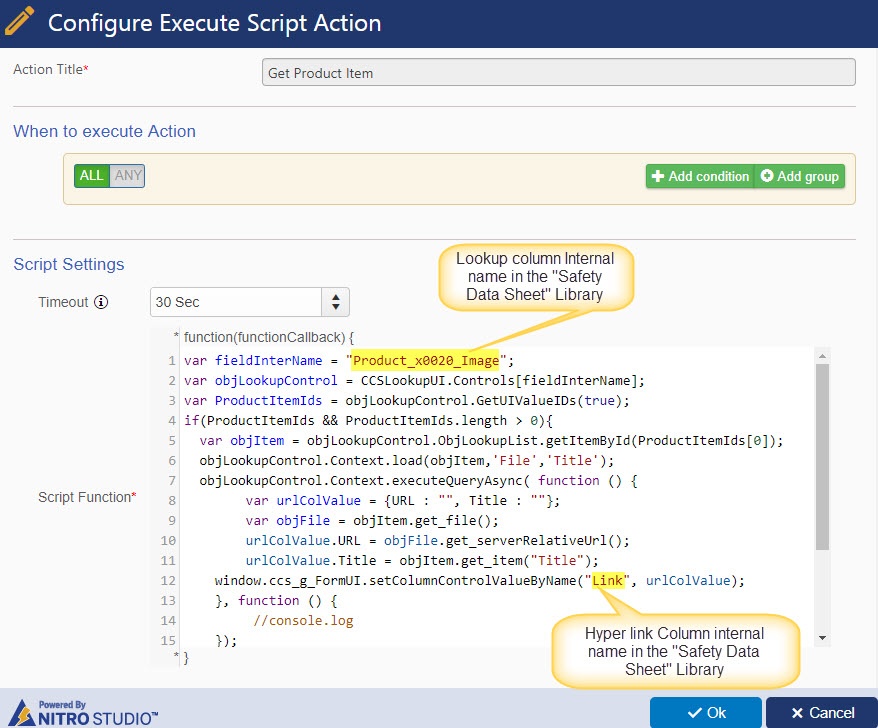
Script used in the above action:
var fieldInterName = "Product_x0020_Image";
 var objLookupControl = CCSLookupUI.Controls[fieldInterName];
 var ProductItemIds = objLookupControl.GetUIValueIDs(true);
 if(ProductItemIds && ProductItemIds.length > 0){
 var objItem = objLookupControl.ObjLookupList.getItemById(ProductItemIds[0]);
 objLookupControl.Context.load(objItem,'File');
 objLookupControl.Context.executeQueryAsync( function () {
 var urlColValue = {URL : "", Title : ""};
 var objFile = objItem.get_file();
 urlColValue.URL = objFile.get_serverRelativeUrl();
 urlColValue.Title = objFile.get_name();
 window.ccs_g_FormUI.setColumnControlValueByName("Link”, urlColValue)
 }, function () {
 //console.log
 });
}Note: we have to replace the ##LookupColumnInternalName##, ##HyperlinkColumnInternalName## in the above script with the internal names of the columns (lookup, hyperlink) as per our business scenarios.
To know the internal names of the columns,
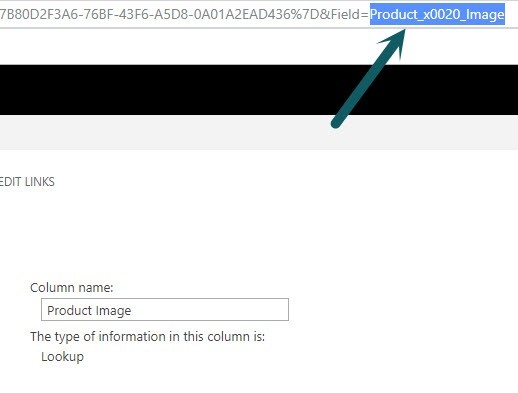
Go to library settings of the “Safety Data Sheet” document library -> click on lookup column
-> Internal name will be present in the URL as shown below.
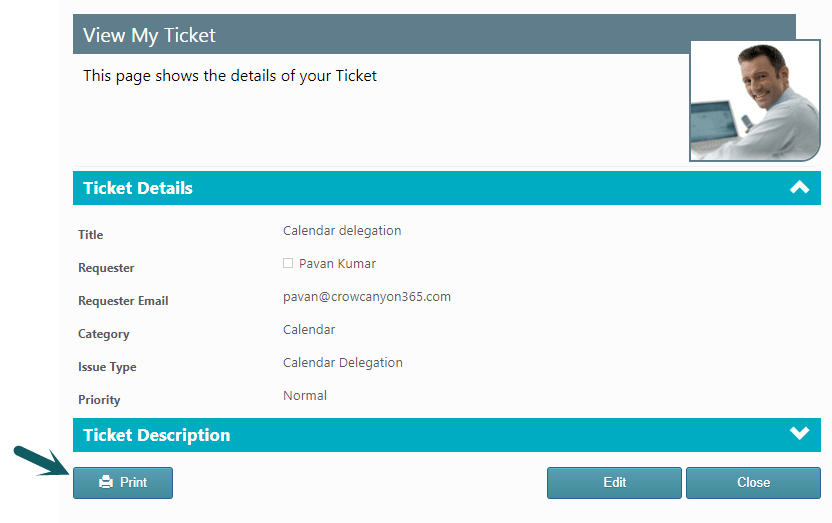
6. How to configure Print feature in Portal forms?
NITRO activated sites have a print feature for the list items. This is not directly available in the NITRO Power Portal forms.
In this example we have described the configuration to add print feature in portal display forms.
Instructions
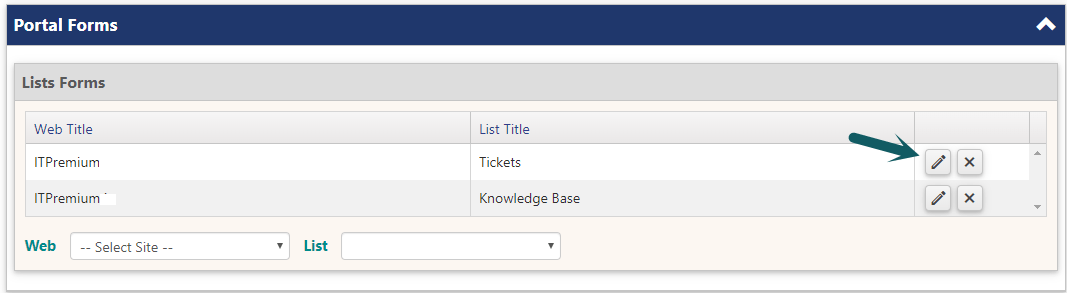
We can configure print button in portal display form using custom JavaScript. Please follow steps given below.
Go to Portal Site -> Portal Settings -> Portal Forms -> Edit “Tickets” list forms -> Go to Display form -> Custom JavaScript (under Advanced section).
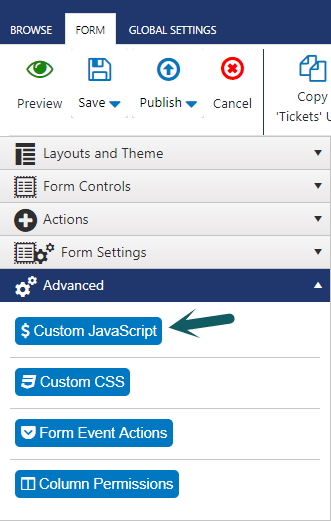
Enter the script given below in ‘Custom JavaScript Code’ section and then publish the portal forms.
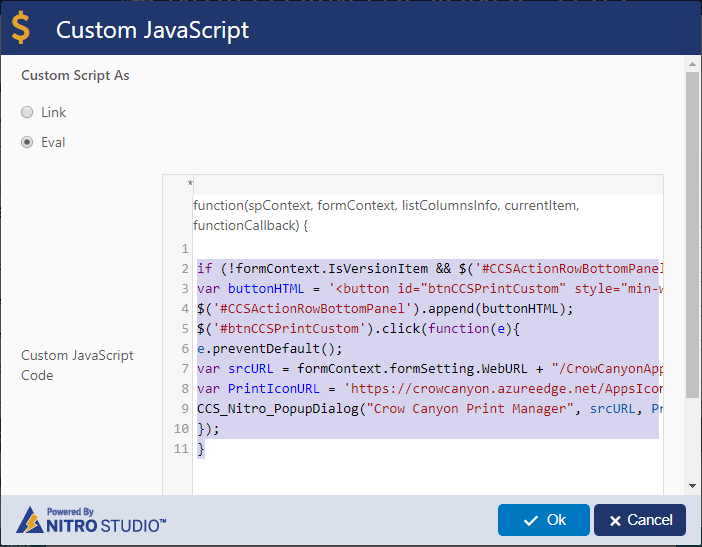
Script used above:
Print button will appear in portal display form as shown below:
7. Copy SharePoint column value to clipboard on button click
In this sample use case, we have configured custom script to copy the URL from a hyperlink column on button click.
Note: Same steps can be followed for below different SharePoint column types:
- Single line of text
- Multiple lines of text (Plain text)
- Choice
- Number
- Date and Time
- Lookup
- Yes/No
- Person or Group
- Hyperlink or Picture
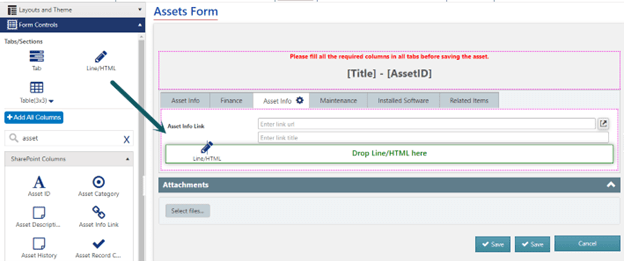
Instructions
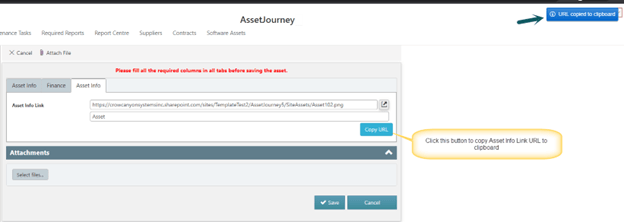
In this sample use case, we have configured “Copy URL” button under “Asset Info Link” hyperlink column.
- Add ‘Line/HTML’ control below the ‘Asset Info Link” hyperlink column.
Navigate to NITRO Forms designer for the list -> Add ‘Line/HTML’ from ‘Form Controls’ section below ‘Asset Info Link’ column.
- Edit source code for ‘Line/HTML’ from left hand panel settings.
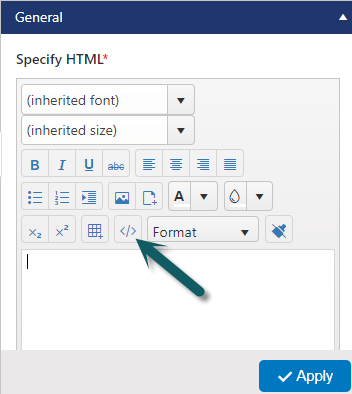
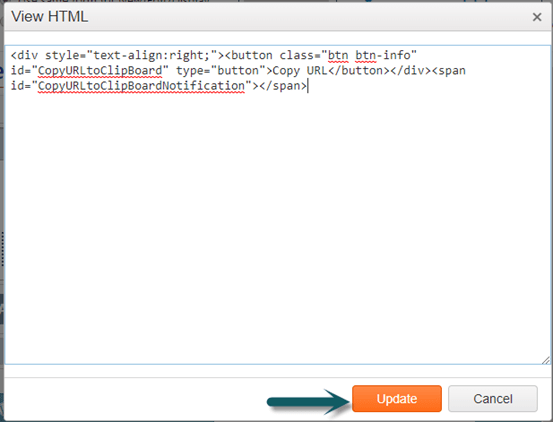
Update ‘View HTML’ with below script:
<div style="text-align:right;"><button class="btn btn-info" id="CopyURLtoClipBoard" type="button">Copy URL</button></div><span id="CopyURLtoClipBoardNotification"></span>Note: ‘Copy URL’ is the button title. Replace button title as required.
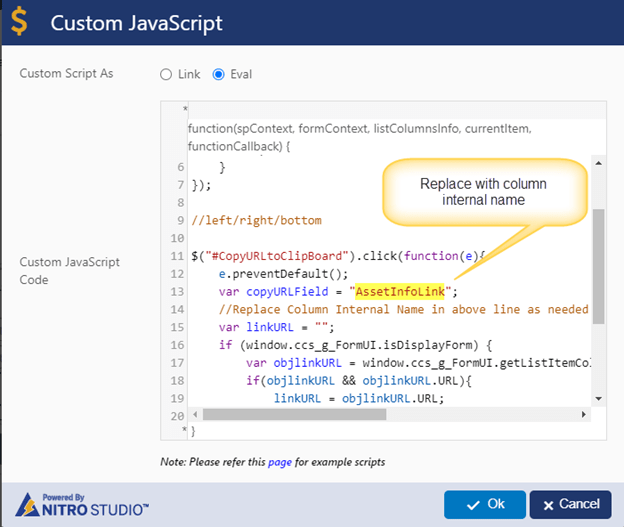
- Click ‘Custom JavaScript’ (from ‘Advanced’ section in left hand panel) and enter the given script.
Script:
$("#CopyURLtoClipBoardNotification").kendoNotification({
    hideOnClick: true,
	autoHideAfter : 2000,
	position: {
        top: 10
    }
});

//left/right/bottom

$("#CopyURLtoClipBoard").click(function(e){
	e.preventDefault();
	var copyURLField = "ColumnInternalName";
	//Replace Column Internal Name in above line as needed.
	var linkURL = "";
	if (window.ccs_g_FormUI.isDisplayForm) {
		var objlinkURL = window.ccs_g_FormUI.getListItemColumnValue(window.ccs_g_FormUI.listFields[copyURLField],true);
		if(objlinkURL && objlinkURL.URL){
			linkURL = objlinkURL.URL;
		}
	} else {
		 linkURL = window.ccs_g_FormUI.fetchColumnValueUI(copyURLField);
	}

	window.ccs_g_Utils.copyToClipBoard(linkURL);
	$("#CopyURLtoClipBoardNotification").getKendoNotification().show(" URL copied to clipboard");
});
Note:
- Replace ‘ColumnInternalName’ with internal name of required SharePoint column.
- Replace ‘URL copied to clipboard’ with required notification message.
Sample Output
For the print feature, the code shown in the screenshot does not match the text JS that is provided. Took me a bit to realize why it wasn’t working properly! The below line should fix that for people.
var buttonHTML = ‘<button id=”btnCCSPrintCustom” style=”min-width: 135px;” type=”button” class=”ccs-btnColor”>Print</button>’;