Applies to: SharePoint Online and On-Premises
Description
NITRO Forms has lot of built in functionality to create dynamic forms and customize the form UI as required in common business applications. For any custom requirements, you can add CSS and JavaScript on the form to change the UI and functionality. This article describes the configurations required to modify the NITRO form color in NITRO designer settings.
In this article we have also described the configurations required to change the look and feel of the NITRO Forms based on a request status column value. These color changes are applied dynamically when the value is changed on the New/Edit item Form. For display Form, it is based on the saved column value.
- Modify the NITRO forms look and feel
- Modify the NITRO forms look and feel dynamically based on “Status” column value
Detailed Steps
1. Modify the NITRO forms look and feel
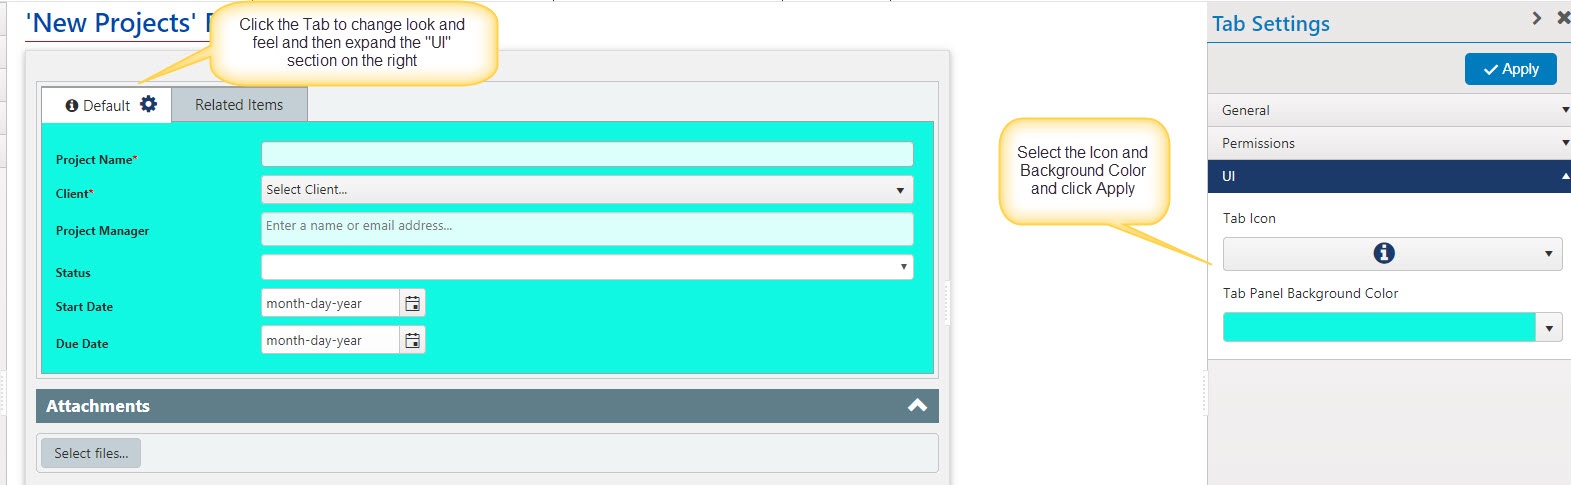
In NITRO forms settings we can directly modify the look and feel of NITRO form using “UI” setting for tab/section.
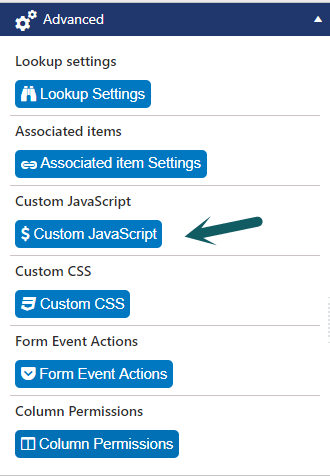
Go to List Settings -> Crow Canyon NITRO forms -> Select the Tab -> Tab Settings -> UI -> Select the “Tab Icon” and “Tab Panel Background Color” then click on Apply and and publish the settings.
Please refer image below for tabs, similar settings can be applied for sections:
2. Modify the NITRO forms look and feel dynamically based on “Status” column value
In this article, we have considered the “Request Status” column. Based on the value of this column different colors are applied on the form.
Summary of Steps
- Details of the required custom script for changing colors
- Form configuration in New/Edit forms
- Form configuration in Display form
- Sample Output
- Sample output screenshots applied to whole form
- Sample output screenshots applied to only column row
1. Details of the required custom script for changing colors
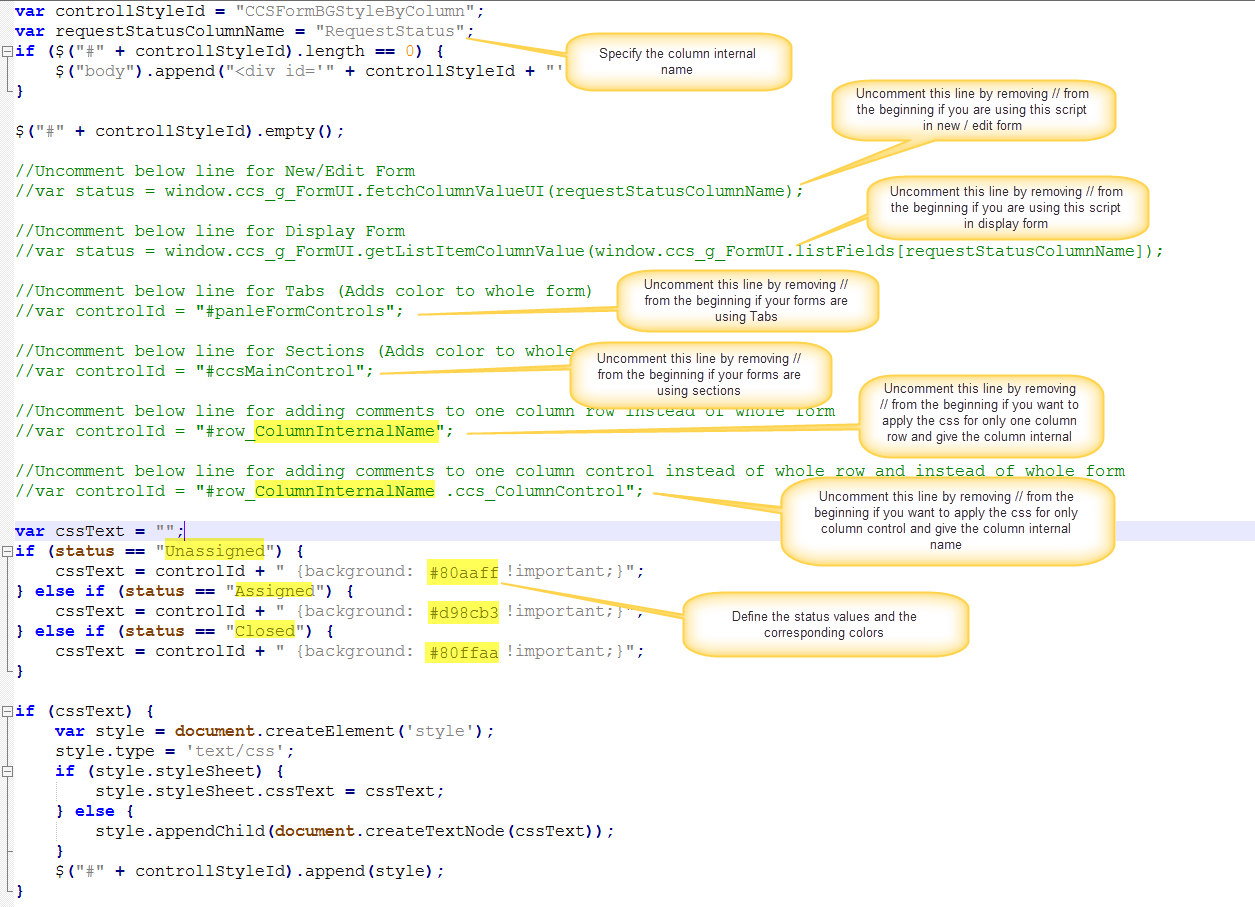
Please copy the below script in notepad/code editor and then make the required changes. Script requires following updates, please refer image below to make these changes:
- Internal name of the column needs to be replaced in multiple places. Different colors are applied based on value of this column
- Column value text and corresponding color codes
- Certain lines in script are for New/Edit form of the list item, others are for the display form. Uncomment the required lines depending on usage
- Based on whether you are using tabs or sections on the Form, different lines need to be used
- You can apply color to whole form or only particular column control. Uncomment the required lines as required
var controllStyleId = "CCSFormBGStyleByColumn"
var requestStatusColumnName = "RequestStatus";
if ($("#" + controllStyleId).length == 0) {
$("body").append("<div id='" + controllStyleId + "'/>");

}
$("#" + controllStyleId).empty();
//Uncomment below line for New/Edit Form

//var status = window.ccs_g_FormUI.fetchColumnValueUI(requestStatusColumnName);
//Uncomment below "if statement" if we want to run this script on lookup column
//if(status){
//status = status.split(";#")[1];
//}
//Uncomment below line for Display Form

//var status = window.ccs_g_FormUI.getListItemColumnValue(window.ccs_g_FormUI.listFields[requestStatusColumnName]);
//Uncomment below line for Tabs (Adds color to whole form)

//var controlId = "#panleFormControls";
//Uncomment below line for Sections (Adds color to whole form)

//var controlId = "#ccsMainControl";
//Uncomment below line for adding comments to one column row instead of whole form

//var controlId = "#row_ColumnInternalName";
//Uncomment below line for adding comments to one column control instead of whole row and instead of whole form

//var controlId = "#row_ColumnInternalName .ccs_ColumnControl";
var cssText = "";

if (status == "Unassigned") {

cssText = controlId + " {background: #80aaff !important;}";

} else if (status == "Assigned") {

cssText = controlId + " {background: #d98cb3 !important;}";

} else if (status == "Closed") {

cssText = controlId + " {background: #80ffaa !important;}";

}
if (cssText) {

var style = document.createElement('style');

style.type = 'text/css';

if (style.styleSheet) {

style.styleSheet.cssText = cssText;

} else {

style.appendChild(document.createTextNode(cssText));

}

$("#" + controllStyleId).append(style);

}
Note: Use this link to generate the color code.
Please change the above script as explained below:
In above script, replace “RequestStatus” column name with actual column internal name as per your requirement.
2. Form configuration in New/Edit forms
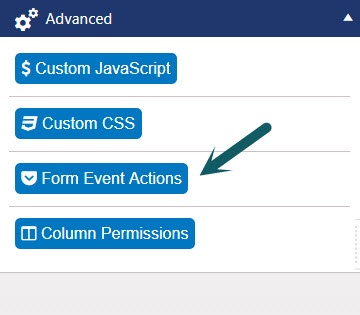
Go to List Settings -> NITRO forms -> Advanced Settings -> Click on Form Event Actions and configure the form event action as shown below:
Please note the column selected for column value change. Select the required column in your environment:

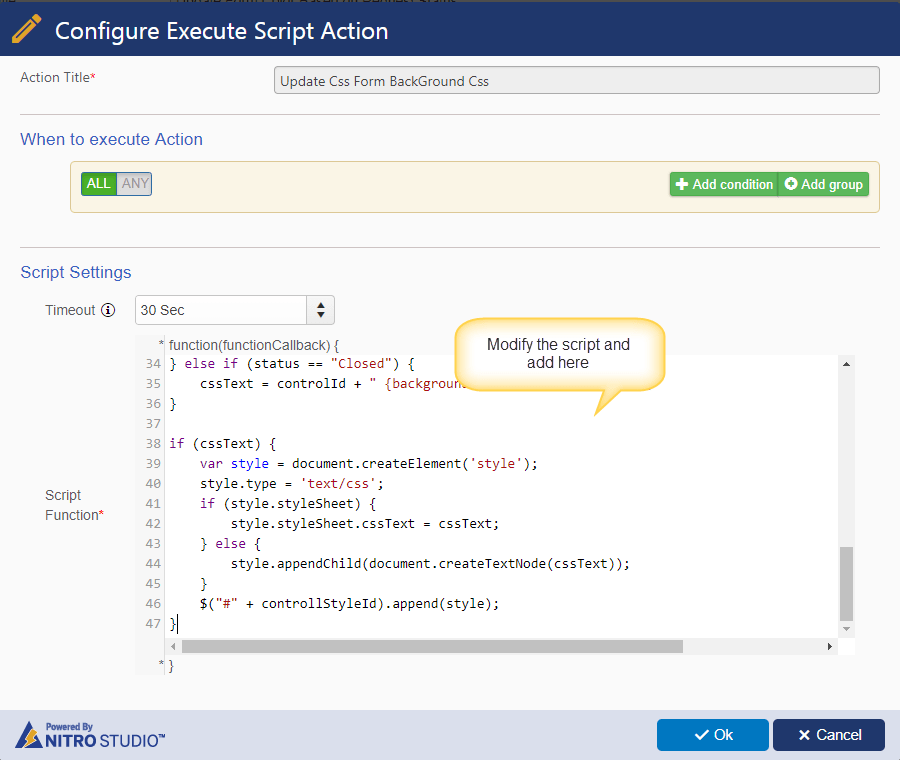
Execute Script action
Modify the above script as per your requirement and use that in the execute script action. Note the comments about New/Edit form in script image to uncomment the required lines and make other updates for column name/value and color codes:
3. Form configuration in Display form
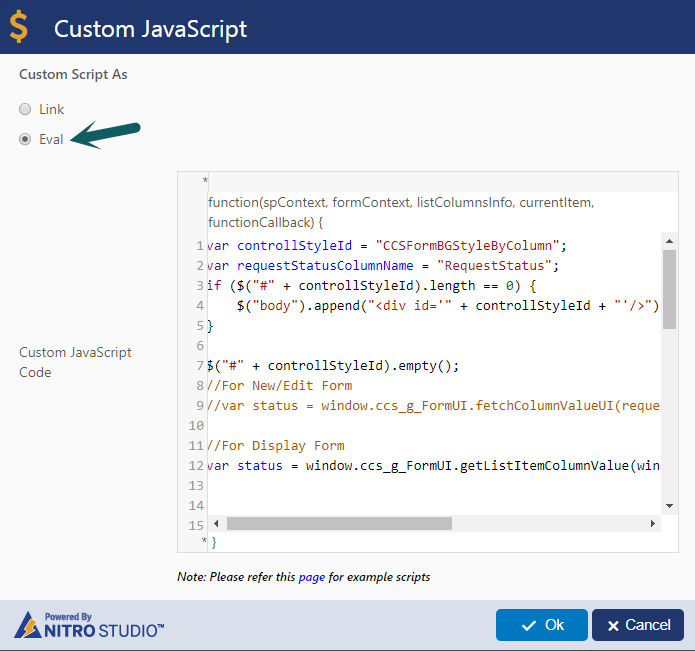
Go to List Settings -> Crow Canyon NITRO Forms -> Select Display Forms -> Custom Java Script -> Modify the above script as needed and configure like shown below.
Modify the script as per your requirement and use that here. Note the comments about Display form in script image to uncomment the required lines and make other updates for column name/value and color codes:
4. Sample Output
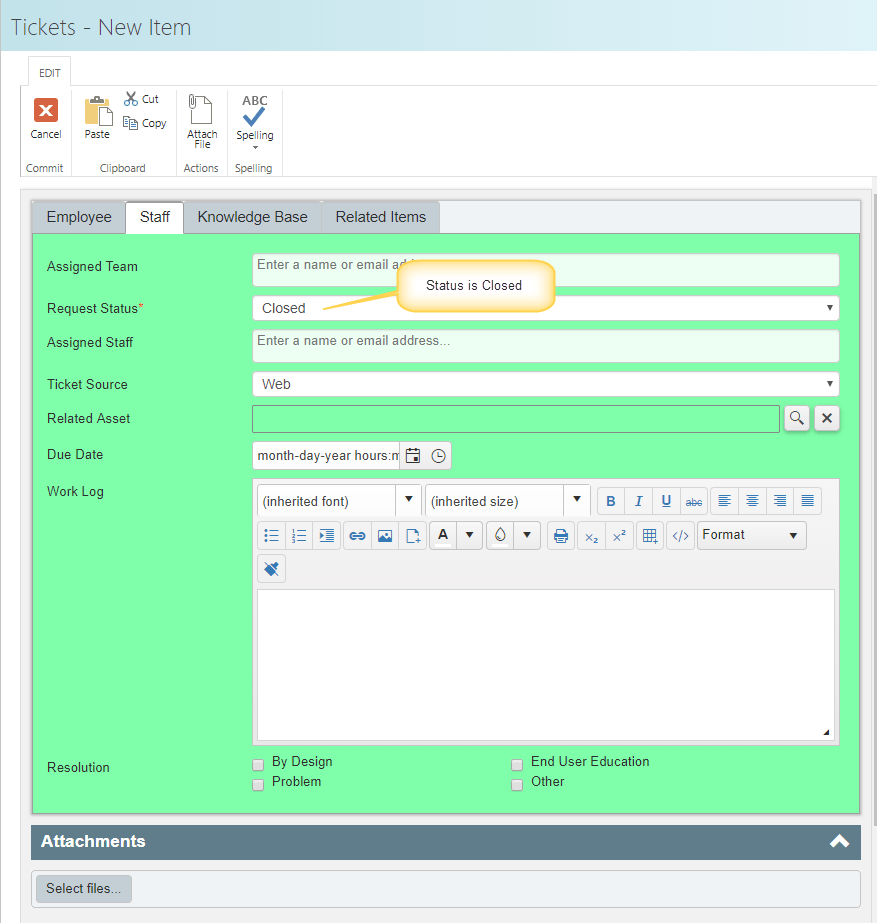
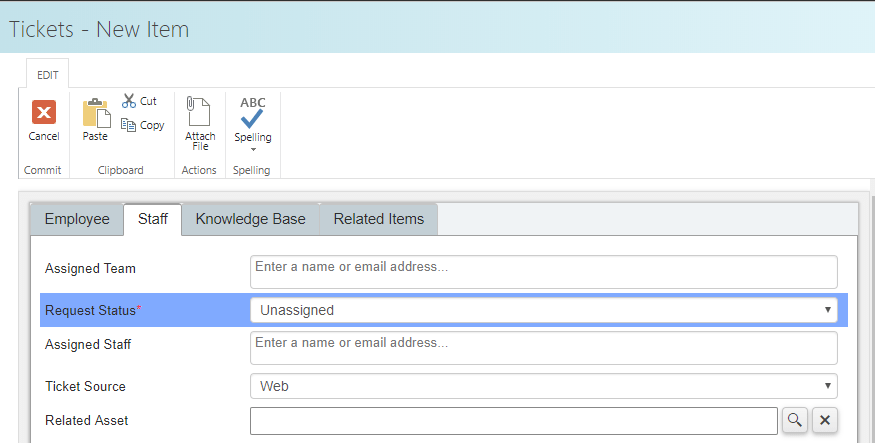
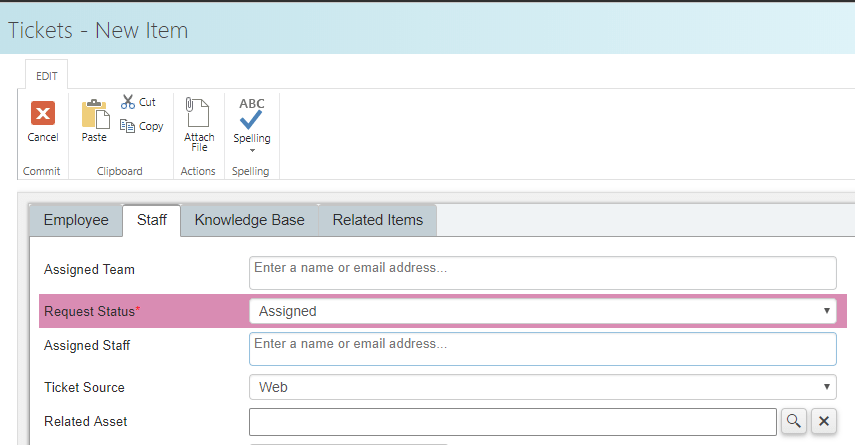
Sample output screenshots applied to whole form
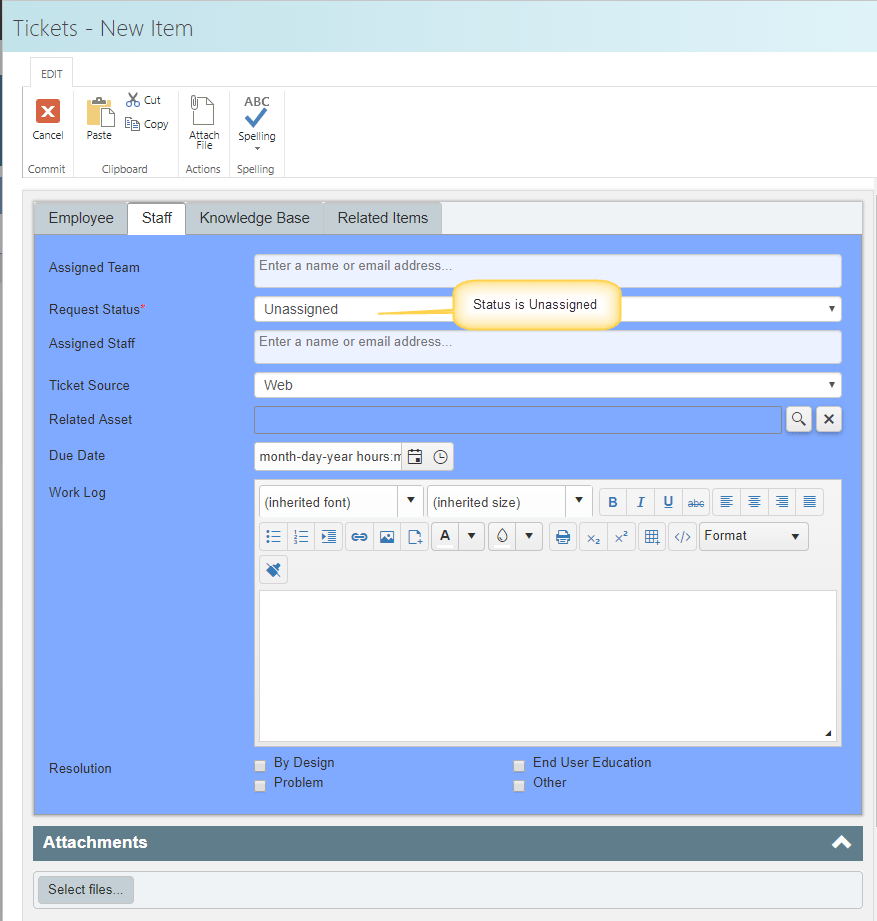
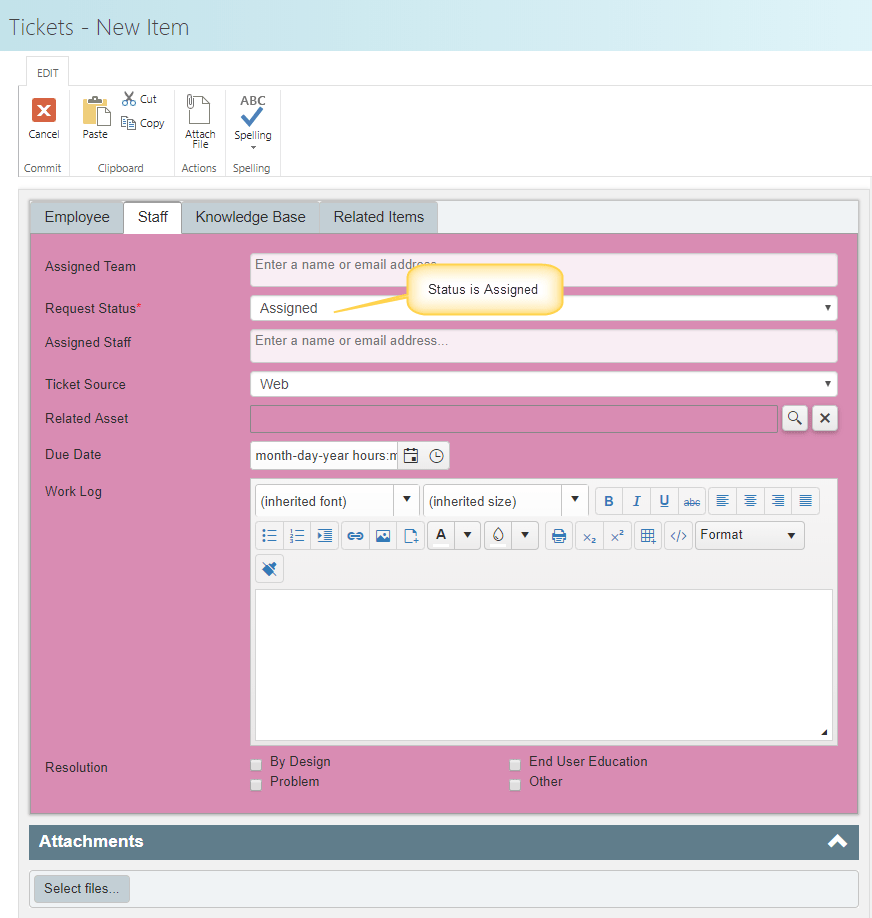
Output same in new or edit or display forms based on the Request Status:
Unassigned Status:
Assigned Status:
Closed Status:
Applying colors only to the column row (and not to whole Form background)
Use the script that was copied from above and make the changes required for only column control color (and not the whole form). Also make other changes related to column name/value and color codes etc. Sample script is given below:
var controllStyleId = "CCSFormBGStyleByColumn";

var requestStatusColumnName = "RequestStatus";

if ($("#" + controllStyleId).length == 0) {

$("body").append("<div id='" + controllStyleId + "'/>");

}
$("#" + controllStyleId).empty();

var status = window.ccs_g_FormUI.fetchColumnValueUI(requestStatusColumnName);
//Uncomment below line for New/Edit Form

var status = window.ccs_g_FormUI.fetchColumnValueUI(requestStatusColumnName);
//Uncomment below line for Display Form

//var status = window.ccs_g_FormUI.getListItemColumnValue(window.ccs_g_FormUI.listFields[requestStatusColumnName]);
//Uncomment below line for Tabs (Adds color to whole form)

//var controlId = "#panleFormControls";
//Uncomment below line for Sections (Adds color to whole form)

//var controlId = "#ccsMainControl";
//Uncomment below line for adding comments to one column row instead of whole form

var controlId = "#row_RequestStatus";
//Uncomment below line for adding comments to one column control instead of whole row and instead of whole form

//var controlId = "#row_ColumnInternalName .ccs_ColumnControl";
var cssText = "";

if (status == "Unassigned") {

cssText = controlId + " {background: #80aaff !important;}";

} else if (status == "Assigned") {

cssText = controlId + " {background: #d98cb3 !important;}";

} else if (status == "Closed") {

cssText = controlId + " {background: #80ffaa !important;}";

}
if (cssText) {

var style = document.createElement('style');

style.type = 'text/css';

if (style.styleSheet) {

style.styleSheet.cssText = cssText;

} else {

style.appendChild(document.createTextNode(cssText));

}

$("#" + controllStyleId).append(style);

}
Sample Output screenshots
Unassigned:
Assigned:
Closed:
For more custom CSS examples in NITRO forms, please refer this Article