Applies To
SharePoint Online and SharePoint On-Premises
Overview
NITRO Forms allow integration of external data with SharePoint list data. Data in Microsoft SQL server tables can be fetched and populated in SharePoint list columns in the NITRO Forms. For data in sources other than SQL Server, custom service option can be used.
When list item is saved, this data is saved in the SharePoint item columns. This saved data has reference to the SQL table record based on the unique Id value of record that is saved in the list item data.
While fetching data from Database, we can get it based on data already present on the form. This can be based on other external columns or regular SharePoint list columns or combination of both. These cases are explained in more details in below sections.
NITRO also allows insert / update of records in external data. Please refer this article for more details.
Prerequisites
Multiple Records
If you want to pull back multiple records from SQL (e.g. to show a dropdown of choices from the SQL DB), you will need to create two Single Line of Text columns prior to setting up the below configurations. For example, you will want to create a column called “Department” and one called “DepartmentID” if you are pulling back multiple records from a table of departments.
Single Record
When using the Single Record option, you’re typically mapping information from SQL to columns in SharePoint based on the returned record. In this case, you’ll want to create as many SharePoint columns (Single Line of text, Multiple lines of text, Choice, Number, Currency, Date, Yes/No, or Lookup) as necessary to capture the information from SQL.
Steps to configure External Data Columns
- Go to NITRO form Setting Page
- Go to the Form Settings section on the left panel
- Click on ‘External Data Columns’ Button to bring up the list of existing configurations
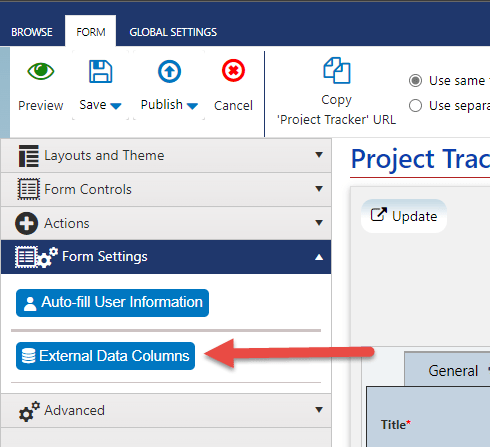
- Click ‘New Configuration’ button to bring up ‘Configure External Data Column’ form. Specify the external data settings options as per the description given below
Configuration Name
- This should be a unique name for the external data configuration for a column in the NITRO form.
Query Output
- Multiple Records
- This is used when list of items is maintained in database table and on the Form user needs to make a selection of one item. For example:
- Get all departments and let user select the department for a purchase request
- Get all employees of the department (based on selected department on the Form) and let user select the employee who will be approving the purchase request
- This configuration uses two list columns, one for the display and selection of the database record, and other for storing the unique value of the database record
- This is used when list of items is maintained in database table and on the Form user needs to make a selection of one item. For example:
- Single Records
- This is used when a single record is fetched from database and one or more values from the record need to be mapped to corresponding SharePoint list column. Typically this record will be fetched based on the data already on the form. For example:
- Based on the selected employee on the form, fetch the employee’s email and phone number and populate these values on the corresponding columns on the Form
- In this case multiple attributes fetched from the database record can be mapped to corresponding columns on the form. Supported SharePoint list column types are Single Line of text, Multiple lines of text, Choice, Number, Currency, Date, Yes/No and Lookup
- This is used when a single record is fetched from database and one or more values from the record need to be mapped to corresponding SharePoint list column. Typically this record will be fetched based on the data already on the form. For example:
Web Service Type
NITRO Forms are implemented fully in client side code (JavaScript and CSS). However, database can’t be connected directly from client side code and so an intermediate service is required to connect and fetch data. Below options are available for this service:
- Default
- SharePoint On-Premises: NITRO Forms has SharePoint server-side code component that directly connects to Database. This means database server should be accessible from the SharePoint server(s)
- SharePoint Online: Crow Canyon has a web service running in Microsoft Azure to connect to your database and fetch data. This means database server should be accessible from Microsoft Azure network
- Custom
- If we don’t want to use the default Crow Canyon provided services, you can easily write your own service and deploy it. In this case the database connection string need not be specified in the NITRO Forms settings and can be there only in your service code
- Please refer Custom Service section in this document for more details. We provide the service template to which you can add your code to connect and fetch data and deploy it. After that you can use this service URL in NITRO Forms settings to fetch data
- Web Service URL – Only for custom option. Enter Custom Web Service URL to connection the Database for fetching data from Database tables
Database Settings
- Database Connection String – Microsoft SQL Server Database Connection string
- Mandatory for Default Service Type
- Optional for Custom Service Type (your custom service code can override the connection string value sent from UI)
- Select Query – Fetch the records from Database table using SQL Select Query.
- Queries can be simple without any variable data from other columns on the form. In Scenario 1 described below, list of departments is fetched from database using a simple query
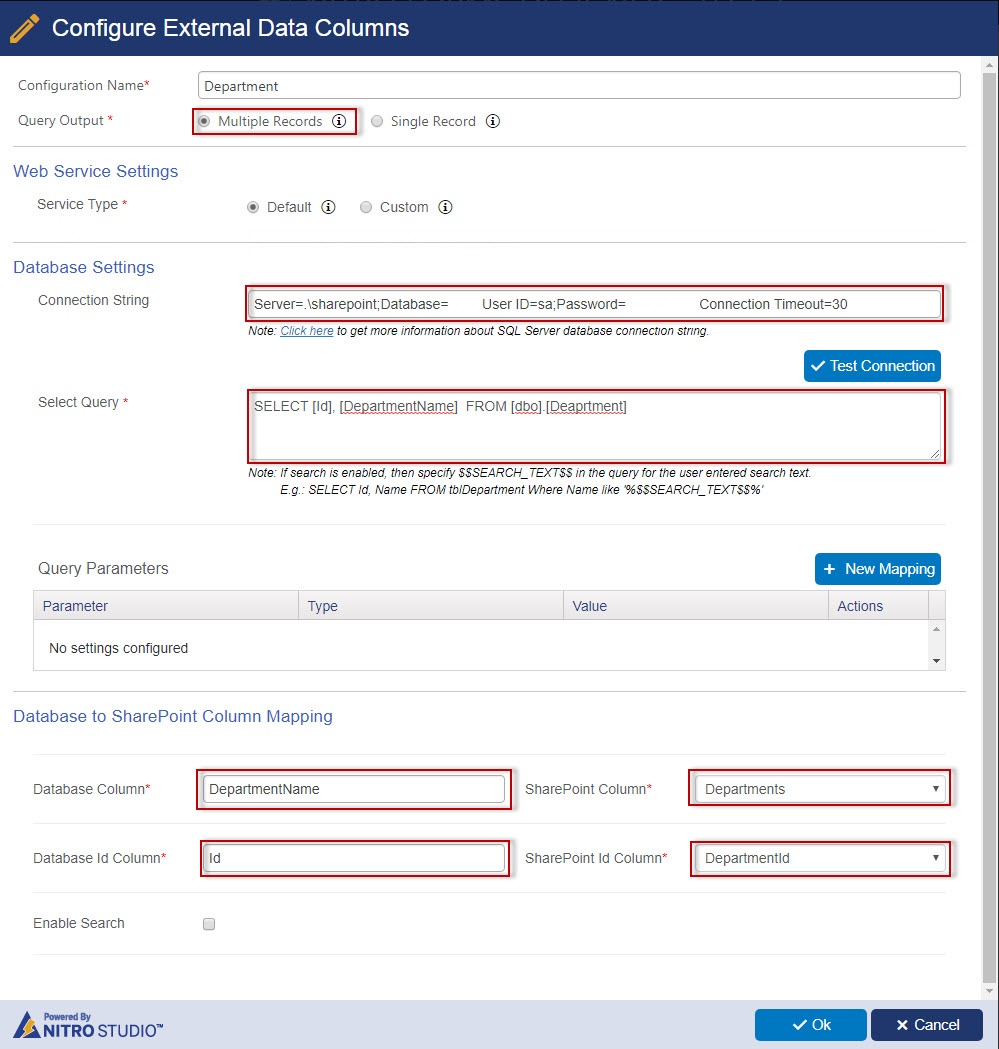
- E.g: Select [Id], [DepartmentName] FROM [dbo].[Department]
- This query doesn’t use any parameters based on the column values on the form
- If Query output should vary based on the data on the form, then use parameters in the where clause of the select query. Parameter can be given any name and need to be prefixed with @
- In Scenario 2 described below, employee records are fetched from database for the department value selected on the form
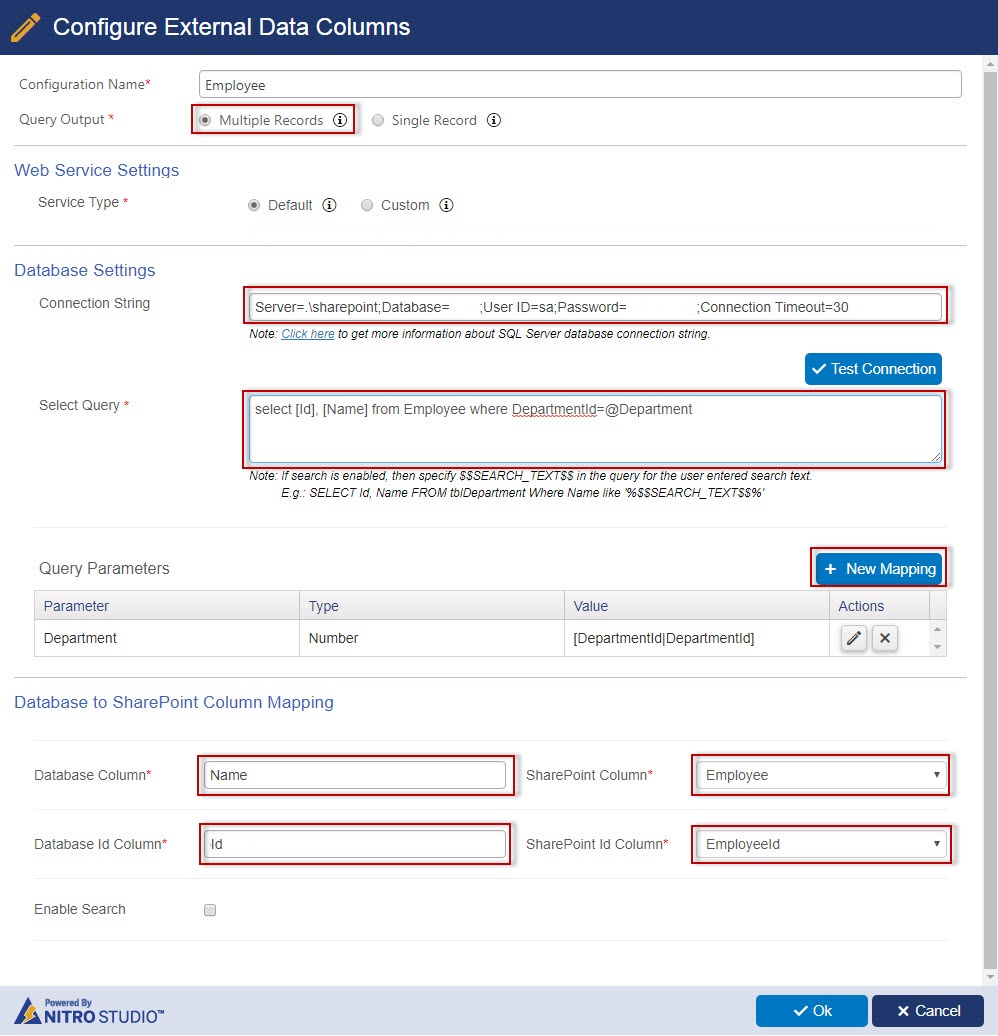
- E.g: select [Id], [Name] from Employee where DepartmentId = @Department
- Here, DepartmentId is the column in Employee table. While getting the records, we want to get those employees that are from department selected on the form. For this, we define a parameter @Department. The value of this parameter will be mapped to the department column on the form in ‘Query Parameters’ section as described below
- Queries can be simple without any variable data from other columns on the form. In Scenario 1 described below, list of departments is fetched from database using a simple query
- Query Parameters – If select query has any parameters, then these need to be mapped to list columns on the form. Before running the query NITRO Forms code will replace the actual value of the column in the query. In above example, before fetching employee records from database, @Department parameter in the query will be replaced with the column that is mapped for this parameter
- Sample use case is mentioned in Scenario 2 configuration below. Please see this section on details of mapping the parameters to list column values
- A query can have more than one parameters. And these parameters can be mapped to normal list columns or other external data columns
- If any column that is mapped to a query parameter is changed on the Form, NITRO forms will automatically run the query for external column(s) using that column value as parameter. This way, the values/options of such external columns will automatically get refreshed
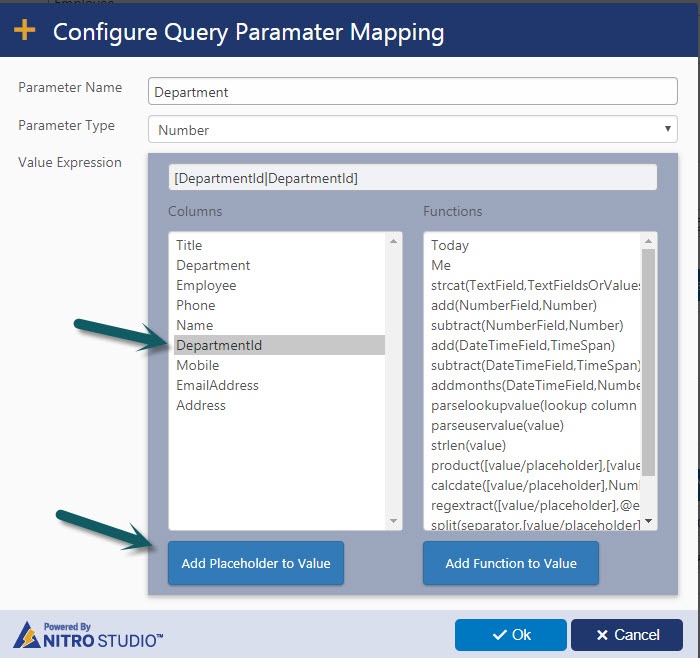
- Configuration (e.g. in Scenario 2 below)
- Parameter in the query: @Department
- Parameter name for mapping: Department (without the @ prefix)
- Parameter Type: This will be database column value type like number, date, text etc. In this case it is a number as departmentId column in database has the Id of the department
- Value Expression – To build the value expression use SharePoint List columns and predefined functions. Typically, it can be just the value of the other list column on the form
Database to SharePoint Column Mapping
For Multiple Records
- Database Column – Enter the column name from the database query. This column will have the value that will be shown to user (e.g. Department name)
- SharePoint Column – Select List Column to show and store above value. This is the column on the form that will show the values fetched from database in a drop-down (or search control)
- Database Id Column – Enter the column name from the database query. This column will have the Id of the database record (typically a number column)
- SharePoint Id Column – Select List Column to store Unique database record Id. For saved forms, this value is used to select the record in display column (so it will work even if display value in Db record is changed)
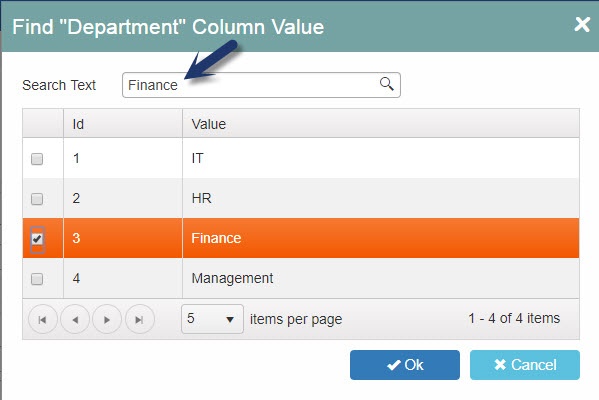
- Enable Search – This feature only works when query output is multiple records. It is possible that database table has many records and these can’t be shown and selected properly in the drop-down. In such cases you can enable the search option. This will show a text box where user can enter some text and then press a button to show all matching database records. User can then select the required record from the search results. Search query can also use parameters to filter records based on other column values on the Form
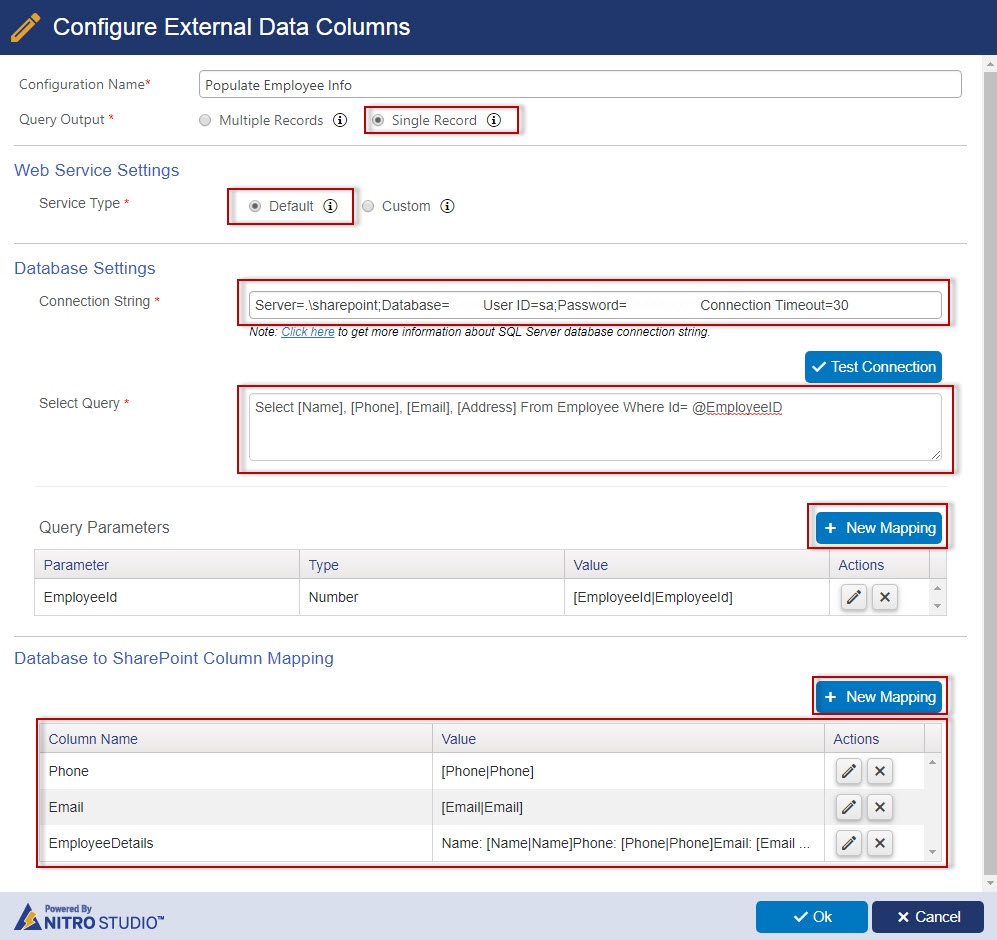
For Single Records
- Column – Select SharePoint List Column
- Value Expression – Use DB column Expression – [Column|Column]
E.g. Populate Employee Email Address – Value expression is [EmpEmail|EmpEmail] where EmpEmail is Db column name. Please refer Scenario 3 below for more details.
Scenarios
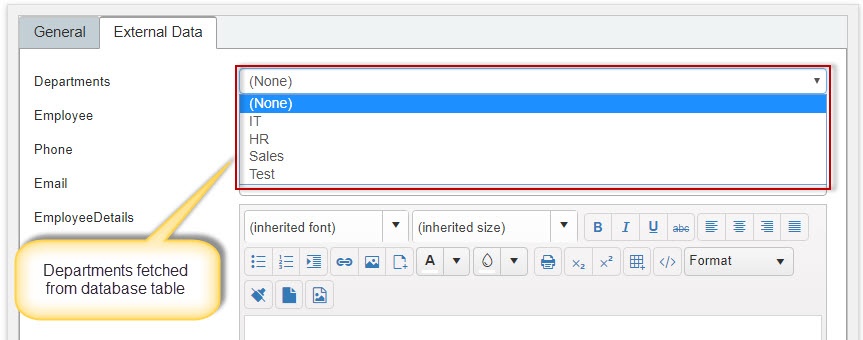
Scenario 1: Get all departments from Database and show them as a drop-down list on the form
Please refer to the below image on how this appears on the NITRO Form:
Configuration for the above scenario:
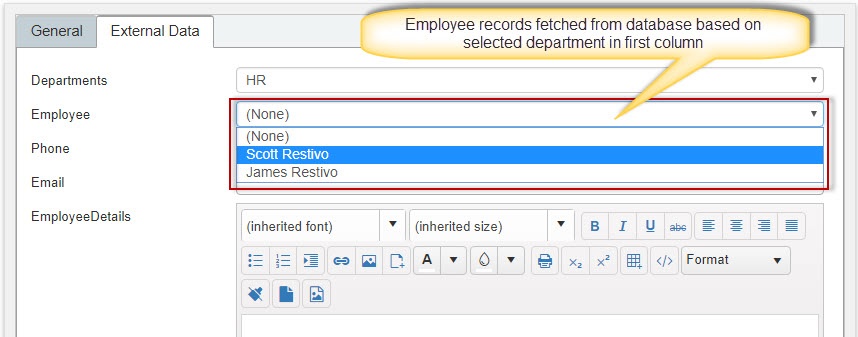
Scenario 2: Show employees in drop-down list based on selected department
When department is selected/changed in the department column, get all employees of the selected department and show it in the employee drop-down column on the form. This appears on the NITRO Form as shown below:
Configuration for the this scenario:
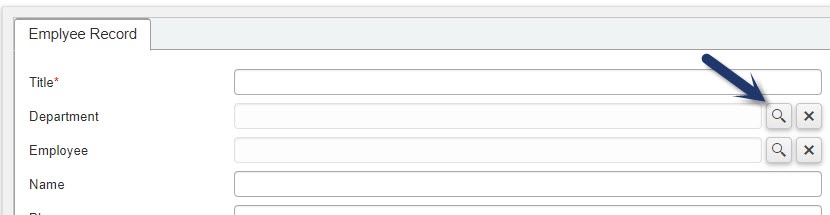
Scenario 3: Populate employee attributes on the Form
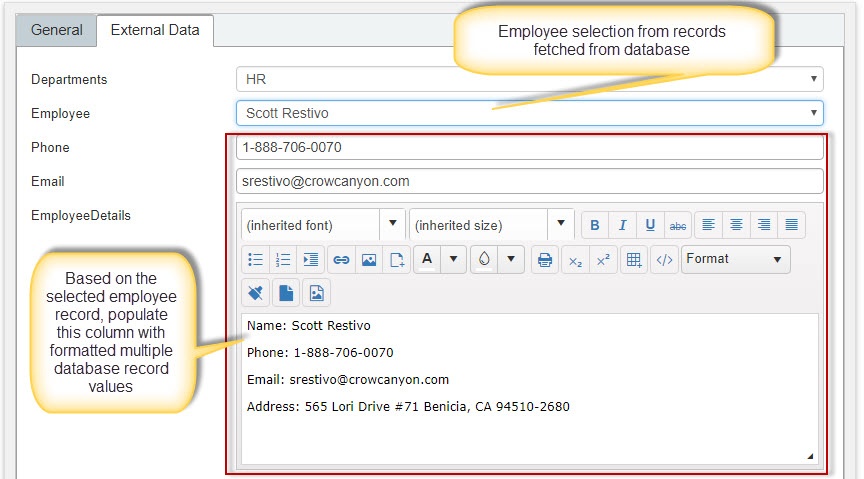
When employee is selected/changed in the employee column, get attributes of the employee from the Database table and populate these attributes in the columns on the Form. This appears on the NITRO Form as shown below:
Configuration for the this scenario:
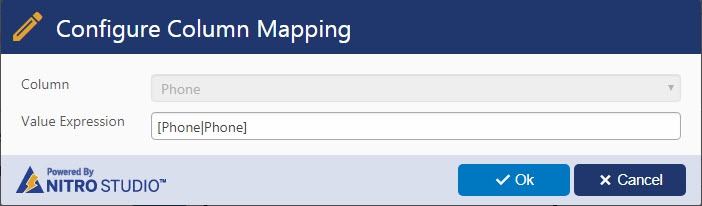
Phone Mapping Dialog
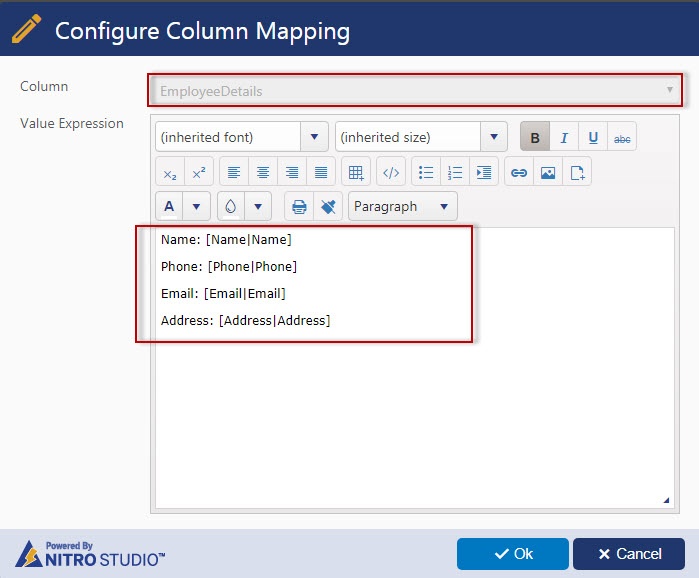
Employee Details Mapping Dialog
Custom Web Service
Crow Canyon provide Web API Service project template (CrowCayon.DBServiceApp) that you can use for the custom option in the settings above. Add the required code and deploy the service and provide the service deployment URL. Please note that service should be accessible from the SharePoint environment. Microsoft Visual Studio 2013 or later is required to update and build the project. Crow Canyon can assist you with this service as part of professional services.
Please refer below for the code that needs to be modified for your custom service:
Currently two methods are defined in DBUtilsService class and these can be modified:
- TestConnection Method – Arguments – Dictionary<string, object> Parameters
Parameters key “dbConn“: This has Database Connection string specified in NITRO Forms Settings. You can modify the connection string value in the dictionary to override what is configured in NITRO Forms. That way, you can give a dummy value in UI and put your actual connection string here. Since service is running in your environment, no one else will have access to the connection string if it is specified here
- SelectQuery Method – Arguments – Dictionary<string, object> Parameters
- Parameters key “dbConn“: Please refer above details
- Parameters key “queryText“: This has the select query specified in NITRO form settings and can be updated here as required
- Parameters key “isSProc“: Whether query is Stored Procedure or a simple select query
- Parameters key “params“: The value for this key has the Query Text Parameters as dictionary with parameter names as key and parameter value as the value in dictionary. It contains the query parameters that are defined while configuring the external data columns in NITRO Forms. Service will get the parameter values as per the data on the form and they can be modified here if required