Applies to: SharePoint Online
Description
This article describes the steps to read user profile properties using Microsoft Graph API in NITRO Workflows using Invoke Web Service action.
For more details regarding Invoke Web Service action in NITRO Workflows, please refer this article.
Pre-requisites:
- User should be an administrator of O365 subscription
- Should have full control permission on the site where we want to configure the NITRO Workflow to read user properties
Summary of steps
- App Registration in Azure Active Directory (Azure AD)
- Create new app registration
- Grant API permissions
- Generate client secret
- Configuration of NITRO Workflow
Detailed Instructions
1. App Registration in Azure Active Directory
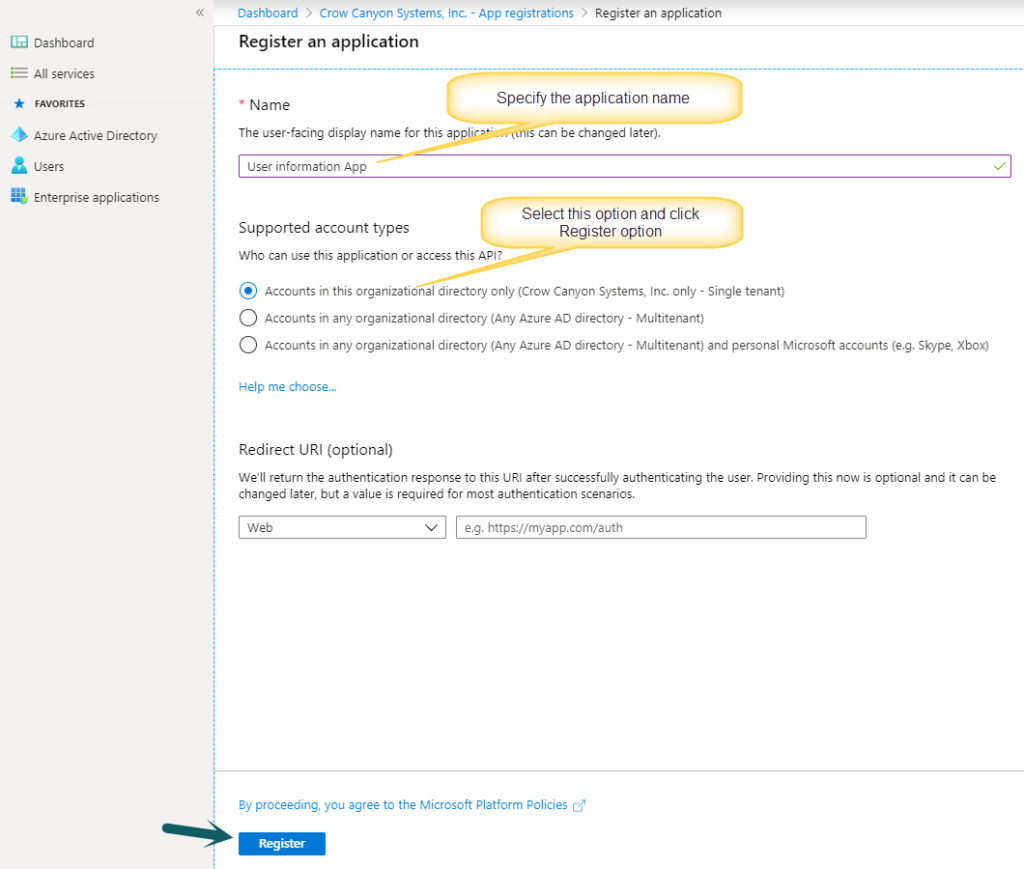
Create new app registration
- Create app registration in Azure AD
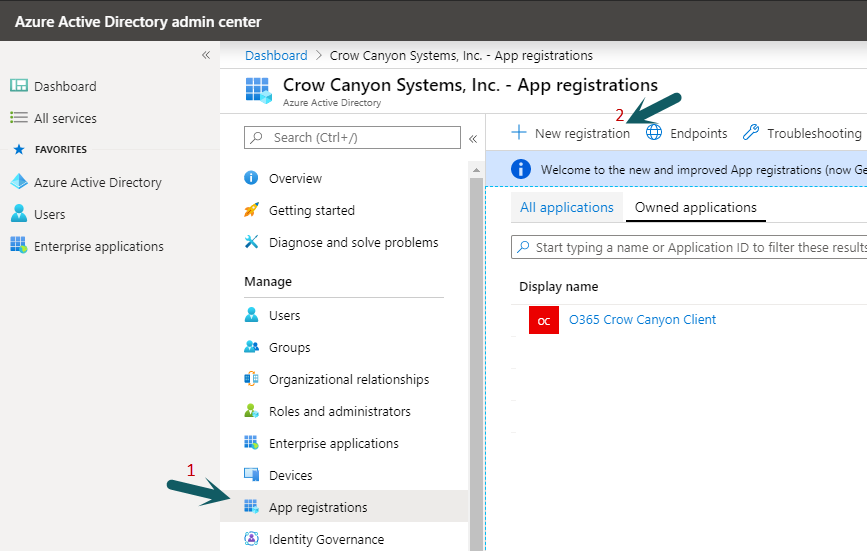
Go to Admin Centre -> Azure Active Directory -> App Registrations -> New registration
Direct URL: https://aad.portal.azure.com/#blade/Microsoft_AAD_IAM/ActiveDirectoryMenuBlade/RegisteredApps
For more details regarding app registration in Azure AD, please refer this article.
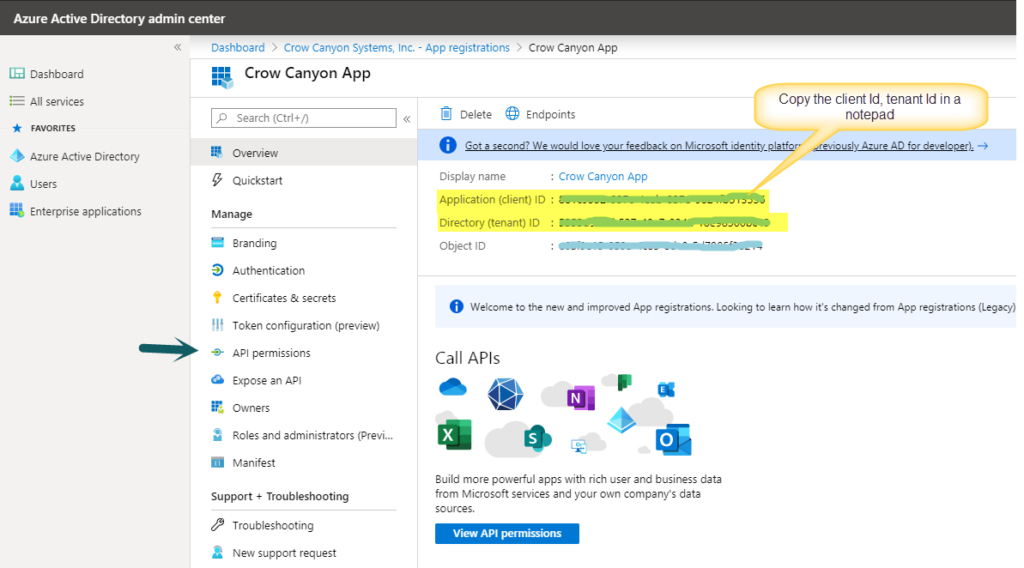
Please copy Client Id and Tenant Id after registering the App as shown in image below. These will be used later in the NITRO Workflow.
Grant API permissions
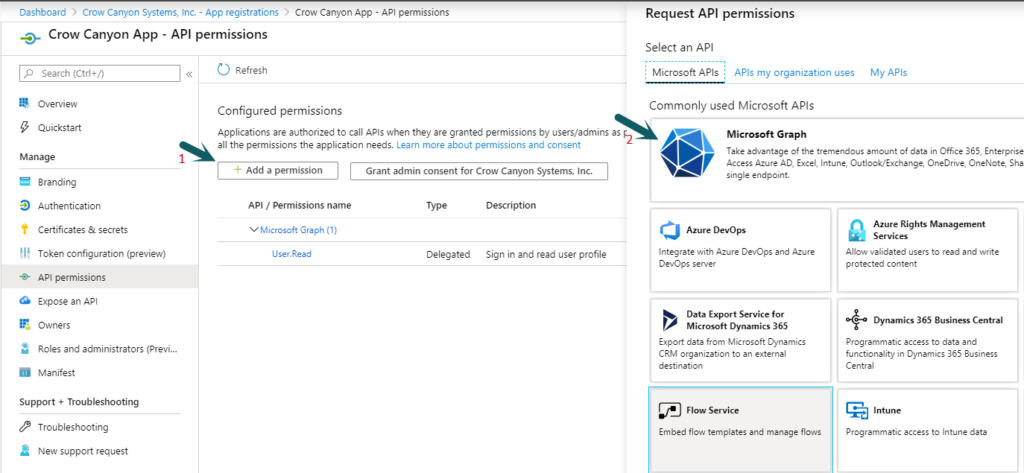
As shown in image above, click ‘API permissions’ link.
Click Add a permission -> Microsoft Graph -> Application Permissions -> Search permission level for “User.Read.All” and click add permission level button.
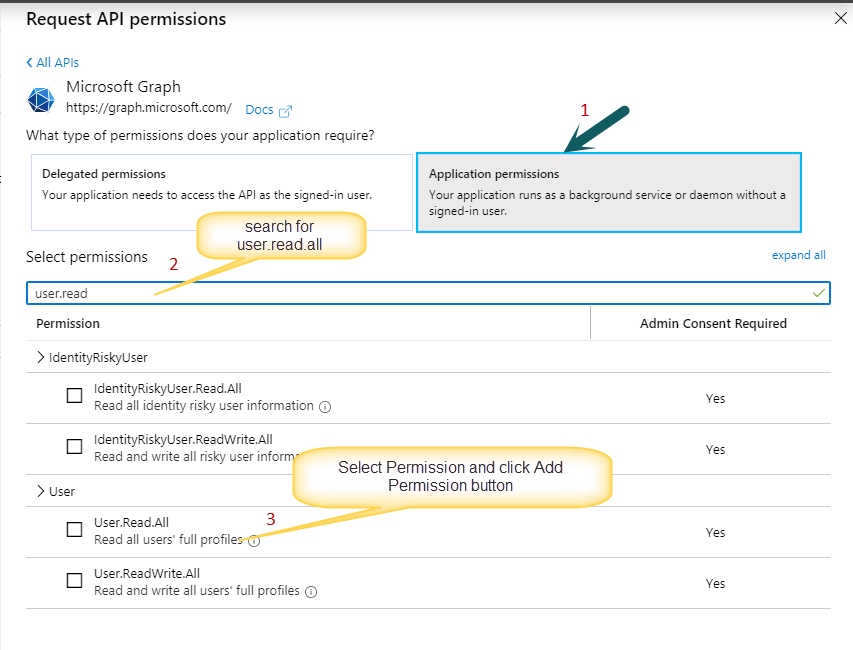
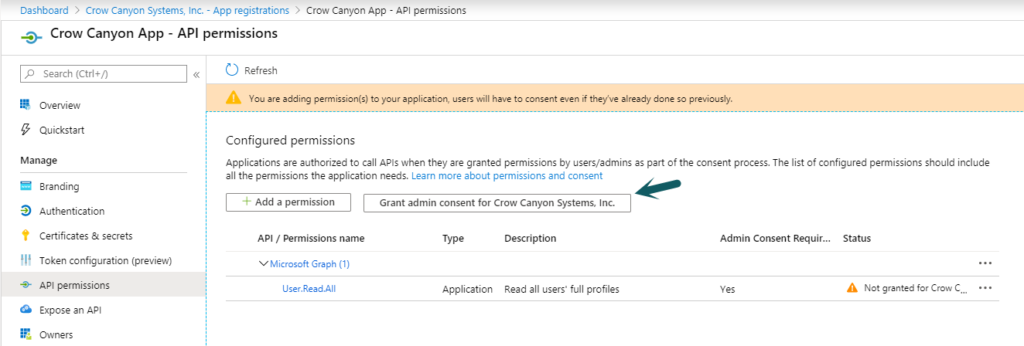
After adding permission level, click “Grant admin consent for <your company name>”
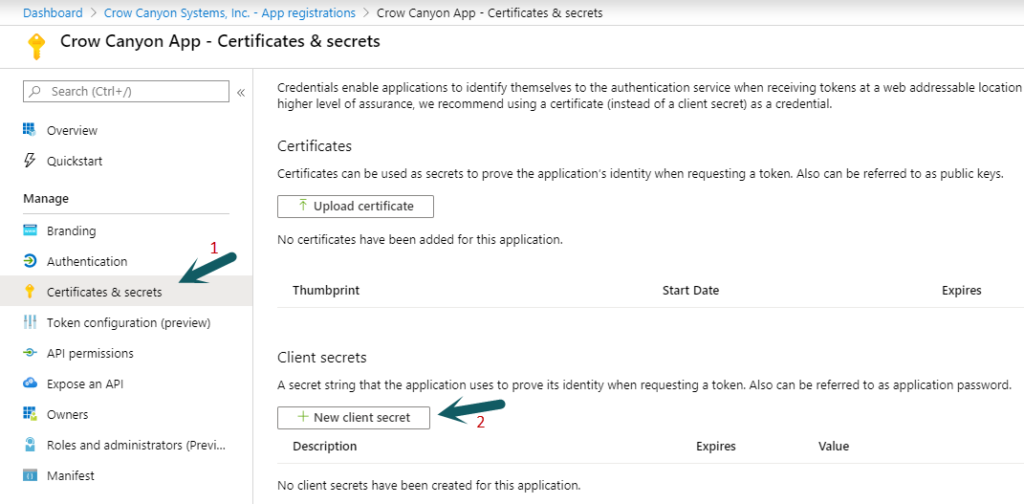
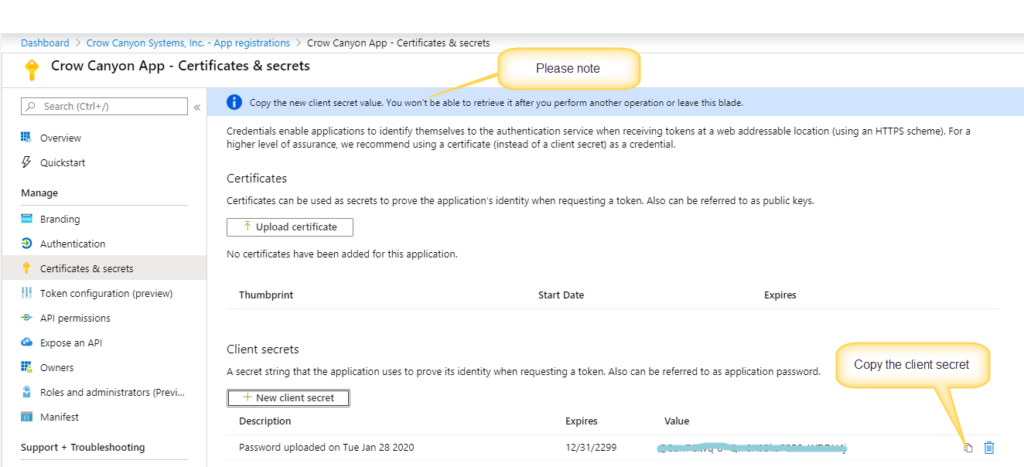
Generate client secret Id
Go to Certificates and secrets -> New client secret -> Add a client secret. You can give any description for the secret.
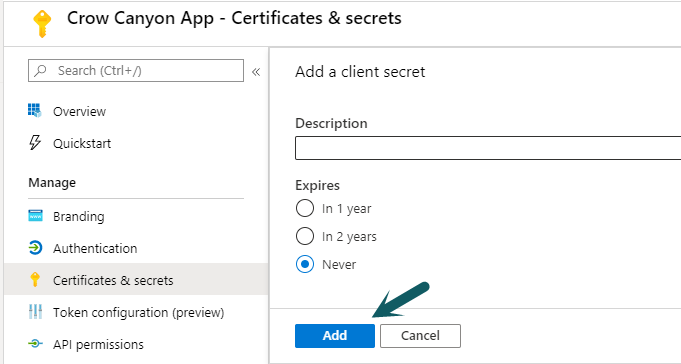
After adding client secret, copy the client secret.
2. Configuration of NITRO Workflows
Go to the site where we want to read user profile properties -> Go to Site Settings -> Crow Canyon NITRO Apps -> NITRO Workflows and configure the workflow as shown below.
In this article, we have given example to read requester user profile properties and then create record in Users list.
Action1: Get Access Token
Configure invoke web service action to get access token as shown below:

URL: https://login.microsoftonline.com/{{tenantId}}/OAuth2/V2.0/token
In the above URL, replace “{{tenantId}}” with your tenant id that we have copied in “Create new app registration” section above.
HTTP Method: POST
Headers:
| Key | Value |
| Content-Type | application/x-www-form-urlencoded |
Data:
grant_type=client_credentials&client_id={{ClientId}}&client_secret={{ClientSecretId}}&scope=https://graph.microsoft.com/.default
In the above, replace {{ClientId}} and {{ ClientSecretId}} that we have copied earlier.
Action2: GetUserProperties
Create invoke web service action to get the user property values for Requester.
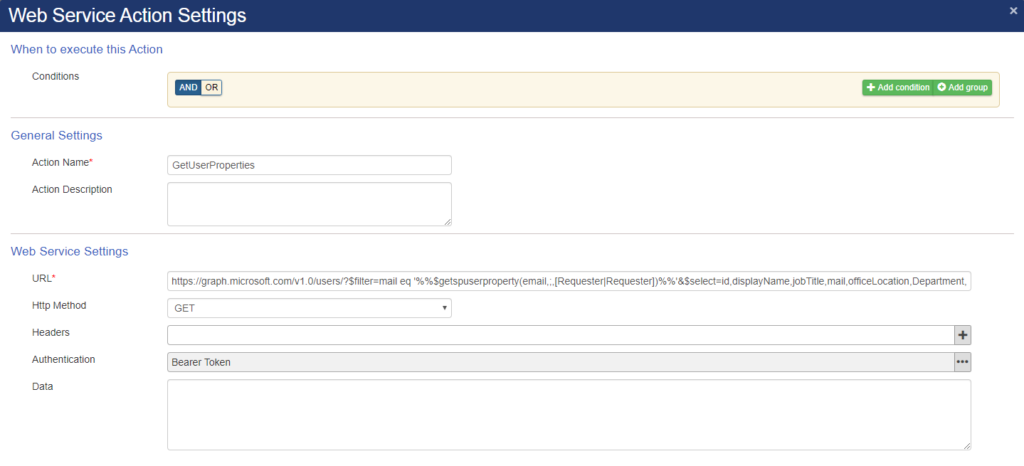
URL:
https://graph.microsoft.com/v1.0/users/?$filter=mail eq ‘%%$getspuserproperty(email,;,[Requester|Requester])%%’&$select=id,displayName,jobTitle,mail,officeLocation,Department,faxNumber,mobilePhone
In the above URL, replace [Requester|Requester] placeholder based on column name in your list.
The above URL will give the user property values of the user present in the “Requester” column. The response will return the specified attributes of the user:
- Id
- displayName
- jobTitle
- officeLocation
- Department
- faxNumber
- mobilePhone
For more attributes, please refer properties section in this article.
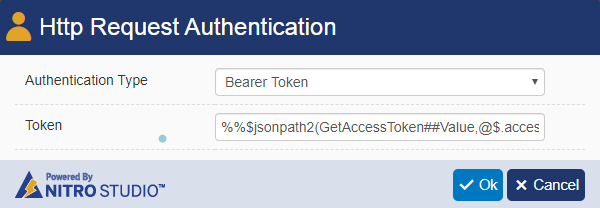
Authentication:
Select Bearer Token authentication
%%$jsonpath2(GetAccessToken##Value,@$.access_token)%%
In the above, replace “GetAccessToken##Value” with “Action1 Name##Value”
Sample Output response:
{
   "@odata.context":"https://graph.microsoft.com/v1.0/$metadata#users(id,displayName,jobTitle,mail,officeLocation,department,faxNumber,mobilePhone)",
   "value":[
      {
         "id":"339dbef6-b33d-40fd-8985-XXXXXXXXXX",
         "displayName":"Pavan Kumar",
         "jobTitle":"Developer",
         "mail":"pavan@crowcanyon365.com",
         "officeLocation":null,
         "department":"IT",
         "faxNumber":null,
         "mobilePhone":"XXXXXXXXX"
      }
   ]
}
Action3: GetManager
To get the manager property value, we need to use different URL.
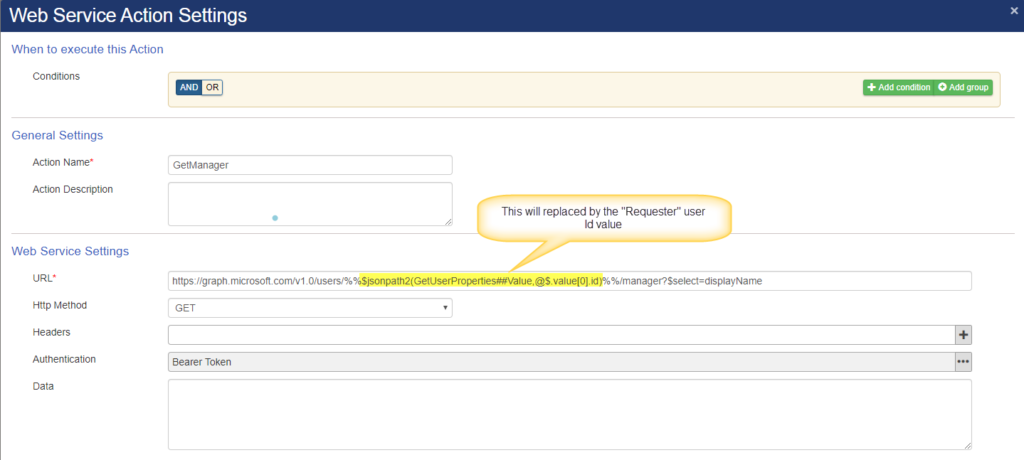
URL: https://graph.microsoft.com/v1.0/users/%%$jsonpath2(GetUserProperties##Value,@$.value[0].id)%%/manager?$select=displayName
“$jsonpath2(GetUserProperties##Value,@$.value[0].id)”:
This will return the requester user id value from the response of “Action 2: GetUserProperties”.
Sample output response:
{
   "@odata.context":"https://graph.microsoft.com/v1.0/$metadata#directoryObjects(displayName)/$entity",
   "@odata.type":"#microsoft.graph.user",
   "displayName":"Scott Restivo"
}
Action4: Manager
Create WF variable action to save the manager value. This can be used in column mappings of add or update item actions.

Value used in above: $jsonpath2(GetManager##Value,@$.displayName)
“GetManager##Value”: Invoke web service action name to get the manager property value.
Action5: Create user record
Create an add item action to create a user record in Users list.

Column Mappings:
| Column Name | Value |
| Department | $jsonpath2(GetUserProperties##Value,@$.value[0].department) |
| Employee | [Requester|Requester] |
| Fax | $jsonpath2(GetUserProperties##Value,@$.value[0].faxNumber) |
| Manager | $parseuservalue(Manager##Value) |
| WorkLocation | $jsonpath2(GetUserProperties##Value,@$.value[0].officeLocation) |
| Mobile | $jsonpath2(GetUserProperties##Value,@$.value[0].mobilePhone) |