Applies to: SharePoint On-premises (2013, 2016, 2019, SharePoint Server Subscription Edition)
Introduction
Crow Canyon NITRO Studio for SharePoint on-premises (2013/16/19) has two versions. Regular version (Azure) connects to Crow Canyon components hosted in Microsoft Azure. This includes checks for licensing and referring JavaScript and CSS files. Note that no SharePoint data is sent outside of customer network. NITRO Secure version (Non-Azure) does not refer to any component outside of customer network and everything is installed within the SharePoint farm. This document has steps to move from Azure version to Non-Azure version. It is possible to have some sites on Azure version while transitioning to Non-Azure versions so both can co-exist. However, it is recommended to move all sites in the farm to same version for ease of maintenance and support.
NITRO Secure Installation
Refer instructions to install NITRO Secure from this article
NITRO Secure Conversion
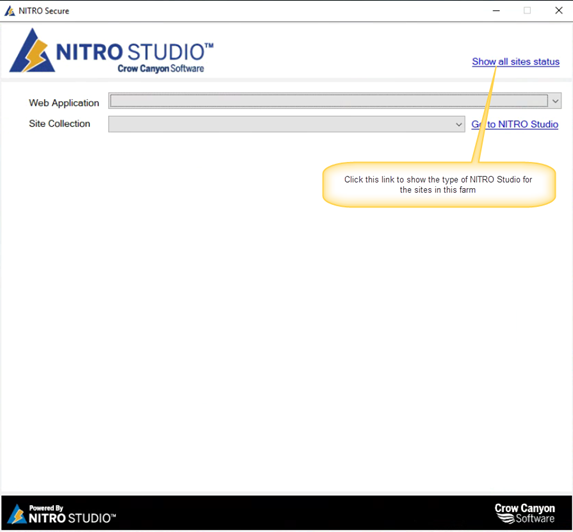
Open “Crow Canyon NITRO Studio Helper” shortcut from the desktop and click “Show all sites status” link in the NITRO Secure utility tool as shown below:
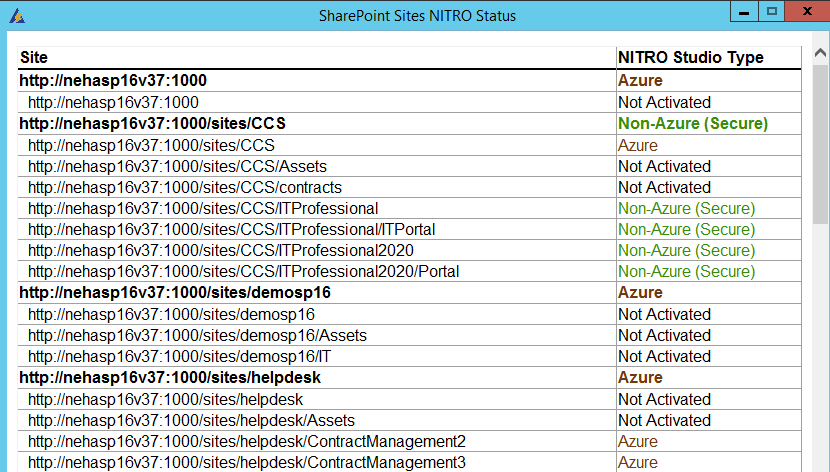
This will open a page that shows status of NITRO activation for all the sites in the SharePoint farm. User should have the required privileges to see status for all sites.
NITRO Studio status page:
Activate NITRO Studio
Activate NITRO Studio for the site where NITRO Studio Azure is originally activated. Note that after NITRO Secure installation, ‘Activate’ button will be shown for the site instead of ‘Manage’ button. And NITRO has to be re-activated on the site.
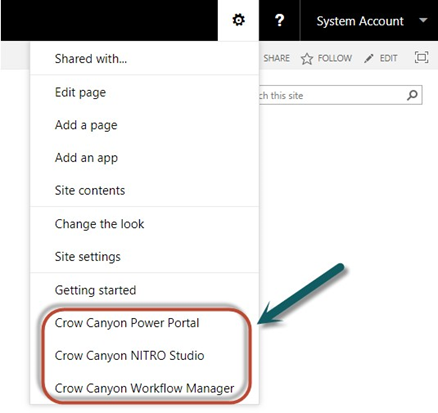
Navigate to the site collection where NITRO Secure is installed and click gear icon (cog) in the top right corner as shown below:
refer “Activate NITRO for a site” section in this article to activate NITRO Studio for a site.
Save NITRO components settings
NITRO Apps configurations need to be resaved after activating the Non-Azure version in site.
Go to site where NITRO Studio is activated -> Site settings -> Crow Canyon NITRO Apps -> navigate to each app listed below to save the configurations.
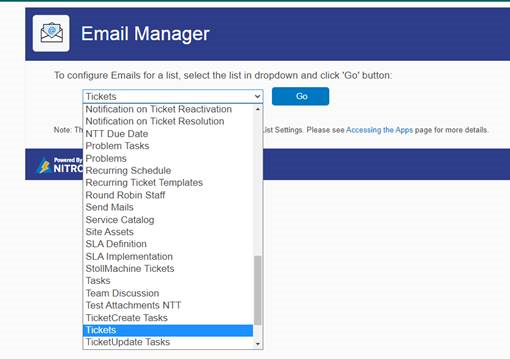
Email Manager
Select each list that is configured for this app and save settings. No changes are required in the settings, just open the settings, and save.
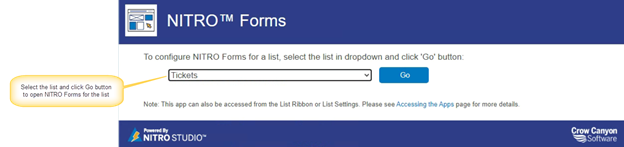
NITRO Forms
For every list that is using NITRO Forms, open the NITRO Forms designer and then publish NITRO forms.
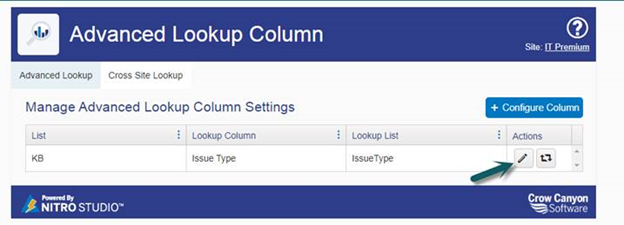
Advanced Lookup
Save each configuration in Advanced Lookup settings page.
Branding
Remove branding and reapply the same branding:
- Remove branding: https://www.crowcanyon.info/nitro/appmanual_v2/index.html?removing-branding.html
- Apply branding: https://www.crowcanyon.info/nitro/appmanual_v2/index.html?crow-canyon-themes.html
Cascaded Lookup
Note: This step can be safely ignored if the lists are already using NITRO Forms. This is required only if there are some lists that use cascaded lookup feature on standard SharePoint forms (not NITRO Forms).
1.Remove “CCSCascadedLookupScriptWP” webpart from default new and edit forms (standard SharePoint list item forms).
Go to the list that is using cascaded lookup settings -> List ribbon -> click on “Default New Form” as shown below, delete the web part names “CCSCascadedLookupScriptWP” and stop editing the page. Repeat the same for Default Edit Form.

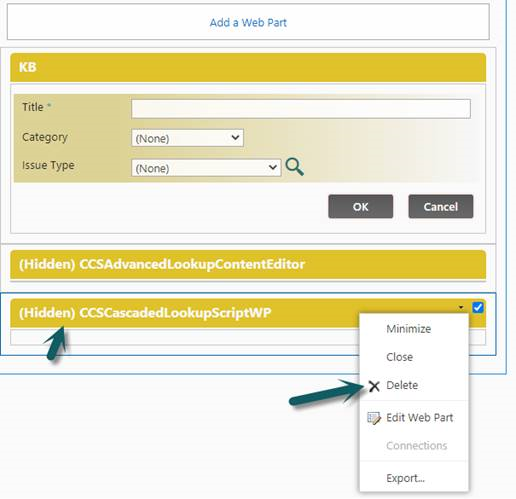
2. After deleting the “CCSCascadedLookupScriptWP” webpart from both default New and Edit forms, go to the list settings -> Crow Canyon Cascaded Lookup -> Edit the cascaded lookup settings and save the settings. This step will add the web parts back with new references to forms.
3. Repeat the same for every list using cascaded lookup on SharePoint forms
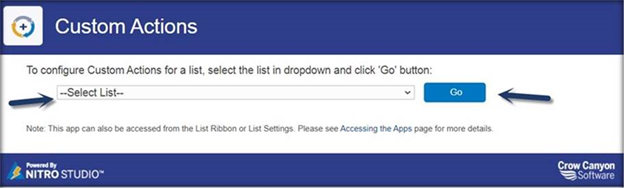
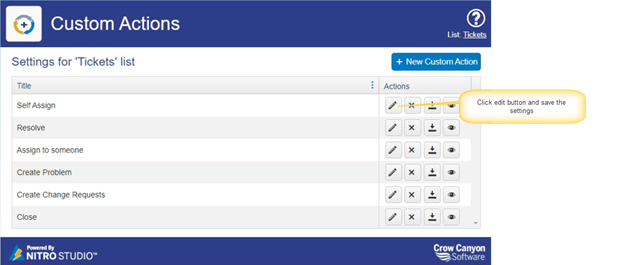
Custom Actions
For each list having Custom Actions configured, navigate to Custom Actions for the list and resave each custom action.
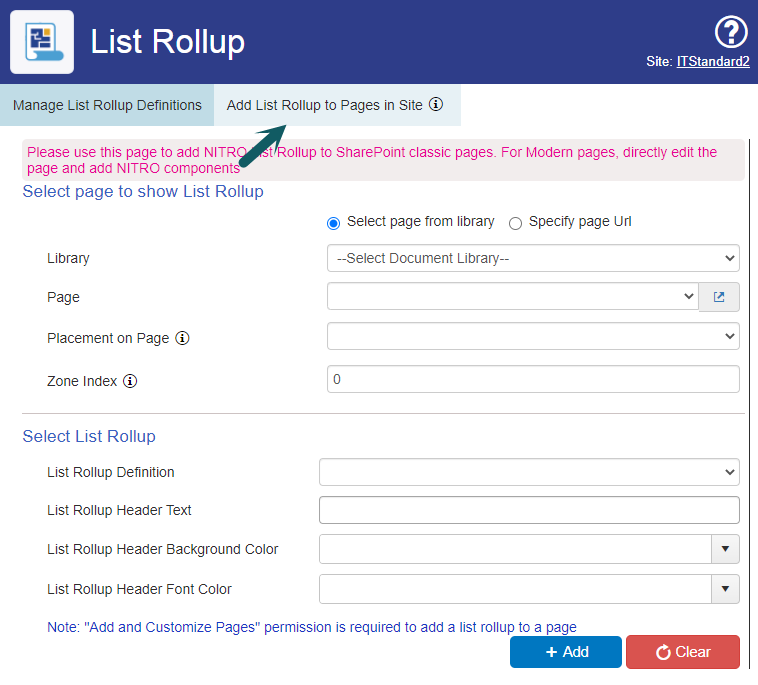
List Rollup
- Edit each list rollup configuration and save settings
- Remove and add web parts in pages:
- List rollup web parts needs to be removed and re-added to each page using this web part
- Navigate to each workspace page (each quick launch link and top link bar link in case of pre-defined applications) à edit the page, remove the web part of List Rollup.
- Note: For standard libraries where pages are saved, navigate to below locations for removing the webparts from workspace pages. If pages are saved in other libraries then navigate to those libraries as well:
- Classic experience (2013, 2016 and 2019 classic UI): Site Contents -> Workspaces
- Modern experience (2019 Modern UI): Site Contents -> Site Pages
- Re-add web part to the page from List rollup app page as shown below:
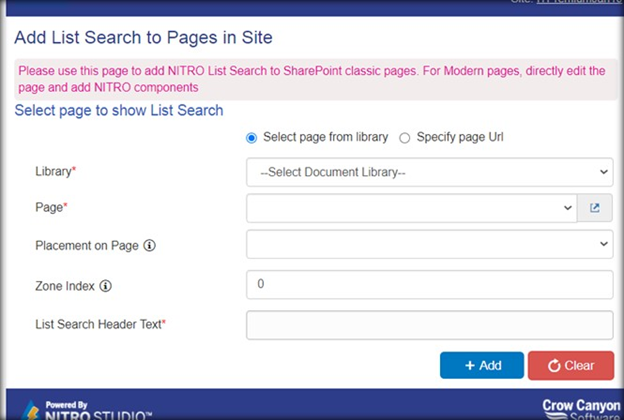
List Search
- Remove and add web parts in pages
- List search web parts needs to be removed and re-added to each page using this web part
- Navigate to each workspace page (each quick launch link and top link bar link in case of pre-defined applications) à edit the page, remove the List Search web part.
- Note: For standard libraries where pages are saved, navigate to below locations for removing the webparts from workspace pages. If pages are saved in other libraries then navigate to those libraries as well:
- Classic experience (2013, 2016 and 2019 classic UI): Site Contents -> Workspaces
- Modern experience (2019 Modern UI): Site Contents -> Site Pages
- Re-add web part to the page from List Search app page as shown below:
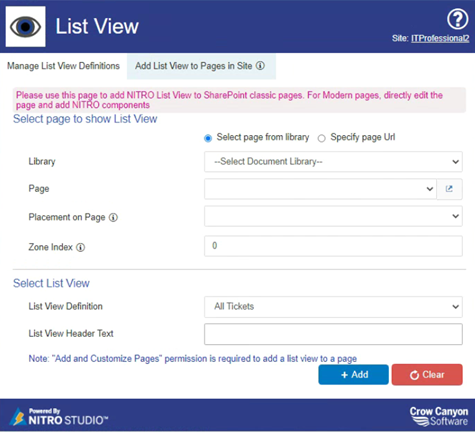
List View
- Edit each list view configuration and save settings.
- Remove and add web parts in pages:
- List view web parts needs to be removed and re-added to each page using this web part
- Navigate to each workspace page (each quick launch link and top link bar link in case of pre-defined applications) à edit the page, remove the list view web part.
- Note: For standard libraries where pages are saved, navigate to below locations for removing the webparts from workspace pages. If pages are saved in other libraries then navigate to those libraries as well:
- Classic experience (2013, 2016 and 2019 classic UI): Site Contents -> Workspaces
- Modern experience (2019 Modern UI): Site Contents -> Site Pages
- Re-add web part to the page from List View app page as shown below:
Reports
- Edit each report settings and save settings.
- Remove and add report web parts in pages:
- NITRO Reports web parts needs to be removed and re-added to each page using this web part
- Navigate to each workspace page (each quick launch link and top link bar link in case of pre-defined applications) à edit the page, remove the list view web part.
- Note: For standard libraries where pages are saved, navigate to below locations for removing the webparts from workspace pages. If pages are saved in other libraries then navigate to those libraries as well:
- Classic experience (2013, 2016 and 2019 classic UI): Site Contents -> Workspaces
- Modern experience (2019 Modern UI): Site Contents -> Site Pages
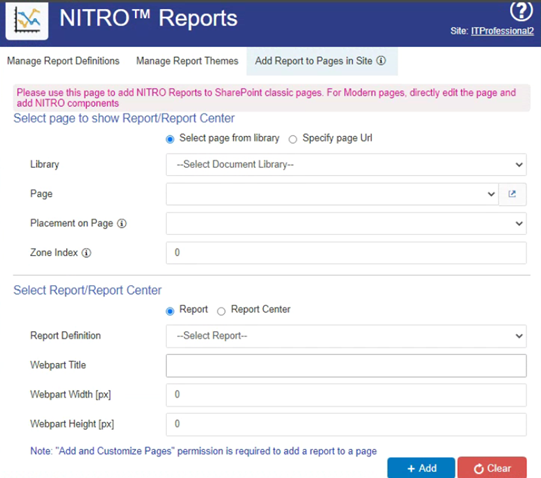
- Re-add web part to the page from NITRO Reports app page as shown below:
TilesArc
- Edit each Tiles, Dials and Link Tiles settings and save settings.
- Remove and add Tiles, Dials and Link Tiles web parts in pages:
- Tiles, Dials and Link Tiles web parts needs to be removed and re-added to each page using this web part
- Navigate to each workspace page (each quick launch link and top link bar link in case of pre-defined applications) à edit the page, remove the list view web part.
- Note: For standard libraries where pages are saved, navigate to below locations for removing the webparts from workspace pages. If pages are saved in other libraries then navigate to those libraries as well:
- Classic experience (2013, 2016 and 2019 classic UI): Site Contents -> Workspaces
- Modern experience (2019 Modern UI): Site Contents -> Site Pages
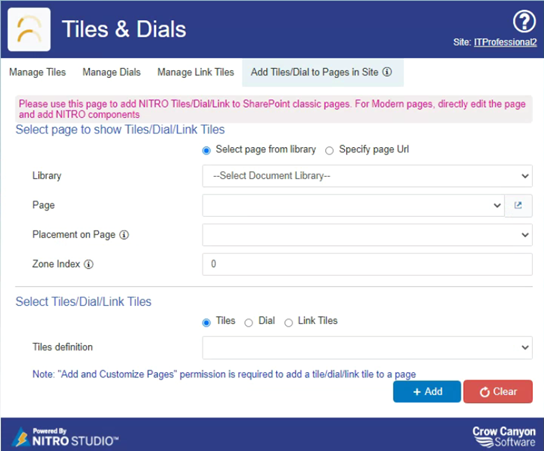
- Re-add web part to the page from “Tiles and Dials” app page as shown below:
User Info Filler
Re-save settings
Print Manager
No changes required
ColorKPI
No changes required
LinkedItems
No changes required
MailTemps
No changes required
Application Specific pages
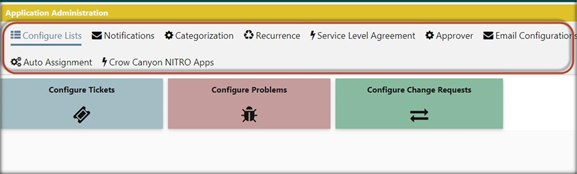
In Crow Canyon pre-built applications there is a tabs component in ‘Application Administration’, “Onboarding Dashboard” pages. There is a content editor web parts that has link referring to a text file located in Site Assets library of the site.
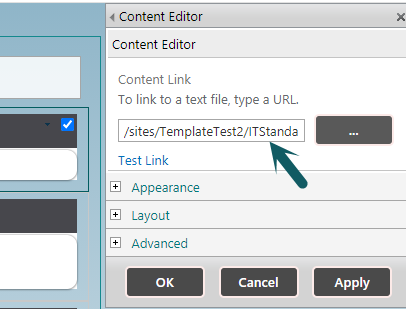
- These files need to be downloaded to local computer and then below changes need to be done in the links. The hyperlinks (href) and source (src) URLs that are referencing to Crow Canyon Azure need to be replaced with local files in the site
- Below table lists old URL that need to be replaced with corresponding NITRO Secure URL. Considering example site collection URL as http://contoso/sites/ServiceDesk, links are given below. Please change this as per the URL of your site collection.
| Azure URL | Non-Azure URL |
| https://kendo.cdn.telerik.com/2017.2.621 | /sites/ServiceDesk/CrowCanyonNITRO/Libs/V2 |
| https://kendo.cdn.telerik.com/2017.3.1026 | /sites/ServiceDesk/CrowCanyonNITRO/Libs/V2 |
| https://kendo.cdn.telerik.com/2018.3.1017 | /sites/ServiceDesk/CrowCanyonNITRO/Libs/V2 |
| https://kendo.cdn.telerik.com/2019.1.115 | /sites/ServiceDesk/CrowCanyonNITRO/Libs/V2 |
| https://cdnjs.cloudflare.com/ajax/libs | /sites/ServiceDesk/CrowCanyonNITRO/Libs |
| https://code.jquery.com/ui/1.12.1/themes/base | /sites/ServiceDesk/CrowCanyonNITRO/Libs/JQuery |
| https://nitrostudio.azurewebsites.net | /sites/ServiceDesk/CrowCanyonNITRO/Nitro |
| https://cdn.crowcanyon.com/ | /sites/ServiceDesk/CrowCanyonNITRO/CDN |
| https://ccsportal.azurewebsites.net | /sites/ServiceDesk/CrowCanyonNITRO/Portal |
Portal sites
There are two versions of portal sites:
- Power Portal
- NITRO Studio based portal
Power Portal
Recreate the Portal site with same as existing portal site URL.
Steps:
- Rename the existing portal site URL
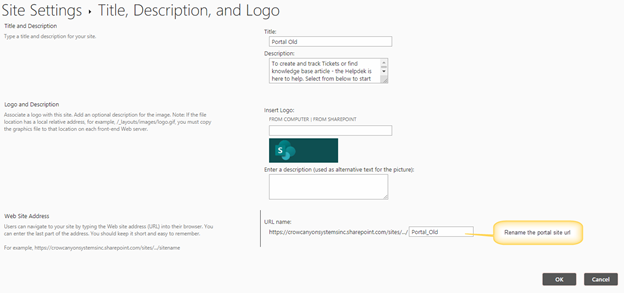
Go to the existing portal site -> Portal Administration -> Click “Site Title, Description, and Logo” -> Rename URL to old
Direct URL: Portal Site URL/_layouts/15/prjsetng.aspx
- Create new portal site with URL of existing Portal site URL
Go to Crow Canyon Power Portal site -> create a new Portal site with existing Portal site URL (after rename)
- Please refer “NITRO Secure License” section below to generate the license information for the Portal site.
NITRO Studio based Portal
- These portals are built with NITRO Studio apps so steps are same as any NITRO site
- Follow same steps mentioned in “NITRO Secure Conversion”, “NITRO Secure License” sections described above.
- After this step, resave the Portal security settings.
- Steps: Go to portal site settings, Crow Canyon NITRO Site Settings, expand “Security Settings” section, select the site and click “Save Settings”.
NITRO Secure License
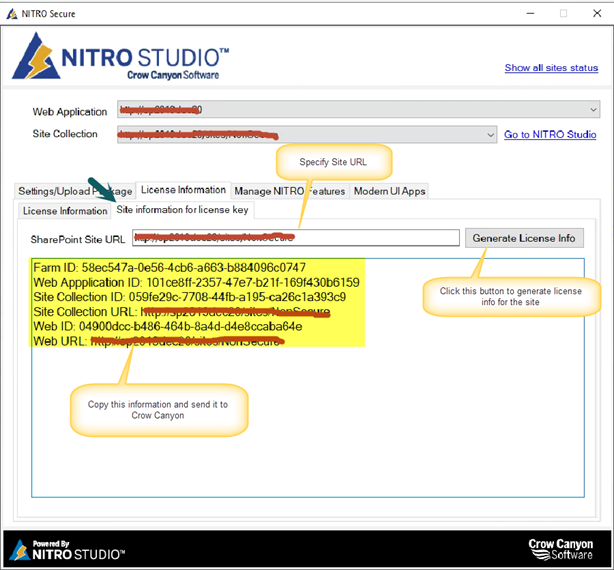
- By default, the NITRO Studio comes with 45 days trial license. To get the subscription farm licenses, please generate license info for the site using “CrowCanyon.NITROHelper.exe” tool as shown below and send it to sharepointsupport@crowcanyon.com .
- Crow Canyon team will generate and send the license keys.
After receiving the license keys, register the license key with “CrowCanyon.NITROHelper.exe” tool:
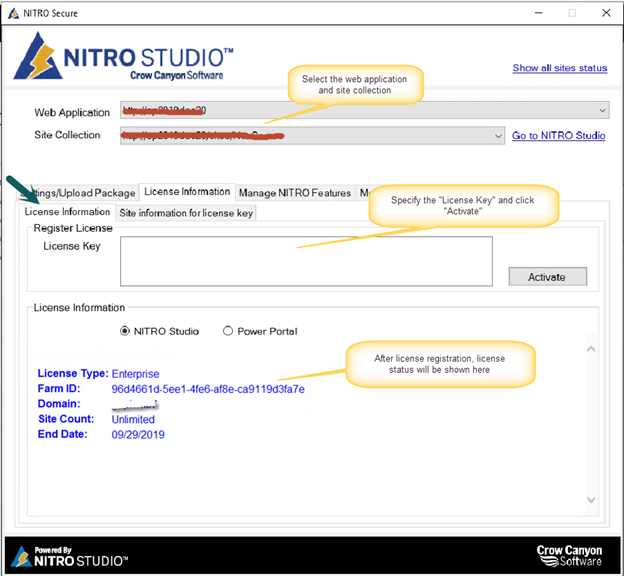
Similarly register the Portal license key and check the license status by selecting the “Power Portal” option in License Information section.