Applies to:
Crow Canyon NITRO activated sites in:
SharePoint Online and On-Premises 2013/2016/2019/SharePoint Server Subscription Edition
Description
NITRO Forms have a lot of built-in functionality to customize the layout, design and functionality as required in common business applications. For any specific cases not covered directly by the configurations, custom JavaScript and CSS can be added. These custom scripts can be invoked on form load, on column values change and before/after an item is submitted. For all these cases, scripts can be invoked conditionally based on various values entered in the form.
Please refer to this article for form event actions’ basic usage and configurations.
This article describes some sample use cases to configure form event actions in NITRO forms.
Use Case 1: Clear the attachments column based on a change in the value of another column
Sample list schema and use case
- Standard SharePoint list
- ‘Category’: Single selection choice:
- Choice options:
- ‘Emails’
- ‘Internet’
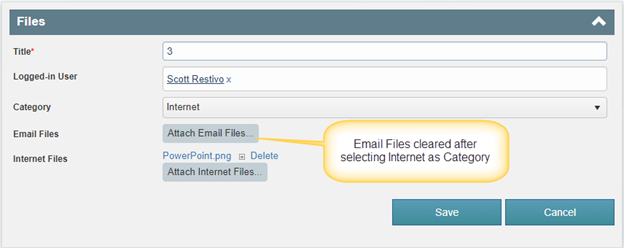
- Based on the selected value, retain attachments in corresponding column and clear others
- Choice options:
- ‘Email Files’: NITRO attachments column
- If selected category is not ‘Emails’, then clear attachments from this column
- ‘Internet Files’: NITRO attachments column
- If selected category is not ‘Internet’, then clear attachments from this column
Steps to configure
Navigate to Crow Canyon NITRO Forms designer for the list -> Form Event Actions (under Advanced section in the left-hand panel) and configure FEA on column value change as shown below:
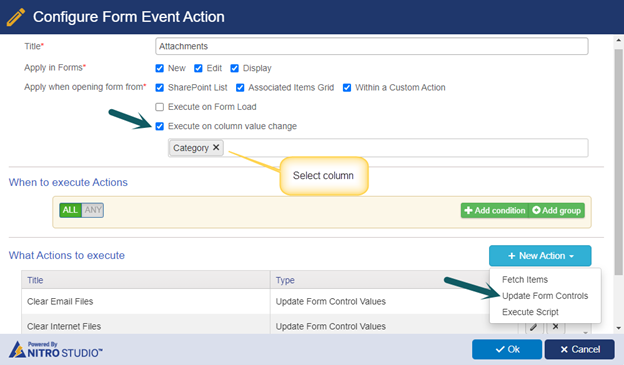
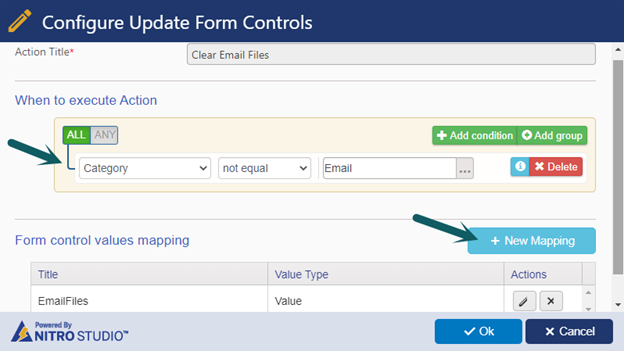
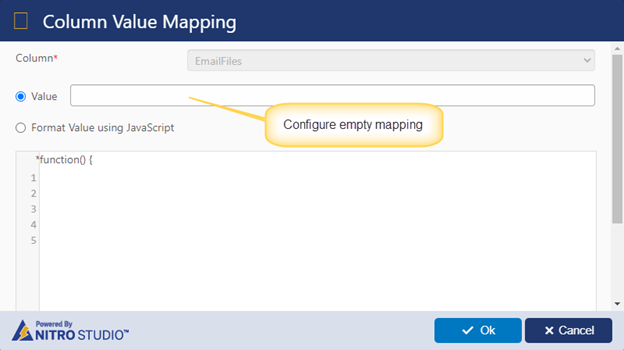
Clear ‘Email Files’:
Clear ‘Internet Files’:
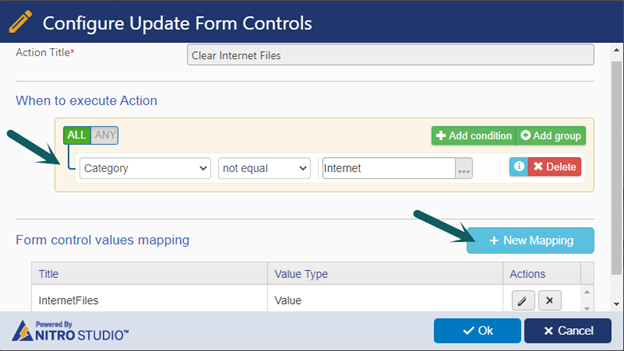
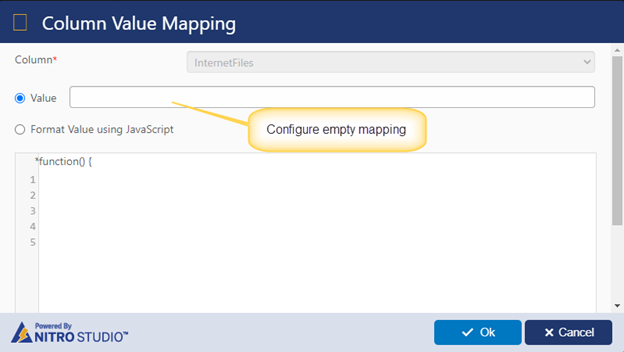
Note: In this sample we have cleared the NITRO attachments column. We can use this same syntax to clear the values for all other column types as well.
Sample Output
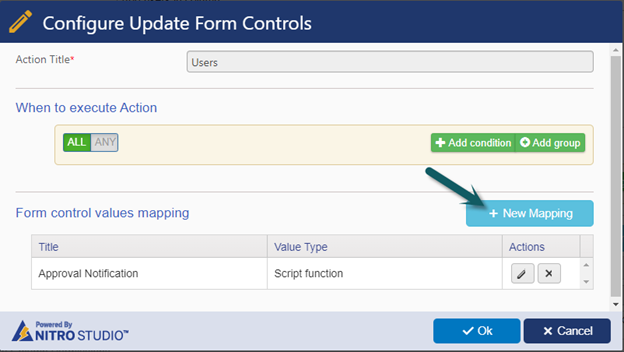
Use Case 2: Append multiple users in a multi-selection enabled person or group column
Sample list schema and use case
- Standard SharePoint list
- ‘Approval Notification’: Multiple selections enabled person or group column
- Populate multiple users in this column in new form
Steps to configure
- Navigate to Crow Canyon NITRO Forms designer for the list -> Form Event Actions (under Advanced section in the left-hand panel) and configure FEA on form load as shown below:
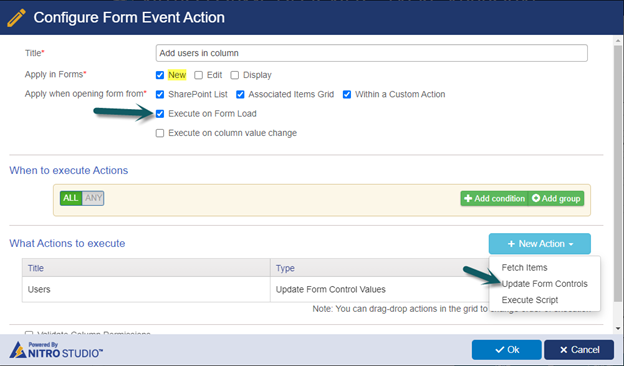
Update the form controls action:
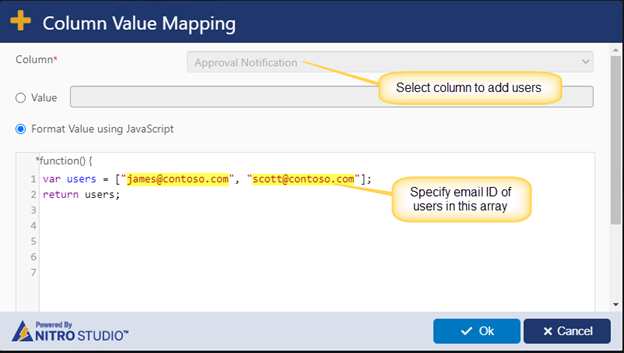
Script:
var users = ["james@contoso.com", "scott@contoso.com"];
return users;
Note: Specify the email ID of users as required.
Use Case 3: Show a popup message when number column value is greater than some value
Sample list schema and use case
- Standard SharePoint list
- ‘Number of Employees’: Number column
- Show a popup message if the ‘Number of Employees’ column value is greater than 1.
Steps to configure:
- Navigate to Crow Canyon NITRO Forms designer for the list -> Form Event Actions (under Advanced section in left-hand panel) and configure FEA on column value change as shown below:
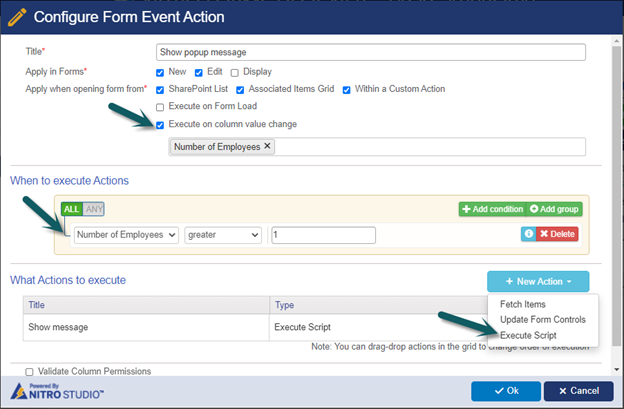
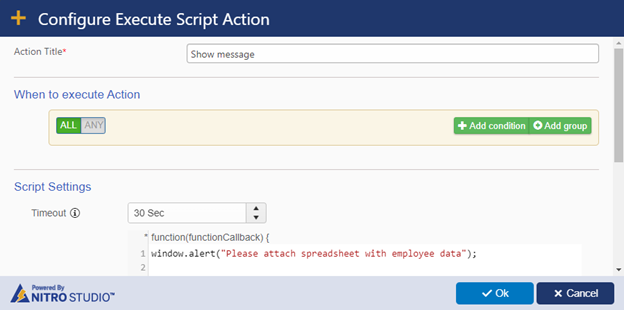
Configure execute script action:
Script:
window.alert("Please attach spreadsheet with employee data");Note: Replace the message as required.
Use Case 4: Show/hide a column based on entered date being less than 28 days from today or not
Sample list schema and use case
- Standard SharePoint list
- ‘Due Date’: Date column
- ‘Show Rush Notification’: Yes/No column (default value is ‘No’)
- This is a hidden column that will be updated using FEA based on ‘Due Date’ column value.
- ‘Rush Justification’: Single line of text column
- Show this column only if ‘Due Date’ column value is less than 28 days from today.
Steps to configure
- Navigate to Crow Canyon NITRO forms designer for the list -> Select ‘Show Rush Notification’ column -> Configure hide permission on this column from the column settings (in the right-hand panel).

- Configure FEA to update ‘Show Rush Notification’ column value based on ‘Due Date’ column value.
- Click ‘Form Event Actions’ (under Advanced section in left-hand panel) and configure FEA on column value change as shown below:
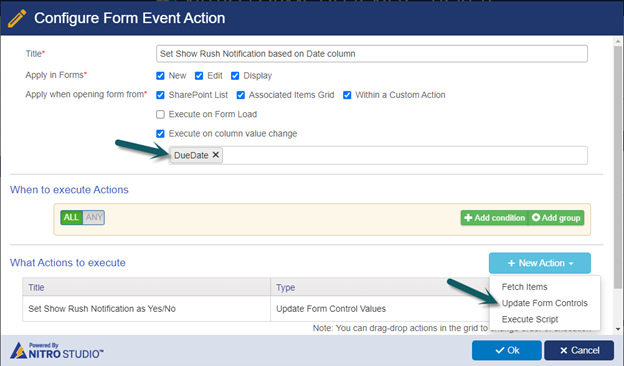
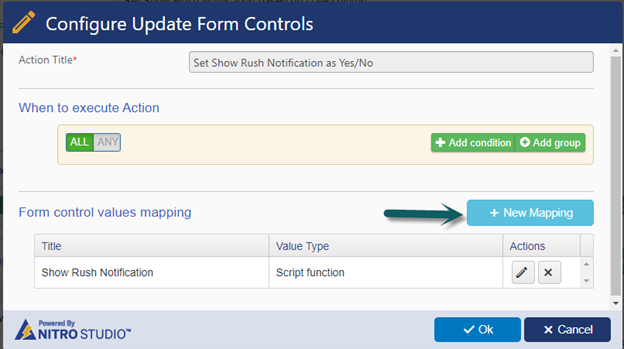
- Configure update form controls action:
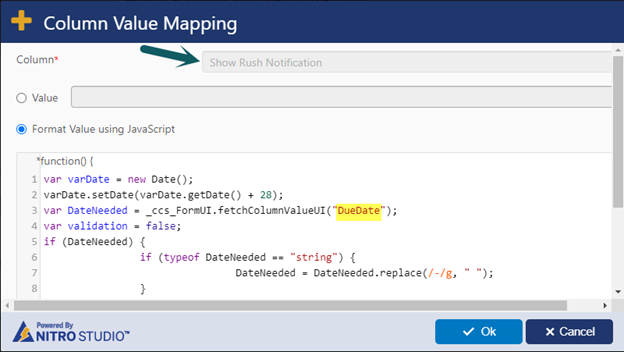
Script:
var varDate = new Date();
varDate.setDate(varDate.getDate() + 28);
var DateNeeded = _ccs_FormUI.fetchColumnValueUI("Column Internal Name");
var validation = false;
if (DateNeeded) {
                if (typeof DateNeeded == "string") {
                                DateNeeded = DateNeeded.replace(/-/g, " ");
                }
                validation = Date.parse(DateNeeded) >= Date.parse(new Date(varDate.toDateString()));
}

if (validation == true){
				return "No";
}

if(validation == false){
                return "Yes";
}
Note: Replace highlighted text with ‘Due Date’ column internal name.
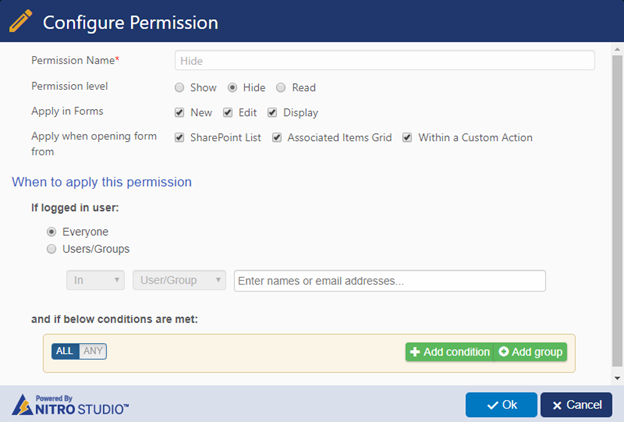
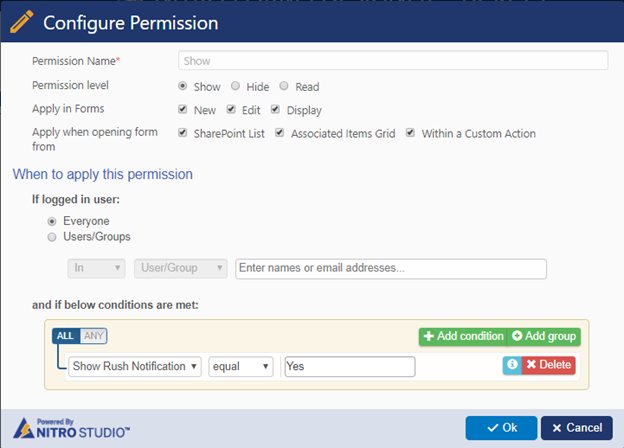
- Configure show/hide column permissions on ‘Rush Justification’ column.
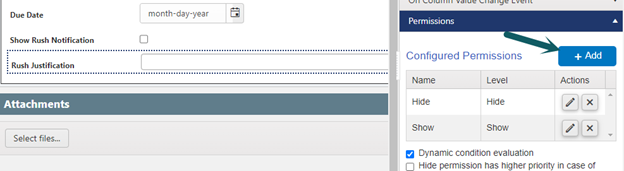
Hide for everyone:
Show if ‘Show Rush Notification’ column value is ‘Yes’:
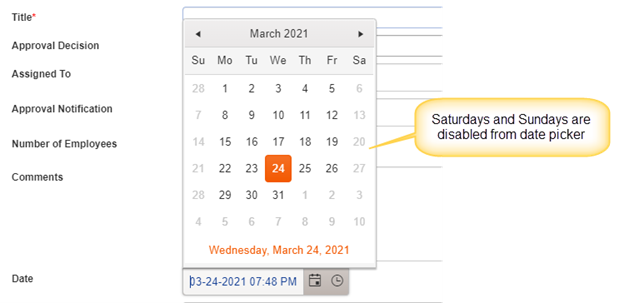
Use case 5: Disable non-working calendar days or enable specific days in date and time controls
Sample list schema and use case
- Standard SharePoint list
- ‘Date’: Date and time column
- Disable non-working days, i.e., Saturday and Sunday from ‘Date’ column date picker
- Enable only second and fourth Tuesday of the month
Steps to configure
- Navigate to Crow Canyon NITRO Forms designer for the list -> Form Event Actions (under Advanced section in left-hand panel) and configure FEA on load as shown below:
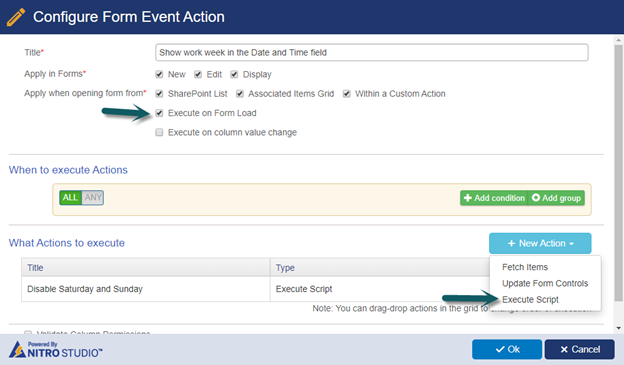
- Configure execute script action:
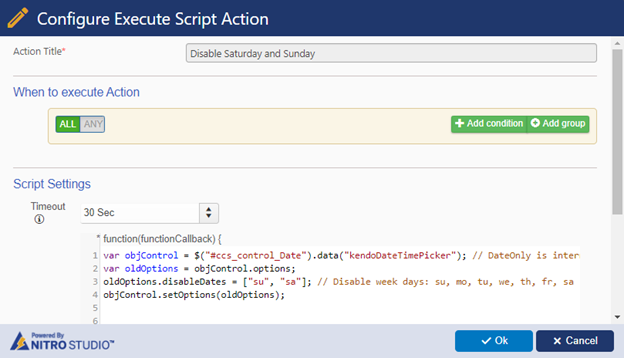
Script – Disable all Saturdays and Sundays:
var objControl = $("#ccs_control_Date").data("kendoDateTimePicker");
var oldOptions = objControl.options;
oldOptions.disableDates = ["su", "sa"];
objControl.setOptions(oldOptions);
Script – Enable only second and fourth Tuesday of the month:
var objControl = $("#ccs_control_Date").data("kendoDateTimePicker");
var oldOptions = objControl.options;

oldOptions.disableDates = function (date) {

	date = new Date(date);
	const dayOfWeek = date.getDay();

	var firstWeekday = new Date(date.getFullYear(), date.getMonth(), 1).getDay() - 1;
	if (firstWeekday < 0) {
		firstWeekday = 6;
	}

	var offsetDate = date.getDate() + firstWeekday - 1;
	const weekOfMonth = Math.floor(offsetDate / 7);

	return !(dayOfWeek === 2 && (weekOfMonth === 2 || weekOfMonth === 4));
}

objControl.setOptions(oldOptions);
Note:
- Replace ‘Date’ in the above script with the internal name of ‘Date & Time’ column. For example, change ccs_control_Date to ccs_control_DateAndTime if the column internal name is DateAndTime.
- “kendoDateTimePicker” is for ‘Date & Time’ column. Replace this with “kendoDatePicker” for ‘Date Only’ column.
- Disable weekdays from date picker as required using the syntax: su, mo, tu, we, th, fr, sa for Sunday, Monday, Tuesday, Wednesday, Thursday, Friday, Saturday, respectively.
Sample Output