Applicable to: SharePoint Online
This article describes the steps to install the NITRO BOT including LUIS application configurations and search schema settings to configure Knowledge Base Search functionality. This article will also describe the steps to import default BOT commands for Crow Canyon IT Helpdesk pre-built application.
Pre-requisites
- Microsoft Teams Admin rights
- Enable Custom Apps at tenancy level
- Steps: Go to Teams Admin Center -> Teams apps -> Setup policies -> Click Global (Org-wide default) policy -> in that policy, enable “Upload custom apps” (this may take 24 hours to take effect)
- Site Collection Administrator access on the SharePoint site collection
- Install NITRO Studio in the SharePoint site collection
- Reference: https://www.crowcanyon.help/article/424/
Summary of steps
- Upload NITRO BOT Package
- Add/Pin NITRO BOT into users MS Teams
- NITRO BOT Configurations (for IT Helpdesk application)
- Import default BOT commands
- Create Resource Group in Azure
- Create and configure LUIS application
- Knowledge Base Seach configurations
- Email Domains
- BOT Analytics Configurations
Detailed Steps
Upload NITRO BOT Package
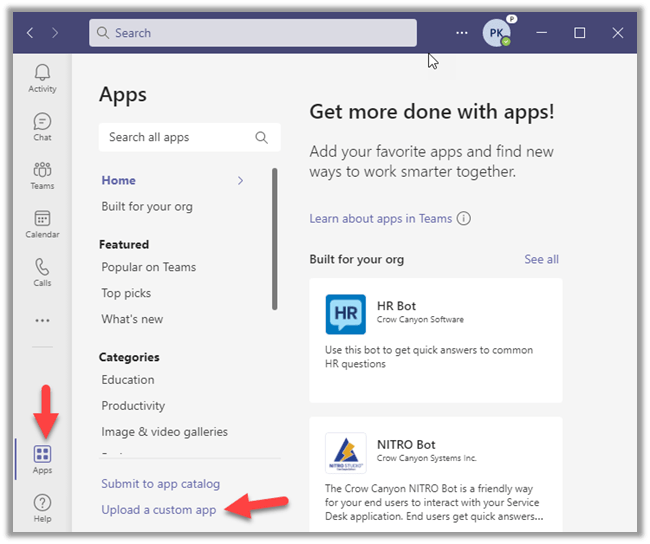
Open MS Teams, click “Apps”, click “Upload a custom app” as shown below. Please contact sharepointsupport@crowcanyon.com for NITRO BOT package download link.
Add/Pin NITRO BOT into users MS Teams
Follow the steps described in https://www.crowcanyon.info/nitro/botmanual_v2/index.html?accessing-and-pinning-the-nitr.html
NITRO BOT Configurations (for IT Helpdesk application)
Import default BOT commands
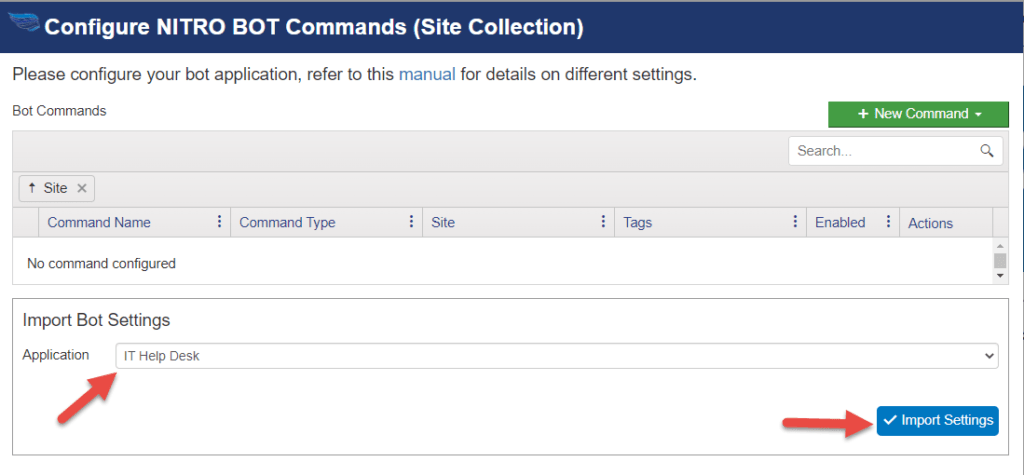
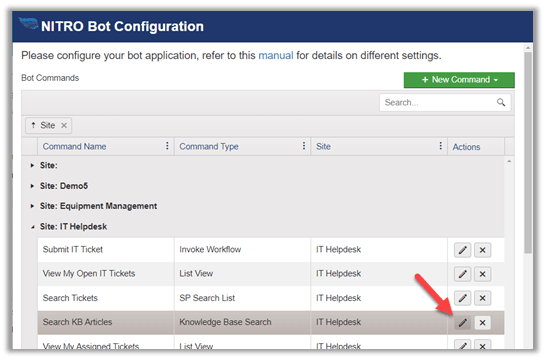
Go to application site, open NITRO Studio -> BOTS -> click “Configure NITRO Bot Commands (Site Collection)” -> NITRO BOT, import BOT settings, choose “IT Help Desk” and import as shown below.
Create Resource Group in Azure
If you have do not already have an existing resource group in Azure for the below LUIS application, please create this prior to following the steps below.
Manage resource groups – Azure portal – Azure Resource Manager | Microsoft Docs
Create and configure LUIS application
Create LUIS application
Refer below articles to create and configure LUIS application
https://docs.microsoft.com/en-us/azure/cognitive-services/luis/sign-in-luis-portal
https://docs.microsoft.com/en-us/azure/cognitive-services/luis/luis-how-to-start-new-app
In this article, we use the LUIS application “CrowCanyonITPNITRO2” created using above reference links.
Configure LUIS application
Find LUIS application id, authoring key and host name
After the LUIS application is created, follow below steps to know the LUIS application id, authoring key and host name that are required to configure NITRO BOT:
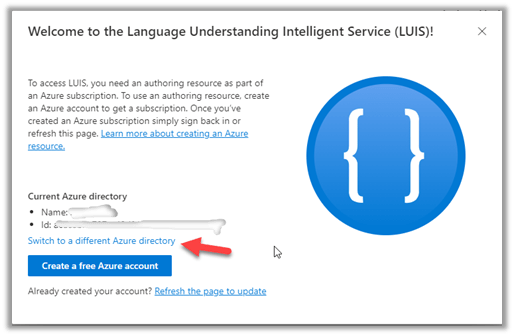
- Open https://www.luis.ai in browser and sign in
- It may prompt to switch to a different azure active directory if the logged in account has multiple Azure AD subscriptions
- Select the right subscription and then click “Select or create an authoring resource”. This will open a page to select right authoring resource.
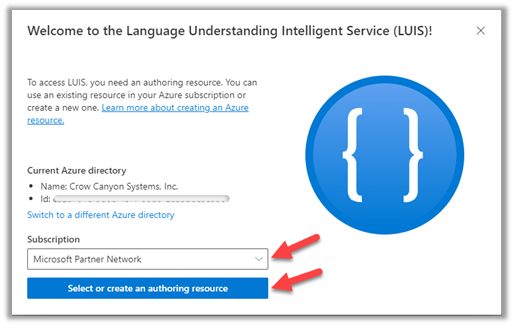
- Azure directory and Azure subscription will be pre-populated, select the authoring resource and click “Confirm” as show below. This will open a page that will show all available conversation apps.

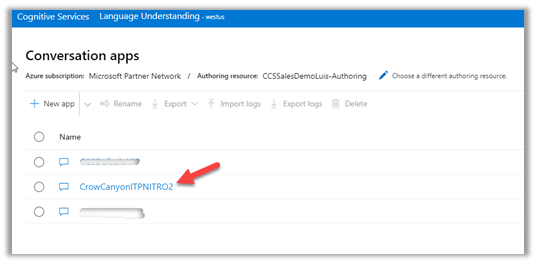
- Open the right conversation app and this will open the LUIS app settings page.
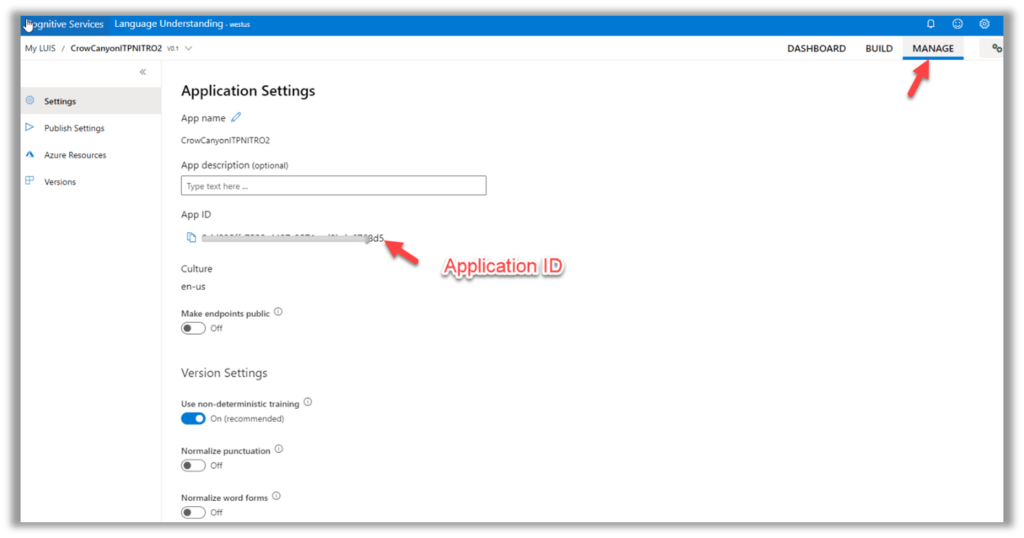
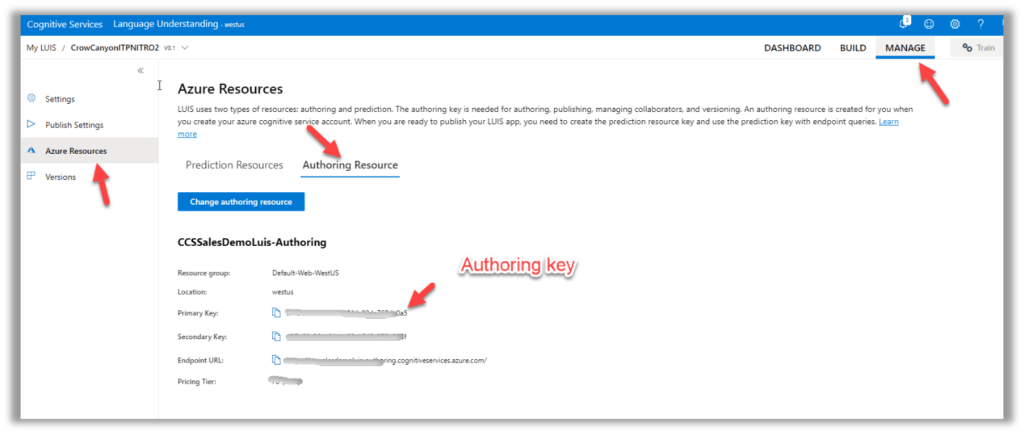
- Click on “Manage”, Settings, Application Settings, copy the “App ID”. This will be used in NITRO BOT configurations in next steps in this article
- Click on “Manage”, Azure Resources, Authoring Resource, copy the “Primary Key”. This is the authoring key that will be used in NITRO BOT configurations in next steps in this article
Find Host Name
Host Name: Based on the location used to create our resource that used to create our LUIS application, use the corresponding host name from below list.
E.g.: If the resource is created in “West US” then use “westus.api.cognitive.microsoft.com” as host name in our BOT configurations.
- Australia East – australiaeast.api.cognitive.microsoft.com
- Brazil South – brazilsouth.api.cognitive.microsoft.com
- Canada Central – canadacentral.api.cognitive.microsoft.com
- Central India – centralindia.api.cognitive.microsoft.com
- Central US – centralus.api.cognitive.microsoft.com
- East Asia – eastasia.api.cognitive.microsoft.com
- East US – eastus.api.cognitive.microsoft.com
- East US 2 – eastus2.api.cognitive.microsoft.com
- France Central – francecentral.api.cognitive.microsoft.com
- Japan East – japaneast.api.cognitive.microsoft.com
- Japan West – japanwest.api.cognitive.microsoft.com
- Korea Central – koreacentral.api.cognitive.microsoft.com
- North Central US – northcentralus.api.cognitive.microsoft.com
- North Europe – northeurope.api.cognitive.microsoft.com
- South Africa North – southafricanorth.api.cognitive.microsoft.com
- South Central US – southcentralus.api.cognitive.microsoft.com
- Southeast Asia – southeastasia.api.cognitive.microsoft.com
- UK South – uksouth.api.cognitive.microsoft.com
- West Central US – westcentralus.api.cognitive.microsoft.com
- West Europe – westeurope.api.cognitive.microsoft.com
- West US – westus.api.cognitive.microsoft.com
- West US 2 – westus2.api.cognitive.microsoft.com
Create LUIS entity, train and publish LUIS application
Next, train the LUIS application with Knowledge Base categories.
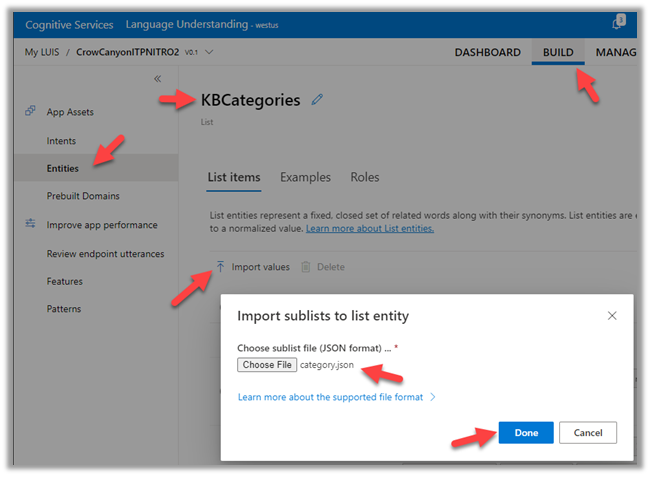
- Download the categories.json from NITRO BOT’s Knowledge Base Search command
- Go to application site, open NITRO Studio -> BOTS -> edit the imported NITRO BOT, edit “Search KB Article” command (command type: Knowledge Base Search) as shown below.
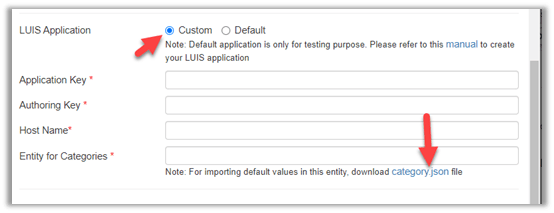
- Choose “Custom” in “LUIS Application” setting, and then click “category.json” link as shown below. This will download the category.json file.
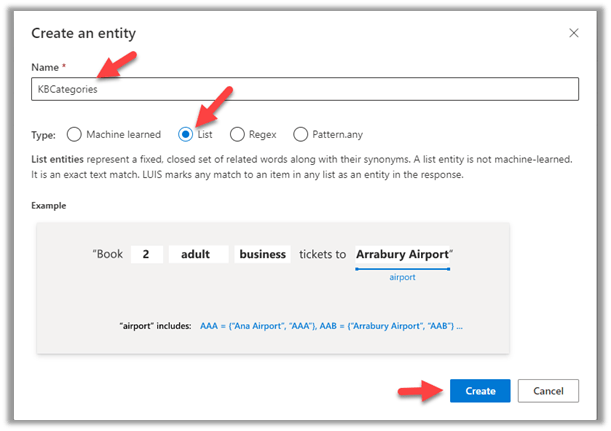
- Create Entity in LUIS application created in above steps (“CrowCanyonITPNITRO2” LUIS application in this example)
- Open the LUIS application in browser, click on “BUILD”, Entities, click “+ Create”, enter name and choose “List” type as shown below.
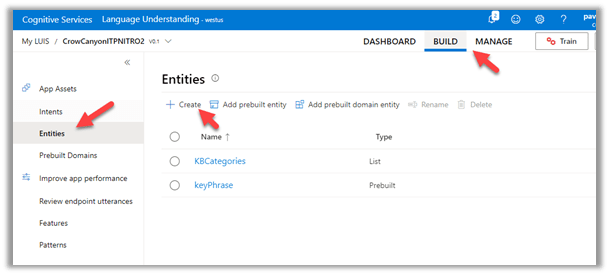
- Click “Import values”, upload the “category.json” downloaded in previous steps.
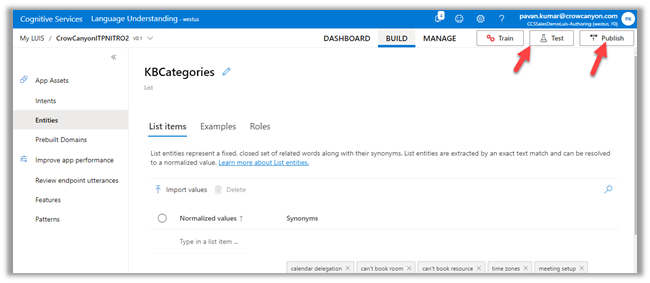
- After the categories are imported, click “Train” (Initially Train button has red dot indication and once we clicked, it changes to green dot indication) and then click “Publish”
Note this entity name (“KBCategories” in this example) and we will use this in next steps.
Configure LUIS application in NITRO BOT
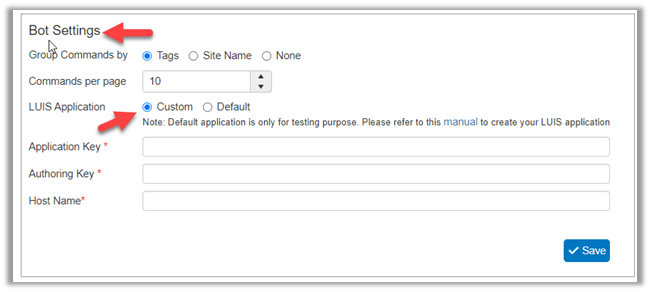
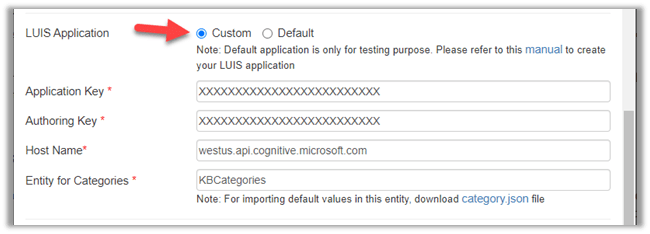
- Go to the SharePoint site that we are configuring the NITRO BOT (IT Helpdesk site in this example), site settings, Crow Canyon NITRO Apps, open “BOTS” under “Advanced” section, edit the BOT application, go to BOT Settings section, select “Custom” under “LUIS Application” and enter the application key, authoring key, host name prepared in the above steps and save.
Knowledge Base Search configurations
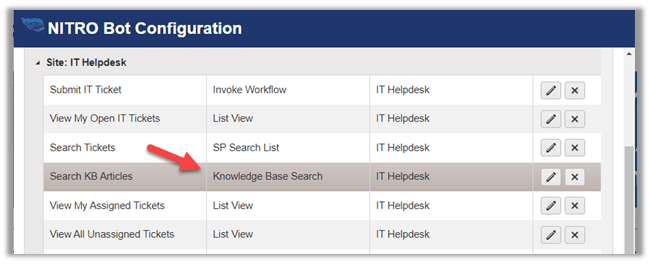
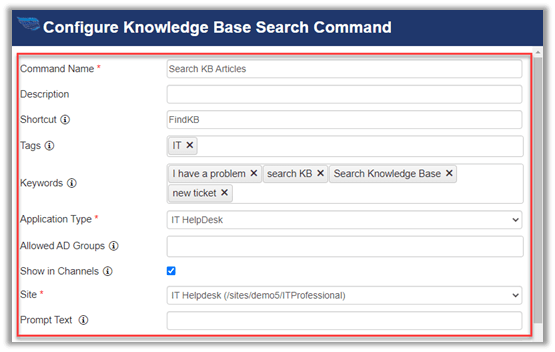
One of the commands in standard IT Helpdesk NITRO BOT commands is, “Knowledge Base Search” that require additional configurations after importing the default commands.
This command has five different sections in its configurations:
- General command details
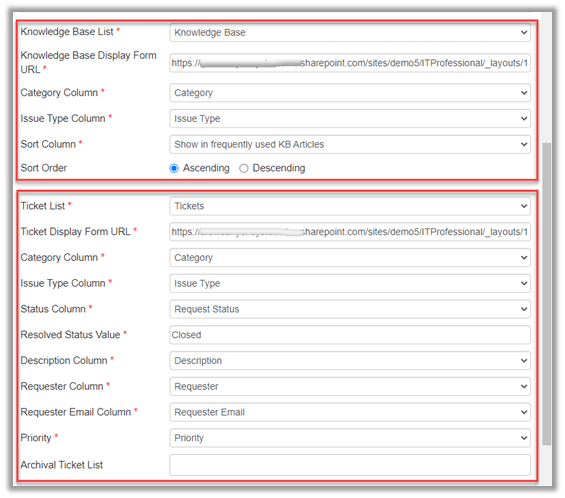
- Knowledge Base list
- Tickets list
- LUIS application
- Search Schema Managed Properties
Section #4 and #5 need special configurations.
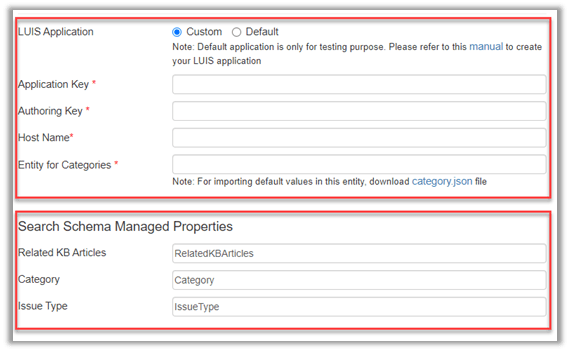
LUIS application
Enter the application key, authoring key, host name and entity name prepared in above steps and save.
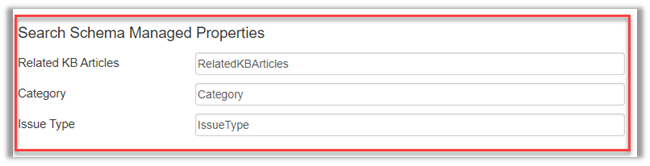
Search Schema Managed Properties
Enter the managed property alias of “Related KB Articles” lookup column of “Tickets” list, “Category” and “Issue Type” lookup columns aliases of “Knowledge Base Articles” list and save.
To create the search schema managed property alias for these columns, refer below “Search Configurations in site” section.
Search Configurations in site
To create search schema managed properties, please follow below steps:
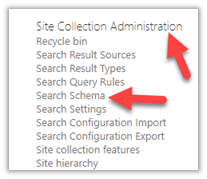
- Go to Root Site, site settings, under “Site Collection Administration”, click on “Search Schema”
- Filter “RefinableString” Managed Property, edit unused RefinableStringXX property as shown below:
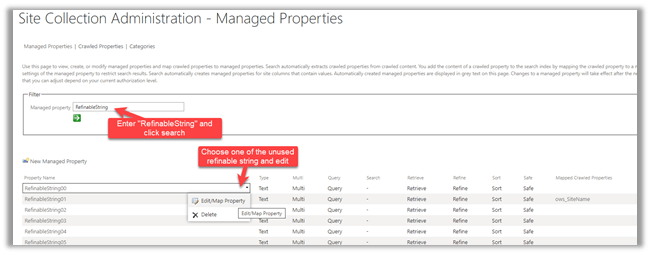
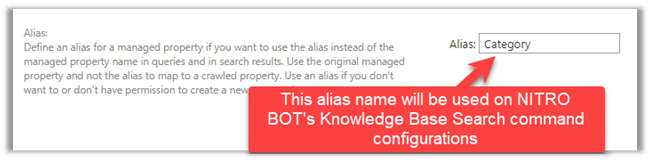
- Specify alias name for property. This will be used in the NITRO BOT’s knowledge base search command settings.
- Scroll to “Mappings to crawled properties” section, click on Add a Mapping button
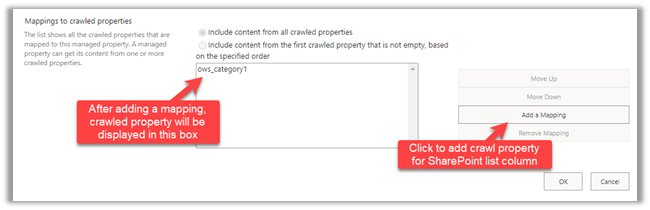
- Search crawled property with column internal Name for which we want to create manage property. Then select the property (starts with ows_[Column Internal Name]) and click Ok.
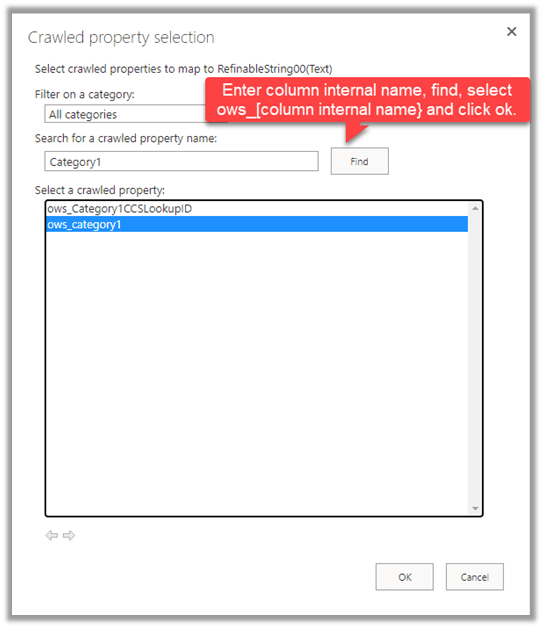
Note: If we do not find the crawled property to map (for example, ows_Categoty1), go the list that has this column, list settings, advanced settings, click “Reindex List”. We can continue with other configurations as SharePoint may take time to get the re-indexing done for the list.
- Re-index Lists: Go to Tickets list, list settings, Advanced Settings and click on Re-index Button. Repeat the same for Knowledge Base Articles list.
Note: If we are unable to find crawled property for list columns then re-index the list. It takes about an hour to re-index the list
Email Domains
Bot prompts user to login with their Microsoft O365 account. It uses the domain of logged in user to identify the bot applications that user can access. It is mandatory to specify all the required domains in this section. If no domains are added, then BOT won’t respond for anyone.
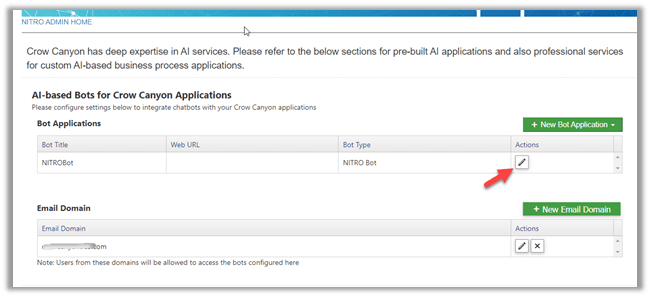
Go to the SharePoint site that we are configuring the NITRO BOT (IT Helpdesk site in this example), site settings, Crow Canyon NITRO Apps, open “BOTS” under “Advanced” section, click “New Email Domain”, enter value and save.

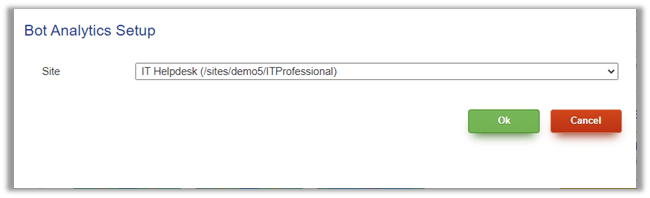
BOT Analytics Configurations
Go to Crow Canyon NITRO Studio, NITRO Admin Home, Nitro Applications, Updates, click on “BOT ANALYTICS”, select the site and click OK.
It will create the “Chat Bot Admin Dashboard” and “Performance Reports”. This helps administrators recognizing the area of improvements to Knowledge Base system so Bot “learns” more at solving user problems over time.