For SharePoint On-premises, please refer this article.
Pre-requisites
- User Permissions
- User doing the installation requires tenant admin rights on the SharePoint online tenancy where NITRO Studio is being installed
- Note: If NITRO Studio is already installed in any other site collection in your tenancy then user with site collection administrator permissions can perform the installation. In this case tenant admin permissions are not required
- Site Collection
- To install NITRO Studio in a new site collection, tenant administrator can create a new site collection
- Or installation can be done in an existing site collection
- App Catalog
- NITRO Studio components are installed as SharePoint Apps in the site collection. These apps are added to the app catalog site of the tenancy for installation
- It is likely that app catalog site already exists for your tenancy. If not, it can be created as per steps given in this article
- Access Control
- If “Allow access from specific IP Address locations” is enabled in Access Control for the tenancy, please refer this article and allow the the IP Addresses.
- Enable Custom App Authentication in O365
- Some SharePoint tenancies have custom app authentication disabled. In this scenario, Custom Apps do not work in SharePoint sites and show “The Remote Server returned an error: (401) Unauthorized” error. If you encounter this error when opening NITRO Studio app, please click here to check and enable Custom App authentication.
Installation Steps
Install NITRO Studio App in the Site Collection
This app is available in the SharePoint App Store and will be installed from there.
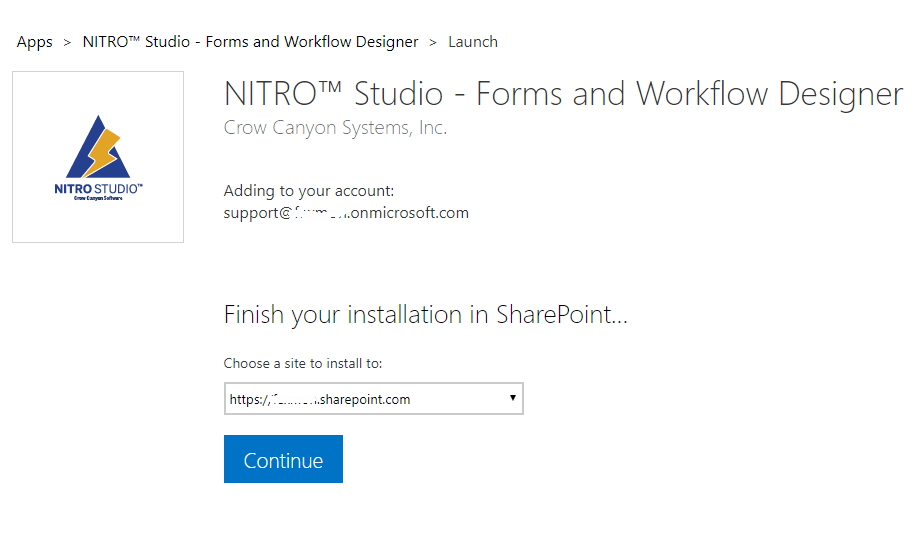
- Go to the NITRO Studio page in the App Store using this link
- Click “Get It Now” button on the App Store page to install NITRO Studio App. You will need to login to your Office 365 account to install this if you are not logged in already
- You will be asked to choose which Site to install NITRO in. Please select the required site in the drop-down and click ‘Continue’ and follow the rest of on-screen steps to install the app in the site collection
Please contact Crow Canyon support in case you face any difficulty in NITRO Studio app installation.
Grant Permissions
After installing the NITRO Studio in the site collection, go to the ‘Site Contents’ page of the root site. Click NITRO Studio App to open the main page of NITRO Studio. This page will show a message with “Grant Permissions” button as shown below:
Note: If these permissions are already granted as part of NITRO setup in any other site collection, then this message is not shown and you can continue with the next step in installation process.
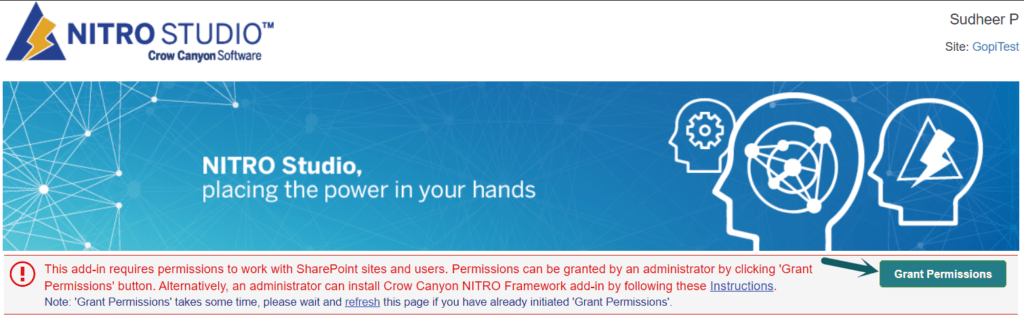
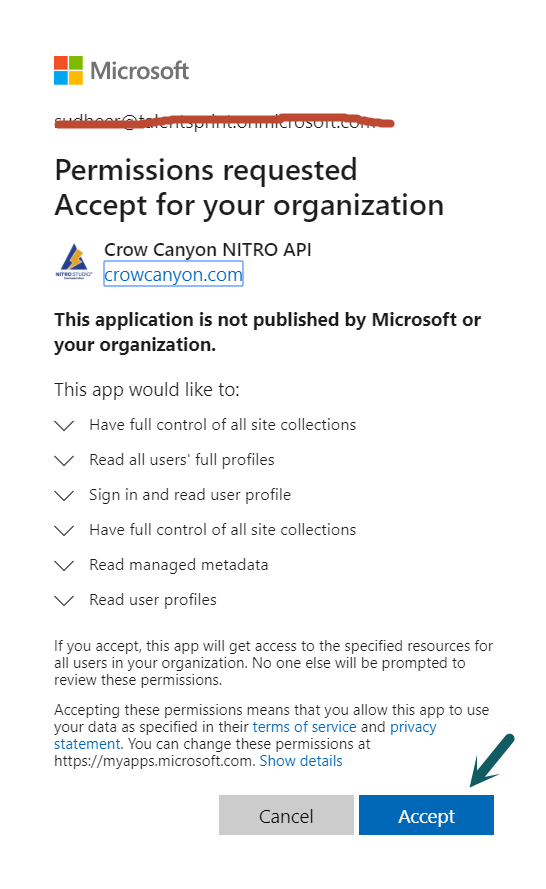
A user with administrator privileges on tenancy can click this button to open a window with details of permissions. Click “Accept” button to grant permissions. Once permissions are granted, this message will go away. Please refresh the page couple of times if you still see the message after granting permissions.
Setup NITRO Studio components
Once permissions are granted, main page will show a message with a Setup button as shown below. Clicking on the Setup button will install all the required components for the NITRO Studio.
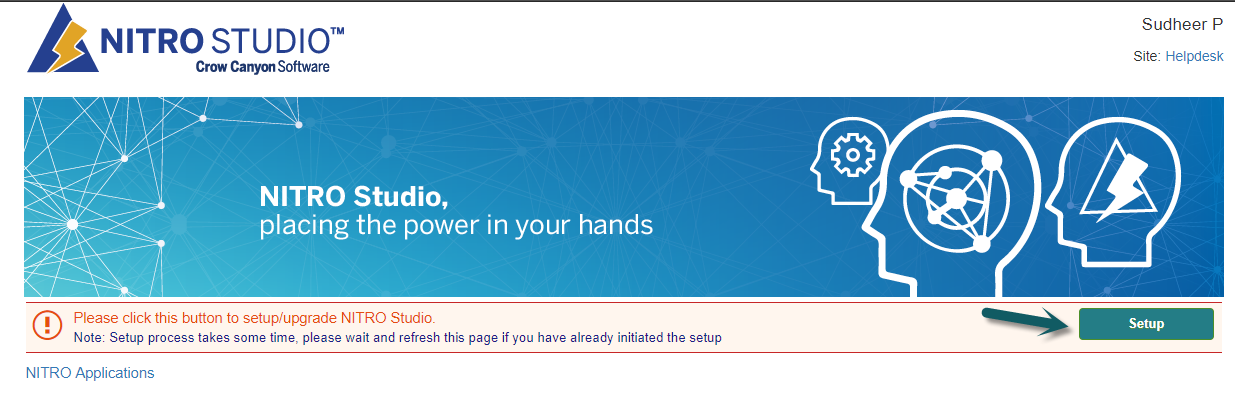
This will add below Apps to App Catalog site of the tenancy. And these apps will be installed in the Site Collection. Note that NITRO Modern UI WebParts are not installed by this step, this is installed in the sub-site when NITRO is activated in the sub-site.
| App Name | Description |
| CrowCanyon.EmailSync.app | This App provides the functionality to monitor emails in a Microsoft Exchange mailbox and create those mails as SharePoint list items in O365 |
| CrowCanyon.ApprovalWorkflow.app | Configure approval workflows easily on SharePoint lists |
| CrowCanyon.WorkflowManager.app | Configure business workflows on SharePoint lists. Supports workflows on list item create/update/delete, based on date time values in the list items and also scheduled workflows (fixed time or recurring Calendar) |
| CrowCanyon.ConfigurablePortal.app | Create easy to configure and use versatile Portal sites as a front end to your SharePoint business process sites. Provides customized UI and security settings to provide a simplified and secure interface to users |
| CrowCanyon.ProductApp.app | This App is used in some of the Crow Canyon’s prebuilt business applications like IT Helpdesk. You can add it to the catalog at a later time as well when you actually use one of these applications |
| CrowCanyonNITROSPFxWebParts.sppkg CrowCanyonNITROWebPartsII.sppkg | Provides NITRO features in SharePoint modern sites. Modern UI has different types of lists and pages and all the NITRO components are fully supported. Note that these apps are not installed to site during NITRO Studio setup. These are added to individual sites when NITRO Studio is activated in the site. |
Activate NITRO in a sub-site of the site collection
Once above setup is done, NITRO can be activated in the sub-sites of the site collection. Or install the pre-built Crow Canyon NITRO applications.
Please refer this article to install the prebuilt Crow Canyon NITRO applications.
Steps to check whether Custom App Authentication is enabled
Step 1: Download and install SharePoint Online Management Shell.
https://www.microsoft.com/en-in/download/details.aspx?id=35588
Step 2: Run SharePoint Online Management Shell as Administrator and perform below commands.

Connect-SPOService
Provide SharePoint Admin Center URL and authenticate using a Global Admin account
https://contoso-admin.sharepoint.com
Step 3: Enter the below command to check Custom App Authentication.

$tenantSettings = Get-SPOTenant
$tenantSettings.DisableCustomAppAuthentication
If the result is True, then run below command
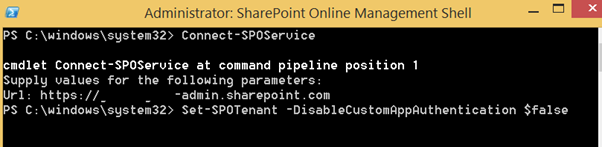
Set-SPOTenant -DisableCustomAppAuthentication $false
Step 4: After enabling the custom app authentication, it may take 5-10 minutes for changes to take effect. Please try opening the ‘Crow Canyon NITRO Studio’ app again to verify that app is working.