NITRO Workflows:
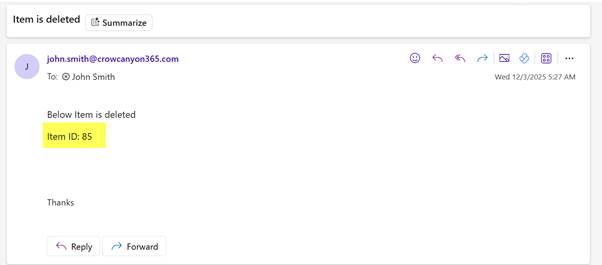
Update: For workflow on item delete, Id of the deleted item is available in variable ‘NITRO_ItemId’.
Current Behavior
Previously, when configuring a workflow using the “An item is deleted” event in NITRO Workflow Manager, the workflow could not access the ID or any column values of the deleted item. This limited the ability to reference the deleted item in workflow actions such as email notifications.
Enhancement
NITRO Workflow Manager now captures the ID of the deleted item and stores it in a fixed variable:
Fixed Variable: NITRO_ItemId
This variable can be used in workflow actions, such as mail templates, to include the deleted item’s ID.
How It Works
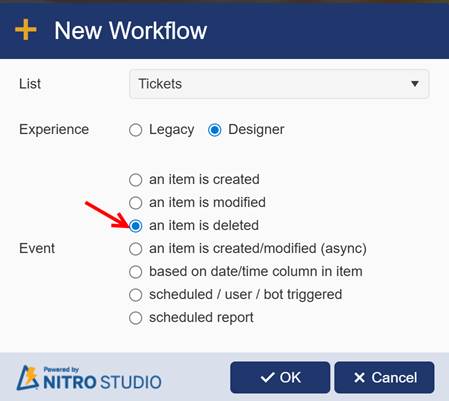
When a workflow is configured on the Item Deleted event:
- NITRO automatically stores the deleted item’s ID in the variable NITRO_ItemId.
- In email templates, you can insert this value using:
%%NITRO_ItemId##Value%% - When the item is deleted, the workflow triggers and the email is sent with the deleted item’s ID.
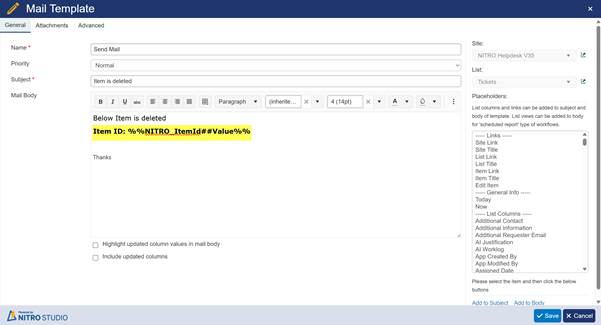
Example – Email Notification with Deleted Item ID
Workflow Configuration on Item Delete Event
How to Navigate to NITRO Workflows
Go to the SharePoint list where you want to configure the workflow -> Click NITRO Workflows on the ribbon -> Create or edit a workflow and choose the “An item is deleted” event.
Configure Send Mail action
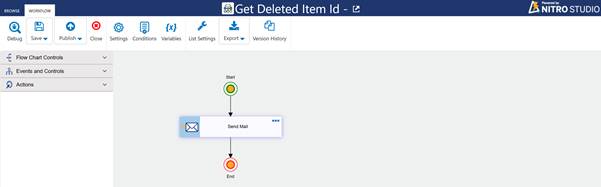
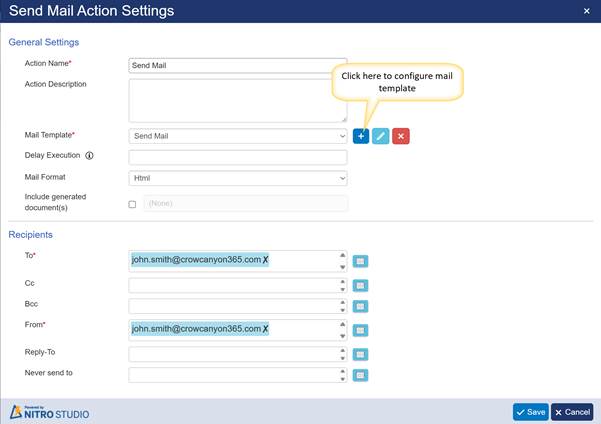
Configure Mail Template using the variable NITRO_ItemId
Update: Added option to select the required NITRO Form for the item in the Create Item action.
- A new enhancement has been added to the Create Item action in NITRO Workflows, allowing users to choose which NITRO Form should open for the created item.
- If a list has multiple NITRO Forms configured, the new “Edit/Display NITRO Form” option enables the workflow to open the item with a specific form. The dropdown displays all available forms associated with the list, and the item created through this action will open using the form selected here.
- To configure this feature:
Navigate to the list → NITRO Workflows in list ribbon → Configure workflow with create item action as shown below
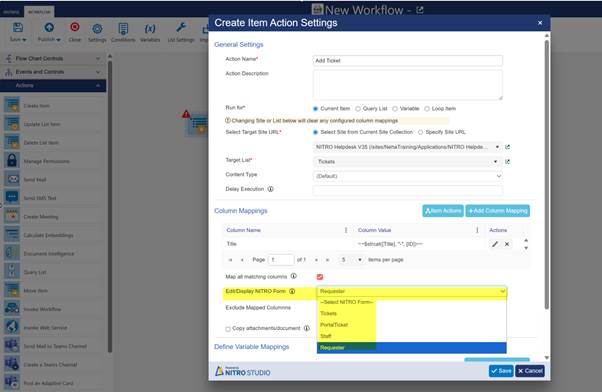
In above form UI, Requester form is selected
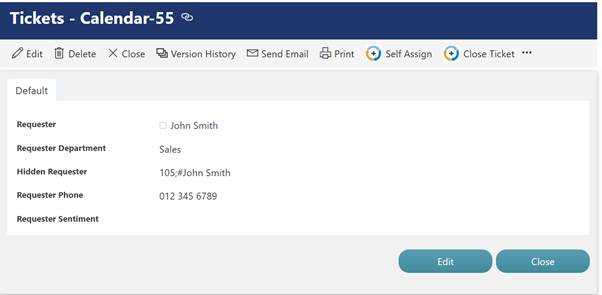
An item created with this ‘Create Item’ action will open with Requester form
Sample Output:
- Enhancement: New function ‘formaturlvalue’ to support setting hyperlink column value using markdown syntax ‘[link text](https://example.com)’ or the URL and link text.
Update: While exporting workflows, added option to export all mail templates from the lists of the selected workflows.
Feature Overview
An enhancement has been added to the Workflow Export functionality that allows users to easily include all related mail templates during export.
New Option: Export All Mail Templates
When exporting workflows, users can now enable the option to:
Export all mail templates from the lists associated with the selected workflows
This ensures that any workflow-dependent email templates are included automatically, making migration and backup processes more complete and convenient.
How It Works
Go to site -> Site contents-> Site Settings -> Crow Canyon NITRO Apps -> NITRO Studio -> Workflows
- Select the workflows you want to export.
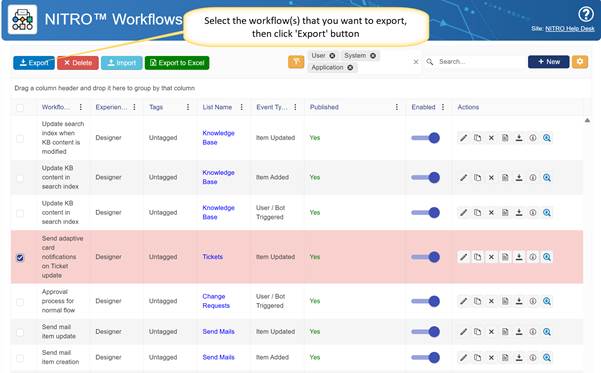
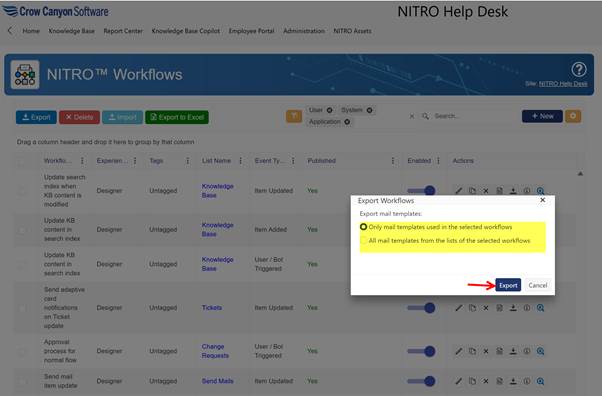
Below window will pop up which provides two option to export the mail templates
- Only mail templates used in the selected workflows – Exports just the templates that are directly referenced in the workflows you chose.
- All mail templates from the lists of the selected workflows – Exports every mail template available in the related lists, whether the workflow uses them or not.
Import the workflow that is exported earlier
Go to NITRO workflows Homepage – Click ‘Import’ button available in the workflow ribbon
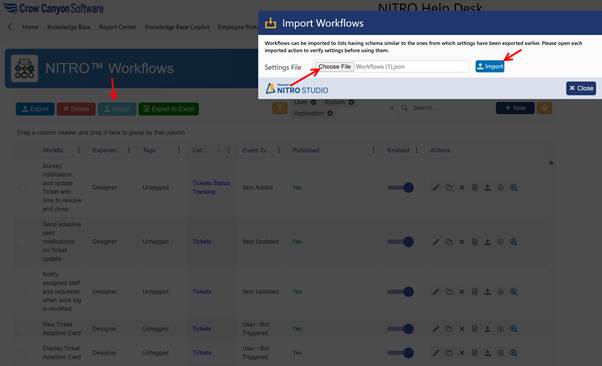
Below window will popup after clicking ‘Import’ in above window
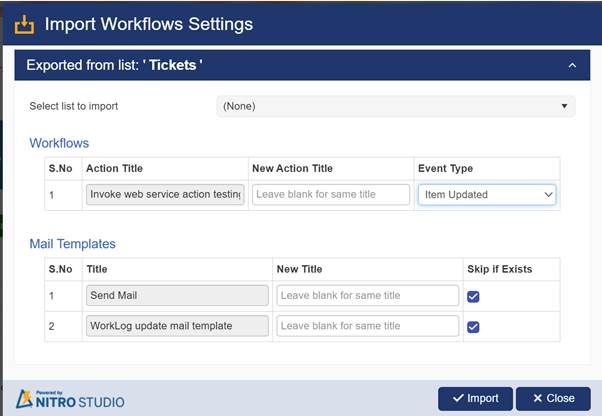
Import Workflows Settings window in NITRO Studio, used when importing workflows and related mail templates from another list.
1. Exported From List
- Displays the source list name from where the workflows were exported.
- In this example: Tickets.
2. Select List to Import
- A dropdown to choose the target list where you want to import the workflows and mail templates.
Workflows Section
This section lists all workflow actions available for import.
Columns Explained:
- S.No
Sequence number of the workflow action. - Action Title
The name of the workflow action being imported. - New Action Title
Option to provide a new title for the workflow in the target list.- Leave blank to keep the same title.
- Event Type
Select the event (e.g., Item Updated, Item Created) that should trigger the imported workflow in the target list.
Mail Templates Section
This section shows the mail templates available for import.
Columns Explained:
- S.No
Sequence number of the mail template. - Title
Name of the mail template being imported. - New Title
Option to assign a new name to the mail template in the target list.- Leave blank to maintain the original name.
- Skip if Exists
If checked, the system will not overwrite an existing mail template with the same name in the target list.
Buttons
Import
Starts the import process using the selected settings.
Close
Closes the window without importing.
Update: For ‘Map all matching columns’ option in column value mappings, excluding ‘Thumbnail’ type of columns.
NITRO Workflows include an enhanced option in the Create/Update Item action that allows users to automatically map column values between lists.
Key Details
- The “Map all matching columns” option automatically maps columns that have:
- The same internal name, and
- The same data type.
- This simplifies configuration by removing the need to manually map each column individually.
- Exception:
Columns with the ‘Thumbnail’ data type are excluded from automatic mapping and must be mapped manually if needed.
A Thumbnail column is a system-generated, non-editable column that SharePoint automatically creates for document libraries. It stores a small preview image of a file (a photo, document, PDF, video, etc.) so that users can visually identify items in a list view.
- You cannot manually create or configure a “Thumbnail” column.
It is not available in the Add Column menu.
NITRO Forms:
Enhancement: New function ‘formaturlvalue’ to support setting hyperlink column value using markdown syntax ‘[link text](https://example.com)’ or the URL and link text.
The formaturlvalue function prepares a hyperlink value so SharePoint can display it correctly.
The new function allows you to easily generate this format using:
- Markdown format: [DisplayText](URL)
- Or by directly passing URL and DisplayText as parameters.
This ensures the link appears properly in NITRO Forms, Custom Actions, and Workflows.
Function Syntax
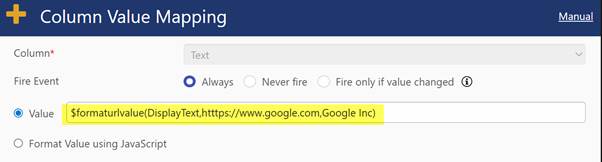
formaturlvalue(Markdown|DisplayText|URL, [Placeholder/URLValue], [Placeholder/DisplayTextValue])
Sample Function Configuration:
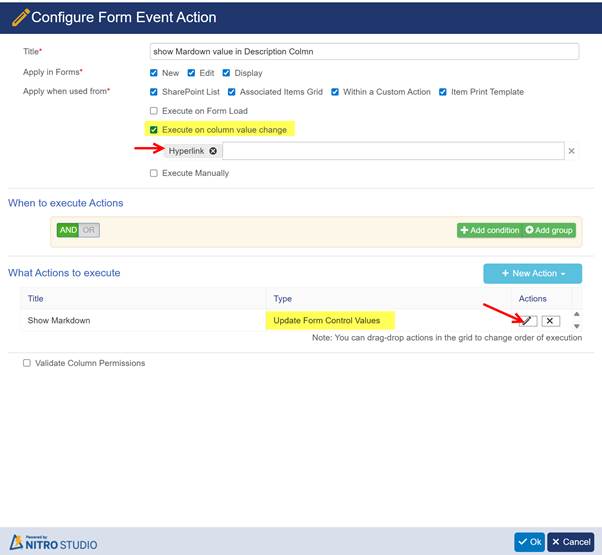
Go to NITRO forms of required list -> Advanced section in left panel -> Form Event Actions
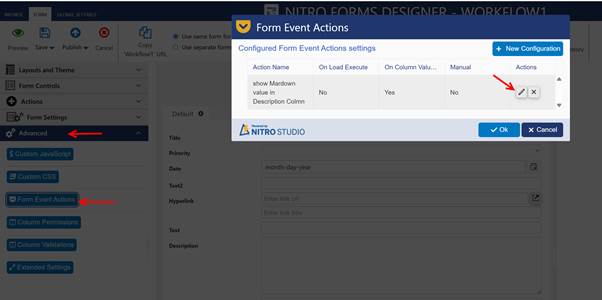
Either configure new Form Event Action or edit the existing one.
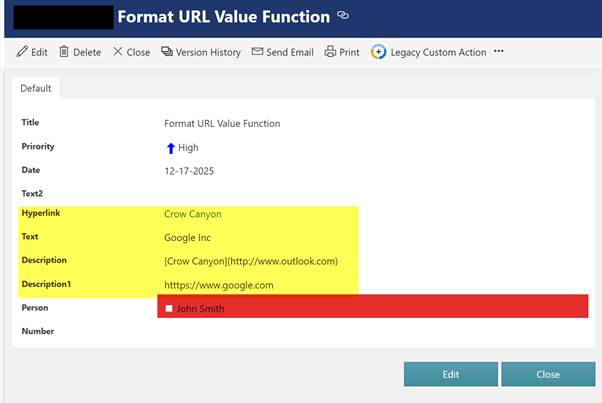
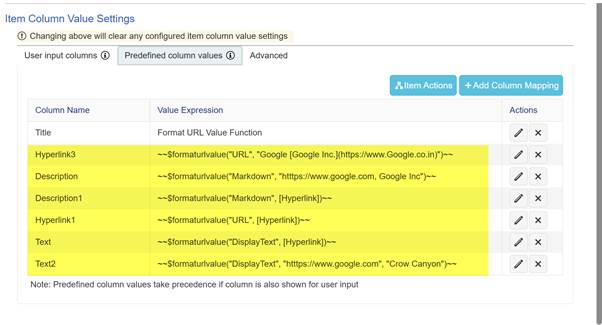
Form Event Action is executing when the column value for ‘Hyperlink’ column is changed. Based on Hyperlink column value, setting values in ‘Description’, ‘Text’ and ‘Description1’ column using ‘formaturlvalue’ function.

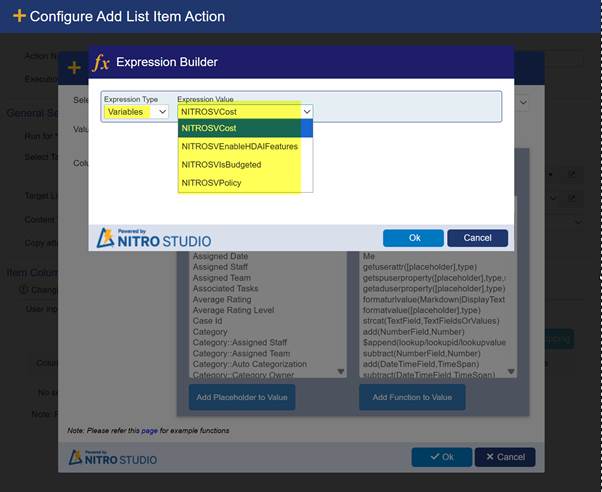
Description Column Value:
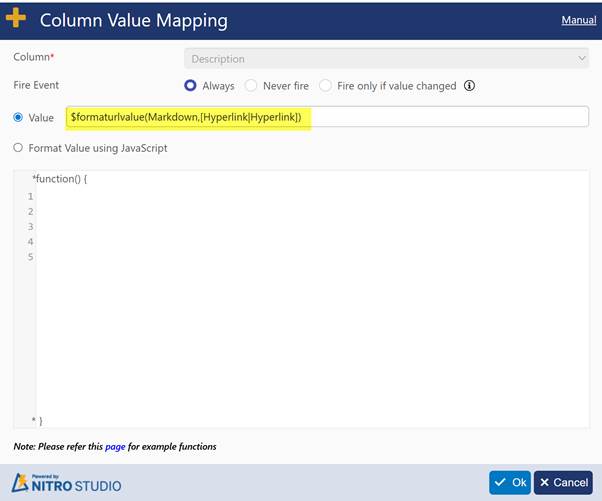
When you click on Value firld below window will open where you can configure ‘f
ormaturlvalue’ function.

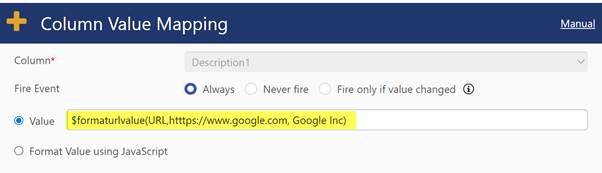
Similarly, you can set Description1 and Text column values
Description1 column value:
Text Column Value:
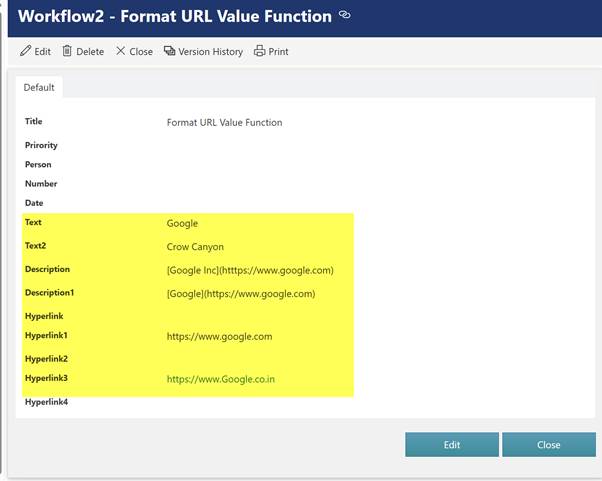
Sample Output:
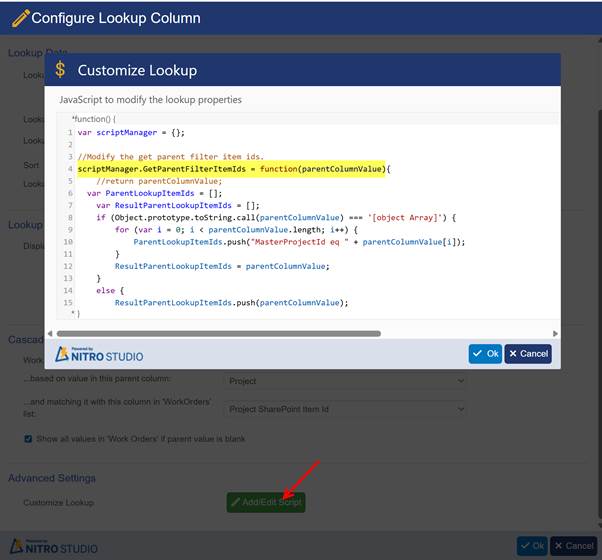
Enhancement: Added new function ‘GetParentFilterItemIds’ in ‘Customize Lookup’ script to support custom cascaded filtering scenarios.
GetParentFilterItemIds is used when a lookup field must filter its data based on multiple parent lookup values selected in the form.
Standard NITRO lookup filtering only allows:
- Direct parent-child filtering
- Static filter conditions
- Filtering using one parent lookup
In our example (Refer Added support for NITRO converted lookup columns in cascaded lookup settings document for example)
Use Case
- Projects List: Master and Child Projects.
- Work Orders List: Each Work Order linked to a Project.
- Requirements List: Captures project requirements.
Requirement: When creating a Requirement under a Master Project (e.g., P2), the Work Orders lookup should show only Work Orders linked to the Master (P2) and its immediate Children (P5, P6).
Expected Work Orders: WOC5, WOC8, WOC9
Role of GetParentFilterItemIds
- Dynamically collects the Master Project ID and its immediate Child Project IDs.
- Returns [P2, P5, P6] to NITRO to filter the Work Orders lookup.
- Ensures only relevant Work Orders are displayed, excluding unrelated projects or deeper hierarchies.
Added new function ‘GetParentFilterItemIds’ in ‘Customize Lookup’ script as shown below
Enhancement: Added support for NITRO converted lookup columns in cascaded lookup settings.
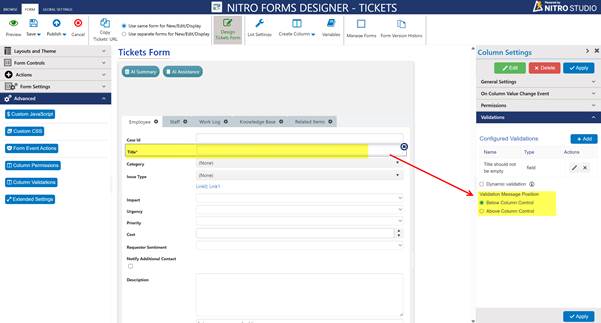
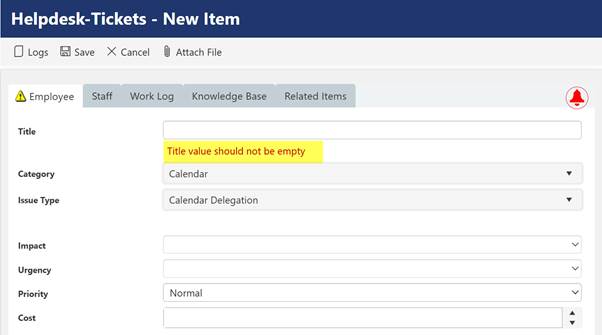
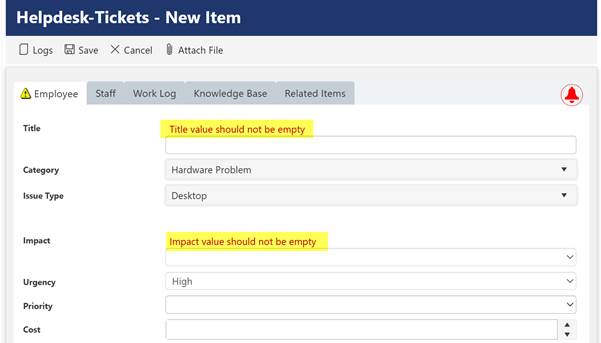
Update: Under validations, added an option for positioning validation message below or above the column control.
This update introduces enhanced flexibility in form validation by allowing administrators and developers to control the position of validation messages relative to the form’s column controls. This feature improves the user experience by making error messages more visible and contextually aligned.
- Validation Message Positioning: Choose whether the validation message appears above or below the associated column control.
- Customizable Per Column: This setting can be configured individually for each column with validations applied.
Enabling and Configuring
- Open the form in NITRO Studio.
- Navigate to the Validations settings for the desired column.
- Locate the Validation Message Position option.
- Select either:
- Below Column Control – Default behavior; message appears under the field.
- Above Column Control – Message appears above the field for increased visibility.
- Save the changes and publish the form.
Sample Output of Validation message with Below Column Control:
Sample Output of validation message with Above Column Control:
Enhancement: Added function ‘getaduserproperty’ to fetch user attributes from active directory. Also added support for ‘onPremisesExtensionAttributes’ in this function to retrieve user attributes for hybrid environments.
Background:
- On-prem Active Directory user accounts will have default properties like first name, last name, email, etc. In addition, there will be custom attributes that we can use to capture other details of the user. One example, ’employee id’.
- In Office 365, if hybrid environment (sync on-prem user accounts to O365) is setup, then we can map standard attributes of on-prem user account to standard attributes of Entra user account. Also, there 15 extensions attributes support in O365 then can be used to map with on-prem custom attributes. This is to sync user proeprties from on-prem AD to O365
- Originally our $getaduserproperty() function can read standard attributes from Microsoft Entra ID (Azure Active Directory) and now it is enhanced to read extension attributes.
Configurations:
- Scenario
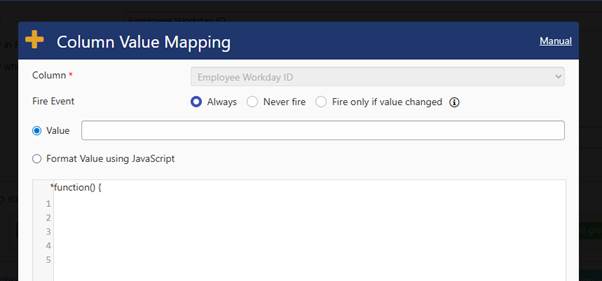
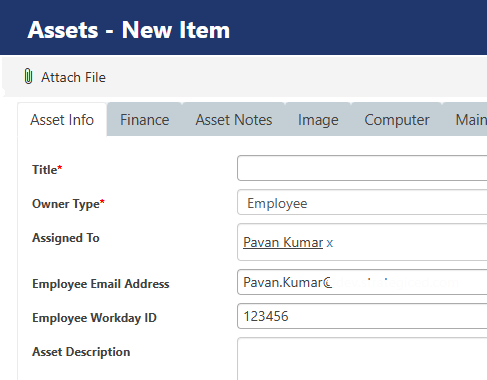
In my ‘Assets’ list, I have ‘Assigned To’ person or group (user only) field. When I select an user in ‘Assigned To’ field, read ‘Employee Workday Id’ from ‘extension attribute 5’ from Microsoft Entra ID user properties and populate in another text field, ‘Employee Workday Id’ field on asset form.
- NITRO Forms:
Go to Assets list settings -> NITRO Forms -> Variables in ribbon -> define beflow variables
varOnPremExtenAttributesJSON
varWorkDayId

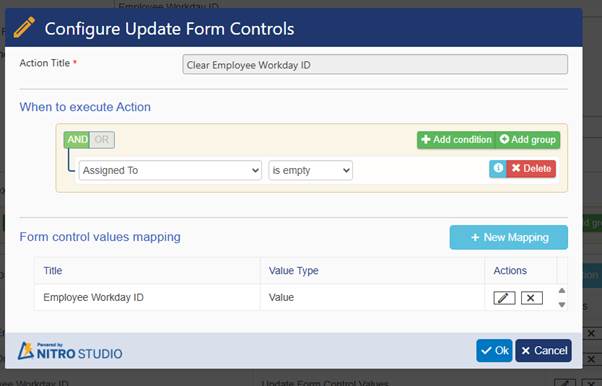
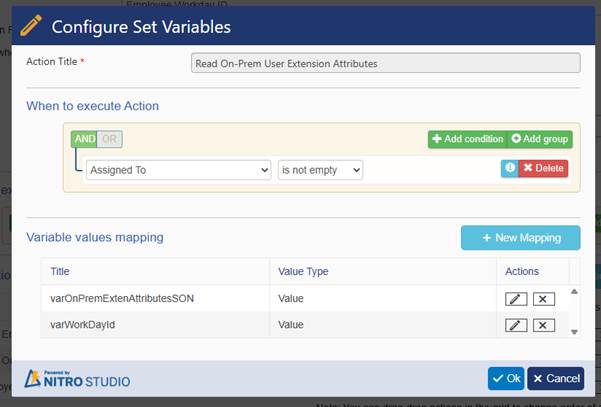
Go to Advanced section of NITRO Form-> Form Event Actions -> configure ‘Employee Workday ID’ Form Event action which will execute when column value for ‘Assigned To’ change
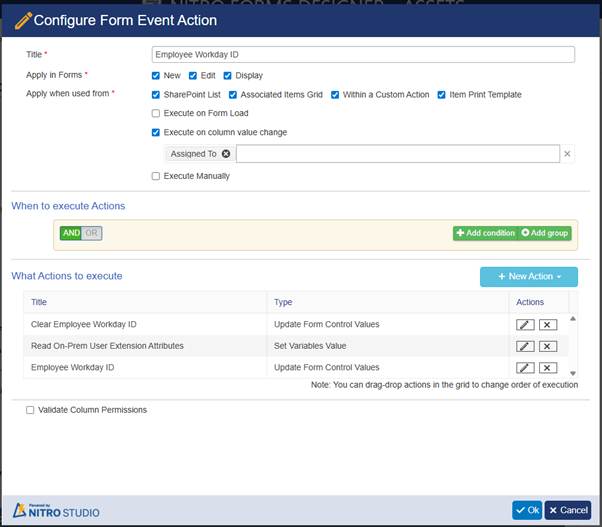
Clear Employee Workday ID (Configure Update Form Control action)
Configure Set Variable Action for Read On-Prem User Extension Attribute
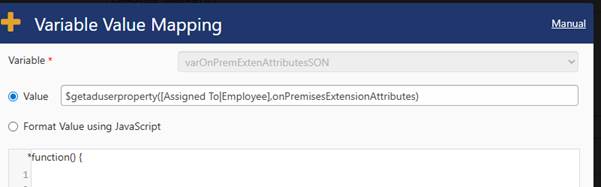
varOnPremExtenAttributesJSON = $getaduserproperty([Assigned To|Employee],onPremisesExtensionAttributes)
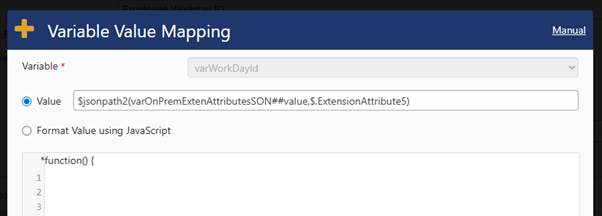
varWorkdayId = $jsonpath2(varOnPremExtenAttributesSON##value,$.ExtensionAttribute5)
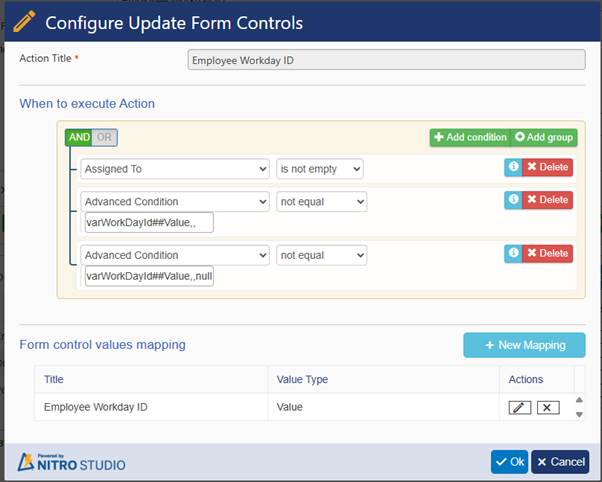
Advanced Condition Not equal to varWorkdayId##Value,,
Advanced Condition Not equal to varWorkdayId##Value,,null

Output
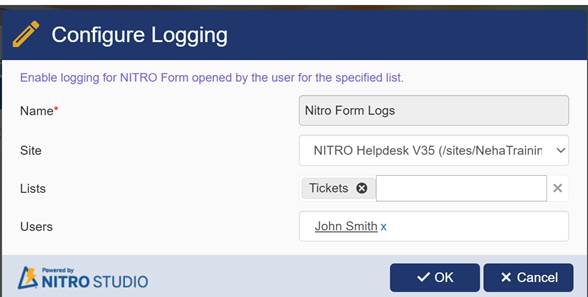
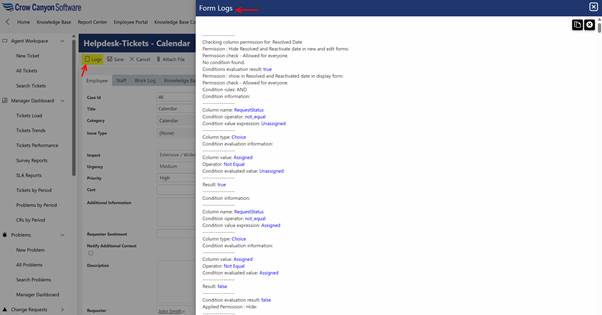
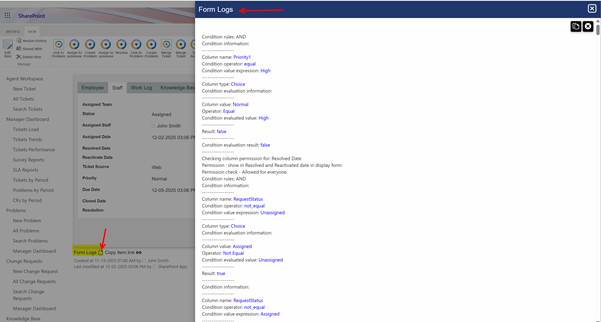
Update: Added logs for Form Event Actions and Conditions evaluation. These can be enabled for specific users from NITRO Utility section in NITRO Site Settings page.
This update introduces logging functionality for Form Event Actions and Conditions evaluation within NITRO Forms. These logs are designed to help administrators and developers debug and monitor the behavior of forms more effectively.
- Form Event Actions Logging: Tracks execution of all configured form event actions.
- Conditions Evaluation Logging: Captures the evaluation results of conditions applied to forms.
- User-specific Logging: Logs can be enabled for specific users to reduce system noise and focus on relevant activity.
Enabling Logs
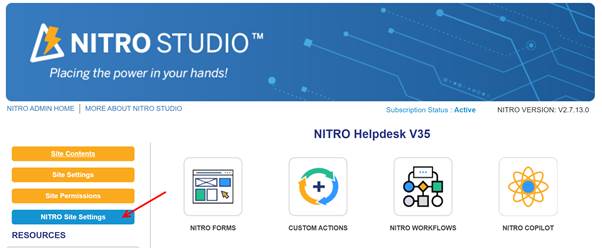
- Navigate to the NITRO Site Settings page.
- Open the NITRO Utility section.
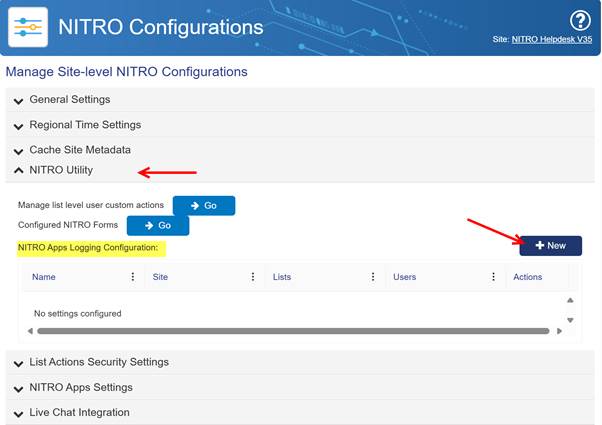
Below window will open after clicking ‘New’ button
We are showing Logs button in modern form in toolbar and classic forms showing after copy link (at bottom)
Modern Form Logs:
Classic Form Logs:
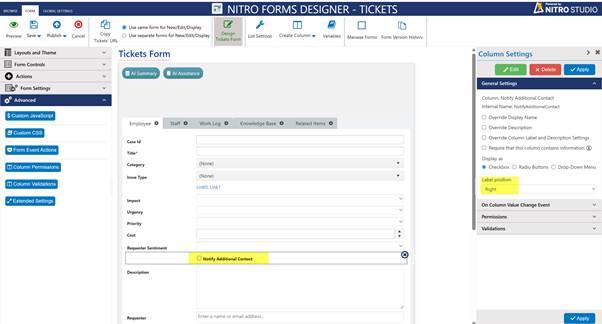
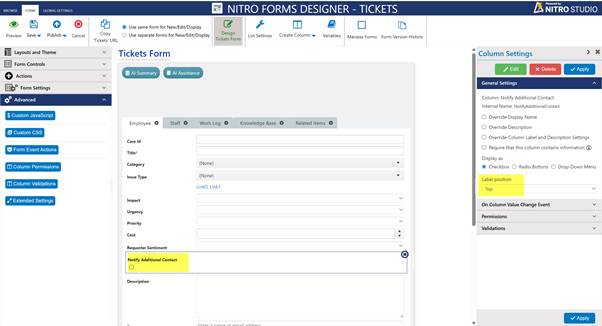
Update: Added label position support for Boolean column in display form.
An update has been added to support label positioning for Boolean (Yes/No) columns in the display form.
You can now control where the label for a Boolean field appears in the display form—for example, placing the label above, beside, or in another supported position relative to the Yes/No value.
To enable this setting
Navigate to NITRO forms of required list -> Add yes/No column on form -> go to Column Settings -> Label Position
There you can select label position as per requirement.
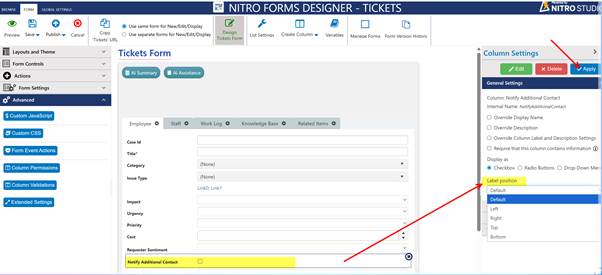
After selecting the Label Position, click on ‘Apply’ button
Sample Output with Right Label Position
Sample Output with Top Label Position
Similarly, user can select any label position as per requirement
Update: New advanced option ‘FormHeaderName’ to change list name in form header bar.
A new advanced option called FormHeaderName has been introduced in NITRO Forms.
The FormHeaderName setting allows you to override and customize the list name that appears in the form’s header bar.
You can now change the default list name shown at the top of the form to any custom label using the FormHeaderName option.
Note: Applicable on New/Edit/Display form
To enable this setting
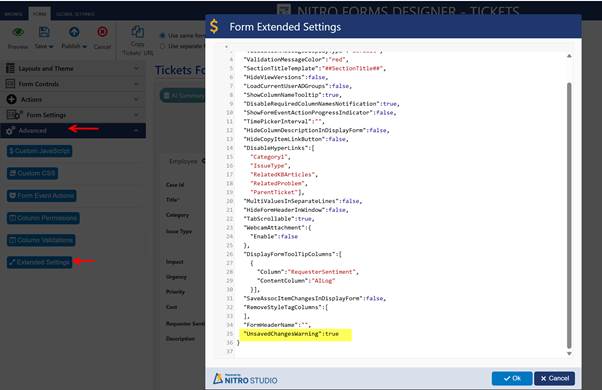
Navigate to NITRO forms of required list -> Advanced section in left panel -> Extended Settings
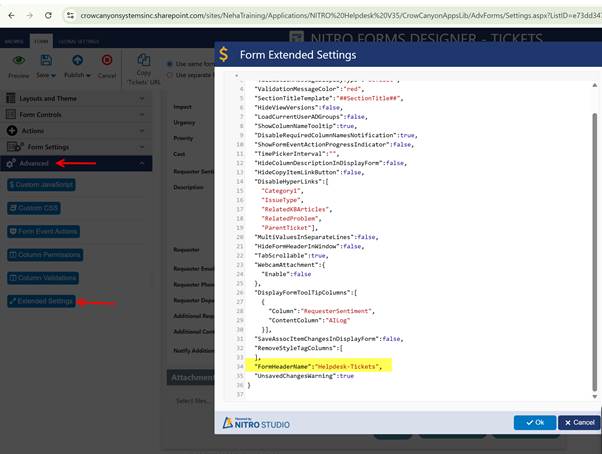
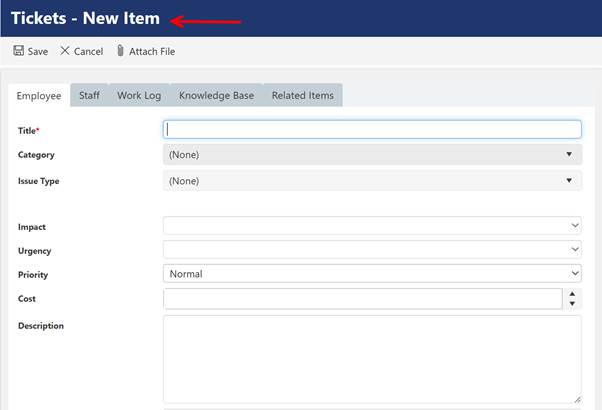
Sample Output before Changing the form header name
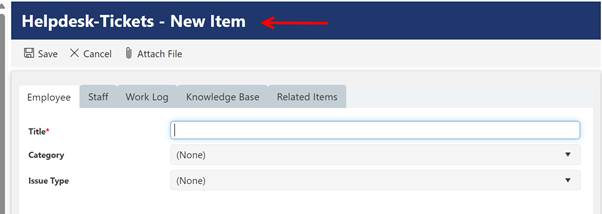
Sample Output After Changing the form header name
Enhancement: New advanced option ‘UnsavedChangesWarning’ to show a warning for unsaved changes in form on close/reload.
A new advanced option called UnsavedChangesWarning has been added to NITRO Forms.
When UnsavedChangesWarning is enabled, the system will display a warning message if the user tries to manually reload the form without saving their changes.
To enable this setting
Navigate to NITRO forms of required list -> Advanced section in left panel -> Extended Settings
Set “UnsavedChangesWarning”:true
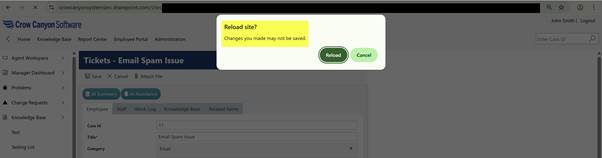
Sample Output:
After making changes in NITRO form, if user clicks on reload button then warning message will be displayed.

Below warning message will be displayed
Custom Actions:
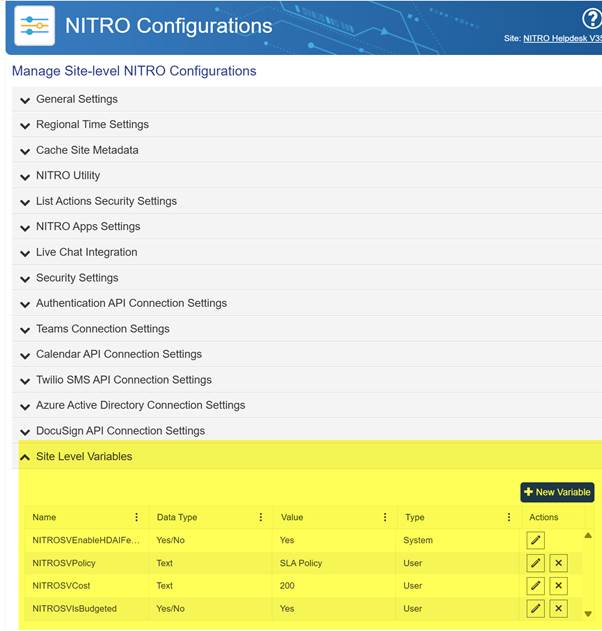
Enhancement: Added support for NITRO site level variables. These are defined in NITRO Site Settings page, and available in expression builder, mappings, and conditions etc.
NITRO Custom Actions now support NITRO Site-Level Variables, enabling a more centralized and efficient configuration process. When the same variable is required across multiple Custom Actions or steps, it can be defined once at the site level, ensuring it is accessible and reusable throughout all actions.
Key Feature
NITRO Site-Level Variables—defined in the NITRO Site Settings page—can now be used in:
- Expression Builder
- Column Mappings
- Conditions
- And other configuration fields within Custom Actions
This allows users to create reusable values at the site level and reference them across multiple actions without duplication.
Defining Site-Level Variables
Site-Level Variables can be created and managed from the NITRO Site Settings page.
Go to NITRO Studio page -> NITO Site Settings in left side
Using Variables in Custom Actions
When configuring a Custom Action, these variables will appear automatically in dropdowns and builders, allowing quick selection and consistent use.
Enhancement: New function ‘formaturlvalue’ to support setting hyperlink column value using markdown syntax ‘[link text](https://example.com)’ or the URL and link text.
The formaturlvalue function prepares a hyperlink value so SharePoint can display it correctly.
The new function allows you to easily generate this format using:
- Markdown format: [DisplayText](URL)
- Or by directly passing URL and DisplayText as parameters.
This ensures the link appears properly in NITRO Forms, Custom Actions, and Workflows.
Function Syntax
formaturlvalue(Markdown|DisplayText|URL, [Placeholder/URLValue], [Placeholder/DisplayTextValue])
Configuration:

Sample Configuration of function:
Sample Output:
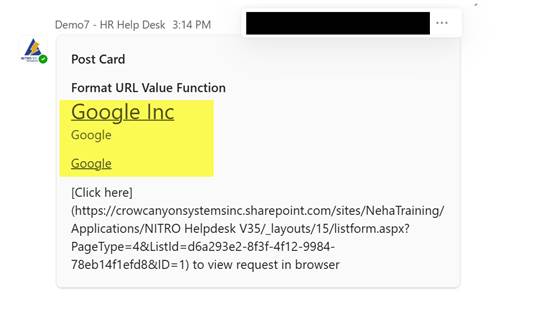
FYI, you can use hyperlink column as target if you are fetching URL using ‘formaturlvalue’ function.
Post an adaptive card action:

You can use this function to cfeate appropriate hyperlink values
Sample Output:
Update: For ‘Map all matching columns’ option in column value mappings, excluding ‘Thumbnail’ type of columns.
NITRO Workflows include an enhanced option in the Create/Update Item action that allows users to automatically map column values between lists.
Key Details
- The “Map all matching columns” option automatically maps columns that have:
- The same internal name, and
- The same data type.
- This simplifies configuration by removing the need to manually map each column individually.
- Exception:
Columns with the ‘Thumbnail’ data type are excluded from automatic mapping and must be mapped manually if needed.
A Thumbnail column is a system-generated, non-editable column that SharePoint automatically creates for document libraries. It stores a small preview image of a file (a photo, document, PDF, video, etc.) so that users can visually identify items in a list view.
- You cannot manually create or configure a “Thumbnail” column.
It is not available in the Add Column menu.
List View and Tiles and Dials:
Enhancement: Added support for placeholders {LoggedInUserName} and {LoggedInUserEmail} in view query.
A new enhancement has been added to NITRO List Views, allowing users to dynamically filter list data using two new placeholders:
- {LoggedInUserName}
- {LoggedInUserEmail}
These placeholders can now be used directly in View Query settings to create personalized views based on the currently logged-in user.
How It Works
When configuring a view, you can add filter conditions using these placeholders. At runtime, NITRO will automatically replace them with the logged-in user’s actual Display Name or Email Address.
Example: Tickets List in Helpdesk Application
Scenario
The logged-in user should be able to see:
- Tickets assigned to them, and
- Tickets created/submitted by them
This is achieved by configuring two separate views in the Tickets list.
Configuration Steps
- Go to the site -> Gear Icon → Site Contents → Site Settings
- Open Crow Canyon NITRO Apps -> Select List Views
- Create a new list view or update an existing one
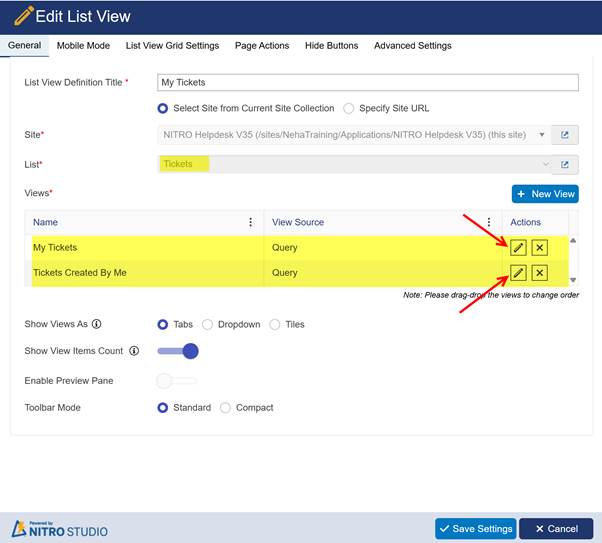
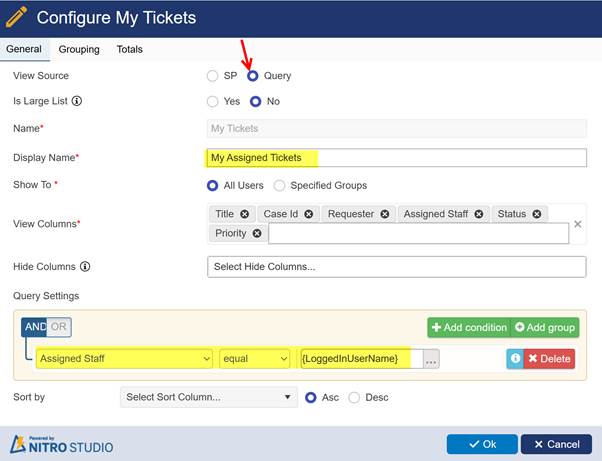
View 1: My Tickets
Shows: Tickets assigned to the logged-in user
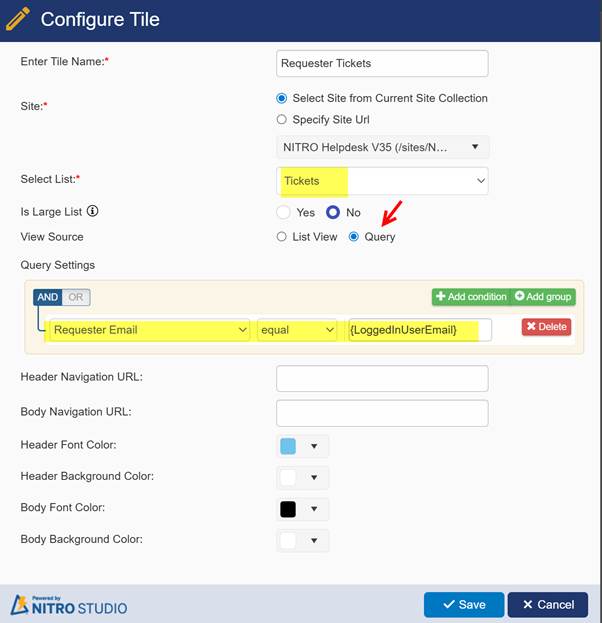
In Tickets → View Settings → View Query, use:
Assigned Staff == {LoggedInUserName}
Or, if the system uses email instead of username:
Assigned Staff Email == {LoggedInUserEmail}
Sample Output – John Smith:
Sample Output – Joe Bloggs:
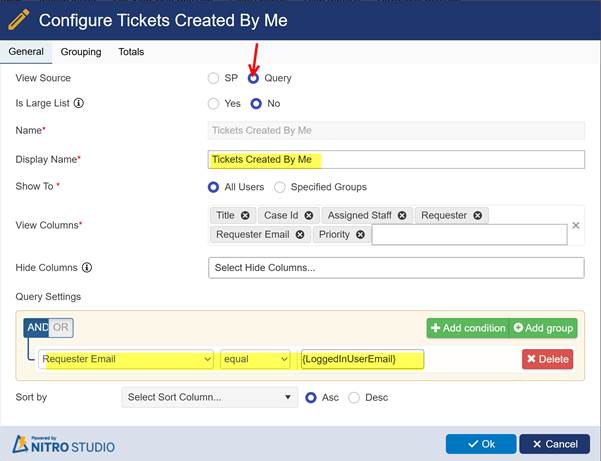
View 2: Tickets Created By Me
Shows: Tickets created/submitted by the logged-in user
Use the view query:
Requester Email == {LoggedInUserEmail}
Sample Output – John Smith:
Sample Output – Joe Bloggs:
Result
- Each logged-in user will only see:
Tickets assigned to them
Tickets they created - No need to configure separate views per user
- View results automatically adjust based on who is logged in
Tiles and Dials
Manage Tiles now supports {LoggedInUserName} and {LoggedInUserEmail} in the view query
To Configure Mange Tiles
Navigate to the site -> Setting (Gear icon on top right corner) -> Site contents -> Site Settings -> Crow Canyon NITRO Apps -> Tiles and Dials -> Manage Tiles
Sample Configuration:
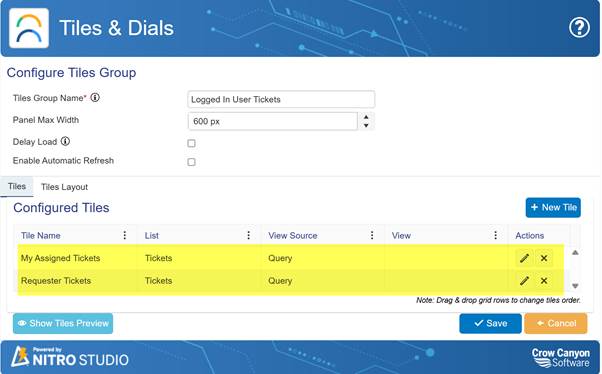
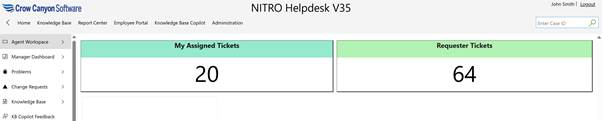
My Assigned Tickets Configuration: It will Displays the count of Tickets assigned to the logged-in user in output.
Requester Tickets Configuration: It will display the count of Tickets created by logged in user in output.
John Smith Sample Output
Joe Bloggs Sample Output:

NITRO Copilot:
Update: Using AI summary of the interaction as Ticket subject.
The system now automatically uses the AI-generated summary of the ticket interaction as the Ticket Subject. This makes subjects more meaningful and accurately reflects the user’s issue or request based on the conversation content.
FYI, we are not showing any settings for this.
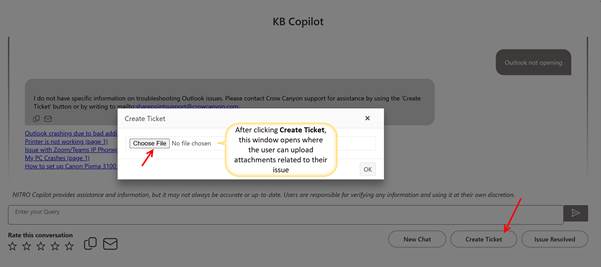
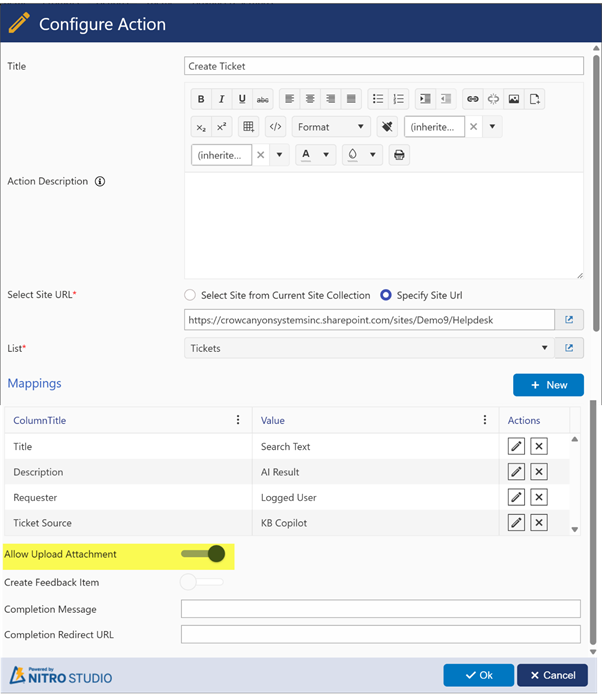
Enhancement: Support for uploading attachment when creating the Ticket.
A new enhancement has been introduced in NITRO Copilot, allowing users to upload attachments at the time of ticket creation. This provides a more complete and seamless experience, enabling users to share relevant files, screenshots, or documents directly with their support request.
Configuration
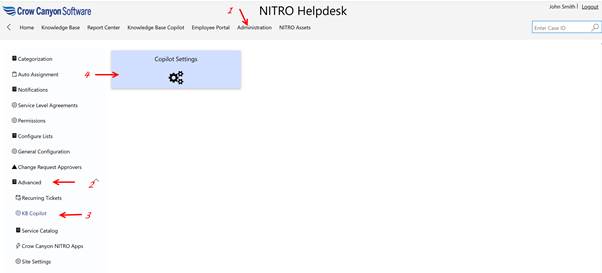
This feature can be enabled from the Copilot – In Action Settings page.
Steps:
- Go to Helpdesk Application -> Administration in Top link bar -> Advance Section in left panel -> KB Copilot -> click Copilot Settings tile
Open the Copilot settings page -> go to Actions tab
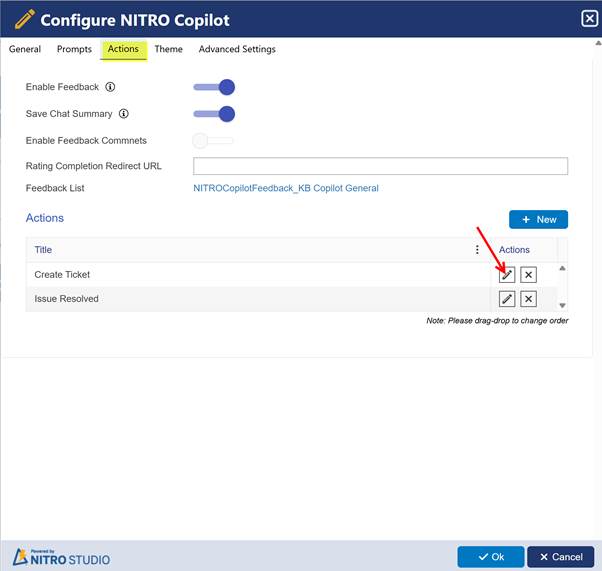
Either create a new action or modify the existing one. In this example, we are editing the Create Ticket action.
- Locate the option “Allow Upload Attachment”
- Turn it ON to allow users to upload files when creating tickets
Ticket Creation with Attachment
Once enabled, users will see an attachment upload field when creating a new ticket. They can add one or multiple attachments (based on list settings), which will automatically be stored in the ticket’s attachment area.
Example in Helpdesk Application
When a user reports an issue—for example, “Outlook not opening”—they can now upload:
- Error screenshots
- Log files
- Documents supporting the issue
These files will be included in the newly created ticket.
Output Example