Applies to: SharePoint Online and On-Premises (2013 / 2016 / 2019/SharePoint Server Subscription Edition)
Introduction
Crow Canyon NITRO solution provides the framework to quickly implement business applications on SharePoint. NITRO configurations can be done by users without writing any code and build applications with rich functionality. For advanced and specific business scenarios, simple JavaScript and CSS code can be added for custom configurations within the NITRO Studio. This JavaScript can work with NITRO framework and SharePoint in context of current user to provide specific functionality.
In addition, NITRO has a set of pre-built applications (listed below). These full featured applications that can be installed with just few clicks and then customized as required using the no-code NITRO features (or more advanced cases with JavaScript/CSS). This article describes the steps to install these pre-built Crow Canyon NITRO applications:
Note:
1. For Online:
Before installing NITRO based applications, Crow Canyon NITRO Studio and Tenant Framework App should be installed in the Site Collection where application has to be installed. Please refer this article for installation details.
2. For On-premises:
NITRO application installation requires that Crow Canyon NITRO Studio solution is installed in your SharePoint server and Crow Canyon NITRO Studio feature should be activated in the site collection where NITRO application has to be setup.
For Crow Canyon NITRO Studio installation and activation in a site collection, please refer instructions from this article.
3. License:
NITRO Applications will be installed with 45 day trial license by default. Please contact sharepointsupport@crowcanyon.com for purchasing application license.
Install prebuilt NITRO Applications
Navigate to NITRO Studio
Online:
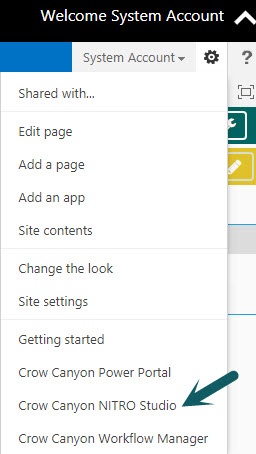
Navigate to the Site Collection where we want to install the NITRO application -> Site Contents -> Click Crow Canyon NITRO Studio
On-premises:
Navigate to the Site collection where we want to install the NITRO application -> Site Settings (click gear icon) -> Crow Canyon NITRO Studio
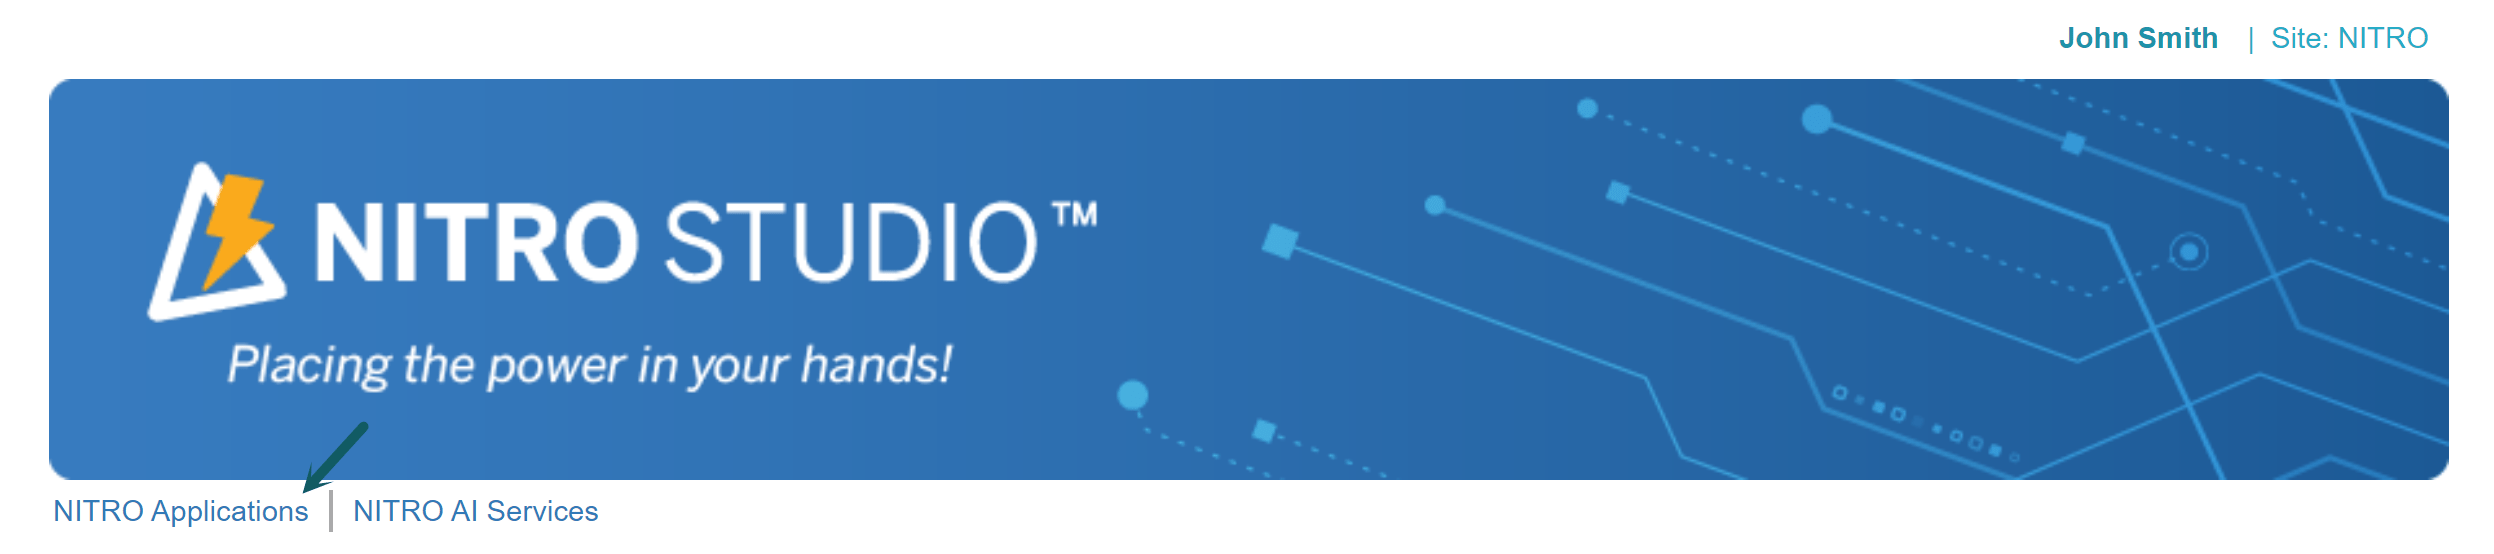
Navigate to NITRO Studio:
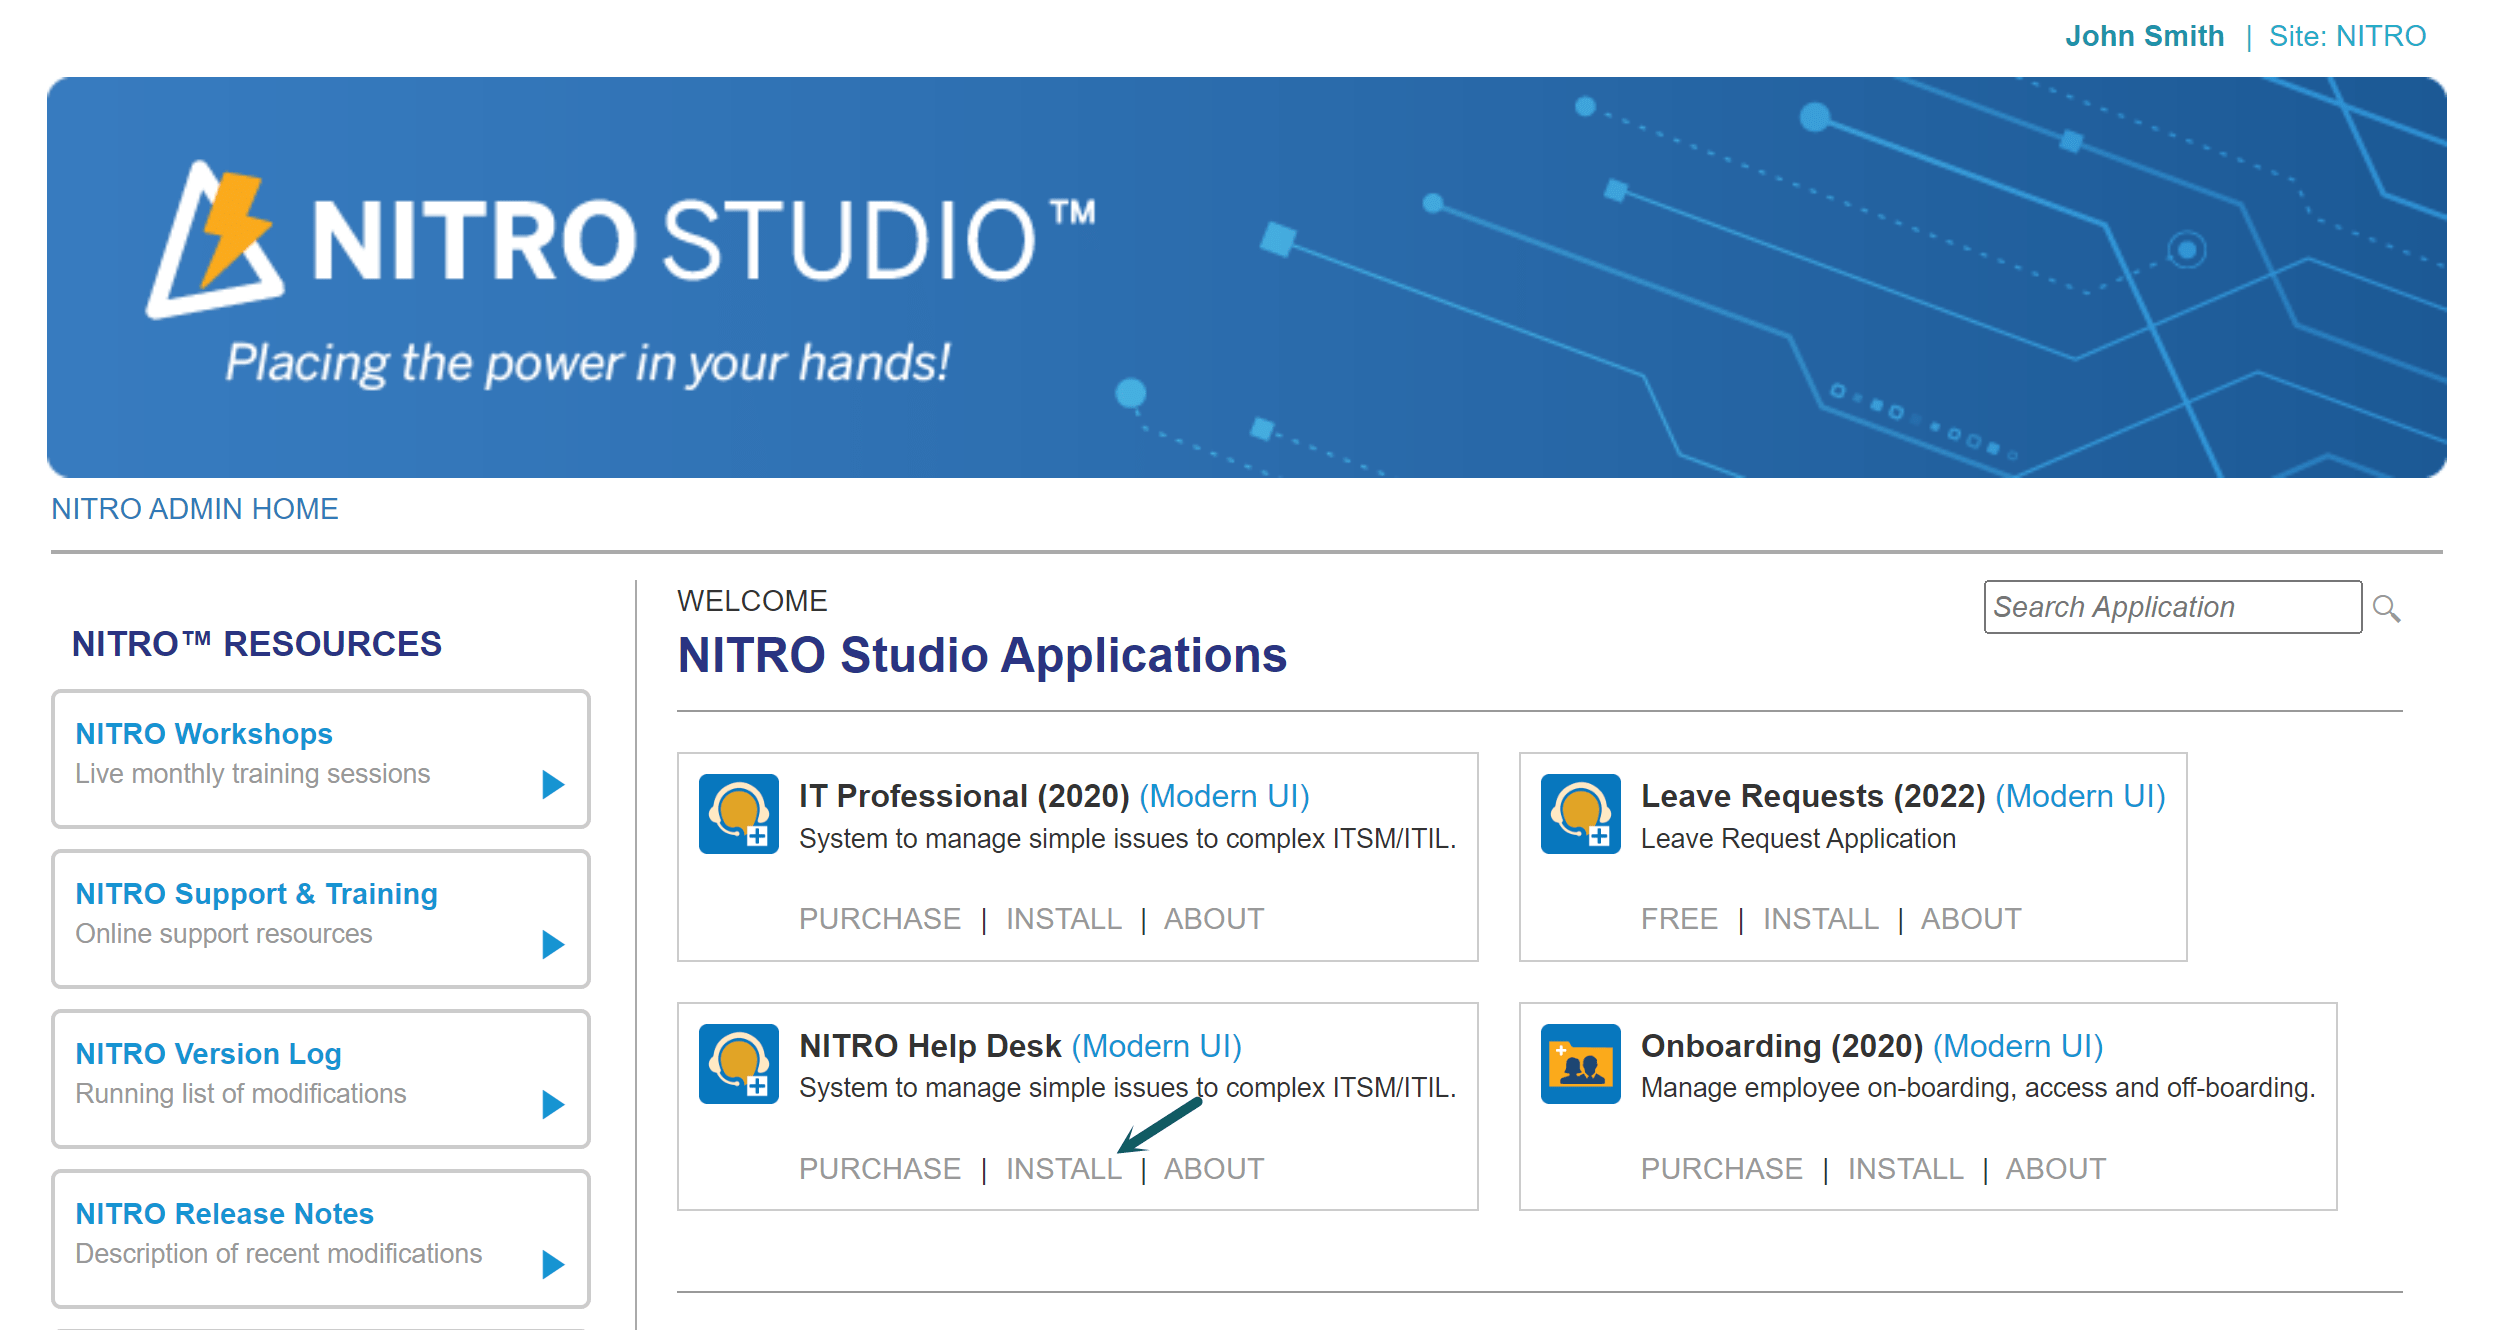
After navigating to NITRO Studio page -> Click NITRO Applications
Click on the application that you want to install:
For IT Help Desk, Facilities, Requests Management and Customer Service applications, we need to install two additional solutions before start installing the application, please refer steps here.
Note:
SharePoint online has modern UI based applications along with classic applications, you can differentiate the classic and modern UI applications beside the application name.
1. On-boarding Application Installation
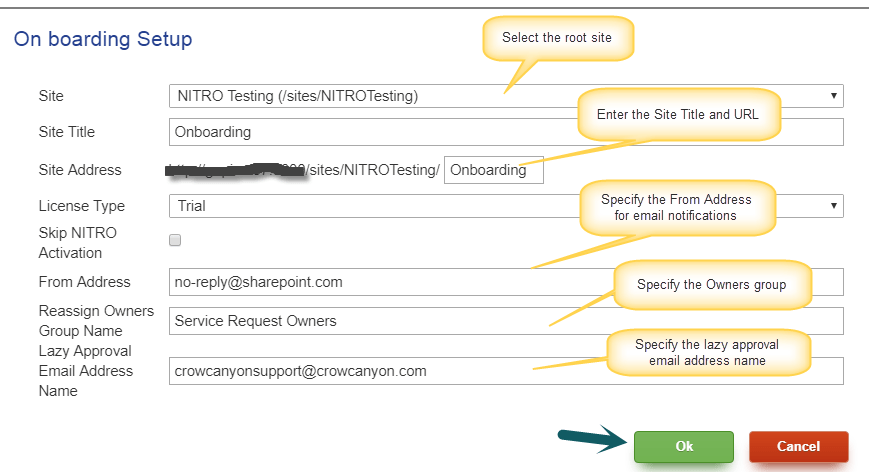
Click Onboarding application tile in NITRO applications page, enter the required details as per details given below and click Ok.
Parent Site: Choose the site under which the on-boarding site needs to be created. Generally it will be the root site of the site collection
Site Title: Title for the new on-boarding site. This can be changed later from site settings if needed
Site Address: URL of the on-boarding site. We recommend to use alpha-numeric URL name without spaces. Please note that it requires lot of configurations changes if URL has to be changed later. Or site can be reinstalled with different URL
License Type: Choose the “Trial” and proceed with the installation, once installation is complete, contact Crow Canyon for permanent license. If no option is available under License Type, please contact Crow Canyon Support. Refer article to convert the Crow Canyon NITRO Trial License to Subscription/Enterprise license
From Address: On-boarding application sends email notifications to users, like when a task is assigned to them. This address will be set as sender address for outgoing emails sent by the application
Reassign Owners Group Name: Specify the required SharePoint group. Members of this group will have the permission to reassign the tasks in on-boarding application. Any SharePoint site is created with 3 default SharePoint groups (Owners, Members, Visitors) prefixed with the site name. We can use these groups or some other custom group name that can be created after site is created.
Lazy Approval Email Address Name: Specify the email address for lazy approval process. This email address will be used for the approve/deny via email feature in the On-boarding application. For more details regarding approve via email feature, refer article.
Setup will create the site and configure the application. You should see following screen after successful installation:

Additional Configurations
1. Enable cache for NITRO forms. Go to Requests list -> List Settings -> Crow Canyon NITRO Forms -> Global Settings -> Click “Enable Cache” button.
2. After installing the Onboarding application, configure owners for various applications that users will be given access to as part of their on-boarding. Tasks will be assigned based on the owner specified for the corresponding applications (like database, email, SAP etc.).
go to Application Administration -> Click on Applications and configure “Owner” for all the Applications.
3. Configure Owner for all the Tasks in Task Types list. Tasks will be assigned based on the Owner configured in the corresponding Task Types.
Go to Application Administration -> Task Types and add Owner for all the Task Types.
4. Configure the Approver, minimum number of days required to process request and other configuration in Configuration settings in Application Administration.
Go to Application Administration -> Configurations -> Configure the General Settings (i.e. Approver, Minimum no. of days required to process the request) and save the configurations.
Note: Click “Go” button to update the Application Management as per the changes done.
2. Service Request Applications (NITRO Helpdesk, IT Professional (2020),IT Standard (2020), Facilities/Work Orders (2020), Request Management (2020), Customer Service (2020))
Add and deploy additional solutions in SharePoint server
Applies to: SharePoint On-premises (2013, 2016, 2019)
Crow Canyon Service Request application requires product workflows and timer job solutions to be deployed in the SharePoint server. We will send these solutions as part of the installation package if you have purchased the Service Request applications. Please contact Crow Canyon support in case you do not receive these solutions.
Add and Deploy solutions
Add and deploy the below solutions in SharePoint server, please refer detailed instructions from this article
- CCSSRWorkflows.wsp
- CrowCanyon.TimerJobs.wsp
| S. No. | Solution Name | Deployment Scope | Description | Feature Scope |
| 1 | CCSSRWorkflows.wsp | Web Application |
This solution has server side code to process business functionality described below:
|
Site Collection |
| 2 | CrowCanyon.TimerJobs.wsp | Web Application |
This solution creates timer jobs in SharePoint for below functionality:
|
Site Collection |
Run Service Request Application Installation
Applies to: SharePoint Online and On-premises (2013, 2016, 2019)
Instructions:
Click the application tile that we want to install in the NITRO applications page, specify the required details and click Ok.
Parent Site: Choose the site under which the service area site needs to be created. Generally it will be the root site of the site collection
Site Title: Title for the new service request applications (IT Professional (2020),IT Standard (2020), Facilities/Work Orders, Request Management, Customer Service) site. This can be changed later from site settings if needed
Site Address: URL of the service request application site. We recommend to use alpha-numeric URL name without spaces. Please note that it requires lot of configuration changes if URL has to be changed later
License Type: Choose the “Trial” and proceed with the installation, once installation is complete, contact Crow Canyon for permanent license. If no option is available under License Type, please contact Crow Canyon Support. Refer article to convert the Crow Canyon NITRO Trial License to Subscription/Enterprise license.
From Address: Service request application sends email notifications to users, like when a Ticket is created, assigned, resolved, closed etc.. This address will be set as sender address for outgoing emails sent by the application
Redirect Owners Group Name: Specify the SharePoint group. Members of this SharePoint group will be redirected to the Manager Dashboard page and all the other users will be redirected to Staff Workspace page when they click on “Tickets” link in quick launch. Any SharePoint site is created with 3 default SharePoint groups (Owners, Members, Visitors) prefixed with the site name. We can use these groups or some other custom group name that can be created after site is created.
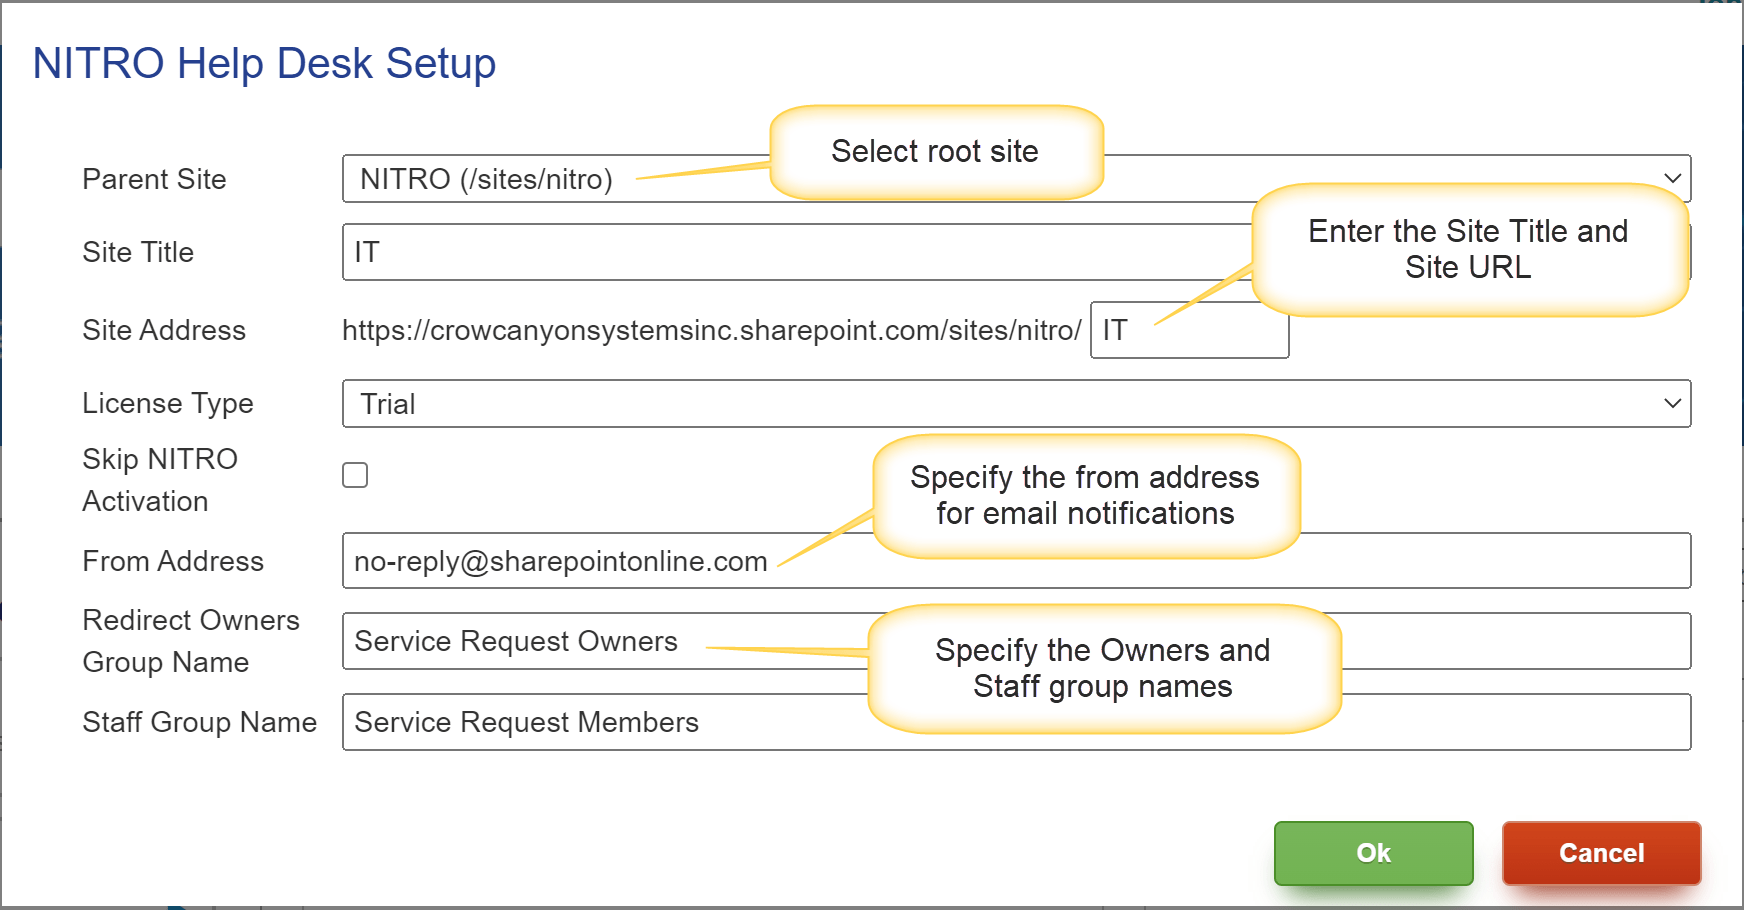
Setup will create the site and configure the application. Once the installation is completed it will show the success message.
Additional Configurations
For Online:
Refer this article for additional configurations.
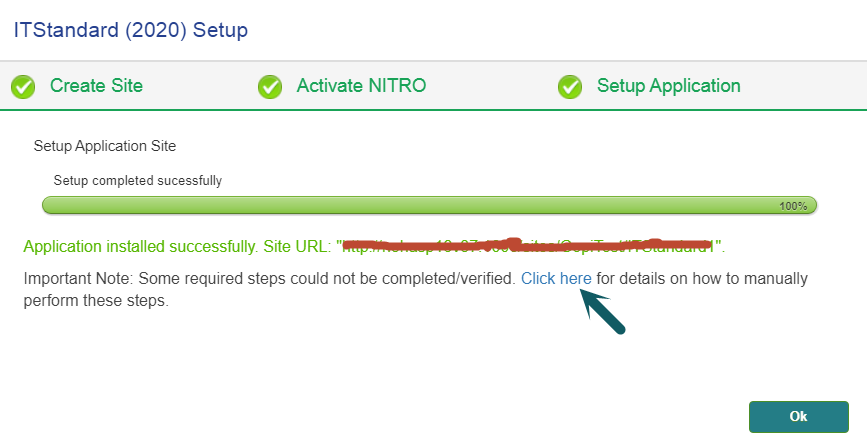
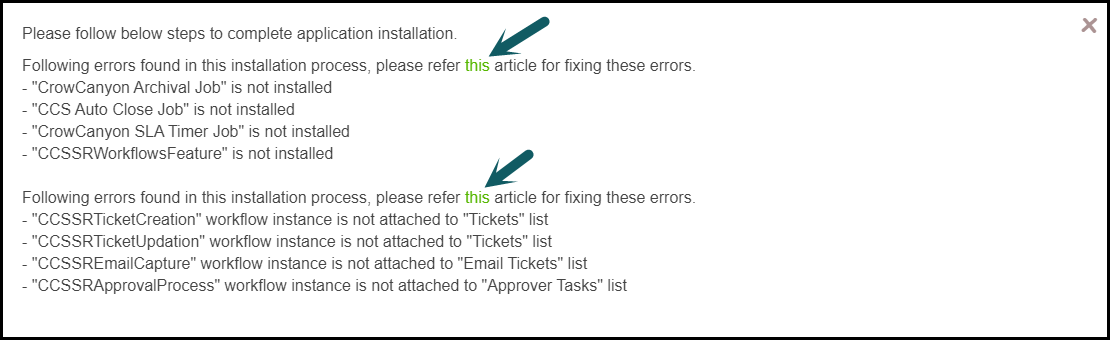
For On-premises:
Application installer will try to activate the required features and attach workflow instances to the required lists. In case, if it is failed then it shows a message as shown below. Follow the link in the error message to fix the same.
For additional configurations to complete the installation process, refer this article.
3. Standalone Assets/Equipment Management application
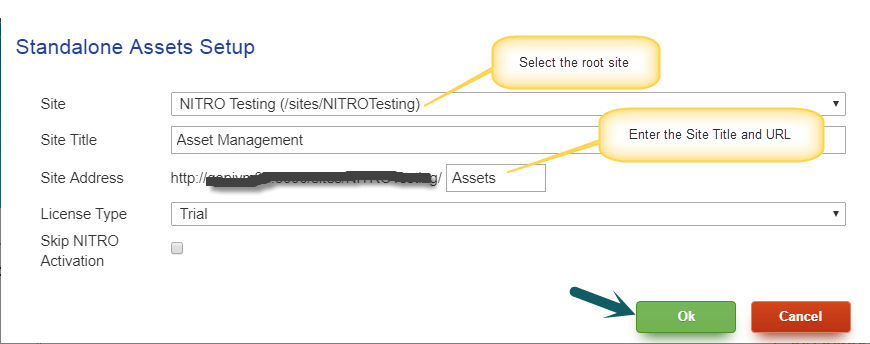
Click on the Standalone Assets/Equipment Management application in NITRO applications page, specify the required details and click Ok.
Parent Site: Choose the site under which the asset application site needs to be created. Generally it will be the root site of the site collection.
Site Title: Title for the new Assets/Equipment Management application site. This can be changed later from site settings if needed.
Site Address: URL of the Assets/Equipment Management application site. We recommend to use alpha-numeric URL name without spaces. Please note that it requires lot of configurations changes if URL has to be changed later.
License Type: Choose the “Trial” and proceed with the installation, once installation is complete, contact Crow Canyon for permanent license. If no option is available under License Type, please contact Crow Canyon Support. Refer article to convert the Crow Canyon NITRO Trial License to Subscription/Enterprise license.
Setup will create the site and configure the application. Once the installation is completed it will show the success message.
Additional Configurations
- Enable cache for NITRO forms. Go to Assets/Equipment list -> List Settings -> Crow Canyon NITRO Forms -> Global Settings -> Click “Enable Cache” button.
“Equipment Management” application specific post configurations:
- Preventive Maintenance Calendar:
- Go to Maintenance Tasks list, recreate ‘Preventive Maintenance Calendar’ modern calendar view.
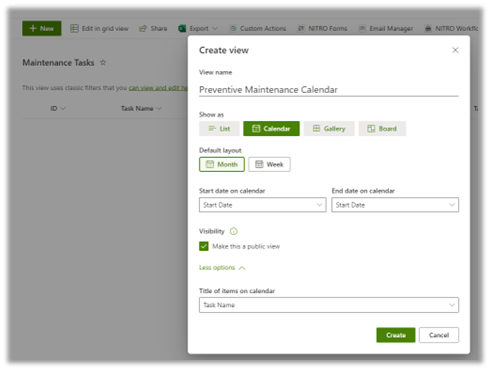
-
- Go to ‘Maintenance Tasks’ list settings, edit the ‘Preventive Maintenance Calendar’ view created in above steps and update the view fields, filter settings as shown below.

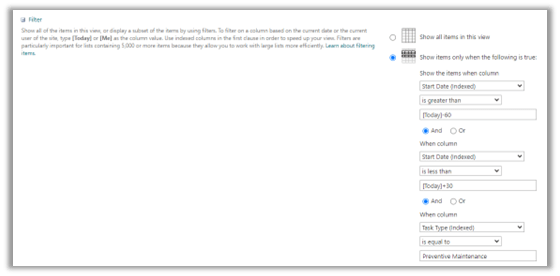
Note: Instead of last 60 days to next 30 days shown in screenshot, make it last 90 days to next 90 days.
- Open ‘Site Pages’ library, Preventive-Maintenance-Calendar.aspx page, delete the existing ‘Maintenance Tasks’ web part and add ‘Preventive Maintenance Calendar’ view using standard Microsoft ‘List’ web part.
For On-premises:
- We need to activate the Crow Canyon Asset Maintenance Timer Job for the site collection. Follow instructions given below:
- Add and deploy the CrowCanyon.TimerJobs.wsp solution in the SharePoint server. Please refer article to add and deploy the solutions in the SharePoint server.
- Note: We will send the CrowCanyon.TimerJobs.wsp solution as part of the application installation package. If you are not able find this solution, please contact Crow Canyon support
- Activate below feature in Site Collection using STSADM command or PowerShell command. Refer instructions from article.
- CrowCanyon.TimerJobs_CCSAssetsMaintenance
- Add and deploy the CrowCanyon.TimerJobs.wsp solution in the SharePoint server. Please refer article to add and deploy the solutions in the SharePoint server.
4. Contract Management Application Installation
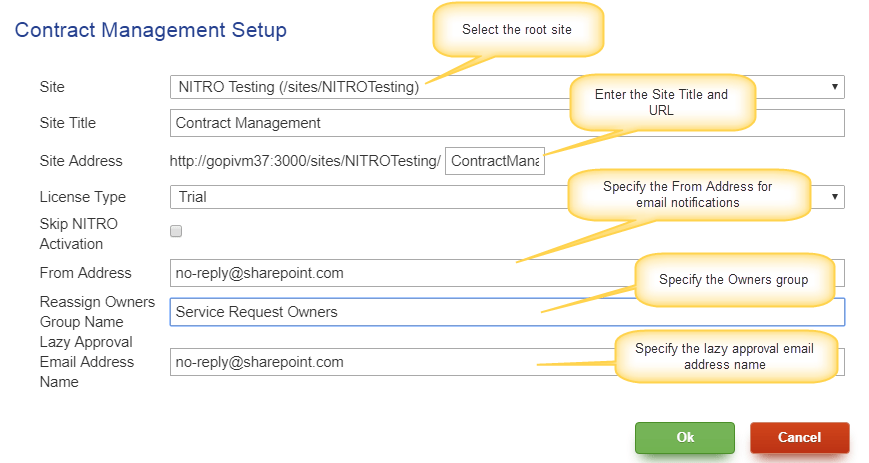
Click Contract Management application tile in NITRO applications page, enter the required details as per details given below and click Ok.
Parent Site: Choose the site under which the Contracts site needs to be created. Generally it will be the root site of the site collection
Site Title: Title for the new Contract site. This can be changed later from site settings if needed
Site Address: URL of the Contract site. We recommend to use alpha-numeric URL name without spaces. Please note that it requires lot of configurations changes if URL has to be changed later. Or site can be reinstalled with different URL
License Type: Choose the “Trial” and proceed with the installation, once installation is complete, contact Crow Canyon for permanent license. If no option is available under License Type, please contact Crow Canyon Support. Refer article to convert the Crow Canyon NITRO Trial License to Subscription/Enterprise license
From Address: Contracts application sends email notifications to users, like when a approval task is assigned to them. This address will be set as sender address for outgoing emails sent by the application
Reassign Owners Group Name: Specify the required SharePoint group. Members of this group will have the permission to reassign the approval tasks in Contract Management application. Any SharePoint site is created with 3 default SharePoint groups (Owners, Members, Visitors) prefixed with the site name. We can use these groups or some other custom group name that can be created after site is created.
Lazy Approval Email Address Name: Specify the email address for lazy approval process. This email address will be used for the approve/deny via email feature in the Contract management application. For more details regarding approve via email feature, refer article.
Setup will create the site and configure the application. Once the installation is completed it will show the success message.
Additional Configurations
Below steps are common for both SharePoint online and Onpremises.
1. Enable cache for NITRO forms. Go to Contracts list -> List Settings -> Crow Canyon NITRO Forms -> Global Settings -> Click “Enable Cache” button.
2. Remove Report Center and Approval Tasks sub links in Quick Launch section
3. [Optional] Contracts and Vendors sublinks are added in both Quick Launch and Top link bars, we can remove these links from Quick Launch as required.
4. Define Contract Renewal Options and Approval Levels in Application Administration as required
Online:
Configure the email sync app settings for the email address which is configured in “Lazy Approval Email Address Name” for Emails list.
On-premises:
Configure incoming email address for Emails list with the email address which is configured in “Lazy Approval Email Address Name”.
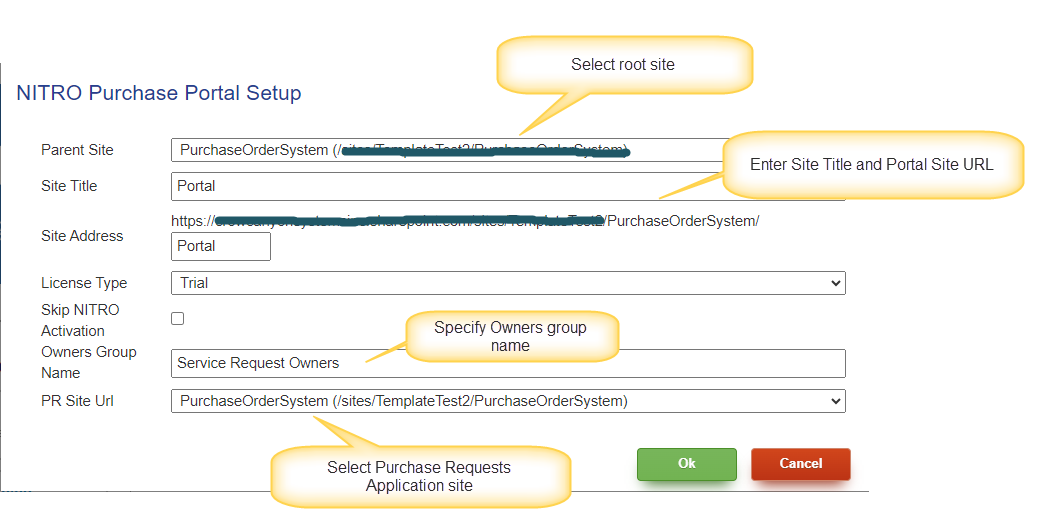
5. Purchase Order System Application Installation
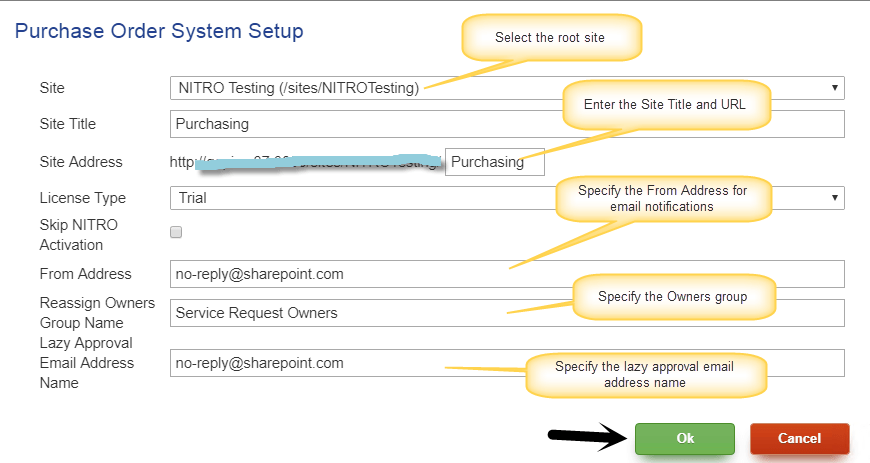
For Online: Click NITRO Purchase V2 application tile in NITRO applications page, enter the required details as per details given below and click Ok.
For On-Premises: Click Purchase Order System application tile in NITRO applications page, enter the required details as per details given below and click Ok.
Parent Site: Choose the site under which the Purchase application site needs to be created. Generally it will be the root site of the site collection
Site Title: Title for the new Contract site. This can be changed later from site settings if needed
Site Address: URL of the Purchasing site. We recommend to use alpha-numeric URL name without spaces. Please note that it requires lot of configurations changes if URL has to be changed later. Or site can be reinstalled with different URL
License Type: Choose the “Trial” and proceed with the installation, once installation is complete, contact Crow Canyon for permanent license. If no option is available under License Type, please contact Crow Canyon Support. Refer article to convert the Crow Canyon NITRO Trial License to Subscription/Enterprise license
From Address: Purchase application sends email notifications to users, like when a approval task is assigned to them. This address will be set as sender address for outgoing emails sent by the application
Reassign Owners Group Name: Specify the required SharePoint group. Members of this group will have the permission to reassign the approval tasks in Purchase Order system application. Any SharePoint site is created with 3 default SharePoint groups (Owners, Members, Visitors) prefixed with the site name. We can use these groups or some other custom group name that can be created after site is created.
Lazy Approval Email Address Name: Specify the email address for lazy approval process. This email address will be used for the approve/deny/send back via email feature in the Purchase Order system application. For more details regarding approve via email feature, refer article.
Setup will create the site and configure the application. Once the installation is completed it will show the success message.
Additional Configurations
Below steps are common for SharePoint Online and On-premises.
1. Enable cache for NITRO forms. Go to Purchase Request list -> List Settings -> Crow Canyon NITRO Forms -> Global Settings -> Click “Enable Cache” button.
2. Remove Report Center and Approval Tasks sub links in Quick Launch section
3. Define Approval Levels in Application Administration as required
Online:
1. Configure the email sync app settings for the email address which is configured in “Lazy Approval Email Address Name” for Approver Emails list.
2. Resave Crow Canyon ID Column settings in “Purchase Requests” and “Purchase Orders” list.
Click “Administration” link in top links -> Configure Lists -> Click “Purchase Requests” tile -> Click Crow Canyon ID column link in list settings -> Edit ID column settings and save the settings.
Note: Do the same for Purchase Orders list as well.
3. Make sure “Contribute without delete” permission level is selected in all below workflow actions:
- WF: Manage permissions on approver task reassign
- Action: Grant contribute without delete for assignee on task
- WF: Manage permissions on line items
- Action: Grant contribute without delete permissions for submitted for
- WF: Manage permissions on purchase orders and line items
- Action1: Grant contribute without delete permissions for purchase agent on PO
- Action2: Grant contribute without delete permissions for agent on line items
- WF: Manage permissions on purchase request and line items
- Action1: Grant contribute without delete permissions for submitted for
- Action2: Grant contribute without delete permissions for submitted for on line items
- WF: Manage permissions when new approver task created
- Action: Grant contribute without delete permissions for assigned to on approval task
4. Install “NITRO Purchase Portal” application.
5. By default, NITRO Purchasing application comes with override settings in Purchase Request list for Portal site. Make sure that portal “Site URL” is correct in override settings in Purchase Request list forms.
Go to site contents -> Purchase Requests list -> List Settings -> Crow Canyon NITRO Forms -> Advanced Settings -> edit portal settings and make sure that Site URL is correct.
On-premises:
1. Configure incoming email address for Emails list with the email address which is configured in “Lazy Approval Email Address Name”.