Applies to: SharePoint Online
Description
NITRO Application for Crow Canyon Service Request is installed from the applications page in NITRO Studio. Post that there are some additional steps to configure the site. Please ensure that you have installed the application as per details in this article before performing these steps.
Summary of steps
- Install and Activate Crow Canyon Product App
- Create and configure Portal site
- Other configurations
Detailed instructions
1. Install and Activate Crow Canyon Product App
- For ‘Modern NITRO Studio (3.0)’
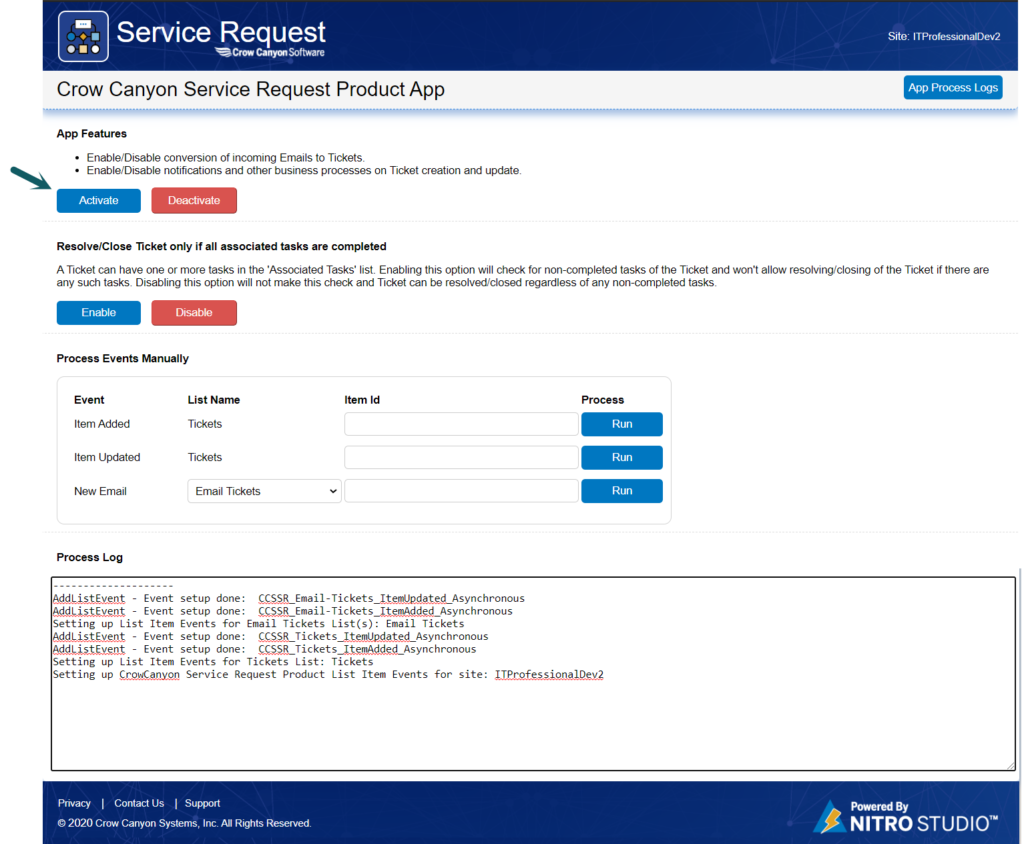
Navigate to the application -> Click ‘Administration’ from the top link bar -> Expand ‘Advanced’ section from the quick launch -> ‘Crow Canyon NITRO Apps’ -> Click ‘Crow Canyon Product App’ tile -> Click ‘Activate’ to activate the product app.

- For ‘NITRO Studio (2.0)’
Crow Canyon Service Request application requires Crow Canyon Product App to be installed and activated in the SharePoint site. Installation file for this App is sent as part of the installation package. Please contact sharepointsupport@crowcanyon.com in case you have not received it.
Go to tenant App Catalog site –> Apps for SharePoint –> upload ‘CrowCanyon.Product.app’ file to the library.
Add Product App to the site:
Go to the service request application site -> Site Contents -> Add an app -> switch to classic page of add an app -> search for ‘Crow Canyon Product App’ and add the app in the site. This will prompt for app request for Global administrator for approval.
Global Administrator can navigate to tenant app catalog site –> App Requests –> approve Crow Canyon Product App request.
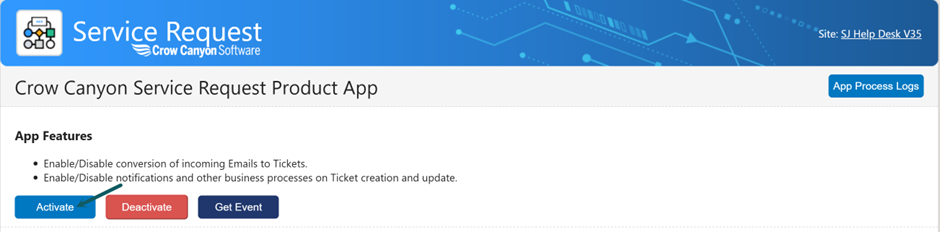
After the approval, go to the service request application –> site contents –> add an app –> add ‘Crow Canyon Product App’ to the site. After adding app to the site, go to site contents –> open Crow Canyon Product App, click “Activate App Feature” button as shown below:
2. Create and configure Portal site
Go to site contents -> open Crow Canyon NITRO Studio app -> click on NITRO Applications -> Search “NITRO Help Desk Portal” application -> Click Install link -> Provide the input for creating Portal site as shown in sample screenshot below.
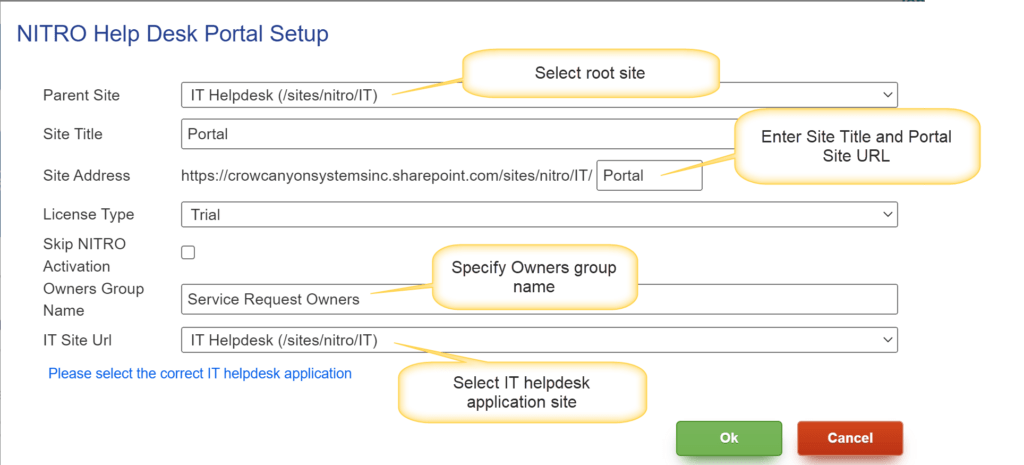
Wait for the setup to finish successfully and click Ok on completion. Add all the administrators of the Helpdesk application to the above-mentioned Owners group (SharePoint group).
3. Other Configurations
1. Add “Employee Portal” top link bar
Go to Service Request site -> Site Settings -> Top link bar and add link to Portal site URL
2. Recommended: We can configure the internal mailbox account for sending outgoing mails from send mail actions of Crow Canyon NITRO Workflows.
Refer article for detailed steps
3. OPTIONAL: Configure incoming email address in Crow Canyon Email Sync app for Email to Ticket conversion functionality. Refer instructions from this article
For Applications – IT Professional (2020), IT Standard (2020), and Request Management (2020)
Note: Skip the below steps #1 and #2 for Modern NITRO Studio (3.0)
1. Update the Crow Canyon Product app tile link in Crow Canyon NITRO Apps Link Tiles. Go to Application Administration -> Advanced section-> Crow Canyon NITRO Apps->Crow Canyon NITRO Studio->Tiles and Dials -> Link Tiles -> Edit Crow Canyon NITRO Apps -> Edit Crow Canyon Product app and update the URL.
To find the Product App link URL, go to Site Contents, navigate to classic experience of site contents, right click on the “Crow Canyon Product App”, copy shortcut. If the length of the URL is greater than 225 characters, we can use the server relative URL. Sample URL looks like below:
/sites/sitecollection/subsite/_layouts/15/appredirect.aspx?instance_id={6CC40AC6-2DB5-4E9B-A1A9-746BD7B026B5}
2. Reset cache in NITRO Workflows
Go to Application Administration -> Crow Canyon NITRO Apps -> NITRO Workflows and click refresh button beside the site dropdown to reset the cache.
3. Go to site settings -> Users and Permissions -> Site Permissions -> delete unique permissions for the site and configure the permissions as required.
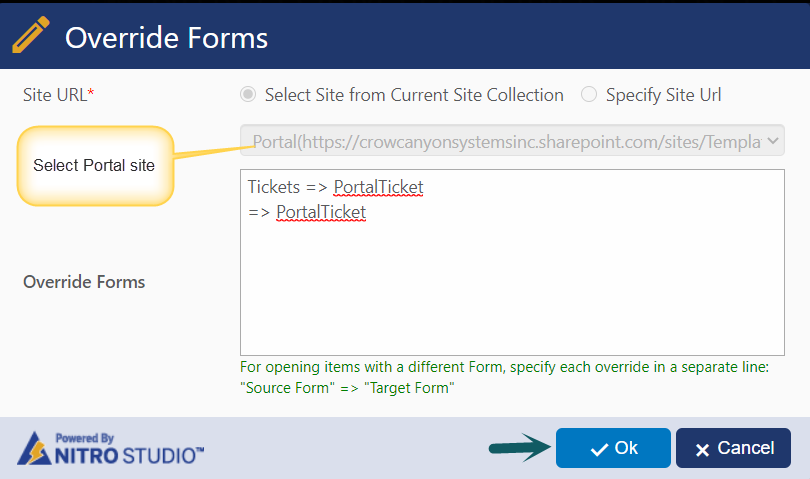
4. By default, service request application comes with override settings in Tickets/Requests list for Portal site. Make sure that portal “Site URL” is correct in override settings in Tickets/Requests list forms.
Go to site contents -> Tickets/Requests/Work Orders list -> List Settings -> Crow Canyon NITRO Forms -> Advanced Settings -> edit portal settings and make sure that Site URL is correct.
For NITRO Help Desk and NITRO Request Management Applications
Along with above configurations, below additional steps are required:
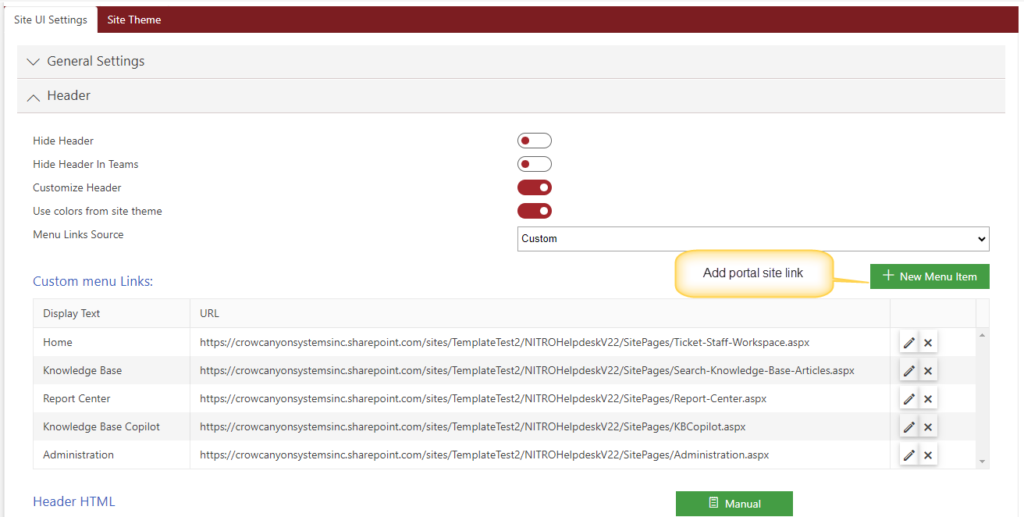
1. Add “Employee Portal” top link bar
Go to Service Request site -> click Administration link in top link bar -> Site Settings under Advanced section -> SharePoint Site Settings -> Crow Canyon Branding (Modern Sites) under Site Administration -> Add portal link in “Custom Menu Links” under “Header” section.
2. In Knowledge Base list form, modify the list Ids in “Auto redirect to KB revision new form” form event actions
Go to Application Administration -> Advanced -> Configure Lists -> Configure Knowledge Base -> Crow Canyon NITRO Forms -> go to Form event action -> Edit “Auto redirect to KB revision new form” action

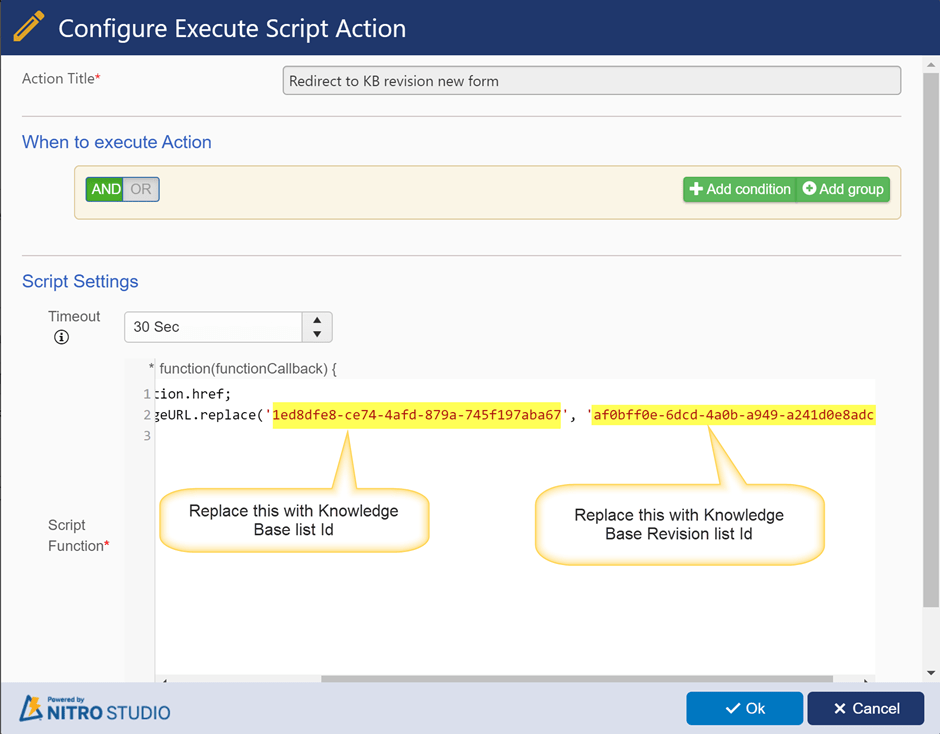
To get Knowledge Base list id, go to Application Administration -> Advanced Section -> Configure Lists -> Click “Configure Knowledge Base” tile and find the URL in the browser.

To get “Knowledge Base Revision” list id, go to Application Administration -> Advanced section -> Configure Lists -> Click “Configure Knowledge Base Revision” link tile and find the URL in the browser (see screenshot above).
2. Ensure the portal site URL is correct in below places:
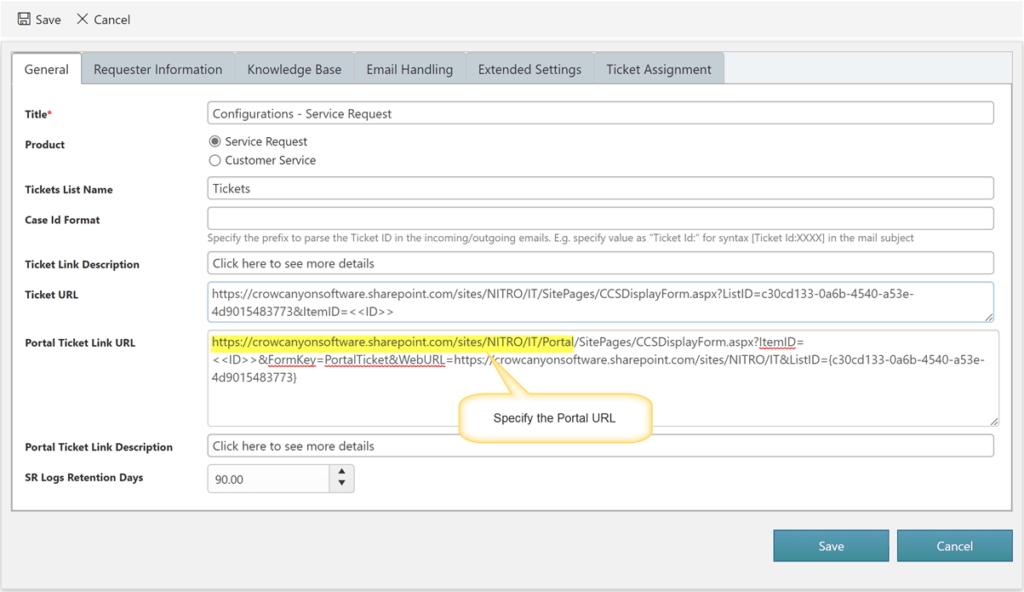
- Configuration Item
Go to Application Administration -> Advanced section -> General Configurations -> Click General Configurations tile -> modify the portal URL in “Portal Ticket Link URL” column as shown below:
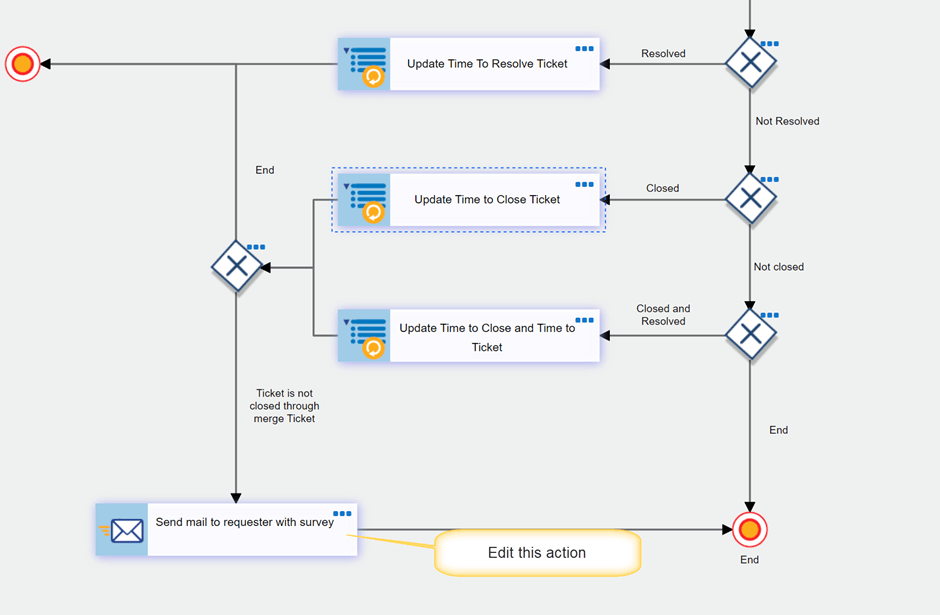
2. Modify the portal URL in survey notification workflow:
Go to Application Administration -> Advanced section -> Crow Canyon NITRO Apps -> NITRO Workflows -> Edit workflow “Survey notification and update Ticket with time to resolve and close”.
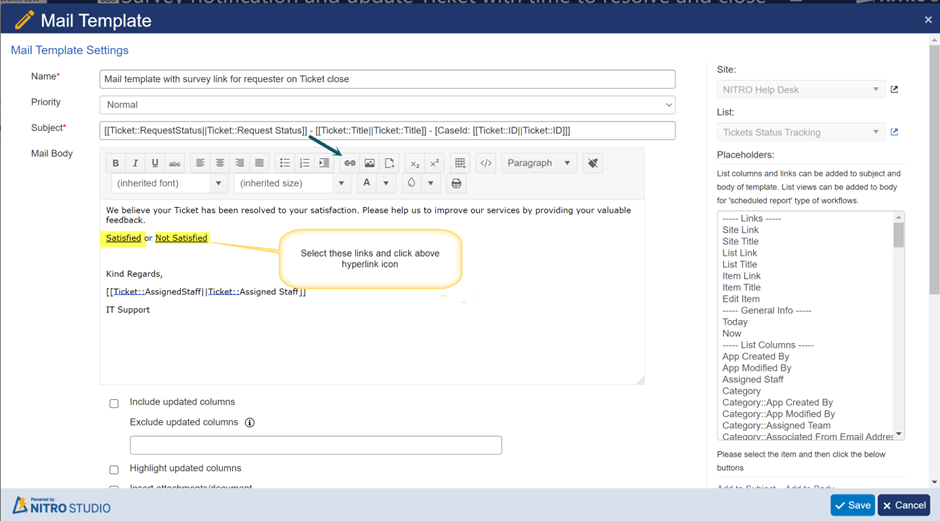
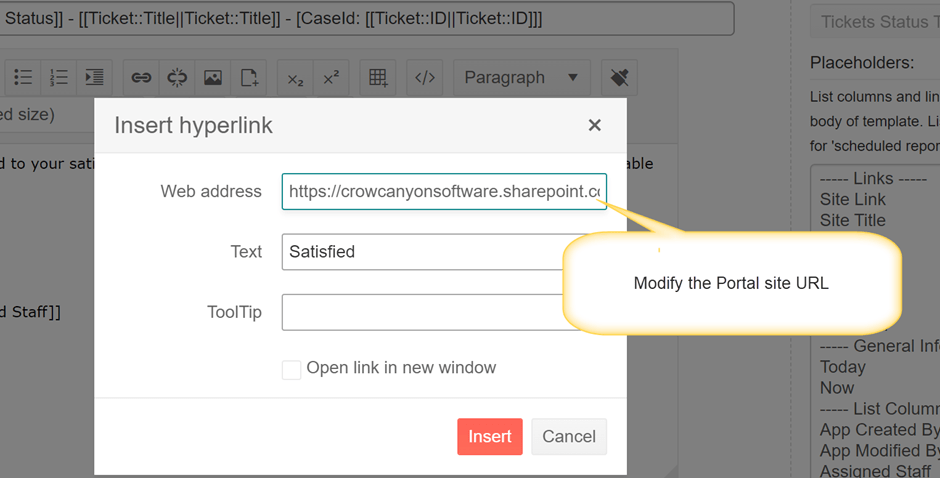
Edit action: “Send mail to requester with survey link” -> Edit mail template and modify the portal URLs in “Satisfied” and “Not Satisfied” links as shown below:
Edit Mail Template:

4. Ensure that “Contribute without delete” permission is selected in below workflow actions.
- Workflow 1: Process KB Updates
- Action: Grant backend staff permissions
- Workflow 2: Process published KB Articles
- Action: Grant backend staff permissions
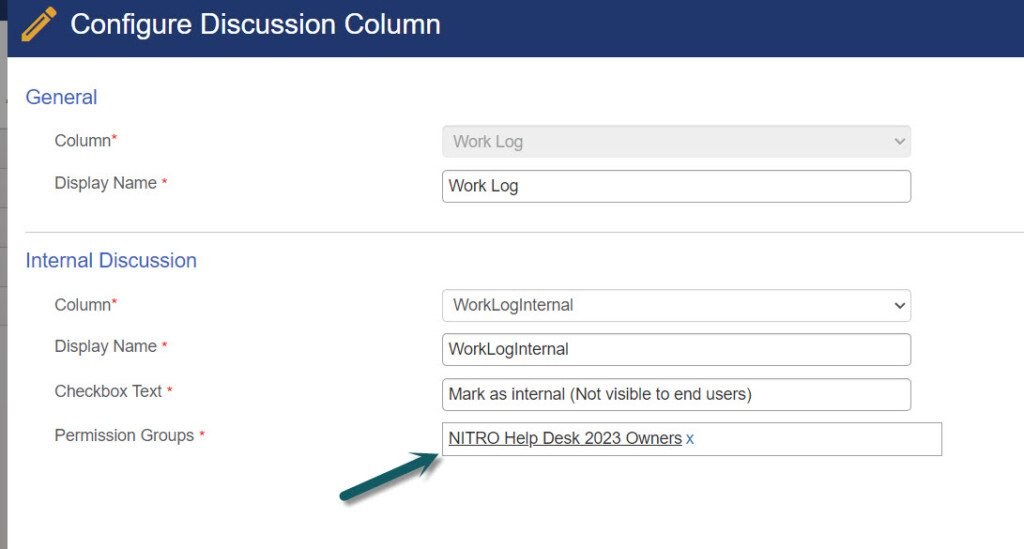
5. Go to site contents -> Tickets/Requests/Work Orders list -> List Settings -> Crow Canyon NITRO Forms -> edit ‘Tickets’ form -> select ‘Work Log’ column -> click on Edit in column settings and update ‘Permission Groups’ setting with the Site Owners SharePoint group, click on Ok and publish the forms.