Applies to: SharePoint Online NITRO Workflows and Advanced Approvals
Introduction
NITRO Workflows and Advanced Approval apps by default uses SendGrid service for outgoing emails. This can sometimes cause mail delivery issues as SendGrid server IPs may not be trusted by receiving server. Also, mails originating outside of receiving server but with sender address of internal domain has chances of being considered a spam mail.
To avoid these issues, these apps now have the following options to send mails.
- Mailbox Settings: Refer instructions in this article for overall mail flow and mailbox configurations
- Microsoft Graph API: Described in current article
In case mail delivery by Mailbox / Graph API fails for any reason then SendGrid is used as backup. This can be configured at the site level in Workflow Manager. All workflows configured in the site will use the same settings for outgoing mails.
Steps to grant permissions only to required mailboxes
Performing these steps will ensure that Crow Canyon Email API will never have access to all mailboxes in your tenancy. API permission restrictions to specific mailboxes is done before granting permissions to the API.
API permissions can be scoped to specific mailboxes as per instructions in this Microsoft article. AppId to be used for this is “1c4f8870-3aab-4882-a733-f05081a17655”. Please find the detailed steps from below.
- Create a mail enabled group in your O365 admin center . Note that this steps requires administrator privileges on your O365 subscription. E.g. “CrowCanyonEmailAPIAccess”
- Add the required mailboxes (one or more) to this group
- Connect to Exchange Online PowerShell. For details, see Connect to Exchange Online PowerShell
- Run below command, note that changes to application access policies can take up to 30 minutes. Replace CrowCanyonEmailAPIAccess@yourdomain.com below with the email Id of the group created above:
New-ApplicationAccessPolicy -AppId 1c4f8870-3aab-4882-a733-f05081a17655 -PolicyScopeGroupId CrowCanyonEmailAPIAccess@yourdomain.com -AccessRight RestrictAccess -Description "Restrict Crow Canyon Email API app access to members of distribution group CrowCanyonEmailAPIAccess."
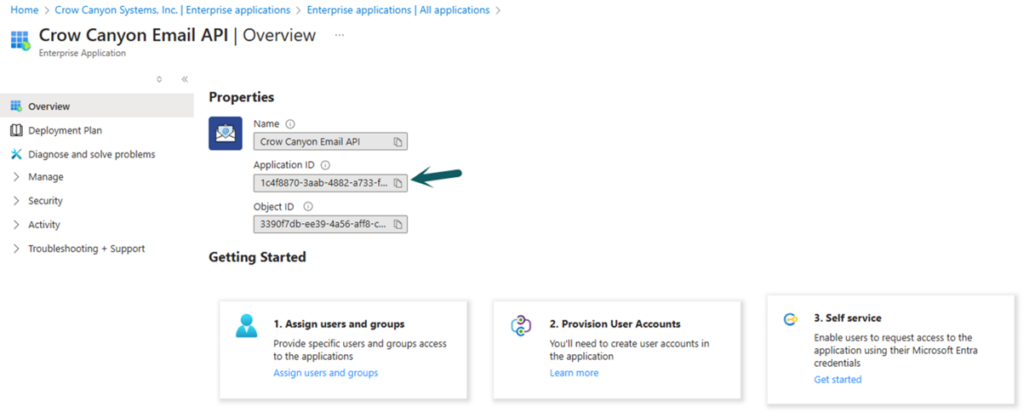
Note: For GCC, ‘AppId’ will be different for each tenant. To find out the ‘AppId’
Sign in to the Azure portal (US Government) as a Global Administrator, go to Microsoft Entra ID, Manage, App registrations, All applications, click on “Crow Canyon Email API”, click “Overview”, copy “Application ID” (see below).![]()
- Verify that mailbox accounts added to the group can be accessed by Graph API. Replace <mailbox email> below with email Id of the mailbox:
-
Test-ApplicationAccessPolicy -Identity <mailbox email> -AppId 1c4f8870-3aab-4882-a733-f05081a17655
-
- Verify that any other mailbox account that is not in “CrowCanyonEmailAPIAccess” group cannot be accessed by Graph API. Replace <mailbox email> below with email of mailbox that is not in the group:
-
Test-ApplicationAccessPolicy -Identity <mailbox email> -AppId 1c4f8870-3aab-4882-a733-f05081a17655
-
Steps
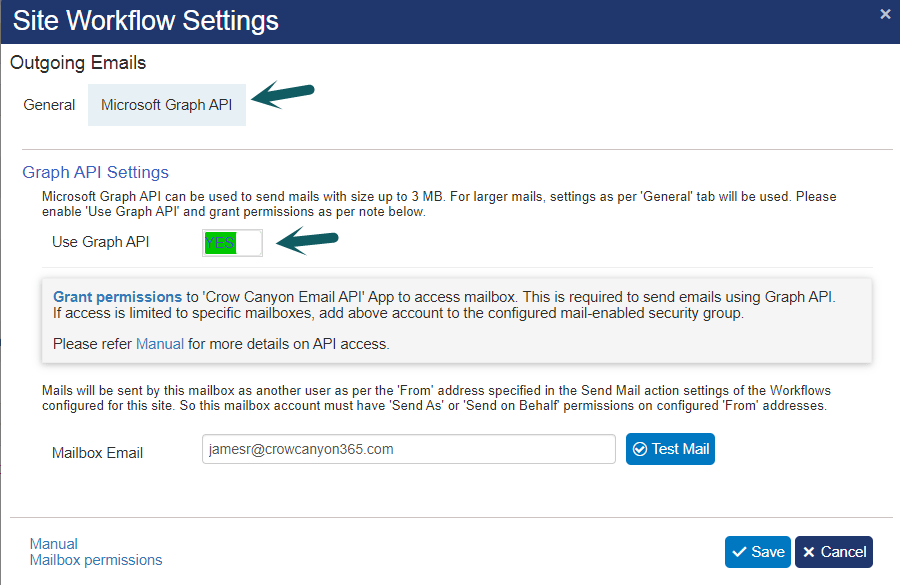
1.Navigate to site settings –> site administration –> Crow Canyon NITRO Apps –> NITRO Workflows app/Advanced Approval app
2. Click gear icon next to the “New Workflow” button to bring up the site settings popup
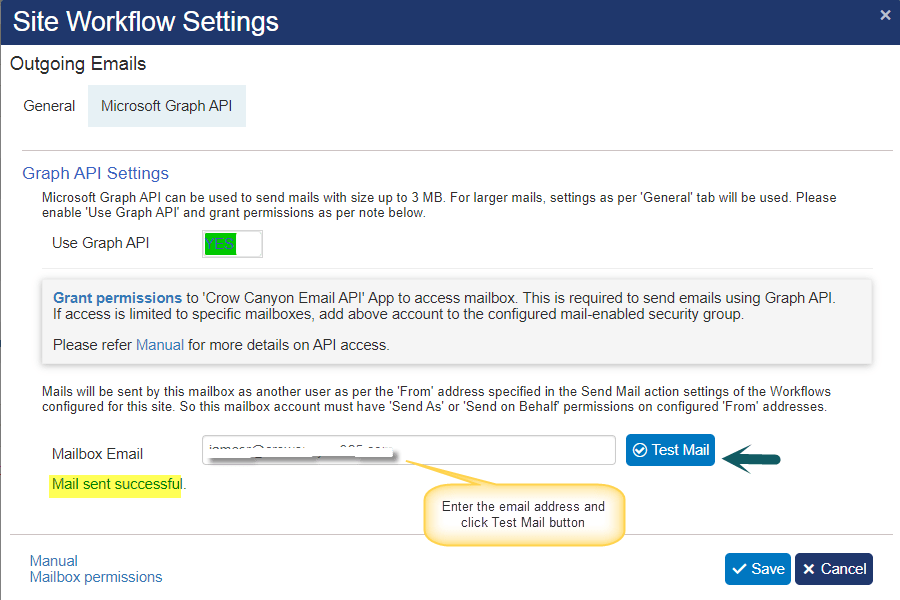
3. Go to “Microsoft Graph API” tab and enable “Use Graph API” setting as shown below:
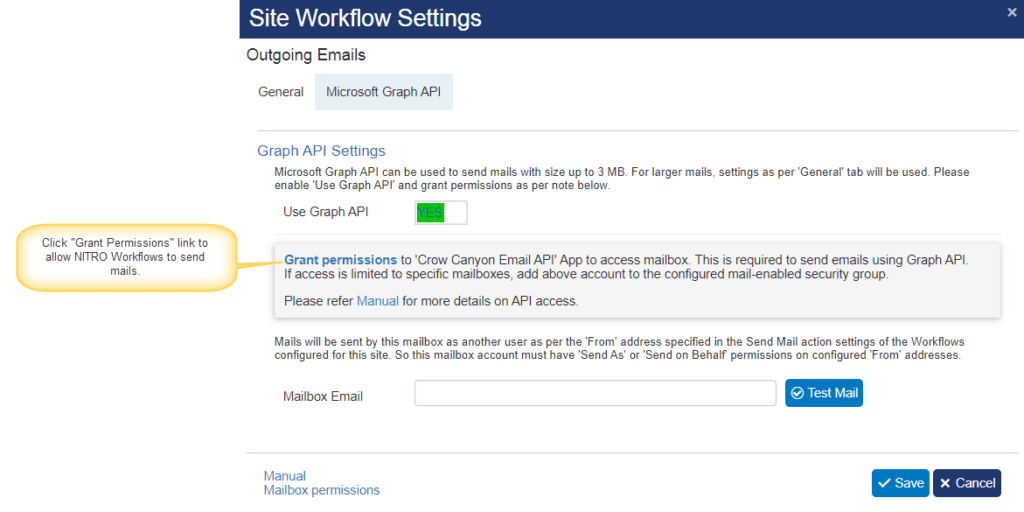
4. For commercial tenant, click “Grant Permissions” in “Graph API Settings” section to allow API access to mailboxes.
For GCC environment, grant admin consent for API Permissions as described below
- Sign in to the Azure portal (US Government) as a Global Administrator, go to Microsoft Entra ID, Manage, App registrations, All applications, click on “Crow Canyon Email API”, click “API Permissions”, click “Grant admin consent for tenancy” button (see below).
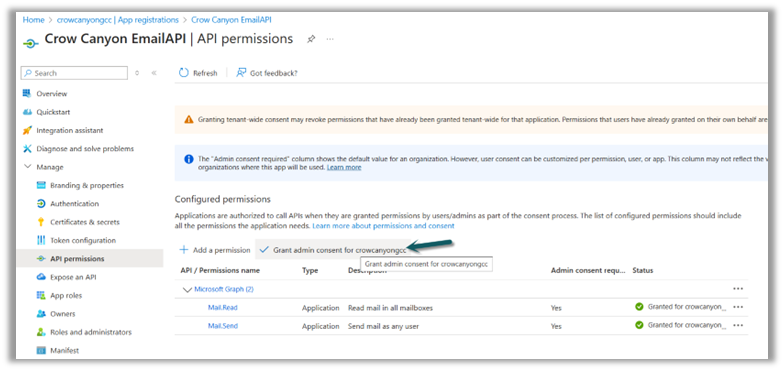

2. Repeat same steps mentioned in #1 for “Azure AD API”, “Microsoft Teams API” and “NITRO API”.
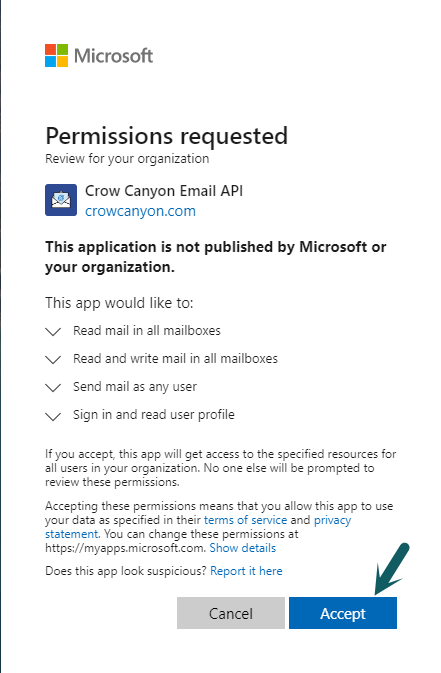
5. “Grant Permissions” link will open a pop-up. Please use an account with administrator privileges for your office 365 subscription to grant the required permissions. Click “Accept” button to grant the permissions.
Note that the grant permissions dialog may still say that grant permissions to all mailboxes, but API is already restricted to only the mail enabled security group configured above.
6. Enter the email address and click “Test Mail” button. This will send a test mail using the configured email address. Next, click “Save” button to save the configurations.
Troubleshooting steps
Issue:
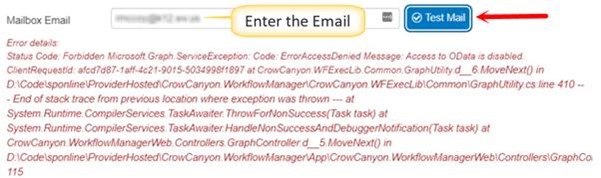
Despite following all the configuration steps as outlined, below error message appears on clicking ‘Test Mail’ button for the specified email address.
Cause:
Mail-enabled security group is created with deleted shared mailbox address:
The shared mailbox account was deleted and then a mail-enabled security group was created with the same shared mailbox address.
Resolution:
Delete the existing mail-enabled security group -> Then, create a new mail-enabled security group with a different name and email address -> Create a new shared mailbox with the email address specified as the ‘From’ address (that is, deleted mail-enabled security group address) -> Add the shared mailbox to the newly created mail-enabled security group -> Follow the steps “Steps to grant permissions only to required mailboxes” from the article above.
Note:
After re-configuring the mail-enabled security group, if the same error is shown on clicking ‘Test Mail’ button, then it is required to wait for at most 24 hours to see the changes. Click the ‘Test Mail’ button again after 24 hours.