NITRO Studio:
- Update: New setting to select map type and specify Azure Maps key for NITRO Forms / List View.
Added these settings in Crow Canyon NITRO Site Settings
Go to the SharePoint Site -> Site Contents -> Site Settings -> Crow Canyon NITRO Site Settings
NITRO Forms:
- New Feature: In form event actions, added a new action to ‘Invoke Web Service’.
Description
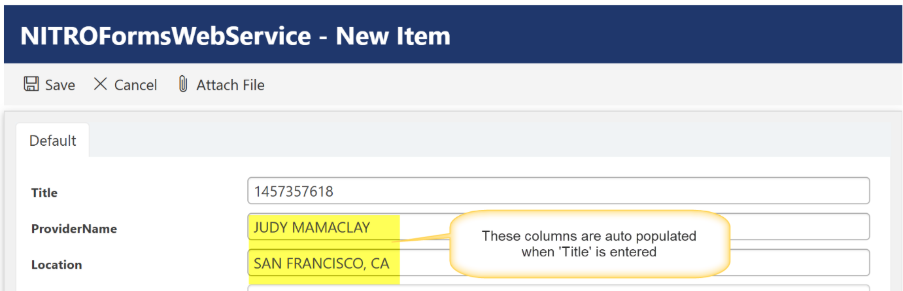
In this example, a publicly available REST API is invoked using Form event actions in NITRO Forms. This Rest API does not require authentication. The response returned from this REST API call is used to populate column values in the SharePoint list item.
Rest API: https://npiregistry.cms.hhs.gov/api/?version=2.1
(Documentation of this Rest API: https://npiregistry.cms.hhs.gov/api-page)
Detailed steps
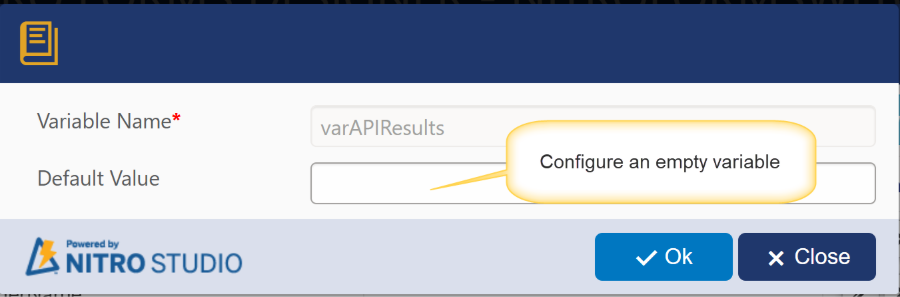
- Configure a variable in the NITRO Forms.
Navigate to NITRO Forms designer for the list à Click ‘Variables’ from the ‘FORM’ ribbon à Configure an empty variable.
Variable Name: varAPIResults
Default Value:
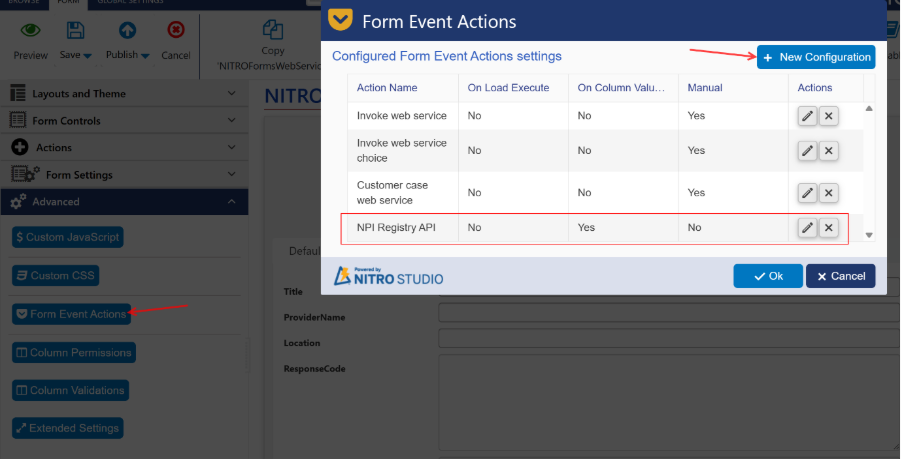
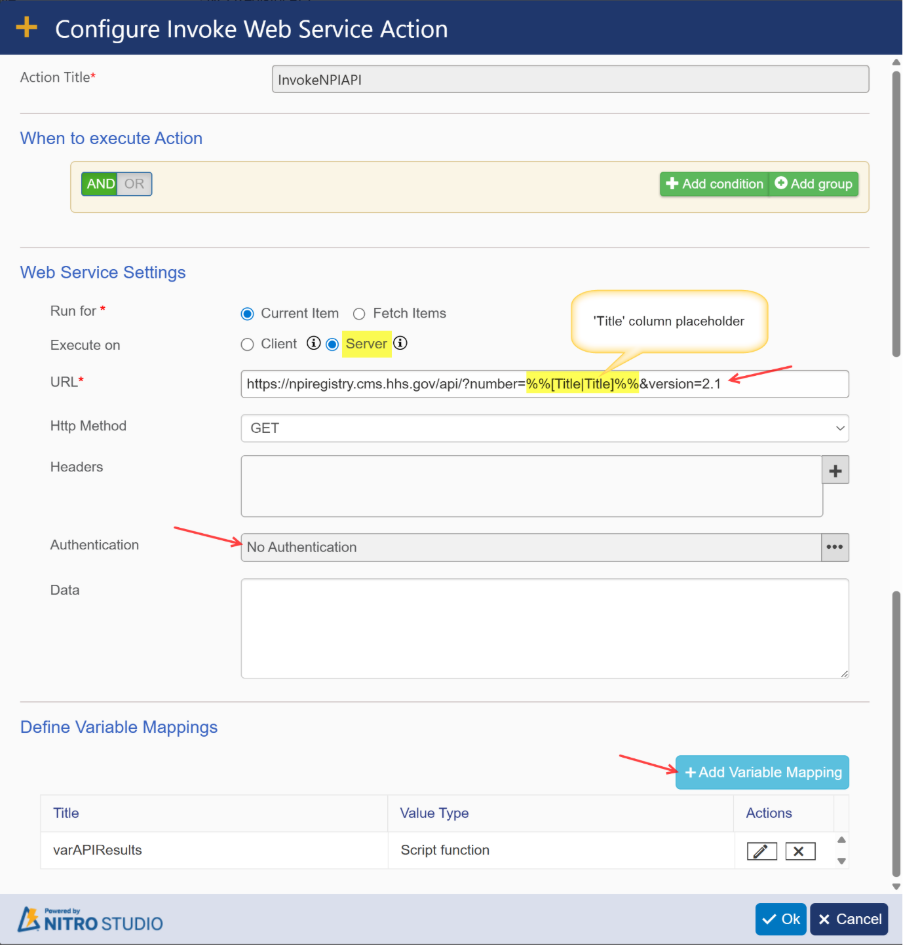
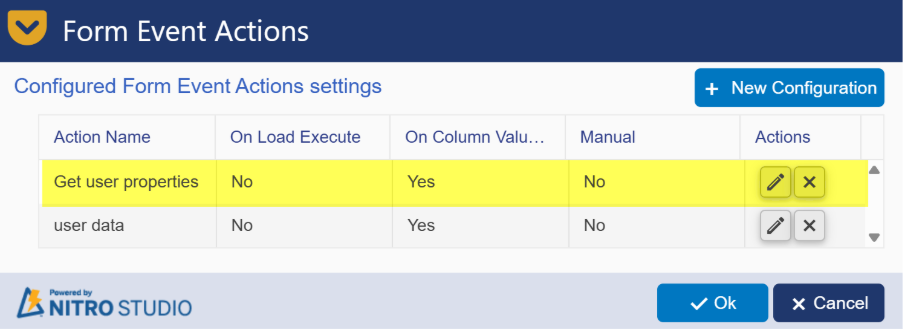
- Configure form event action to invoke the Rest API.
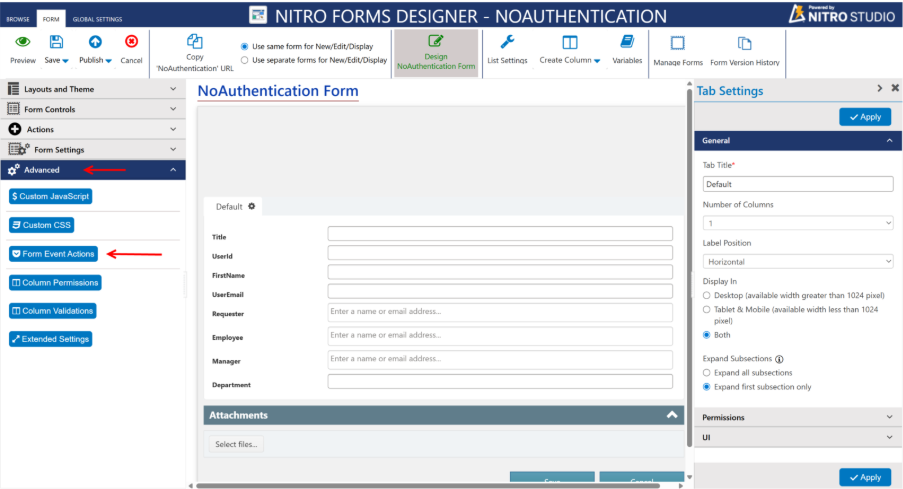
- Expand ‘Advanced’ section from the left-hand panel à Click ‘Form Event Actions’ à Click ‘New Configuration’.
- Configure FEA on column value change.
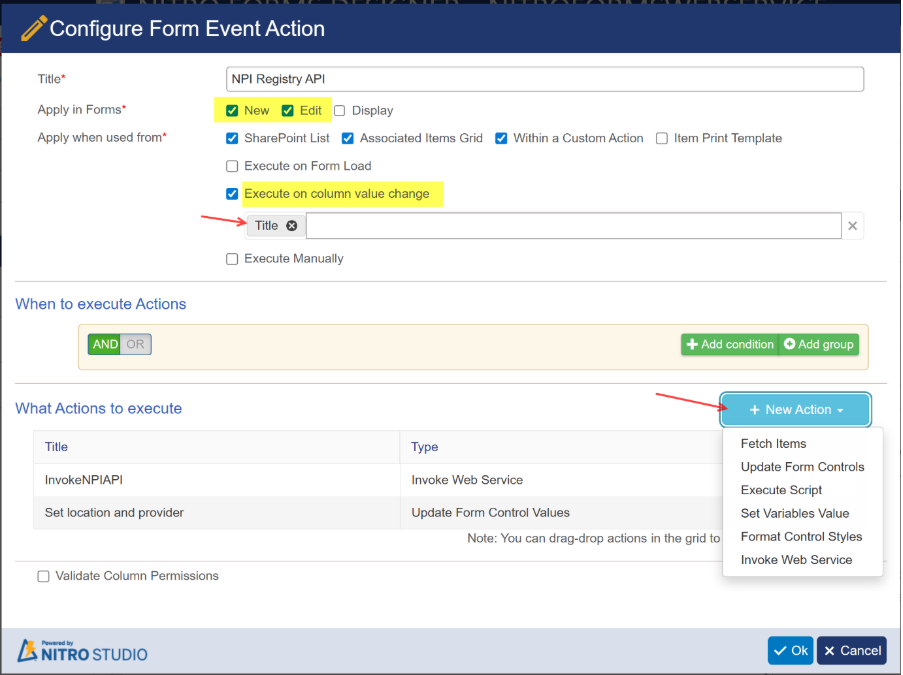
- Configure ‘Invoke Web Service’ action.
URL: https://npiregistry.cms.hhs.gov/api/?number=%%[Title|Title]%%&version=2.1
Note: We have used ‘Title’ column placeholder in the above URL. Please change the placeholders as per your form configuration.
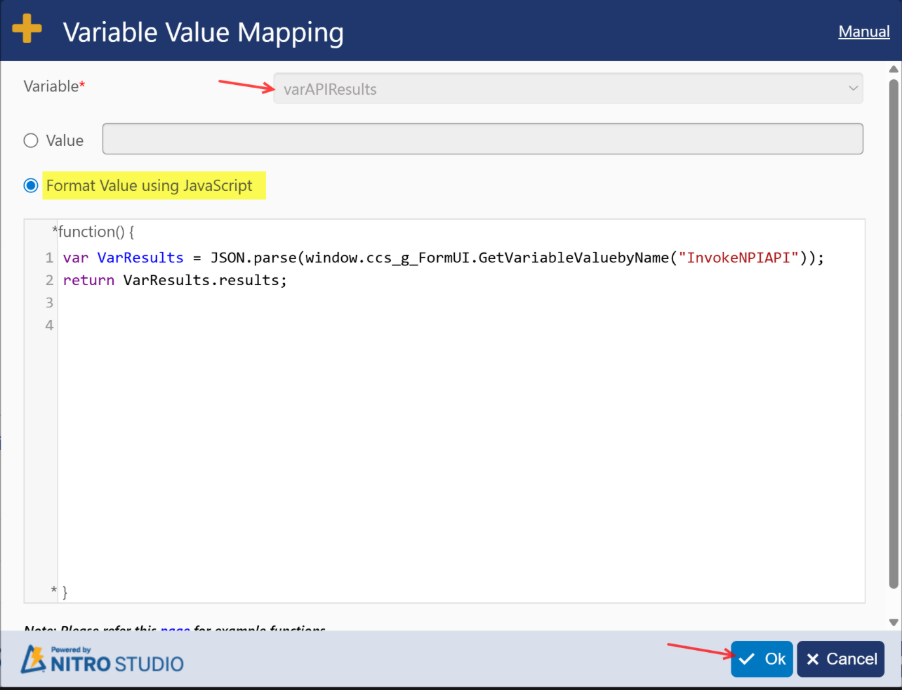
- Add variable mapping for ‘varAPIResults’ using JavaScript.
Script:
var VarResults = JSON.parse(window.ccs_g_FormUI.GetVariableValuebyName(“InvokeNPIAPI”));
return VarResults.results;
Note: ‘InvokeNPIAPI’ is the invoke web service action name.
- Configure ‘Update Form Controls’ action to set value in the ‘Location’ and ‘ProviderName’ columns.
Note: Location’ and ‘ProviderName’ are single line of text columns.
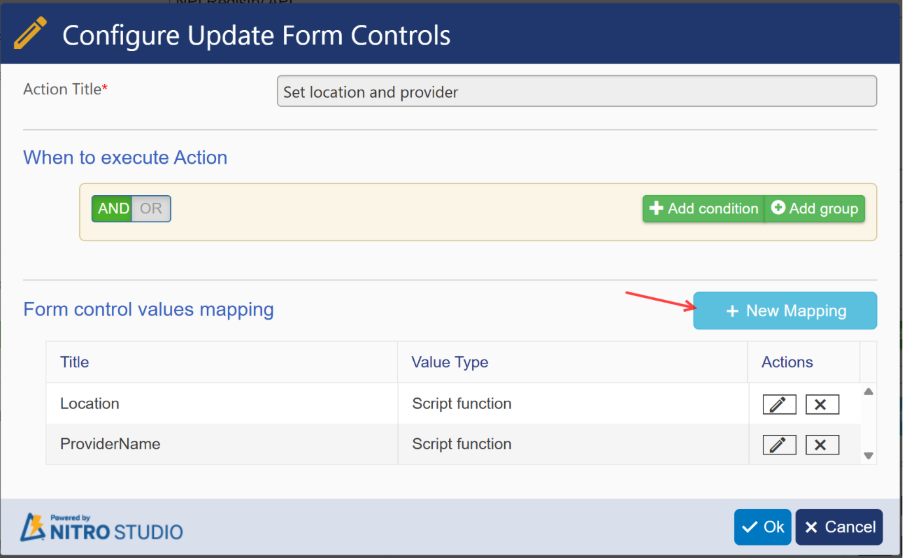
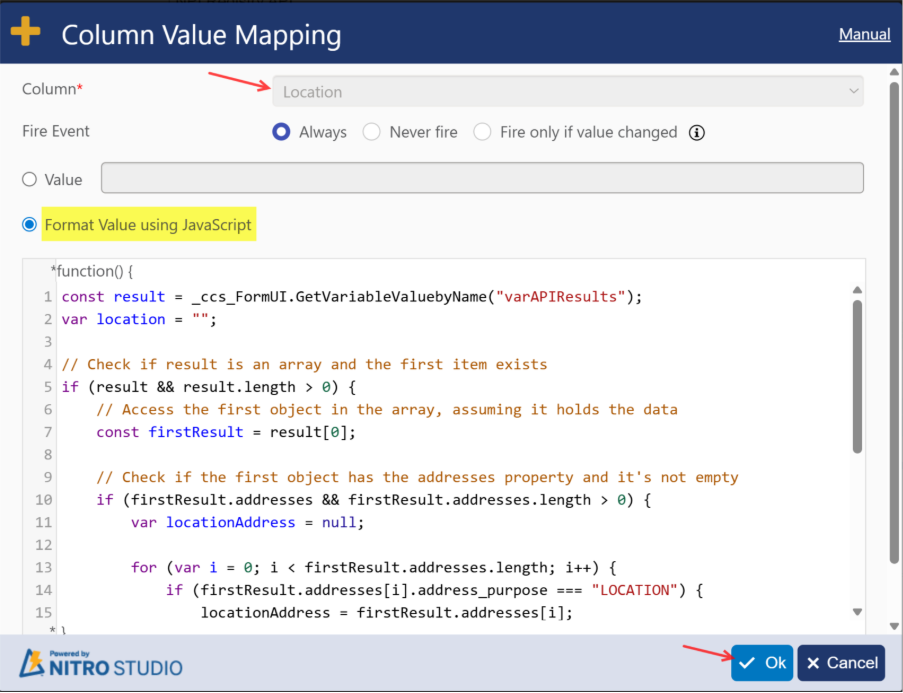
- Add mapping for ‘Location’ column using JavaScript.
Script:
const result = _ccs_FormUI.GetVariableValuebyName(“varAPIResults”);
var location = “”;
// Check if result is an array and the first item exists
if (result && result.length > 0) {
// Access the first object in the array, assuming it holds the data
const firstResult = result[0];
// Check if the first object has the addresses property and it’s not empty
if (firstResult.addresses && firstResult.addresses.length > 0) {
var locationAddress = null;
for (var i = 0; i < firstResult.addresses.length; i++) {
if (firstResult.addresses[i].address_purpose === “LOCATION”) {
locationAddress = firstResult.addresses[i];
break;
}
}
if (!locationAddress) {
locationAddress = firstResult.addresses[0]; // fallback
}
var city = locationAddress.city || “”;
var state = locationAddress.state || “”;
location = city + “, ” + state;
}
}
return location;
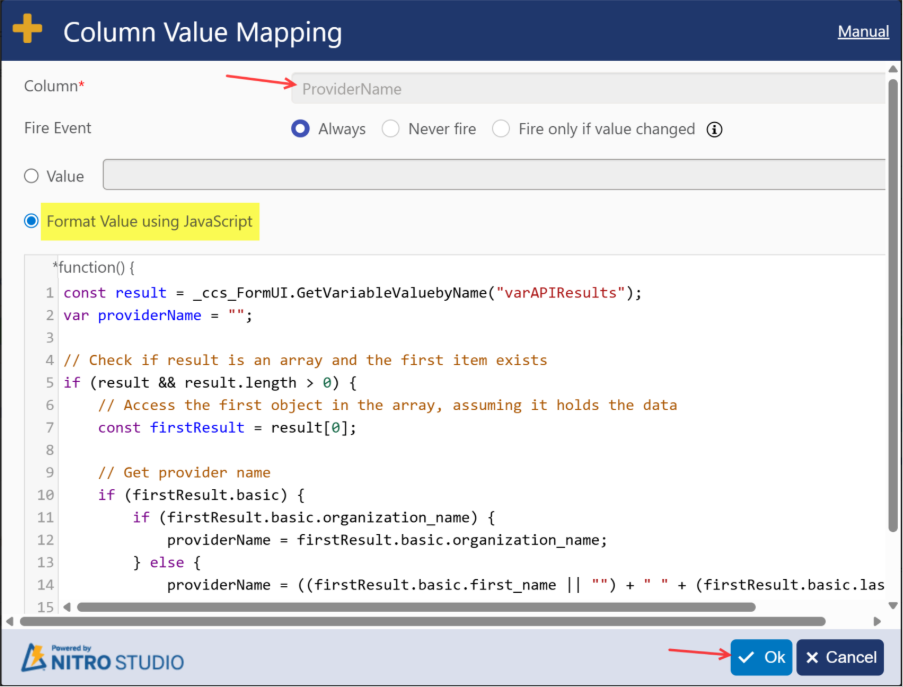
- Add mapping for ‘ProviderName’ column using JavaScript.
Script:
const result = _ccs_FormUI.GetVariableValuebyName(“varAPIResults”);
var providerName = “”;
// Check if result is an array and the first item exists
if (result && result.length > 0) {
// Access the first object in the array, assuming it holds the data
const firstResult = result[0];
// Get provider name
if (firstResult.basic) {
if (firstResult.basic.organization_name) {
providerName = firstResult.basic.organization_name;
} else {
providerName = ((firstResult.basic.first_name || “”) + ” ” + (firstResult.basic.last_name || “”)).trim();
}
}
}
return providerName;
- Save the form event action.
- Publish the NITRO Forms.
Sample output
- Enhancement: Added support for JSONPath and JSONPath2 functions.
For JSONPath and JSONPath2 functions functionality refer: https://www.crowcanyon.help/article/comprehensive-list-of-functions-in-nitro-studio/
These functions support is added in NITRO Form
JSONPath and JSONPath2 functions in NITRO Forms
Description
This article describes the steps to read user profile properties using Invoke web service action and JSON function in NITRO Form.
Summary of steps
- App Registration in Azure Active Directory (Azure AD): for this refer How to read user properties using Microsoft Graph API in NITRO Workflows? – Crow Canyon Software Support
- Configuration of NITRO NITRO form
Detailed Instructions
- Configuration of NITRO NITRO forms using Invoke web service action and JSON function
Go to the site where we want to read user profile properties -> Go to Site Settings -> Crow Canyon NITRO Apps -> NITRO Forms and select list.
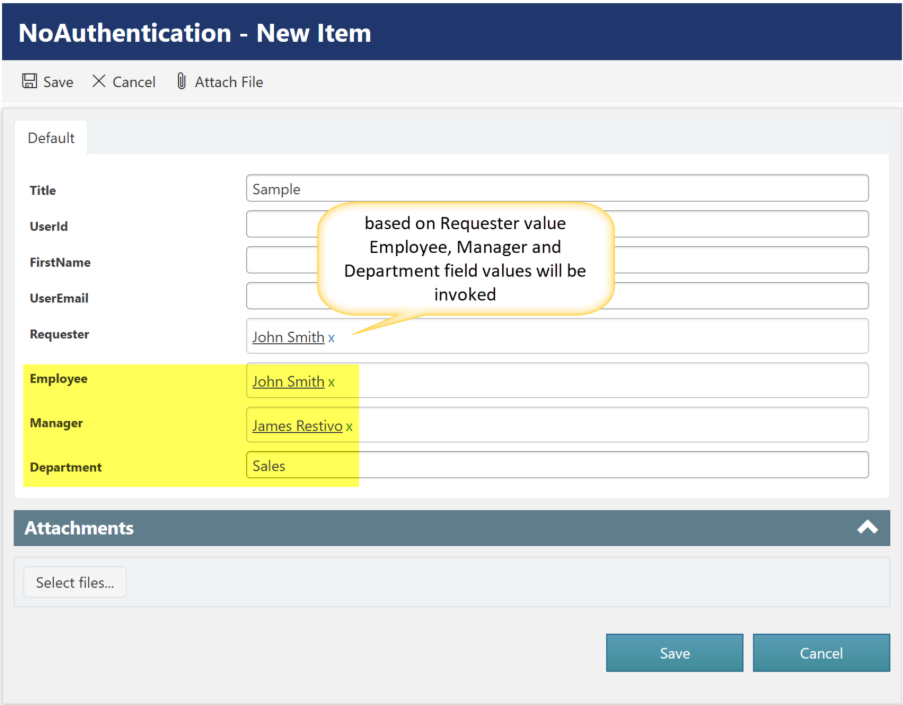
In this article, we have given example to read requester user profile properties and then create record in Users list.
Action1: Get Access Token
Configure invoke web service action to get access token as shown below:
Go to Form Event Action in left panel Under Advanced section in NITRO Forms
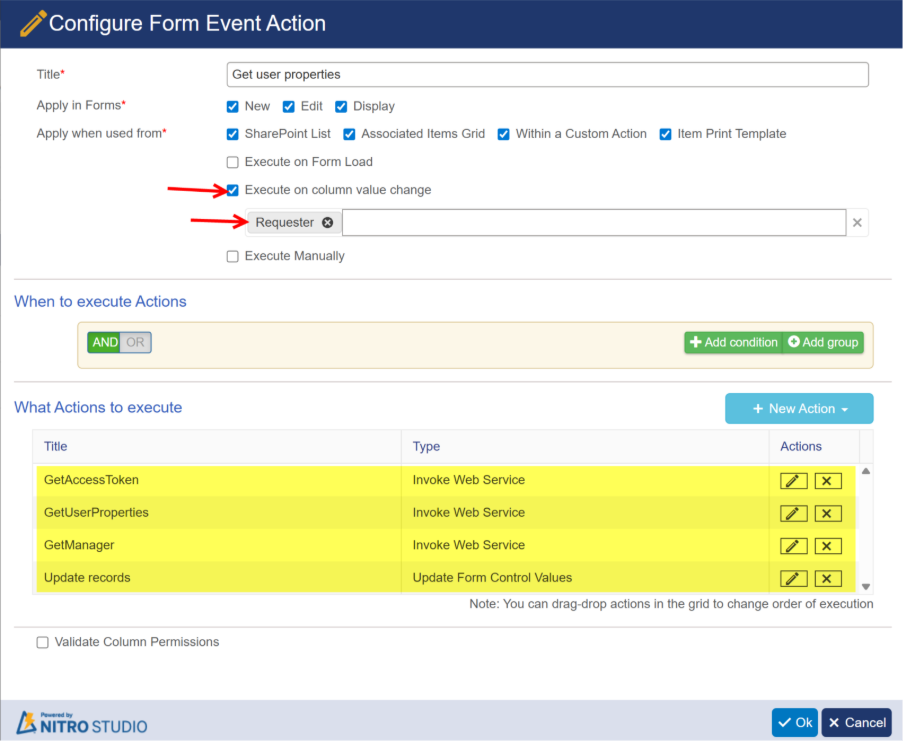
Configure invoke web service action to get access token as shown below:

URL: https://login.microsoftonline.com/{{tenantId}}/OAuth2/V2.0/token
In the above URL, replace “{{tenantId}}” with your tenant id that we have copied in “Create new app registration” section above.
HTTP Method: POST
Headers:
| Key | Value |
| Content-Type | application/x-www-form-urlencoded |
Data:
grant_type=client_credentials&client_id={{ClientId}}&client_secret={{ClientSecretId}}&scope=https://graph.microsoft.com/.default
In the above, replace {{ClientId}} and {{ ClientSecretId}} that we have copied earlier.
Action2: GetUserProperties
Create invoke web service action to get the user property values for Requester.
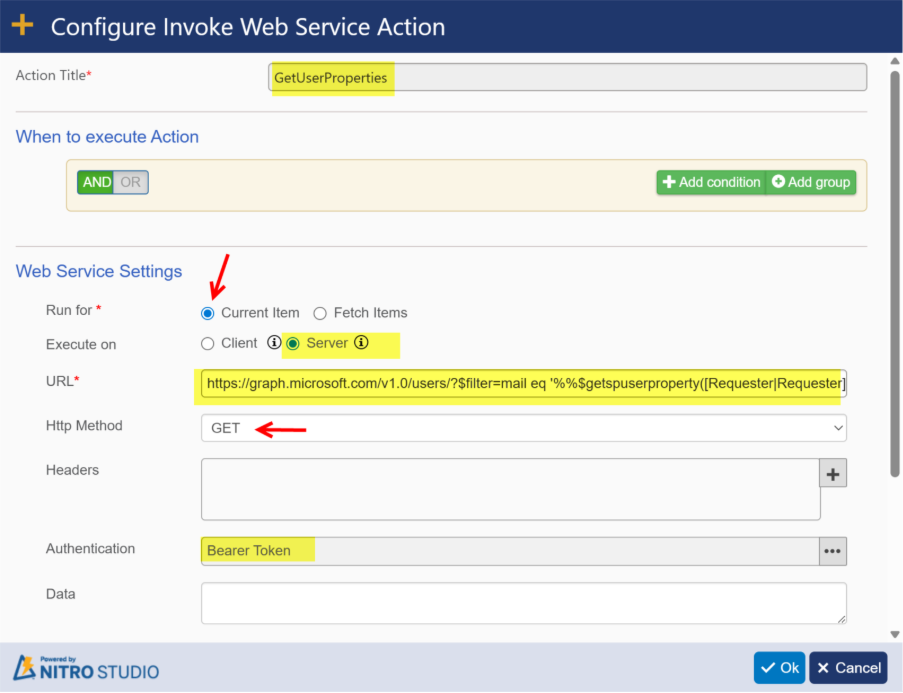
URL:
https://graph.microsoft.com/v1.0/users/?$filter=mail eq ‘%%$getspuserproperty(email,;,[Requester|Requester])%%’&$select=id,displayName,jobTitle,mail,officeLocation,Department,faxNumber,mobilePhone
Note: In the above URL, replace [Requester|Requester] placeholder based on column name in your list.
The above URL will give the user property values of the user present in the “Requester” column. The response will return the specified attributes of the user:
- Id
- displayName
- jobTitle
- officeLocation
- Department
- faxNumber
- mobilePhone
For more attributes, please refer properties section in this article.
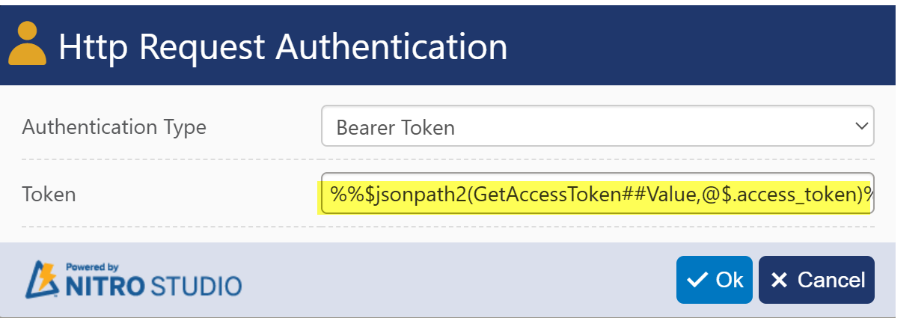
Authentication:
Select Bearer Token authentication
%%$jsonpath2(GetAccessToken##Value,@$.access_token)%%
In the above, replace “GetAccessToken##Value” with “Action1 Name##Value”
Sample Output response:
{
“@odata.context”:”https://graph.microsoft.com/v1.0/$metadata#users(id,displayName,jobTitle,mail,officeLocation,department,faxNumber,mobilePhone)”,
“value”:[
{
“id”:”339dbef6-b33d-40fd-8985-XXXXXXXXXX”,
“displayName”:”Pavan Kumar”,
“jobTitle”:”Developer”,
“mail”:”pavan@crowcanyon365.com”,
“officeLocation”:null,
“department”:”IT”,
“faxNumber”:null,
“mobilePhone”:”XXXXXXXXX”
}
]
}
Action3: GetManager
To get the manager property value, we need to use different URL.
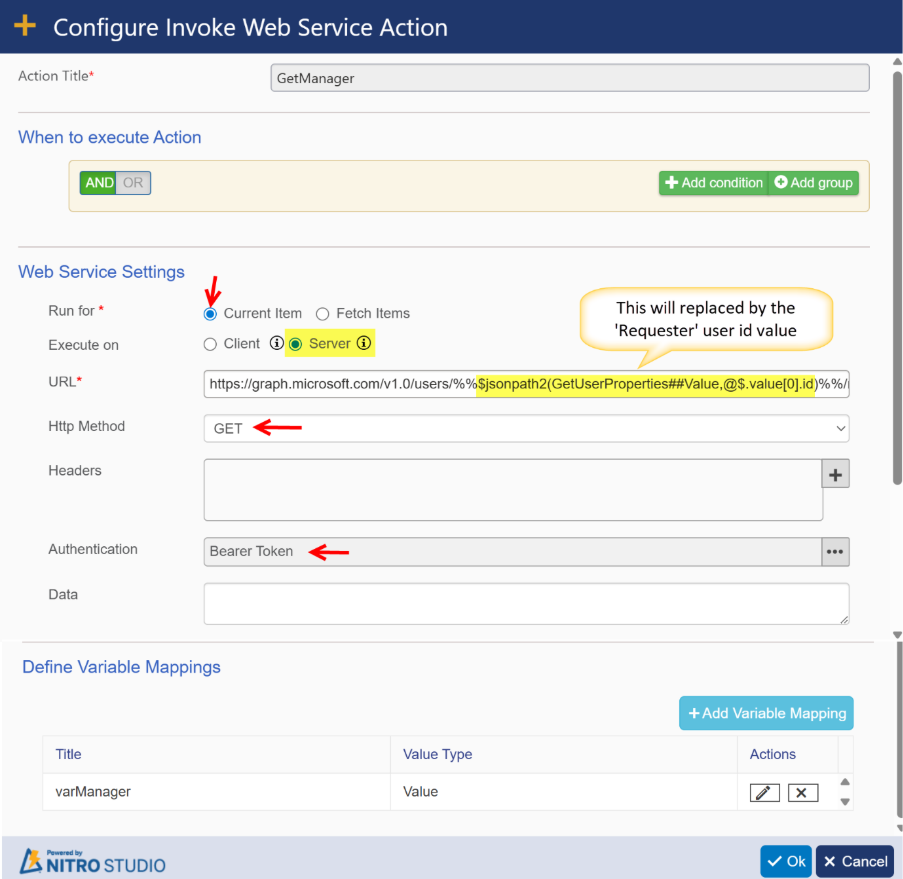
URL: https://graph.microsoft.com/v1.0/users/%%$jsonpath2(GetUserProperties##Value,@$.value[0].id)%%/manager?$select=displayName
“$jsonpath2(GetUserProperties##Value,@$.value[0].id)”:
This will return the requester user id value from the response of “Action 2: GetUserProperties”.
Sample output response:
{
“@odata.context”:”https://graph.microsoft.com/v1.0/$metadata#directoryObjects(displayName)/$entity”,
“@odata.type”:”#microsoft.graph.user”,
“displayName”:”Scott Restivo”
}
Click variable mapping to save the manager value in a variable.
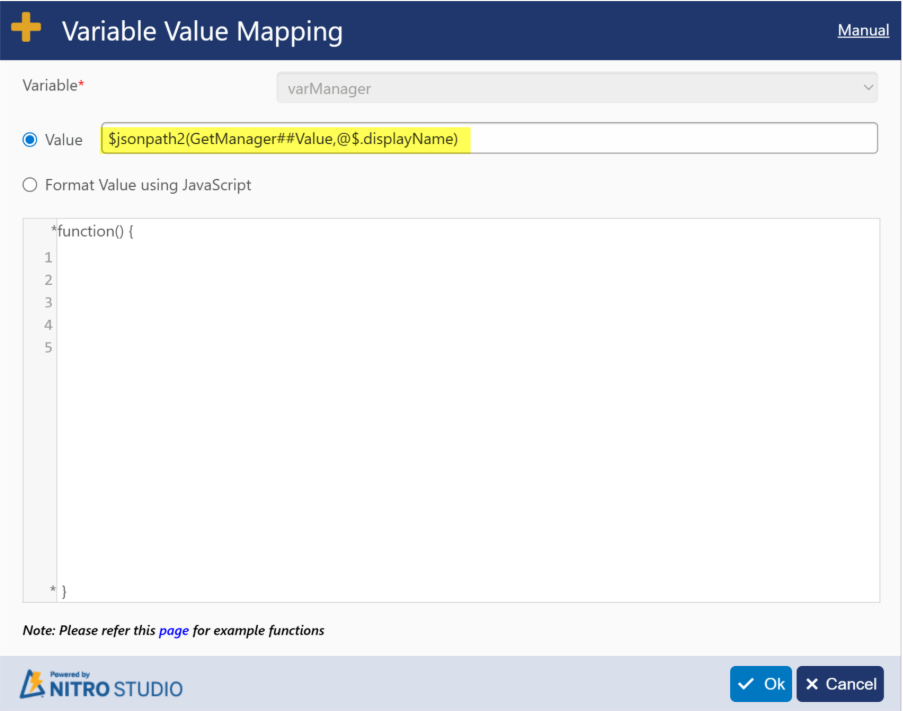
Value used in above: $jsonpath2(GetManager##Value,@$.displayName)
“GetManager##Value”: Invoke web service action name to get the manager property value.
Action4: Update records
Configure Update Form Controls action to update a user record in the list.
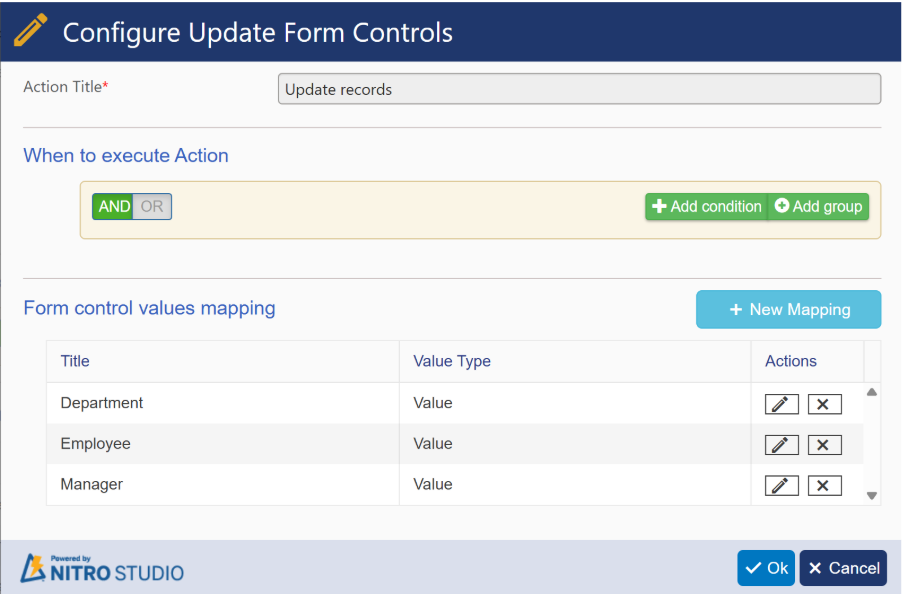
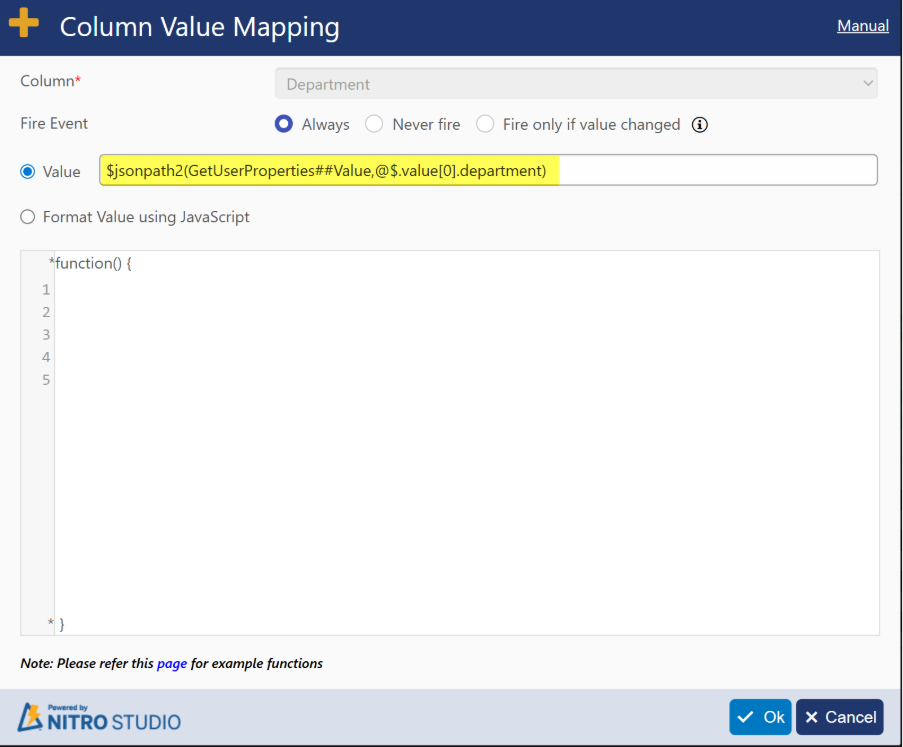
Department column mapping:
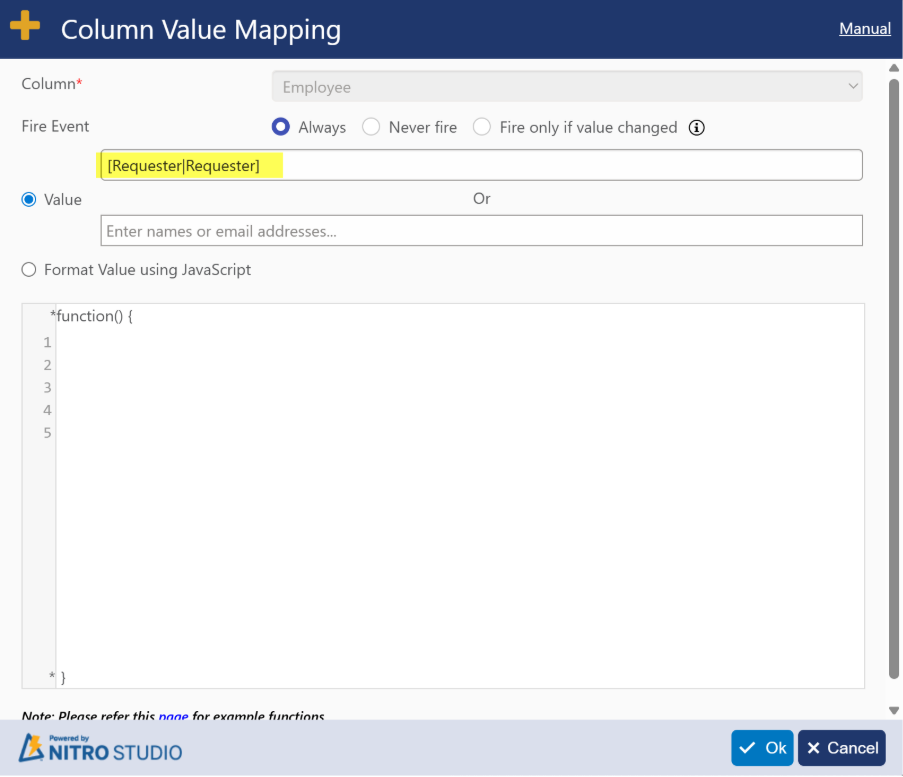
Employee column mapping:
Manager Column Mapping:
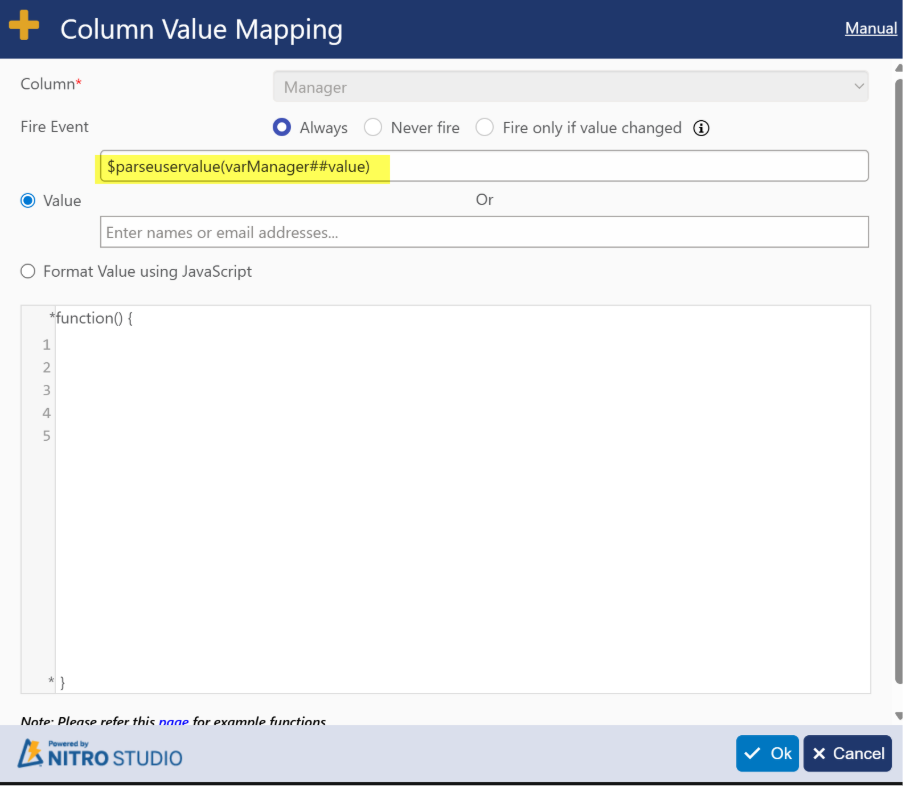
Column Mappings:
| Column Name | Value |
| Department | $jsonpath2(GetUserProperties##Value,@$.value[0].department) |
| Employee | [Requester|Requester] |
| Manager | $parseuservalue(varManager##Value) |
Sample Output:
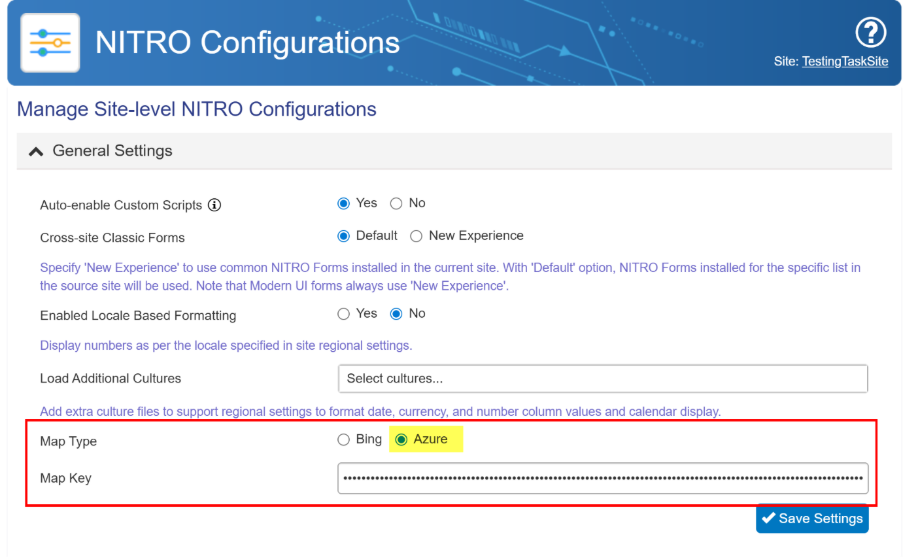
- New Feature: Added Azure map support for Geolocation column as Bing maps are deprecated.
NITRO Studio has added support for Azure Maps integration in NITRO Forms to capture location and in the NITRO List View for the Map View.
Configuration
Azure Maps Key
Configure Azure Maps key in NITRO Site Settings. This key is used for all geolocation columns in the lists for the site.
Go to the SharePoint Site -> Site Contents -> Site Settings -> Crow Canyon NITRO Site Settings
Select Map Type as ‘Azure’
Map Key: Please refer to below article to get the authentication key for your Azure map account in the Azure portal.
If you do not have an Azure or Azure Maps resource, please refer to this article to create: https://learn.microsoft.com/en-us/azure/azure-maps/how-to-manage-account-keys
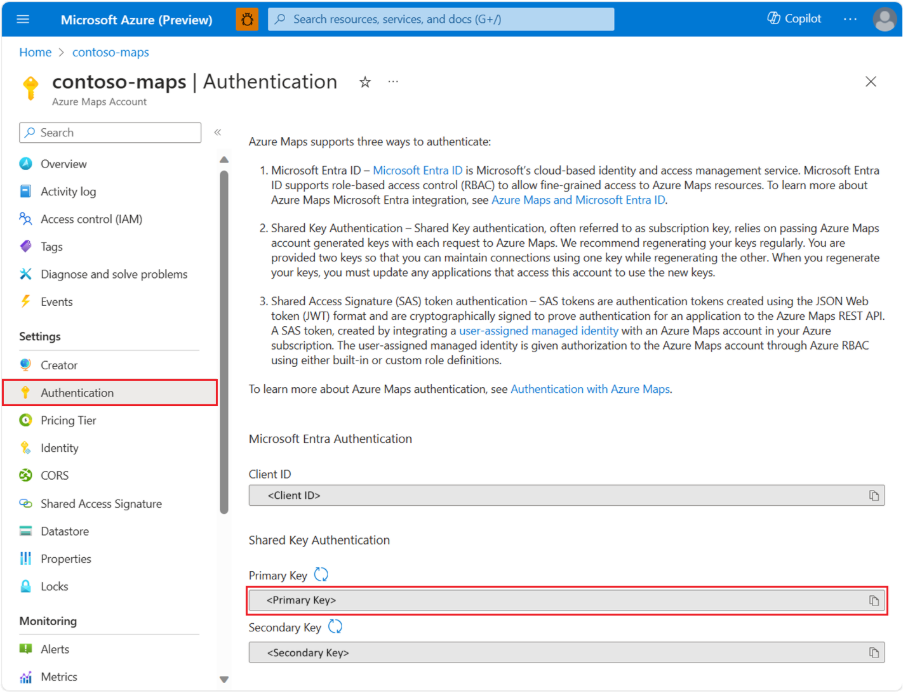
Copy the ‘Primary Key’ for use in the next step as shown below. Enter the map key and save settings.

Geolocation Column in SharePoint
Create a SharePoint List or use your existing list where location data needs to be captured.
Geolocation fields can now be added to SharePoint lists and used directly in NITRO Forms and List Views.
Steps to Add a Geolocation Column
Prerequisites
Before running the steps below, ensure that:
- You have SharePoint admin or site owner permissions.
- PowerShell 7 (x64) is installed on your machine.
- The PnP.PowerShell module is installed.
- An Azure AD app registration is set up, and you have a valid ClientId to authenticate with your SharePoint site.
Procedure
- Install PowerShell 7 (x64).
- Download and install from Microsoft’s official site.
- Install the PnP.PowerShell module:
Install-Module PnP.PowerShell -Scope CurrentUser
- Setup permissions for PnP PowerShell
- Connect to your SharePoint site:
Connect-PnPOnline https://<yourtenant>.sharepoint.com/sites/<sitename> -Interactive -ClientId <client-id>
- Retrieve the list where the column will be added:
$list = Get-PnPList -Identity “<ListName>”
- Add the Geolocation column (change column name):
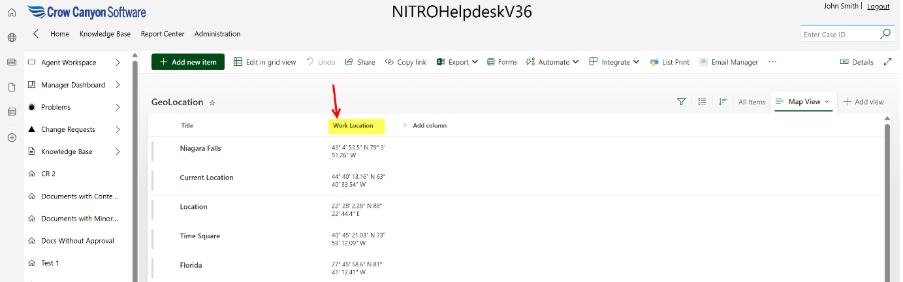
Add-PnPField -List $list -Type GeoLocation -DisplayName “Work Location” -InternalName “WorkLocation” -AddToDefaultView
A new Geolocation column (Work Location) is created in the specified SharePoint list and added to the default view.

NITRO Forms
Geolocation support is available in New, Edit, and Display forms.
- New/Edit Form:
- Capture current location.
- Select location from the map.
- Enter latitude and longitude manually in Specify Location.
- Display Form:
- Show map for saved location.
New/Edit Form:
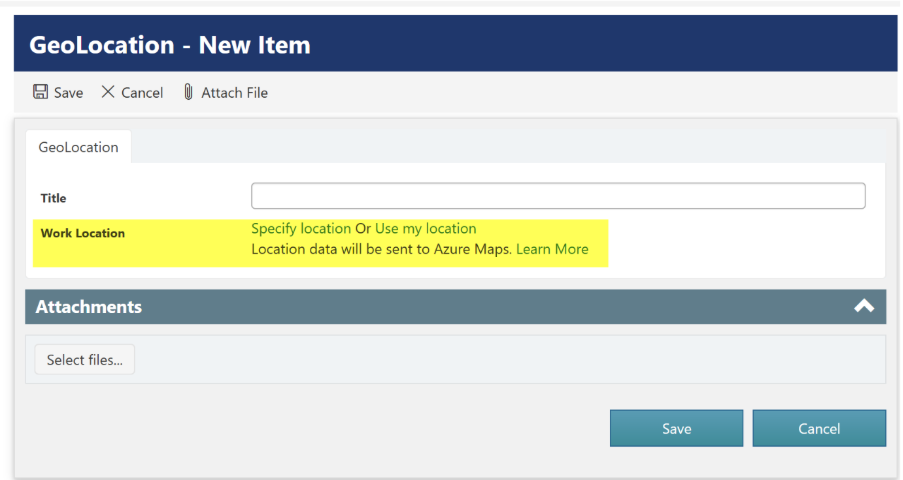
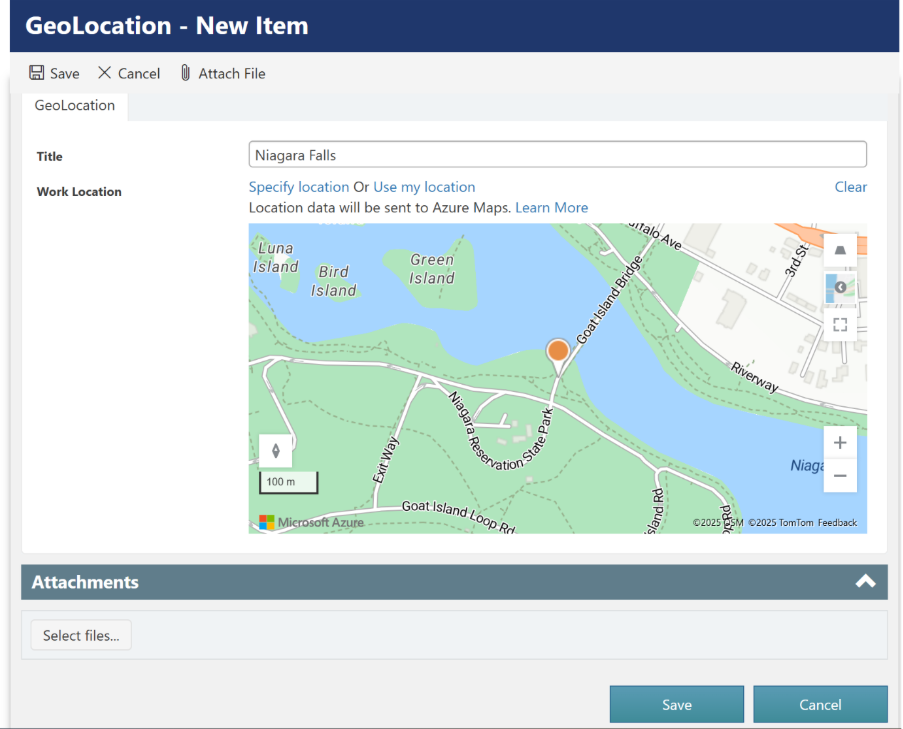
Clicking “Specify Location” opens a window to input the location’s latitude and longitude.
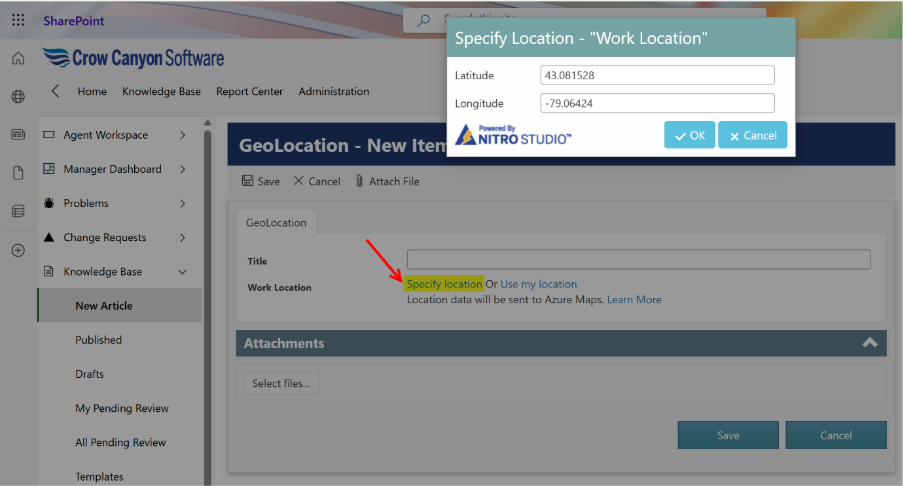
After entering the latitude and longitude values, the corresponding location will be displayed on the map.
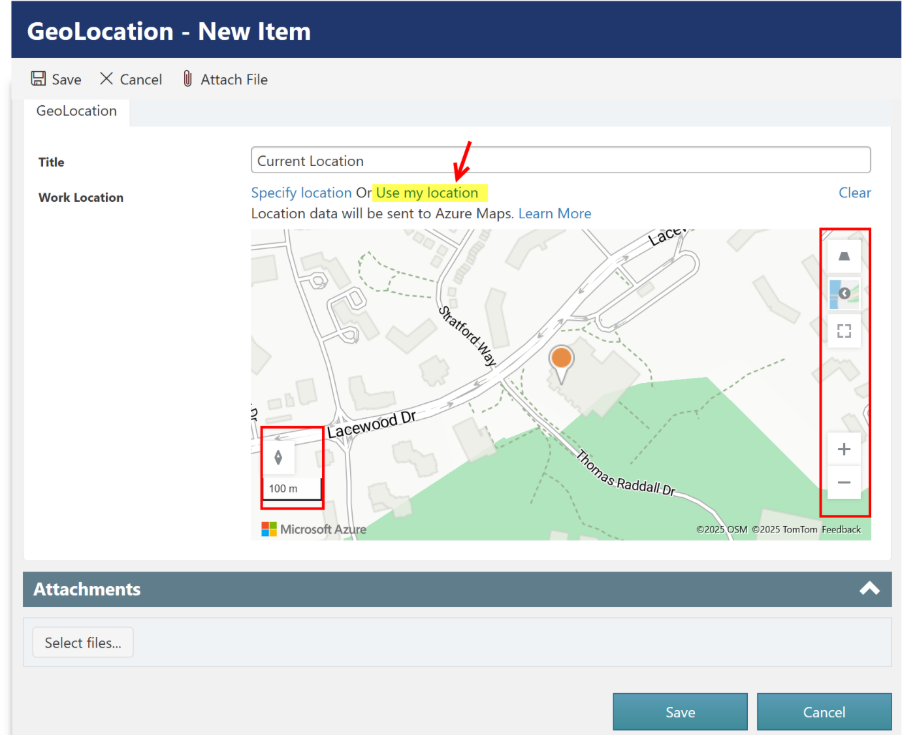
Clicking “Use My Location” displays the user’s current location on the map. Note that this may prompt for location permissions by the browser or the mobile device.
Display Form:
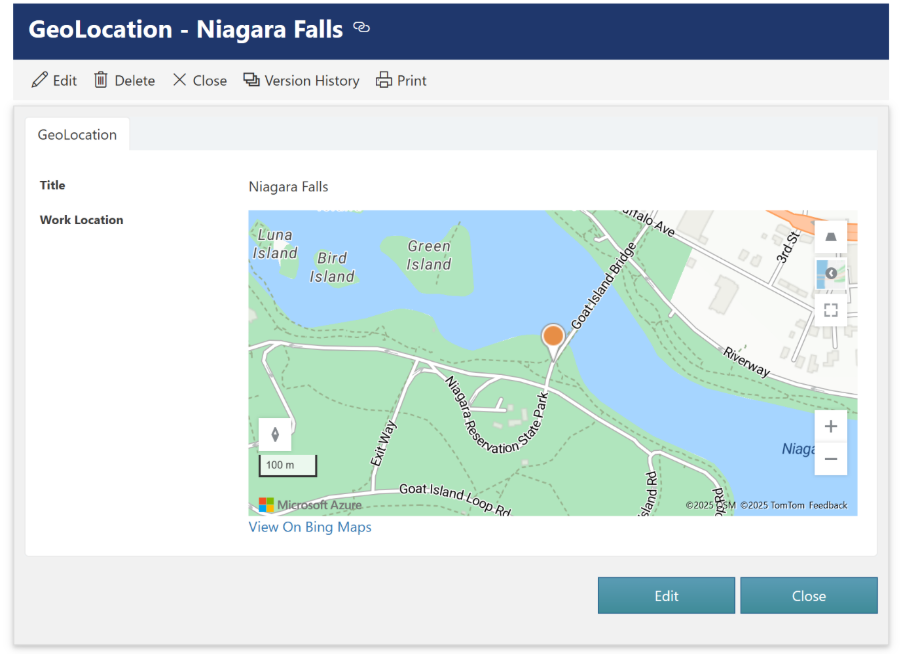
The map can be adjusted using the available controls on New/Edit/Display NITRO Form.
Map Adjustment Options
The following buttons are available to adjust the map:
- Pitch Controls: Reset to default pitch, increase pitch, or decrease pitch.
- Map Style: Select from available map styles.
- Full Screen: View the map in full screen mode.
- Zoom: Zoom in or zoom out.
- Rotation Controls: Reset to default rotation, rotate left, or rotate right.
- Clear: Use the clear option to remove the map.
Create Map View in SharePoint List
Since map displays error due to Bing Maps deprecation, you can now use NITRO List View. SharePoint Map View details are available at this link: https://learn.microsoft.com/en-us/sharepoint/dev/general-development/create-a-map-view-for-the-geolocation-field-in-sharepoint
- New Feature: In ‘AI Action’ added new ‘AI Process’ action type. This has JSON based configuration for orchestrating complex flows with AI.
Overview
The AI Process Action in NITRO Forms allows you to integrate AI into your business processes. You can configure actions such as AI Summaries, AI Assistance, Auto Classification, or Customized Responses, directly within NITRO Forms.
When users run these actions, the system sends selected list data (ticket details, conversation logs, work notes, etc.) to AI, and the AI response is displayed back in the form. This enables faster decision-making, better productivity, and smarter ticket handling.
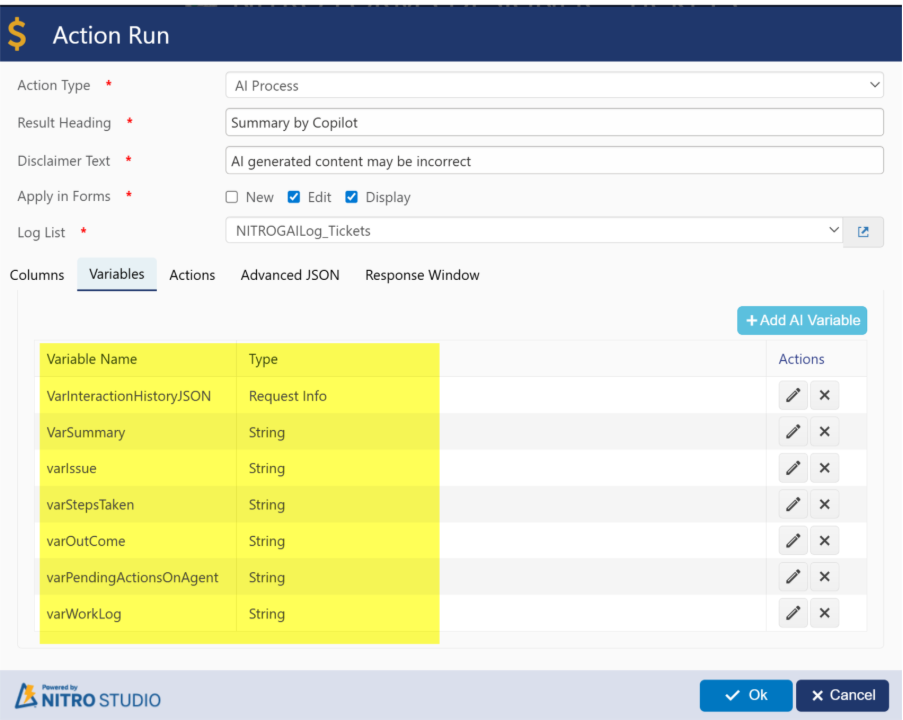
In this example, we configure an AI Action called “Summary by Copilot” that generates a ticket summary using interaction history and work logs, and displays the results directly on the ticket form.
Steps to Configure AI Process Action
1. Create a New AI Action
- Navigate to NITRO Forms Designer → Actions → Add AI Action.
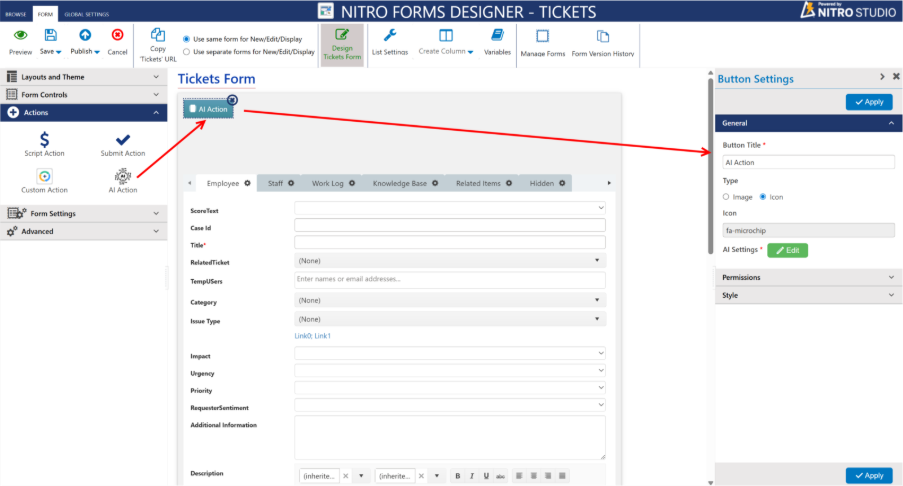
- Set Action Type to AI Process.
- Enter:
- Result Heading: Summary by Copilot
- Disclaimer Text: AI generated content may be incorrect
- Apply in Forms: Edit, Display (select as needed)
- Log List: Select your AI Log list (e.g., NITROGAILog_Tickets)
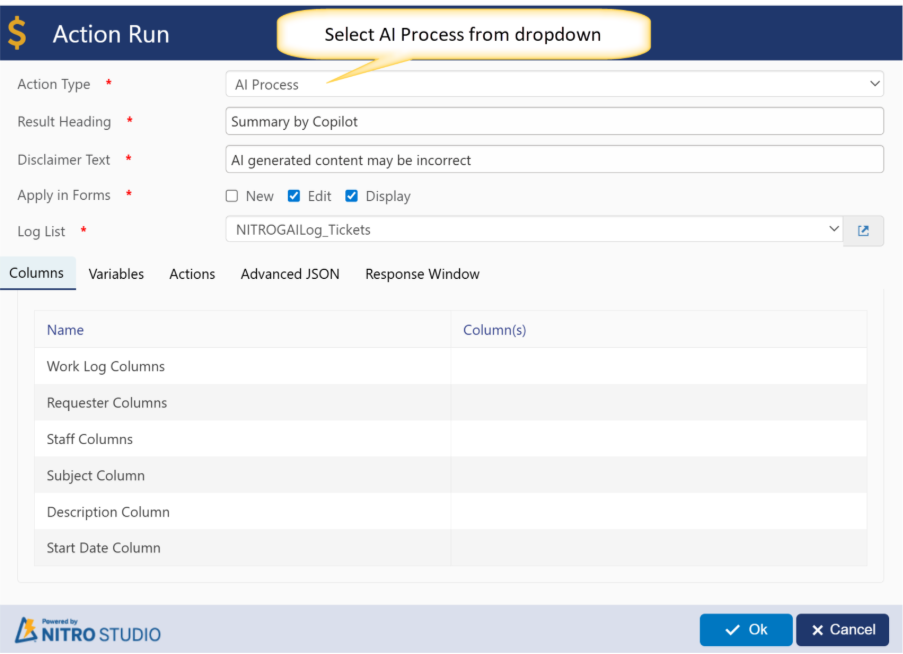
2. Configure Columns
Define which ticket columns should be passed to AI for context:
- Work Log Columns → Work Log, WorkLogInternal
- Requester Columns → Requester, Requester Email
- Staff Columns → Assigned Staff
- Subject Column → Title
- Description Column → Description
- Start Date Column → Created
3. Configure Variables
Variables act as placeholders for both input (sent to AI) and output (received from AI).
Example variables:
- VarInteractionHistoryJSON (Request Info) → Stores interaction history
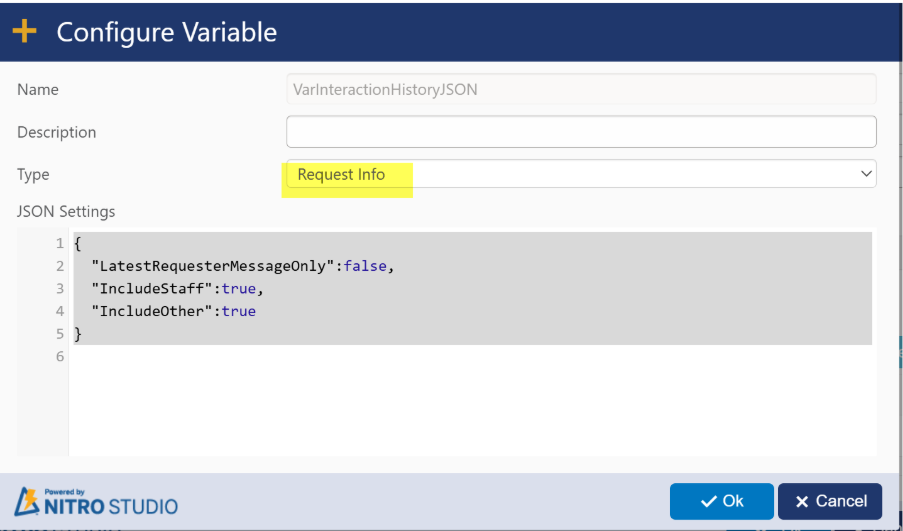
- varWorkLog (String from Work Log column)
- varIssue, varStepsTaken, varOutCome, varPendingActionsOnAgent (Output values from AI)
- VarSummary (Formatted summary for display)
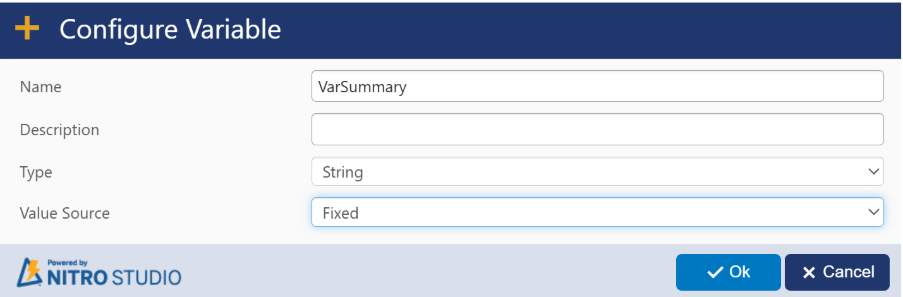
Like VarSummary, create the remaining variables with type set to String and Value Source set to Fixed.
4. Configure Actions
Actions define how AI is called and how results are processed.
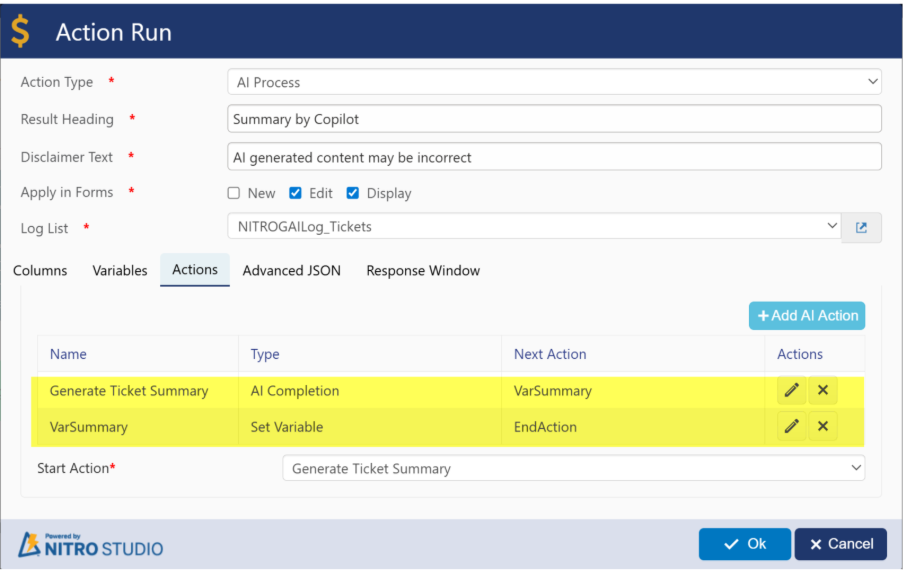
Example setup:
- Generate Ticket Summary (AI Completion)
- Passes interaction history and work logs to AI
- AI generates structured output (Issue, Steps Taken, Outcome, Pending Actions)
- Output mapped to variables
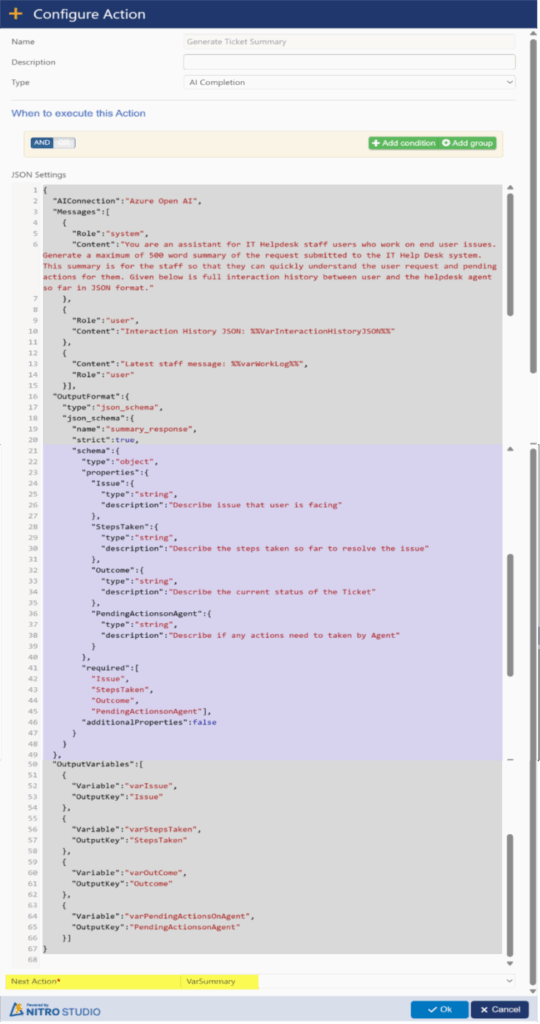
JSON Used above:
{
“AIConnection”:”Azure Open AI”,
“Messages”:[
{
“Role”:”system”,
“Content”:”You are an assistant for IT Helpdesk staff users who work on end user issues. Generate a maximum of 500 word summary of the request submitted to the IT Help Desk system. This summary is for the staff so that they can quickly understand the user request and pending actions for them. Given below is full interaction history between user and the helpdesk agent so far in JSON format.”
},
{
“Role”:”user”,
“Content”:”Interaction History JSON: %%VarInteractionHistoryJSON%%”
},
{
“Content”:”Latest staff message: %%varWorkLog%%”,
“Role”:”user”
}],
“OutputFormat”:{
“type”:”json_schema”,
“json_schema”:{
“name”:”summary_response”,
“strict”:true,
“schema”:{
“type”:”object”,
“properties”:{
“Issue”:{
“type”:”string”,
“description”:”Describe issue that user is facing”
},
“StepsTaken”:{
“type”:”string”,
“description”:”Describe the steps taken so far to resolve the issue”
},
“Outcome”:{
“type”:”string”,
“description”:”Describe the current status of the Ticket”
},
“PendingActionsonAgent”:{
“type”:”string”,
“description”:”Describe if any actions need to taken by Agent”
}
},
“required”:[
“Issue”,
“StepsTaken”,
“Outcome”,
“PendingActionsonAgent”],
“additionalProperties”:false
}
}
},
“OutputVariables”:[
{
“Variable”:”varIssue”,
“OutputKey”:”Issue”
},
{
“Variable”:”varStepsTaken”,
“OutputKey”:”StepsTaken”
},
{
“Variable”:”varOutCome”,
“OutputKey”:”Outcome”
},
{
“Variable”:”varPendingActionsOnAgent”,
“OutputKey”:”PendingActionsonAgent”
}]
}
- VarSummary (Set Variable)
- Formats the output into HTML for display
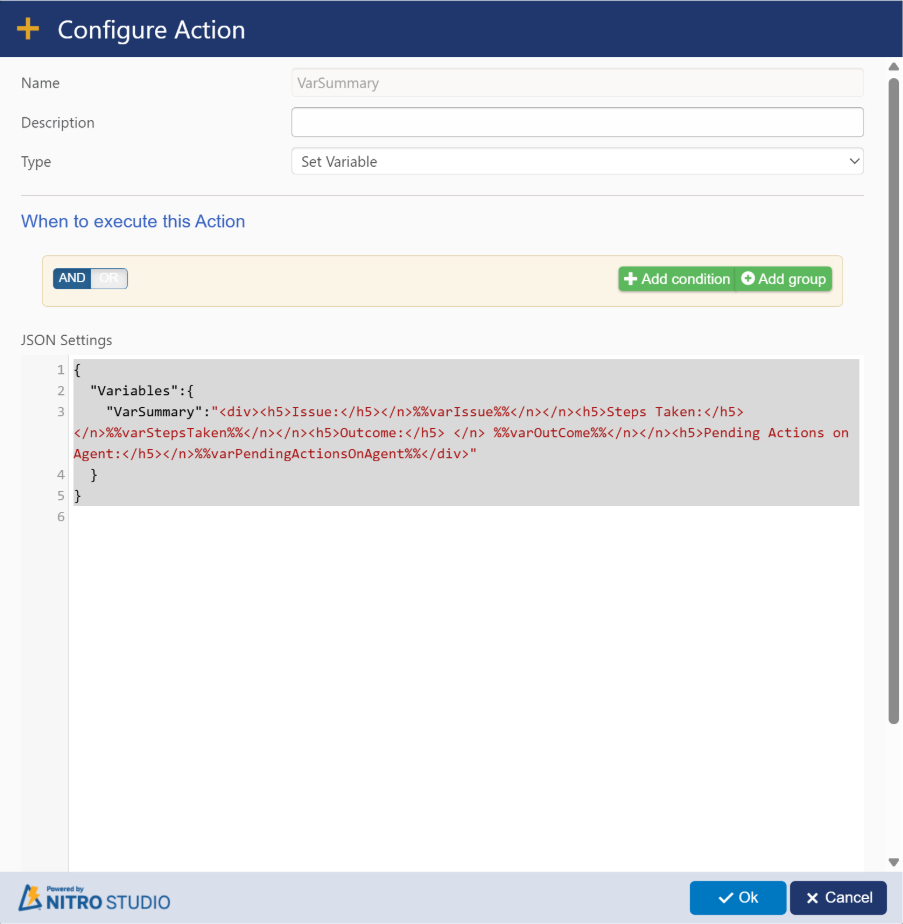
JSON Used above:
{
“Variables”:{
“VarSummary”:”<div><h5>Issue:</h5></n>%%varIssue%%</n></n><h5>Steps Taken:</h5></n>%%varStepsTaken%%</n></n><h5>Outcome:</h5> </n> %%varOutCome%%</n></n><h5>Pending Actions on Agent:</h5></n>%%varPendingActionsOnAgent%%</div>”
}
}
5. Configure Advanced JSON
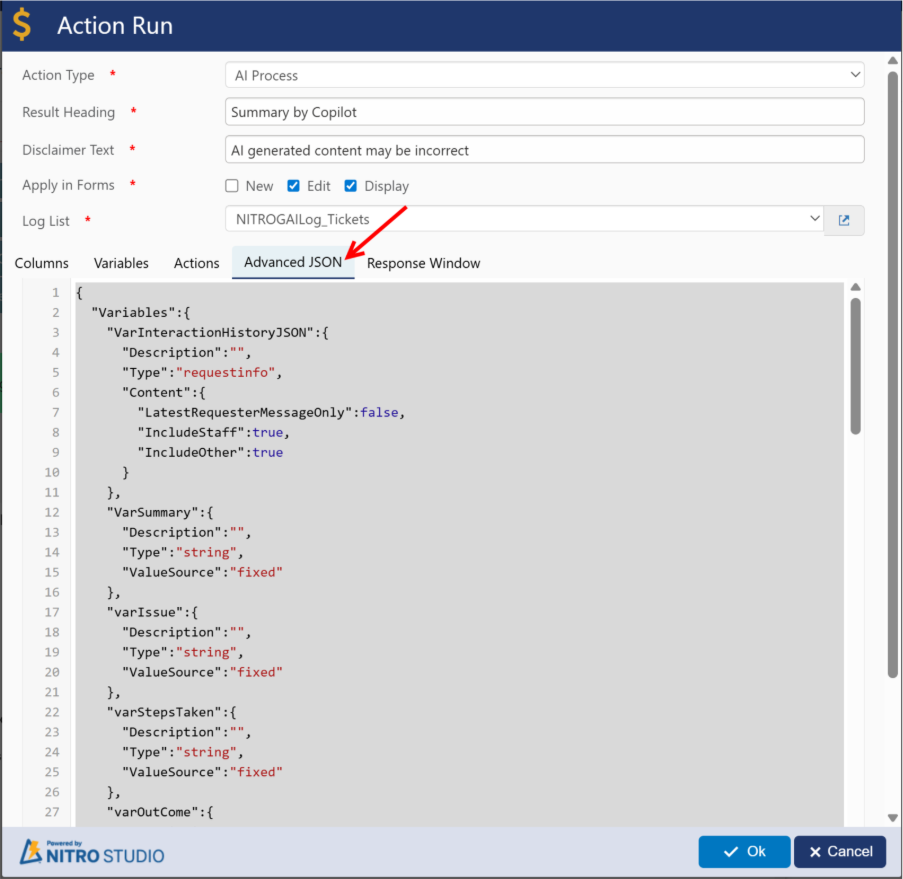
Advanced JSON used above:
{
“Variables”:{
“VarInteractionHistoryJSON”:{
“Description”:””,
“Type”:”requestinfo”,
“Content”:{
“LatestRequesterMessageOnly”:false,
“IncludeStaff”:true,
“IncludeOther”:true
}
},
“VarSummary”:{
“Description”:””,
“Type”:”string”,
“ValueSource”:”fixed”
},
“varIssue”:{
“Description”:””,
“Type”:”string”,
“ValueSource”:”fixed”
},
“varStepsTaken”:{
“Description”:””,
“Type”:”string”,
“ValueSource”:”fixed”
},
“varOutCome”:{
“Description”:””,
“Type”:”string”,
“ValueSource”:”fixed”
},
“varPendingActionsOnAgent”:{
“Description”:””,
“Type”:”string”,
“ValueSource”:”fixed”
},
“varWorkLog”:{
“Description”:””,
“Type”:”string”,
“ValueSource”:”column”,
“ColumnName”:”WorkLog”
}
},
“RequestSchema”:{
“Columns”:{
“WorkLogColumns”:[
“WorkLog”,
“WorkLogInternal”],
“RequesterColumns”:[
“Requester”,
“RequesterEmail”],
“StaffColumns”:[
“AssignedStaff”],
“SubjectColumn”:”Title”,
“DescriptionColumn”:”Description1″,
“StartDateColumn”:”Created”
}
},
“ProgressDialogTitle”:”Dialog Progress Title”,
“ProgressDialogBody”:”<div style=’padding:20px;text-align: center;’>Dialog Progress Body <img src=’https://cdn.crowcanyon.com/images/progress.gif’ /></div>”,
“StartAction”:”Generate Ticket Summary”,
“Actions”:[
{
“AIConnection”:”Azure Open AI”,
“Messages”:[
{
“Role”:”system”,
“Content”:”You are an assistant for IT Helpdesk staff users who work on end user issues. Generate a maximum of 500 word summary of the request submitted to the IT Help Desk system. This summary is for the staff so that they can quickly understand the user request and pending actions for them. Given below is full interaction history between user and the helpdesk agent so far in JSON format.”
},
{
“Role”:”user”,
“Content”:”Interaction History JSON: %%VarInteractionHistoryJSON%%”
},
{
“Content”:”Latest staff message: %%varWorkLog%%”,
“Role”:”user”
}],
“OutputFormat”:{
“type”:”json_schema”,
“json_schema”:{
“name”:”summary_response”,
“strict”:true,
“schema”:{
“type”:”object”,
“properties”:{
“Issue”:{
“type”:”string”,
“description”:”Describe issue that user is facing”
},
“StepsTaken”:{
“type”:”string”,
“description”:”Describe the steps taken so far to resolve the issue”
},
“Outcome”:{
“type”:”string”,
“description”:”Describe the current status of the Ticket”
},
“PendingActionsonAgent”:{
“type”:”string”,
“description”:”Describe if any actions need to taken by Agent”
}
},
“required”:[
“Issue”,
“StepsTaken”,
“Outcome”,
“PendingActionsonAgent”],
“additionalProperties”:false
}
}
},
“OutputVariables”:[
{
“Variable”:”varIssue”,
“OutputKey”:”Issue”
},
{
“Variable”:”varStepsTaken”,
“OutputKey”:”StepsTaken”
},
{
“Variable”:”varOutCome”,
“OutputKey”:”Outcome”
},
{
“Variable”:”varPendingActionsOnAgent”,
“OutputKey”:”PendingActionsonAgent”
}],
“NextAction”:”VarSummary”,
“ActionId”:”Generate Ticket Summary”,
“Description”:””,
“Type”:”aicompletion”,
“Conditions”:{
“condition”:”AND”,
“rules”:[
]
}
},
{
“Variables”:{
“VarSummary”:”<div><h5>Issue:</h5></n>%%varIssue%%</n></n><h5>Steps Taken:</h5></n>%%varStepsTaken%%</n></n><h5>Outcome:</h5> </n> %%varOutCome%%</n></n><h5>Pending Actions on Agent:</h5></n>%%varPendingActionsOnAgent%%</div>”
},
“NextAction”:”EndAction”,
“ActionId”:”VarSummary”,
“Description”:””,
“Type”:”setvariable”,
“Conditions”:{
“condition”:”AND”,
“rules”:[
]
}
}],
“LogListName”:”NITROCAAILog_Tickets”,
“LogListId”:”041f9d7e-c2f0-44fb-b9e4-420121b63026″
}
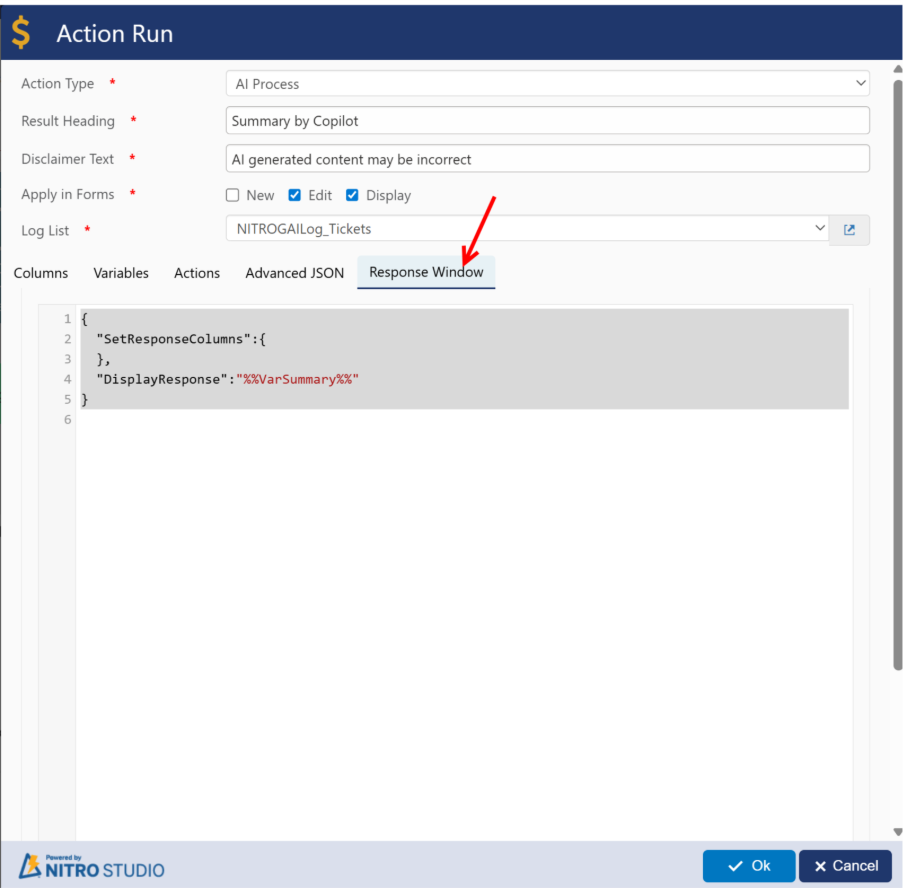
6. Configure Response Window
The Response Window displays the AI-generated summary in the ticket form.
Example setting:
{
“SetResponseColumns”:{
},
“DisplayResponse”:”%%VarSummary%%”
}
Similarly, you can configure any action using AI process as per requirement.
Example Output
Once configured, when a staff member clicks Summary by Copilot, the AI generates a structured summary:
Issue: Internet connection dropping frequently
Steps Taken: Restarted router, checked cables, escalated to ISP
Outcome: Waiting for ISP confirmation
Pending Actions on Agent: Follow up with ISP within 24 hours
This summary is displayed below the action button in the ticket form, helping staff quickly review ticket history and next steps.
Benefits
- Saves staff time by summarizing long conversations
- Provides structured insights (Issue, Steps, Outcome, Pending Actions)
- Reduces manual effort in reading and analyzing ticket logs
- Helps improve response efficiency and accuracy
- Enhancement: Option to customize form header text using advanced settings JSON.
NITRO Forms – Header Customization
With this enhancement, NITRO Forms now support customizable headers in New, Edit, and Display modes. Customers can append additional details such as Item ID, Priority, or other column values to the header text.
By default, the form header displays in the following format:
List Title – Title
With customization, you can define your own header format using placeholders.
Use Case
Add the Item ID to the header of forms (Edit/Display mode), so that each record can be quickly identified from the header.
Configuration
- Navigate to:
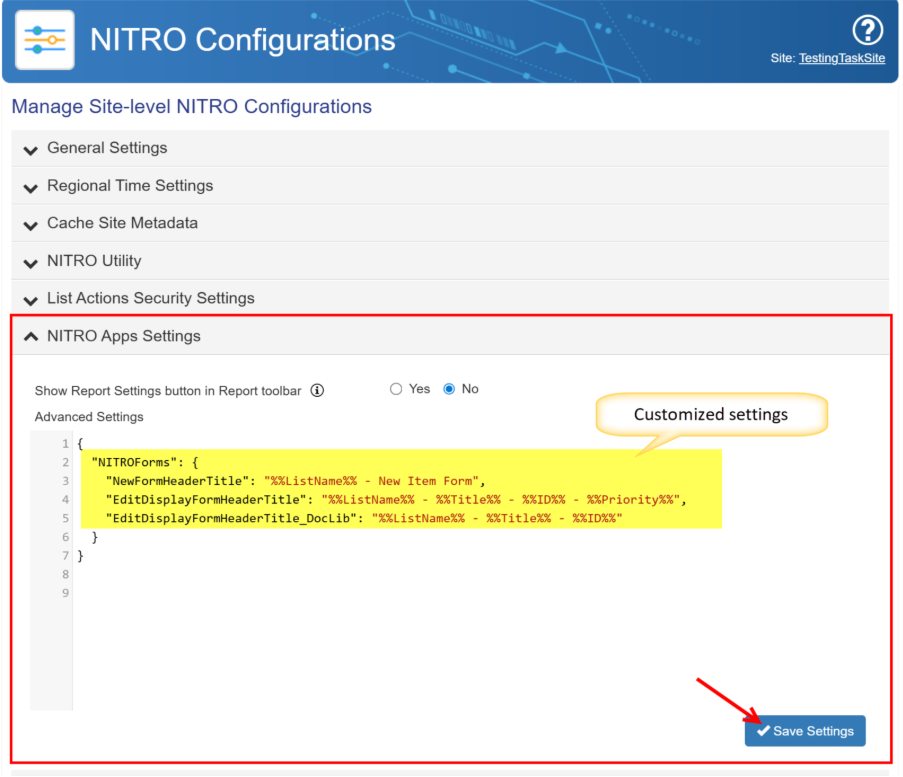
Site Settings → Crow Canyon NITRO Apps → NITRO Site Settings in left panel -> NITRO Apps Settings section
- Add the following JSON configuration under NITROForms:
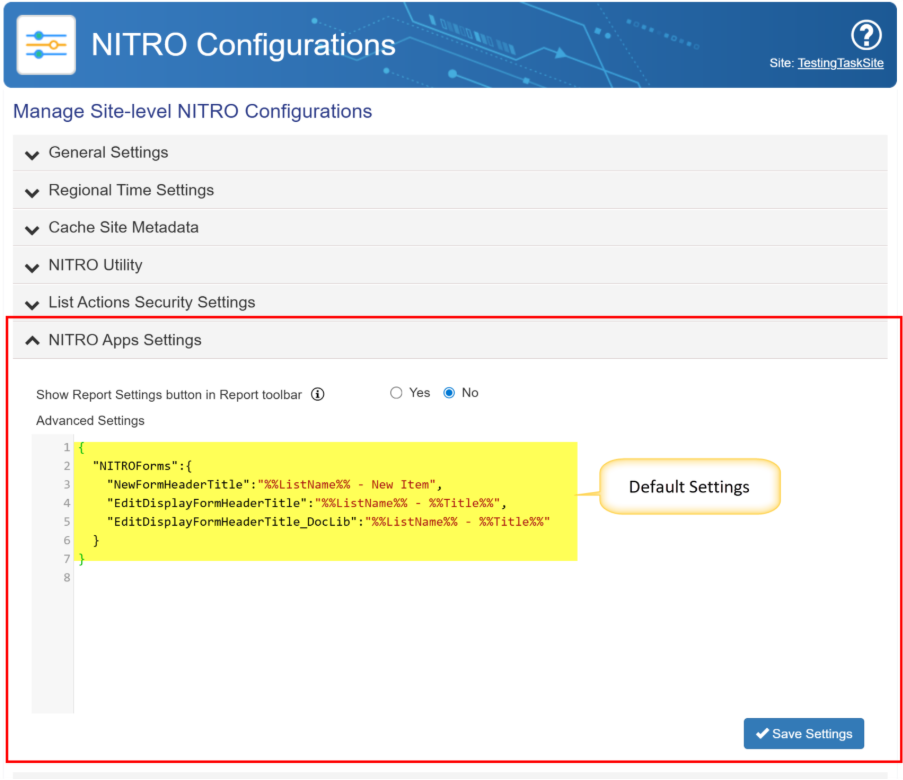
Customize settings:
{
“NITROForms”: {
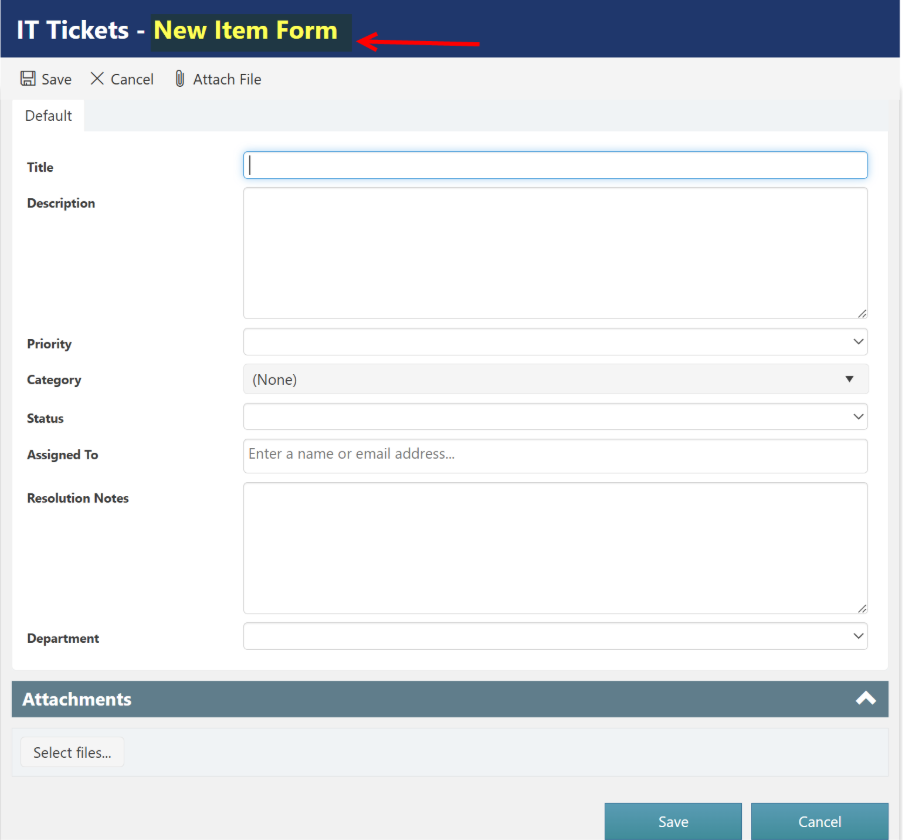
“NewFormHeaderTitle”: “%%ListName%% – New Item Form”,
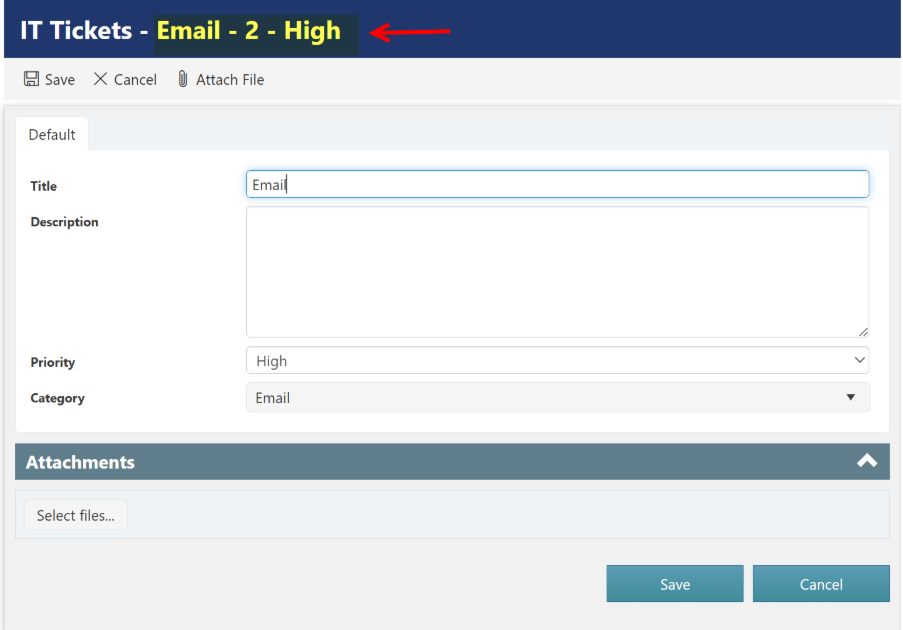
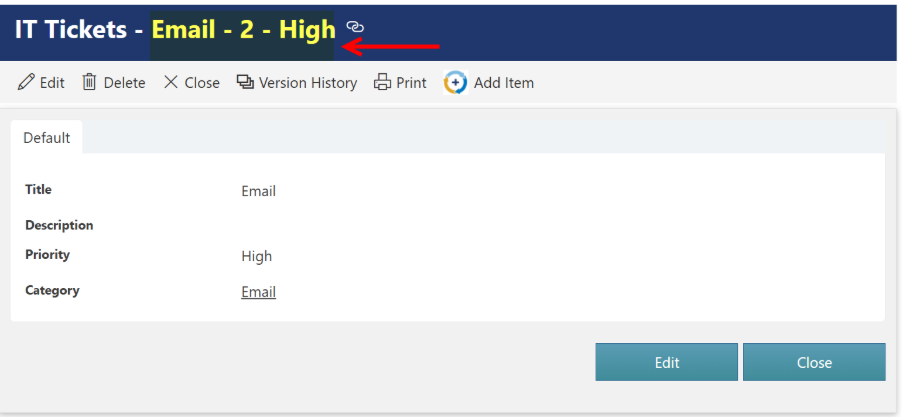
“EditDisplayFormHeaderTitle”: “%%ListName%% – %%Title%% – %%ID%% – %%Priority%%”,
“EditDisplayFormHeaderTitle_DocLib”: “%%ListName%% – %%Title%% – %%ID%%”
}
}
After customizing settings, New, edit and display form header will look like below:
New Form:
Edit Form:
Display Form:
Placeholder Details
- %%ListName%% → Displays the SharePoint list name (fixed placeholder)
- %%Title%% → Displays the value from the Title column
- %%ID%% → Displays the Item ID
- %%Priority%% → Displays the value from the Priority column
- For NewFormHeaderTitle, only %%ListName%% and fixed values are supported.
Note: Placeholders are supported only for simple text fields.
Custom Actions:
- Enhancement: In add list item action, new option to specify the NITRO form to open the item (form key).
When you configure an Add List Item Action in NITRO Custom Actions, you usually define the target list and the column values to create a new item. By default, the system will open the standard form associated with that list.
With this enhancement, in the Advanced section of the Add Item Action, you can now specify a particular NITRO Form (using its form key) to be used for opening the newly created item.
- If your list has multiple NITRO Forms configured (for example, different forms for different departments, user roles, or business scenarios), you can ensure that the correct form is displayed when the item is opened.
- It provides flexibility to direct users to a customized form instead of always relying on the default one.
- This is particularly helpful in Helpdesk, HR, or other business applications where different forms are used for Edit or Display modes based on workflow requirements.
Example scenario:
- we have a “IT Tickets” list.
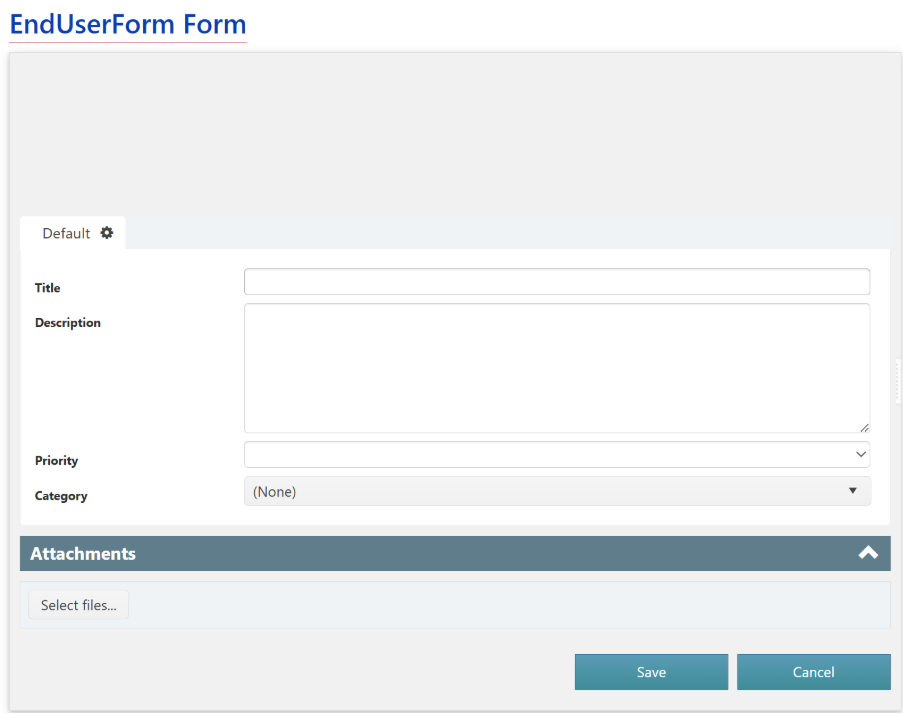
- End-users should see a simplified Display form with limited fields.
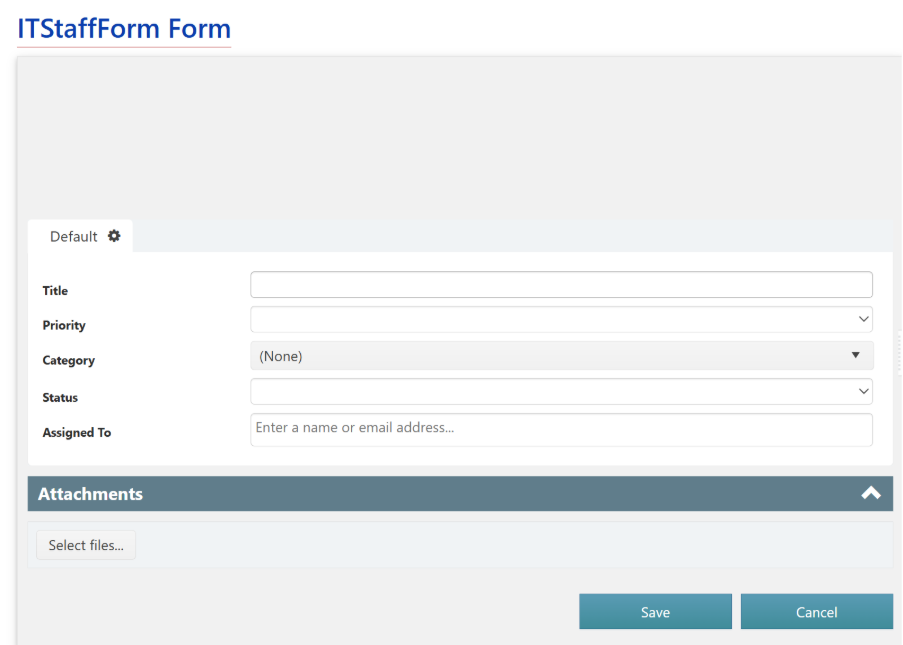
- Staff should see a detailed form with advanced options.
- Using this setting, you can configure the Add List Item Action to always open the correct NITRO form after item creation.
IT Tickets list has three NITRO Forms configured:
- IT Tickets form
- End User form
- IT Staff form
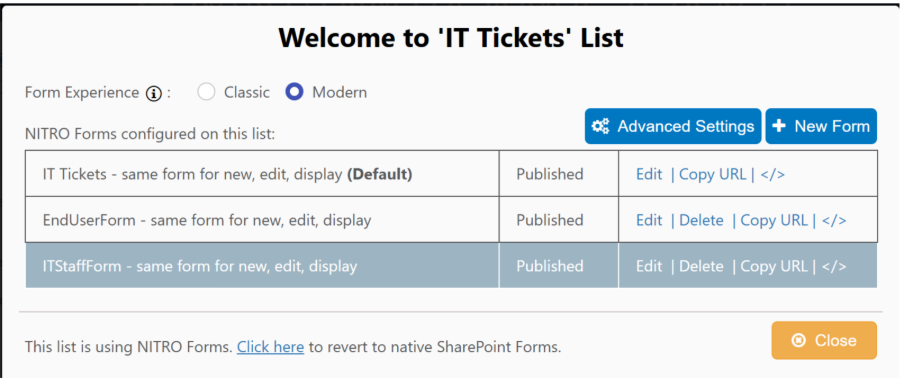
IT Ticket Form:

End User Form:
IT Staff Form:
Configure Add Item custom action on IT Tickets list as shown below:
Go to the SharePoint Site -> Site Contents -> Site Settings -> Crow Canyon NITRO apps under Site Administration section -> Custom Actions -> new/edit custom action -> Add item action -> Advanced Section -> Select Edit/Display NITRO Form (Here, the user can select which NITRO form should be used to open the item created by this custom action.)

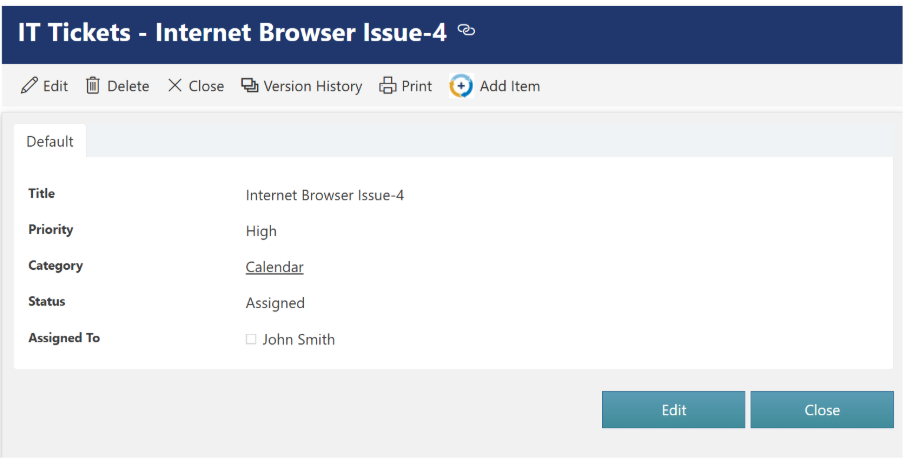
Sample Output: Ticket is created using ‘IT Ticket’ form and add item action is executed on that which has ‘End User Form’ key, so the saved item will open with End User Form
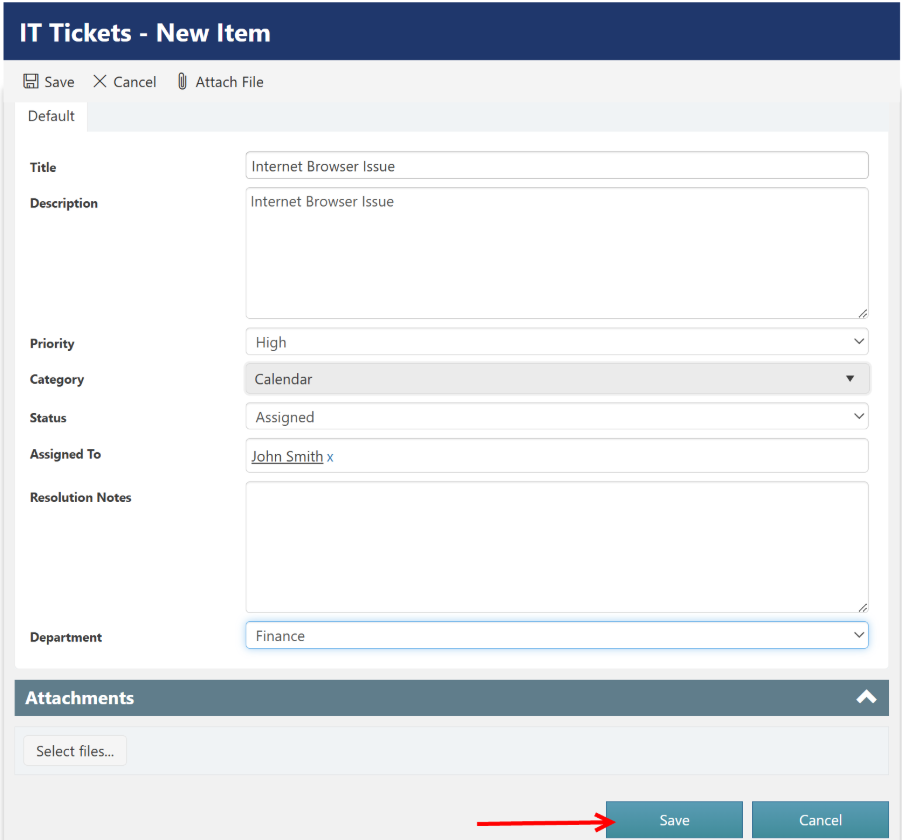
Execute Add Item Action:

The item created using the Add Item custom action will open with the End User form since ‘EndUserForm’ is selected as the form key.
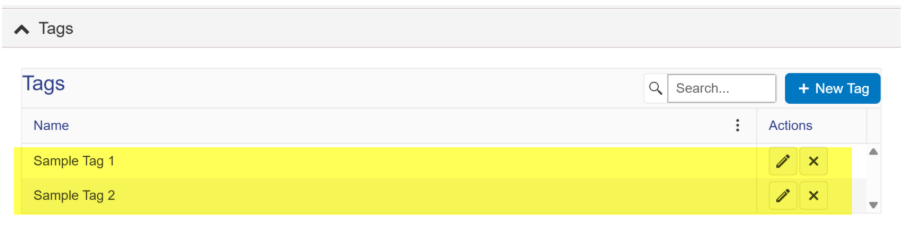
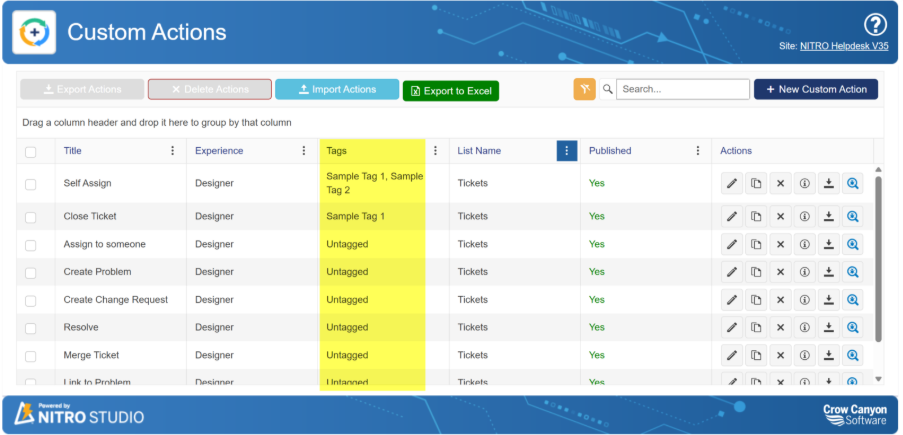
- Enhancement: Added support for tags and action description. Tags can be used to group actions in the listing on the settings page.
Go to the SharePoint Site -> Site Contents -> Site Settings -> Crow Canyon NITRO Site Settings
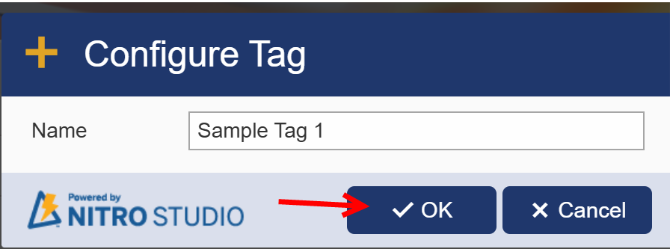
Go to the custom actions Setting page, there you can group custom action under specific tag
Go to the SharePoint Site -> Site Contents -> Site Settings -> Crow Canyon NITRO apps under Site Administration section -> Custom Actions -> new/edit custom action -> go to settings pages of custom action
- Update: Added new button in ‘Actions’ column in settings page listing to show details of Custom Action.
With Tags feature, you can now group custom actions
List View:
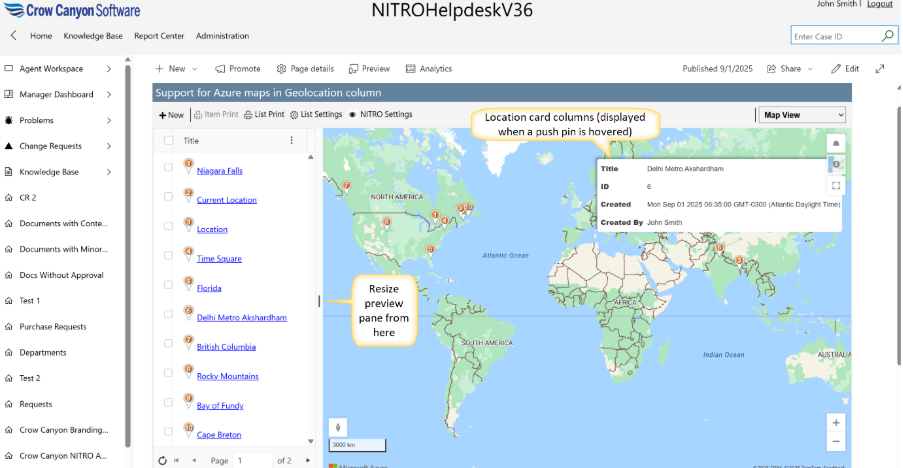
- New Feature: Support for map view using Azure Maps for lists with Geolocation type columns.
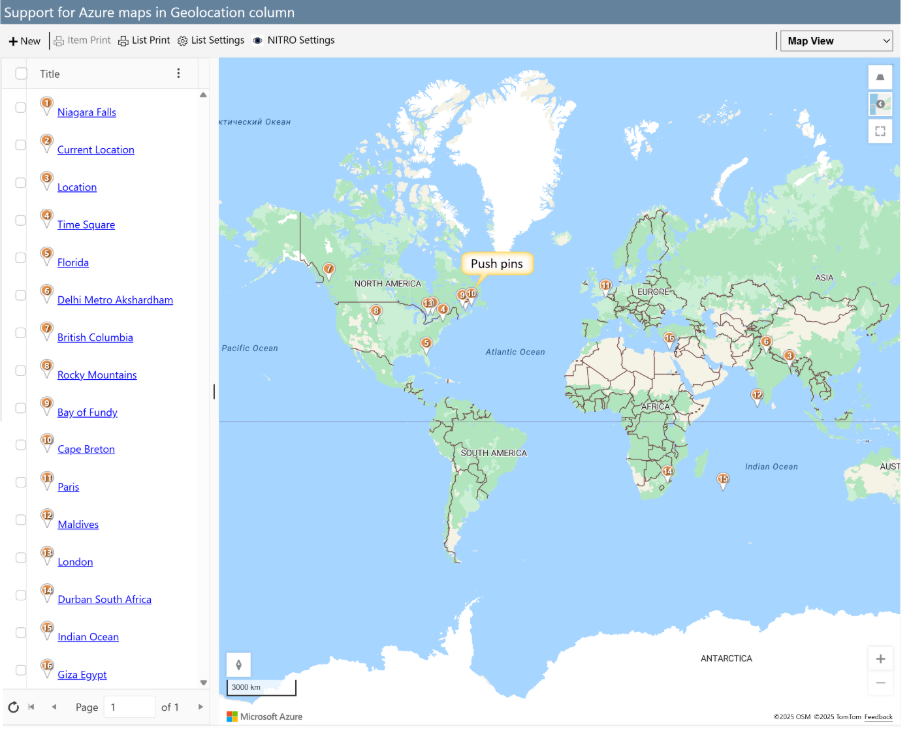
Map View support in NITRO List View
NITRO List View now allows users to visualize list items on an interactive map using Map View, complete with push pins, location cards, and map controls.
Configuring Map View in NITRO List View
To enable and configure Map View:
- Navigate to the NITRO List View Settings page in NITRO Studio.
- Under View Source, select the list and choose Map View as the view type.
Note: Map View option will be shown only if the list has at least one Geolocation column.
- In the Configure Map View dialog, set the following options:
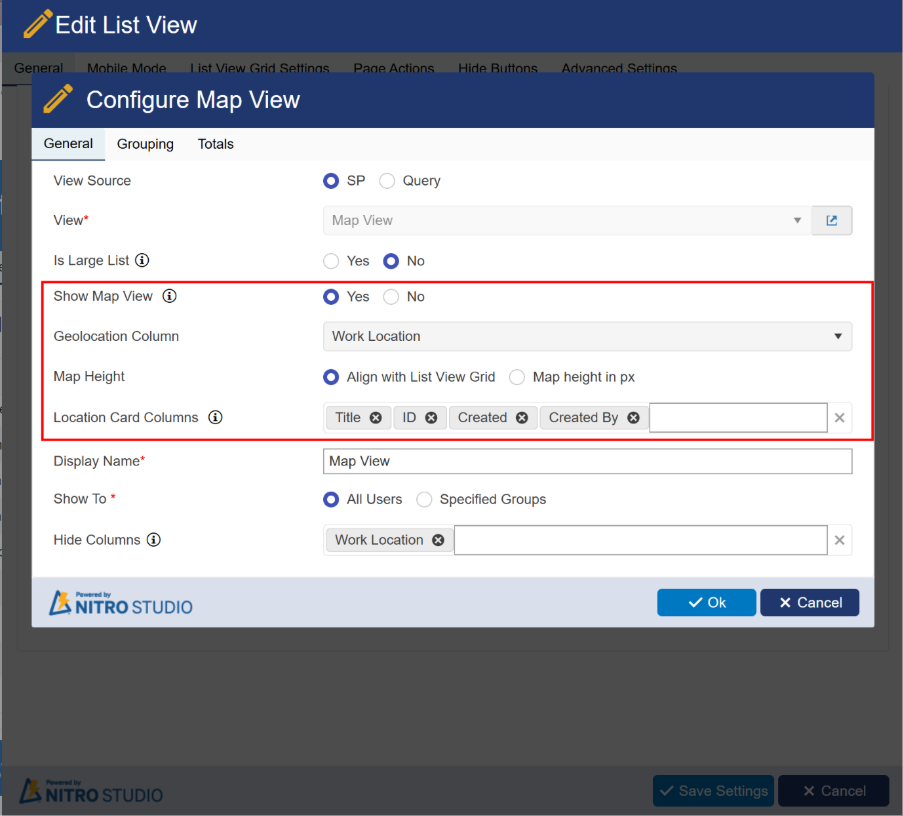

- Show Map View – Enable this option to display the map for the selected list view. It displays location data (Latitude and Longitude Coordinates) in list as pins on the map.
- Geolocation Column – Select the Geolocation column (e.g., Work Location) to plot items on the map.
Note: Only one Geolocation column can be selected per list.
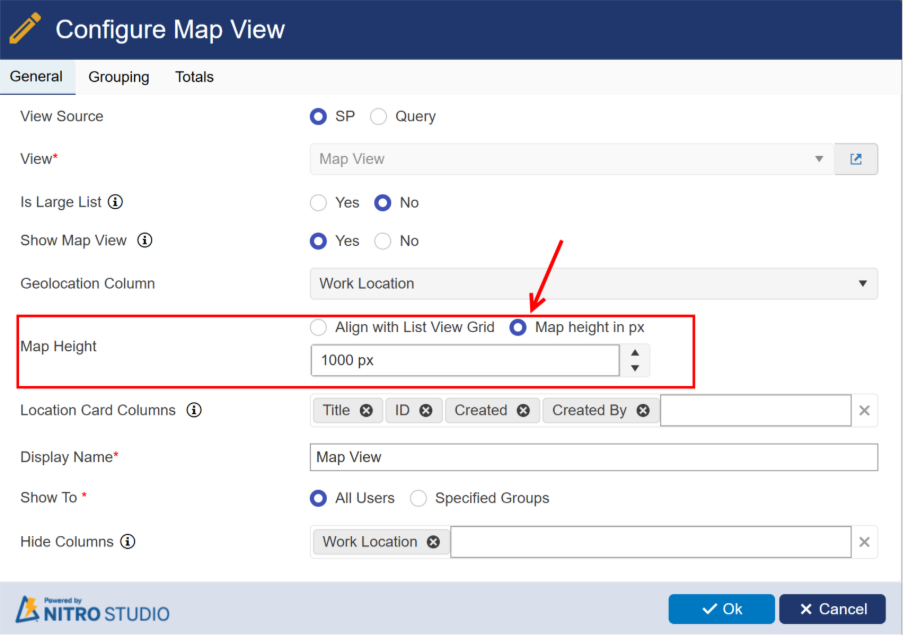
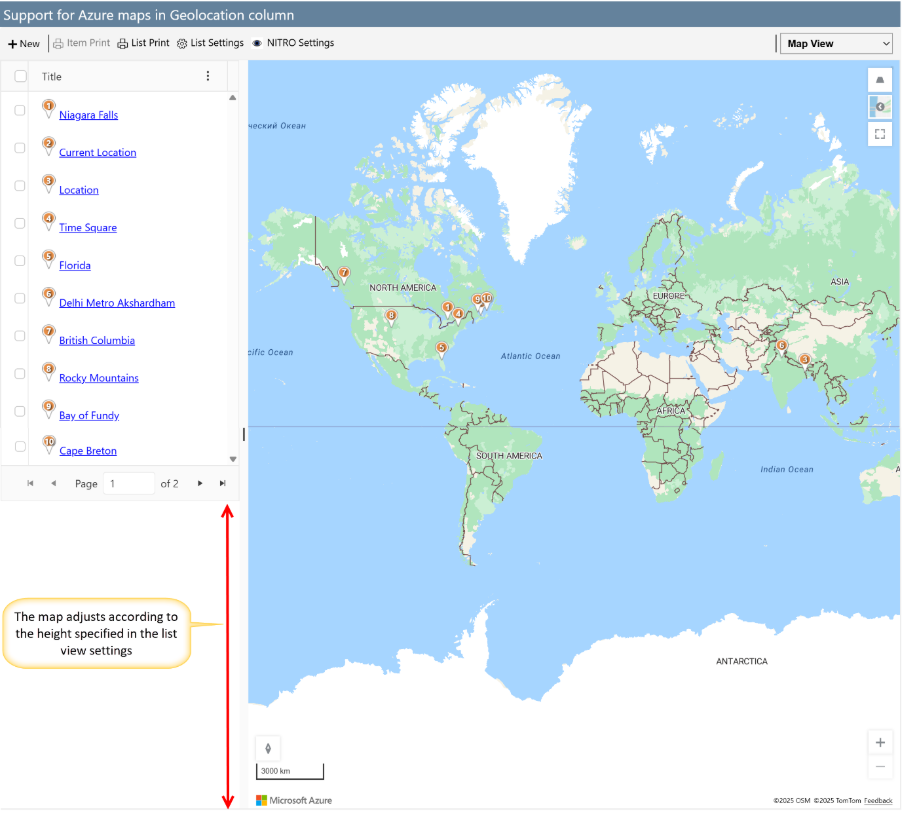
- Map Height – Adjust the map height to align with the list grid or set a custom pixel value.
Map Align with List View Grid
Map Custom Height
- Location Card Columns – when you hover on push pins, location cards are shown. Following location card columns are supported. Title
- Text
- MLT – Plain
- MLT – Enriched
- Priority
- Currency
- Number
- Date
- Lookup
- Person
- Metadata
- Image
- ID
- Calculated
- Hyperlink
Behaviour and Features
- If the SharePoint list does not contain a Geolocation column, the Show Map View option will not be available in NITRO list view settings.
Note:
- The Preview Pane will always appear for Map Views, even if it is not enabled in the NITRO List View settings.
- If any view is configured as a Map View, the Preview Resize option is automatically enabled for all views, regardless of its setting in NITRO List View.