Applies to: SharePoint online
Description
This article lists some advanced configurations for rich print templates for SharePoint list items using Crow Canyon Print Manager App.
-
- How to print without Page URL at the bottom of the Print page?
- How to insert base64 image in Rich text control type print template?
- How to show associated items in Print template?
- How to show “$ Sign” print for currency type columns in associated items summary?
- How to configure such that information comes in left most and right most in the same row like letter format?
- How to show the Summary of associated items with normal font instead of bold?
- How to configure print template so that the maximum content comes into single page?
- How to generate the PDF that matches with print as it is?
- How to print conditional column values?
- Multiple choice column does not allow adding own value with new line separation. How to configure such that one can enter own values in notes column along with predefined options selection in multi-choice column control? How to configure print settings such that it shows both column values together as a single column value?
- Set default width for all columns in associated items column grid in item print template
- Steps to add a page beak in list print
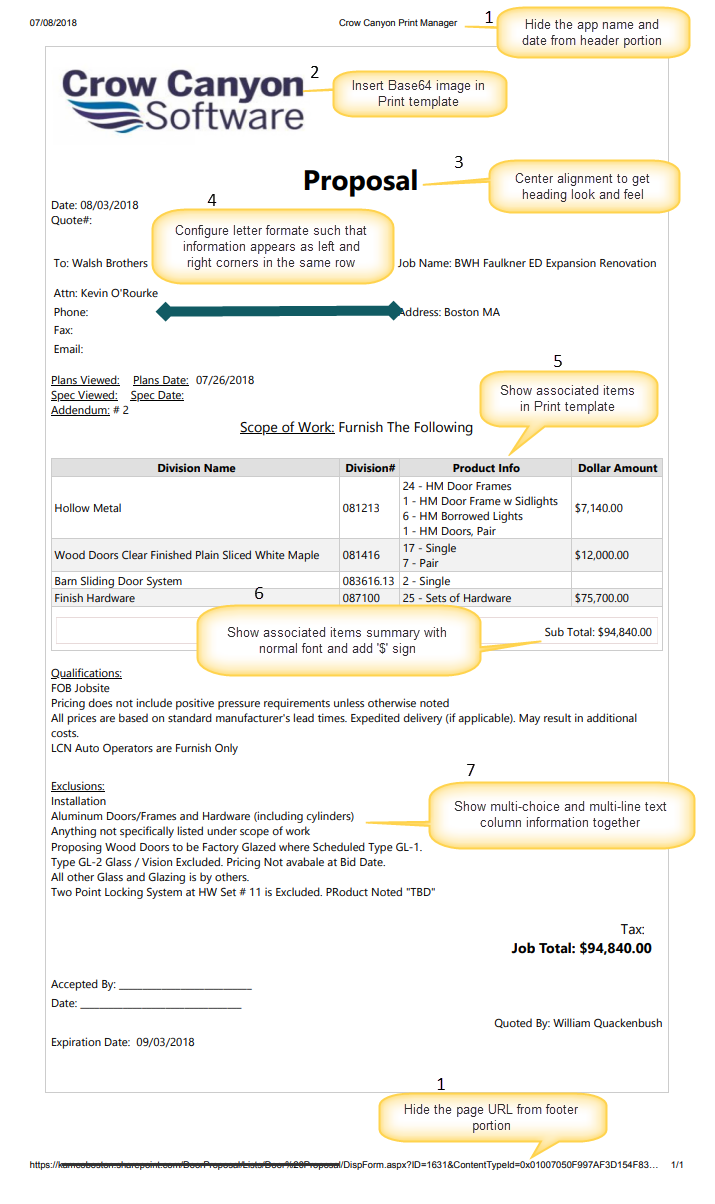
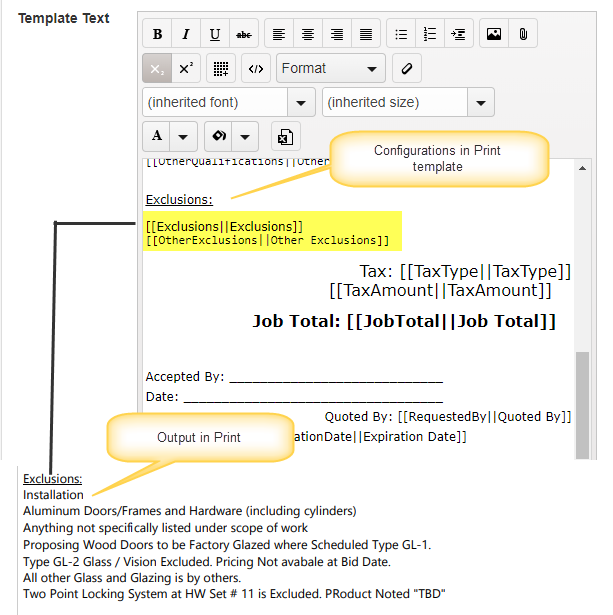
There are multiple options to configure print templates for list items, to configure the rich print template (sample screenshot below) we choose “Rich Text Control” option in print template settings.
Note: For custom JavaScript based print content modifications please refer this article.
Screenshot#1: Sample Print Item Output
How to print without Page URL at the bottom of the Print page?
Open the display form of the item and click Print button –> More settings –> Options –> disable the “Headers and footers”. Please refer inline comment 1 in the screenshot #1.
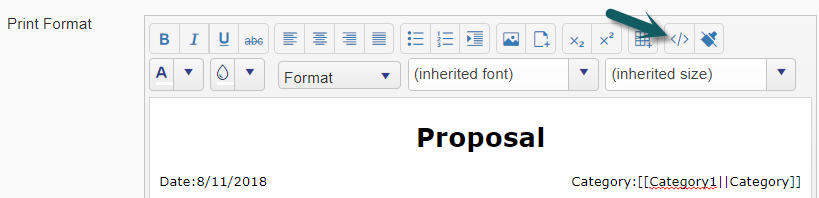
How to insert base64 image in Rich text control type print template?
Refer https://www.crowcanyon.help/article/255/ this article to insert images in Print templates. Please refer inline comment 2 in the screenshot #1..
How to show associated items in Print template?
Configure associated item using Crow Canyon Linked Items app. Go to the list –> List Settings –> Crow Canyon Linked Items –> Configure associated item.
After configuring the associated item, configure the associated item column in Print template. Go to List –> List Settings –> Crow Canyon Print settings –> Manage Item Print Templates and add the associated item column to print template. Please refer inline comment 5 in the screenshot #1..
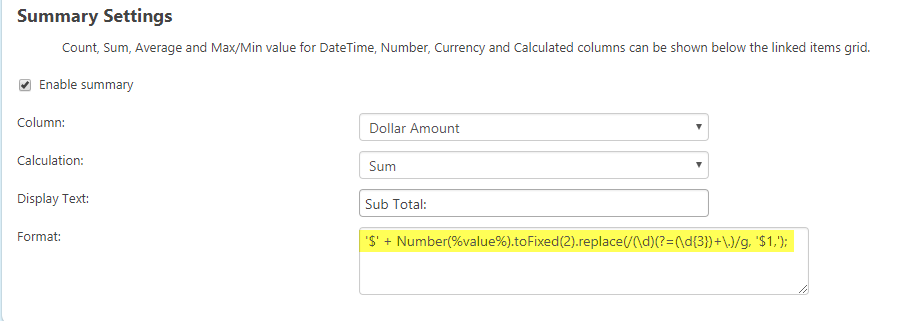
How to show “$ Sign” print for currency type columns in associated items summary?
Go to Site Contents –> List –> List Settings –> Crow Canyon Linked Items and edit the linked item and configure the “Format” like shown below. Please refer inline comment 6 in the screenshot #1.
Format value: '$' + Number(%value%).toFixed(2).replace(/(\d)(?=(\d{3})+\.)/g, '$1,');
Sample screenshot of linked items summary settings:
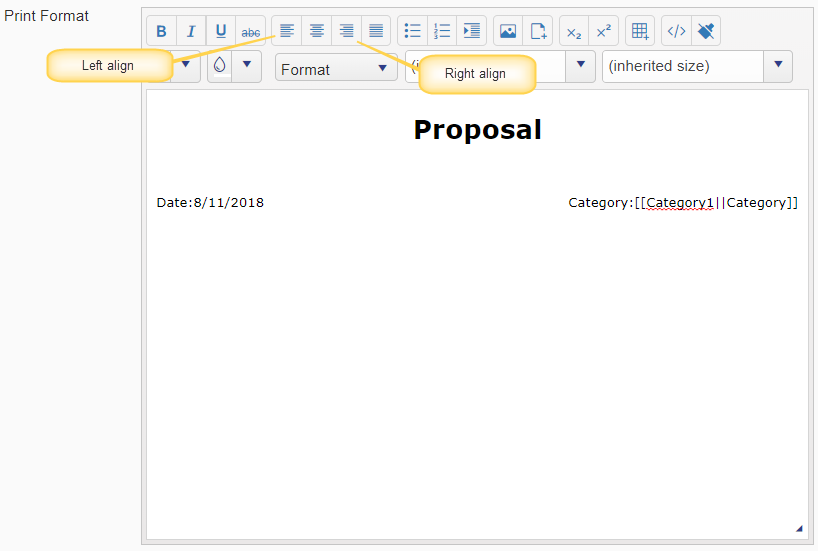
How to configure such that information comes in left most and right most in the same row like letter format?
To show the information in left most and right most in the same row, please follow below instructions. Please refer inline comment 4 in the screenshot #1..
1. Insert the table (add number of rows and columns as required)
2. To insert the information in left most and right most, use the left align and right align in the table cells (see screenshot below).
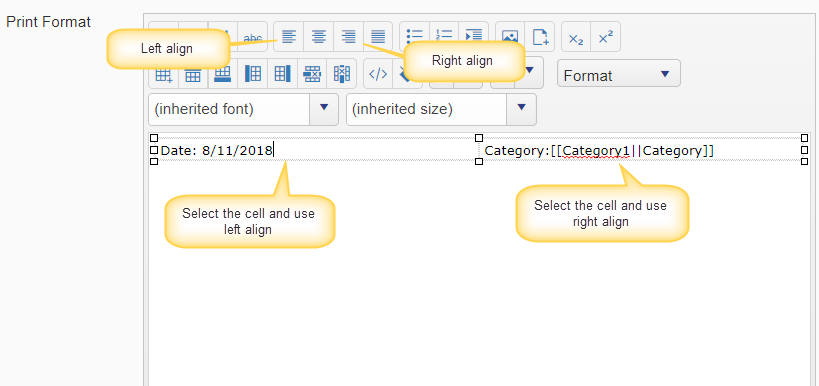
3. Edit the view html source and add the below style CCSTopHeading2 to the view html source and add the CCSTopHeading2 to the table tag like shown below.
The below style adds the width 100% and make the table boarder empty
Sample Style:
<style type="text/css">.CCSTopHeading2{

width:100% !important;

border:0 !important;

}

.CCSTopHeading2 td{

border:0 !important;

}

</style>
<table class="CCSTopHeading2" style=""><tbody><tr style="height:100%;"><td style="width:50%;text-align:left;">Date:8/11/2018</td>

<td style="width:50%;text-align:right;">Category:[[Category1||Category]]</td>

</tr>

</tbody></table>
How to show the Summary of associated items with normal font instead of bold?
Go to List Settings –> Crow Canyon Print Manager Settings –> Edit the Print settings and add the below style to HTML source code at the top of the Print template.
Style:
<style type="text/css">table#results div#templateresults table tbody tr:last-child div b {
font-weight: normal;
}
#templateresults p.applymargin
{
margin:0;
}
</style>
Sample output screenshot in Print:
How to configure print template so that the maximum content comes into single page?
-> Reduce the spaces in Print template configurations
-> Reduce the font size
How to generate the PDF that matches with print as it is?
Print and PDF buttons output differs due to the known limitation in Crow Canyon Print Manager. In Google Chrome browser, click “Print”, change the destination to “Save as PDF” option to get the PDF that matches with print.
How to print conditional column values?
This articles takes an example of printing “Tax” column value such that it prints either “Tax Type” or “Tax” column value based on a choice column “Non-taxable Status” value. If the non-taxable column value is “Add Tax” only then it shows the “Tax” column value otherwise it shows Task Type.
| Column Name | Column Type | Value |
|---|---|---|
| Non-taxable Status | Choice | Add Tax Included Exempt |
| Tax Type | Calculated | =IF(OR([Non-taxable Status]="Included",[Non-taxable Status]="Exempt"),[Non-taxable Status],"") |
| Tax Amount | Currency | |
| Tax | Calculated | =IF([Non-taxable Status]="Add Tax",Tax,"") |
Print template simply looks like below and as per the above column settings, we can achieve conditional printing. See comment “X” in the sample screenshot above.
Tax: [[TaxType||TaxType]][[TaxAmount||TaxAmount]]
Multiple choice column does not allow adding own value with new line separation. How to configure such that one can enter own values in notes column along with predefined options selection in multi-choice column control? How to configure print settings such that it shows both column values together as a single column value?
Multiple choice column does not allow own values with new line separation. If we use multi-choice column with own values in Print settings, it shows as single line of text information. It is directly not possible to separate the multiple choice own values as new lines in Print. For this we need to create a new column of type “Multiple lines of text” and enter the values in new lines and use this column along with multiple choice column in Print.
Example:
Exclusions is a multiple choice column and “Other Exclusions” is a multiple lines of text column. To merge both columns values in print, use style like below.
Style:
<p class="applymargin">[[Exclusions||Exclusions]]</p>
<p style="height:0;"> </p>
<pre style="margin-top:-25px;">[[OtherExclusions||Other Exclusions]]</pre><p style="height:0;"> </p>
Sample column values in form:
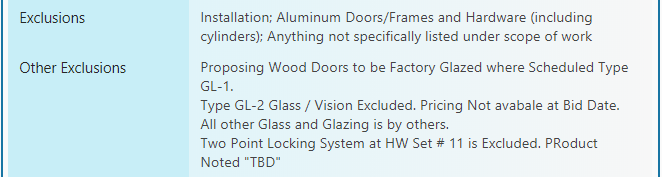
Sample Print settings and corresponding Output:
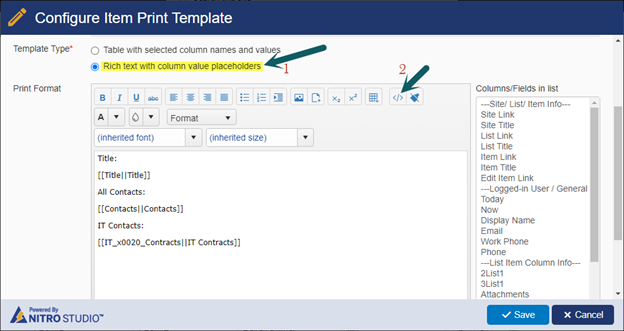
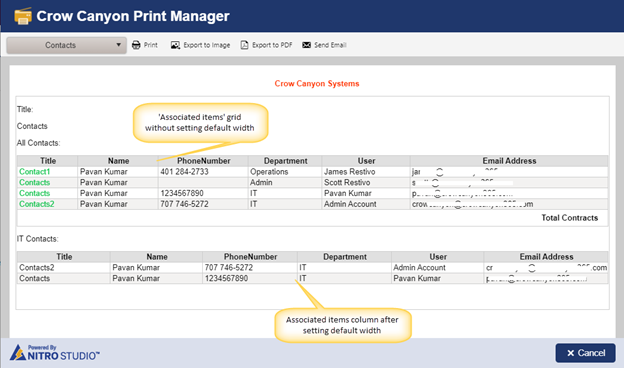
Set default width for all columns in associated items column grid in item print template
It is possible to set default width for all columns in associated items column grid in item print template.
Steps
- Configure ‘Linked Items’ for the associated items column.
Navigate to NITRO Studio page for the site -> ‘LINKED ITEMS’ app -> Configure new settings for associated items column. Refer this manual for configuring linked items.
- Modify configured item print template.
Navigate to required list -> Click ‘Print Settings’ from ‘LIST’ ribbon -> ‘Manage Item Print Templates’ -> Edit required item print template for the list and modify as shown below:
a. Switch to ‘Rich text with column value placeholders’ template type and add placeholders in ‘Print Format’ as required.
b. Click ‘View HTML’ icon to modify the html.
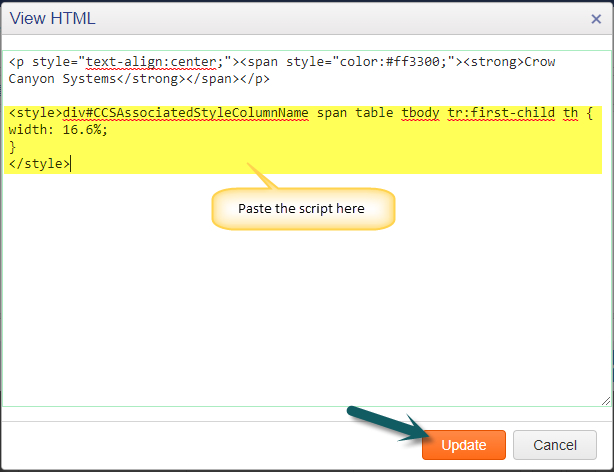
c. Place associated items column placeholder, for setting default width, inside the <div> tag.
<div id="CCSAssociatedStyleColumnName">[[Associated item column placeholder]]</div>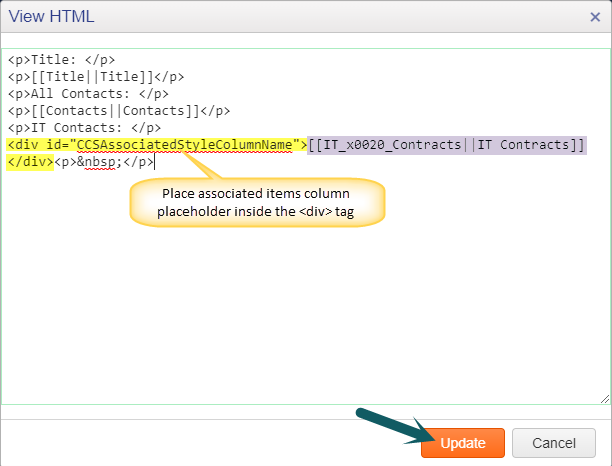
d. Go to ‘Header’ tab -> Click ‘View HTML’.
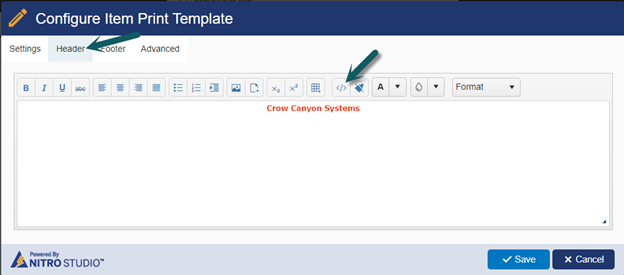
e. Paste the below script and save settings.
Script:
<style>div#CCSAssociatedStyleColumnName span table tbody tr:first-child th {
width: 16.6%;
}
</style>
Note:
- “CCSAssociatedStyleColumnName” should match with id used in #2.c above.
- ‘width: 16.6%’ is specified for 6 columns in the grid and is calculated as 100/6 for six columns. Specify the width according to number of columns in the associated items grid (i.e., 100/no. of columns in the grid).
Sample output:
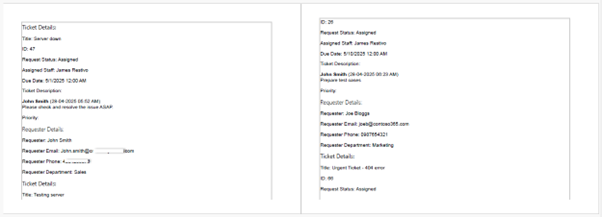
Steps to add a page beak in list print.
The purpose of using page break is to control pagination of the list print. The below code adds page break in list print ensuring that the content following this <div> tag is printed on the next page. It can be used anywhere in the ‘View HTML’ as required.
<div style="page-break-after:always;"></div>Steps:
- Navigate to the list -> List Settings -> Permissions and Management -> Crow Canyon Print Manager Settings -> Edit the required list print template.
2. Under the ‘Print Format’ section, select ‘Rich text with column value placeholders’ -> Click ‘View HTML’ button from the print format toolbar.
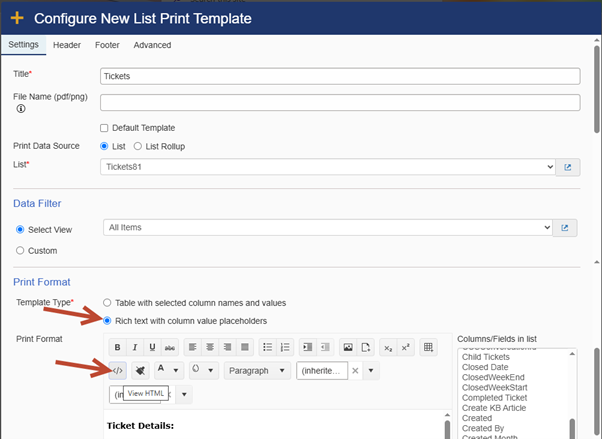
3. Specify code in the ‘View HTML’ dialog -> Click ‘Update’ button.
HTML snippet:
<div style="page-break-after:always;"></div>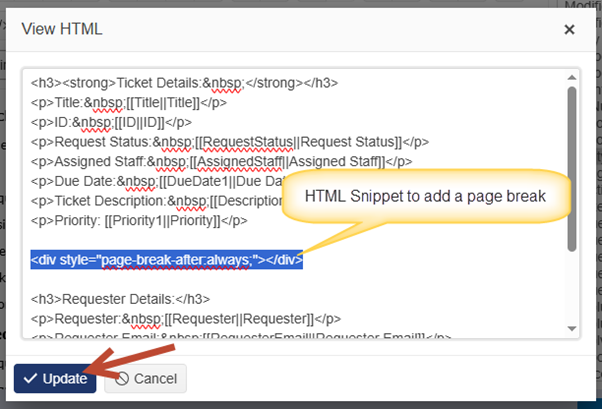
Sample ‘View HTML’ used in this example:
<h3><strong>Ticket Details: </strong></h3>
<p>Title: [[Title||Title]]</p>
<p>ID: [[ID||ID]]</p>
<p>Request Status: [[RequestStatus||Request Status]]</p>
<p>Assigned Staff: [[AssignedStaff||Assigned Staff]]</p>
<p>Due Date: [[DueDate1||Due Date]]</p>
<p>Ticket Description: [[Description1||Description]]</p>
<p>Priority: [[Priority1||Priority]]</p>
<div style="page-break-after:always;"></div>
<h3>Requester Details:</h3>
<p>Requester: [[Requester||Requester]]</p>
<p>Requester Email: [[RequesterEmail||Requester Email]]</p>
<p>Requester Phone: [[RequesterPhone||Requester Phone]]</p>
<p>Requester Department: [[RequesterDepartment||Requester Department]]</p>
<div style="page-break-after:always;"></div>Note: In list print, one page break will be added after printing ‘Priority’ and another page break will be added after printing ‘Requester Department’ for a list item. Page breaks will be applied for all the list items in a similar manner.
4. Click ‘Save’ to save the list print template.
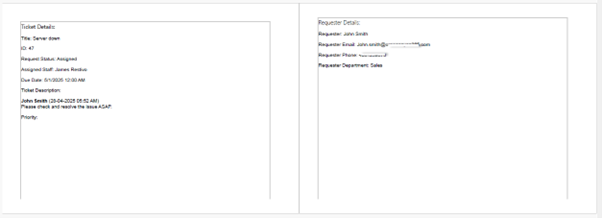
Sample output
HTML Snippet is specified in the list print template:
HTML Snippet is not specified in the list print template: